By Zafar Saleem
UPDATE(12.02.2019): I recently updated this project with most recent react routers i.e. version 4.3.1 which is react-router-dom. Please head to its repository to view the changes.
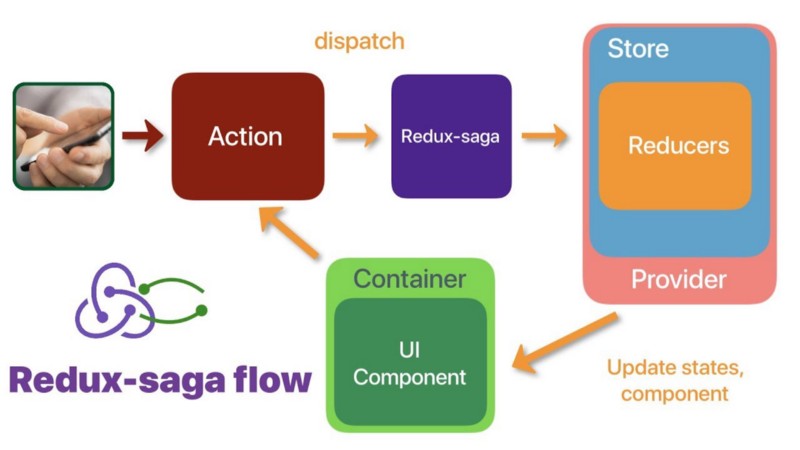
In my previous blog I wrote how to write a scalable architecture in Node.js. Since I used postman to test the working of that platform, I thought this would be a good idea to have its client side implementation. To write its client side I decided to use the tech stack below:
- React
- Redux
- Redux-Saga
- React Router
This post assumes that you already know react and basic concepts of Redux and Redux-Saga.
Getting started
Clone my previous blog repository. CD into its root folder and run npm install. This will install all dependencies.
Secondly, install mongodb in your machine. Once installed run mongo server using the mongod command in your terminal, if it is not started as a service in your machine.
Next, make sure the nodemon package is installed on your machine globally. Go to the server side folder and run nodemon index.js to run the backend server.
Now that our backend is up and running, it’s time to get into its client side implementation.
If you haven’t yet installed create-react-app then go ahead install it using following command.
npm install create-react-app -g
This command will install create-react-app globally.
Create the project
Now it’s time to create a project. Use:
create-react-app react-login
This will create a new project with the name react-login. Go ahead and cd into that folder. Open your package.json file in your favourite editor and add following dependencies:
We don’t need any additional properties in this package.json file. We can simply remove them, but I’ll leave it as is and move forward so that we get to interesting part in this blog.
Now simply run:
npm install
which will install all the dependencies we mentioned above.
Index file
To start with, open the index.js file and place the code below into this file.
In this code we are importing react and react-dom. Then we import Router and browserHistory from react-router. These are required for routing purposes, which I will be using later in the routes/index.js file. Next, we import Provider, this is used to provide store to child components.
configureStore and routes are something we are going to import next and which I will implement in a second. Just import them as is and use them in this file as shown above.
Now our index file is set up.
Store configuration
Create a new folder called store inside the src folder. Inside that new folder, create a file called configureStore.js, and paste following code into that file.
First we are importing createStore, which will be used to createStore, and applyMiddleware, which will be used apply middlewares to our store — sagas in this case, but we will get into that later in this blog — from redux.
We then import rootReducer — we are going to create this later. For now, simply import it and use it as is. This is followed by the function configureStore , which returns an object by calling the createStore function and passing rootReducer as the parameter.
Finally, export configureStore makes configureStore available in the index.js file, constructed earlier.
Now that is out of our way, go ahead and create the src/reducers folder, create index.js file and paste the code below in this file.
This file is responsible for importing the rest of the reducers inside the reducers folder, combining them, and export them so that they are available to be used in configureStore.js. We will make changes to this file when we add new reducers later in this blog.
Routing file
Time for the routes file. Go ahead and create the src/routes folder and inside this folder create an index.js file. Now open it and paste in the below code.
The main goal of this file is to handle routing in our project. The file imports React, Route and IndexRoute. After that, we need a container, in this case I am importing container/App, which we are going to write soon. Next is RegisterPage, which is a component, and we will write that as well.
In the parent Route, when the home path matches then we simply render our App container. On IndexRoute users will see RegisterPage which will be rendered inside the App container.
Container
Now it’s time for the container. Go ahead and make a new folder called container. Inside this folder create a new file called App.js and place the below code into this file.
This is pretty straightforward. The main purpose of this file is to render the rest of the components. {this.props.children} serves this purpose.
Registration
Now it is time for registerPage. Create a new folder src/components and create a component inside the components folder called registerPage.js. Paste the below code into this component.
For now, this is a very simple component. We will edit this later to add a registration form and put some functionality into it.
Output
After creating all the folders and files above, run npm start in your project, and open http://localhost:3000 in your browser. You should be able to see the below result.
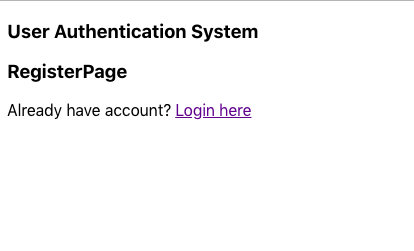
Clicking on login here will not redirect to the login route which we will fix next.
Making it work
Routing
For routing to work, first make a new component inside the components folder. Name it loginPage.js and place the below code inside this component.
This component is very simple. It renders basic content and a link to register the component.
Now open the routes.js file, which we already created above, and make following changes.
Change the index route to LoginPage because we want users to land on the login component when they visit the home page. Before doing that, import it from components folder.
Now refresh your browser and you should be able to see loginPage first. When you click on the “Register here” link, registerPage should be rendered.
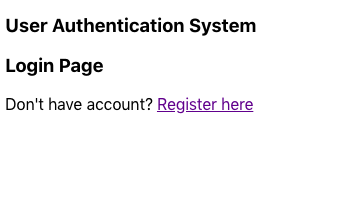

Now we have the basic routes working.
Login and registration
Registration
In order to make the login process work, I will first handle the registration process so that we add some users in our database. So let’s go ahead and open components/registerPage.js and update it with the below contents.
There seems to be a lot of code in this file now, but it’s all simple. First we are importing connect to connect our store with the registerPage component. Then we import registerUserAction which we will write next.
Inside the render function, first I am checking the response from the server if it exists, then assigning success and message properties that are received from the server. This can be a separate function but, for simplicity’s sake, I placed them in the render function.
Next there is a registration form. When user clicks on the register button it triggers the onHandleRegistration function which gets the user’s entered data from the form, and dispatch registerUserAction with their data as parameters. We are going to write actions in the next step.
In order for the above code to work, we need mapStateToProps, as we are doing at the bottom of the component, and then connect it with the registerPage component at the end.
Actions
Now it’s time to add actions. Go ahead and create the src/actions folder. Create the index.js file and place the below code in it.
This code exports some constants that we will be using throughout our project.
Now go ahead and create the authenticationActions.js file inside the same folder, and place the below code in it.
Here I am importing the index file, which exports constants, and then I export registrationUserAction and return an object with action type and user data. Action type in this case is REGISTER_USER. This action will be dispatched when a user is trying to register, and this action will be available throughout our project which we will listen to in our sagas.
Sagas
Now we are at the stage where we can introduce our sagas in our project. If you are new to Redux-Saga then I suggest you tread this blog before proceeding.
If you already know about sagas then go ahead and create a src/sagas folder. Create the index.js file, and place the below code into this file.
In the above file, first I am importing fork from effects and watchUserAuthentication from watchers — which does not exist yet but we will make that file next. Then I simply export a generator function and fork the watchUserAuthentication.
Now go ahead and create a watcher.js file in the same folder as above, and place the below code into this file.
Again, I import takeLatest effect from redux-saga, then registerSaga from authenticationSaga.js, which we will create next. Next, import actions/index.js as types.
I am exporting a generator function which basically watches for the REGISTER_USER action and makes a call to registerSaga.
Now let’s create authenticatioSaga.js saga in same folder as above, and place the below code into this file.
In this saga I am importing a couple more effects — put and call from redux-saga. Then registerUserService is imported from service/authenticationService.js. I am importing all actions as types from actions/index.js. Then I am exporting the generator function registerSaga.
This function is responsible for calling registerUserService, which makes an ajax call to our server to register new user — which I will write after this step. It receives a response from registerUserService and puts the REGISTER_USER_SUCCESS action. If there is an error then it puts the REGISTER_USER_ERROR action.
Import the sagas
Now that we have our sagas it is time to import them in our store. Open store/configureStore.js and update its contents with the below contents.
Here I am importing createSagaMiddleware, rootReducer, and rootSaga. Then, inside the configureStore function, I am creating a new sagaMiddleware and passing it to createStore using the applyMiddleware function. Finally, I am running the rootSaga.
Now it’s time to create the src/services folder and create a new first service. Name it authenticationService.js and place the below code into this service.
This file does a basic ajax request using fetch API with some parameters and header. It is a pretty self-explanatory service.
Reducer
Now that we are making a request to the server, it is time to receive that response in our component. To do this we need a reducer. Go ahead and create a reducers/registerReducer.js file and place the below code into it.
It is a simple reducer function that gets state and returns new state. It checks for REGISTER_USER_SUCCESS and REGISTER_USER_ERROR actions, and returns the new state to the component.
Now go ahead and open the src/reducers/index.js file and update it with the following contents.
In this rootReducer I will be importing all reducers and then combining them before exporting. That is exactly what I am doing with register.
Running the updated code
Now we are done with the registration process. It is time to refresh your browser, go to the register route, and enter some data. If you enter an existing email then you should see the below result.

If you enter a new email then you should be redirected to loginPage, which we are going to implement next.
Login
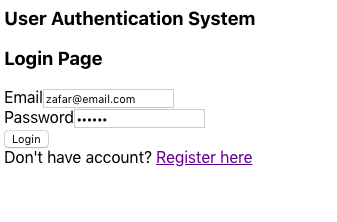
It is time for us to login the user after they are registered. Go ahead and open components/loginPage.js file and update it with the following contents.
This component is pretty much the same as registerPage. The only difference is that it dispatches loginUserAction which we are going to write next. Another difference is that, if the response from the server is successful, I will receive a JWT token. I am storing that token in localStorage. You can use a different method but for this example I am using this approach.
Go ahead and open actions/authenticationActions.js and update it with the following contents.
Here I am exporting the new loginUserAction function with LOGIN_USER action type and user payload.
Before moving forward, go ahead and open the actions/index.js file and update its contents with the following.
Now go ahead and open the sagas/watchers.js file and update its contents with the following.
Here I am simply importing loginSaga and calling it when it receives the LOGIN_USER action.
We do not have loginSaga yet. For that reason go ahead and open the sagas/authenticationSaga.js saga and update its contents with the following.
Here I am importing an additional service — loginUserService, which I will be implementing next — and then exporting the new generator function named loginSaga, which does pretty much the same thing as registerSaga.
Now open the services/authenticationService.js service and update its contents with the following.
Here I am adding loginUserService which does pretty much the same as registerUserService i.e. sending an ajax request to login the user.
Now that we’ve successfully sent a request to the server it is time to receive a response from our server to our login component. For that create a new reducers/loginReducer.js reducer and place the below code into it.
It does pretty much the same thing as registerReducer — listening to LOGIN_USER_SUCCESS and LOGIN_USER_ERROR actions, and returning the new state.
Now open the reducers/index.js file and update its contents with the code below.
Here I am importing loginReducer and combining it with register before returning it as rootReducer.
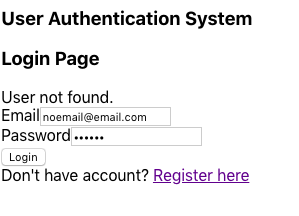
After this, refresh your browser and enter an email that is not registered yet. After pressing the login button you should see the below result.
If you enter a registered email then the request should be successful, but you should not see anything yet, as I haven’t implemented the dashboardPage component. This will only be accessed after successful authentication. Having said that, let’s implement it.
Dashboard page
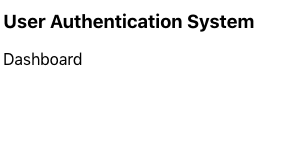
Now create the components/dashboardPage.js component and place the below code into this component.
This is a very simple component — all it does is return the Dashboard text.
Now open the routes/index.js route and update its contents with the following.
Here I am doing some new stuff. First I am importing a dashboardPage and adding it to route. When the dashboard route is accessed the requireAuth function will be triggered. This function checks if the user is loggedIn or not. To check that, I am looking for token in localStorage, which I stored in the loginPage component on successful login. If it does exist, then dashboardPage is rendered to the user.
Now when you refresh page in your browser, enter a registered email, and press enter, you should see the below results.
So there it is, this is a complete login system using React, Redux and Redux-Saga. If you would like to see the whole project then clone this repository.
I hope you enjoyed this post.