

Being able to build predictive models is a superpower – but you can't make much of these models if users can't use them.
In this article, we will go through the process of building and deploying a machine learning web app using Flask and PythonAnywhere.
Flask is a Python web framework which is easy to work with, and PythonAnyWhere is a web hosting service provided by Anaconda.
How to Build a Machine Learning Web App
The idea of turning your predictive models into a web app can feel overwhelming. But I promise you it's relatively easy and straightforward.
Here are the steps we'll need to take to do this:
- Save the machine learning model
- Build a web page using HTML
- Build a backend using Flask
- Style it the way you want
- Deploy it to the web
I wanted to build a diabetes prediction web app and so I used this dataset to do it. You can use any dataset you like, as the process will stay the same.
Before getting started, let's understand the directory structure we are going to follow. This will be helpful in keeping our files organized and making the deployment easy.
Directory structure
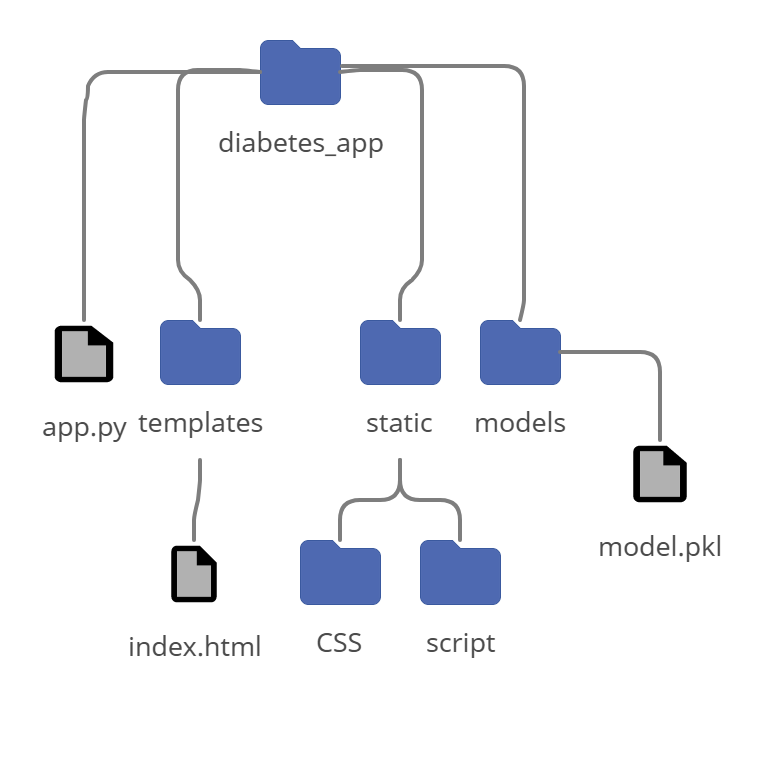 Directory structure we are going to follow
I have named my root directory diabetes_app, but you can name yours whatever you want.
We have three more directories and a Python file in diabetes_app (root directory). The Models directory will contain our trained model. The Static directory has two more directories, CSS will have all the stylesheets saved and script will have JavaScript files, if any. Lastly, the Templates folder will have HTML files saved and app.py is our Python file that has the backend (Flask) code.
Now that we have an organized file structure, let's get started.
How to Save the Machine Learning Model
Saving the model is the easiest of all tasks. We will use the Python pickle library to do this.
Once you are done with training, testing, and hyperparameter tuning, save the best performing model in a variable. For me the best model was RandomForestsClassifier and I saved it like this:
clf = RandomForestClassifier()
clf.fit(X_train.values, y_train)
Now clf has my trained RandomForestClassifier model which is ready to be saved in a file. For this, I will have to import the pickle library and save the clf like this:
import pickle
pickle.dump(clf, open('model.pkl', 'wb'))
pickle.dump() is a function used for saving models. The first parameter is the model name (that is clf in our case) and the second is another function that saves the model in disk. 'model.pkl' is the file name I want my model to be saved in and 'wb' refers to write binary which writes model data into the 'model.pkl' file.
After this step, you will have your model file saved in the same directory you are working in. Don't forget to copy the model.pkl file in the models folder in our project directory. And now that we have saved our model, we are ready to move ahead.
How to Build a Web Page using HTML
The main functionality of any machine learning web app is to make predictions. And for that the user will most probably need to answer a few questions if you have not used unstructured data or uploaded some documents in other cases.
The early stage diabetes risk prediction dataset is in .csv form with 17 features (of which 16 are used as input). We will use HTML forms to create a form that a user can fill out to get their predictions. For example:
<form action="{{ url_for('predict')}}" method="post">
    <p>What is your age?</p>
     <input type="number" name="Age" placeholder="Enter your age"                       required="required" /><br>
    <p>What is your gender?</p>
     <label><input type="radio" name="Sex" value="1" required="required"         />Male</label>
        <label><input type="radio" name="Sex" value="0" required="required"         />Female</label><br>
     <button type="submit">Predict</button>
</form>
<p> {{ prediction }} </p>
Above, we have created a form with two questions. The action attribute on the form is set to {{ url_for('predict') }} which will render our prediction when the form is submitted. For age, we are providing the user with a number input field, and for gender, we have the radio buttons.
The value attribute contains the value for each radio button. Male has value 1 and female has value 0, which will be used as inputs for our prediction. Make sure each input field has matching value attributes as your final (processed/ ready for prediction) dataset. I had a binary encoded gender feature so I used the values 1 and 0 for gender.
The paragraph tag will display the prediction results. Prediction is a variable that will hold our prediction in the Python file which we will see in the next step.
You can add as many questions you want and whatever input type suits you – the functionality will remain the same.
How to Build the Backend using Flask
We are on the most interesting step now, which is to build the backend. First have a look at the code and then we will go deeper in it.
import numpy as np
from flask import Flask, request, render_template
import pickle

app = Flask(__name__)

model = pickle.load(open('models/model.pkl', 'rb'))

@app.route('/')
def home():
    return render_template('index.html')

@app.route('/predict',methods=['POST'])
def predict():
    int_features = [int(x) for x in request.form.values()]
    features = [np.array(int_features)]
    prediction = model.predict(features)
    result = prediction[0]

    return render_template('index.html', prediction=result)

if __name__ == "__main__":
    app.run(debug=True)
Start by importing the libraries we are going to need. We'll need NumPy for handling input values, Flask for making predictions, and pickel to load the model we saved in the first step.
First we create our app object which we will use throughout to build our backend. Secondly, we load our model using the pickel.load() function. This time we have replaced 'wb' with 'rb' which means 'read binary' which tells pickel to read the data.
@app.route('/') means when we are at the homepage of our app and we want to do something here. To do something, we define a function home which renders our HTML file we created in the previous step as our homepage.
@app.route('/predict',methods=['POST']) does the main job of allowing us to make predictions. /predict means we have moved to the predict page of our app.
We define a predict function here, inside which we first store all the input values in an array called int_features using request.form.values(). Once we have our input values, we convert it into a 2D array for prediction and make the prediction like we normally do. Lastly, we store the prediction in the prediction variable which we will use to render result on our web app.
render_template('index.html', prediction=result) tells Flask to assign the result to the prediction variable and render it in our index.html file.
Remember the action attribute set to predict in our HTML? That is the same predict function we have defined here. When the user submits the form, the predict function gets called.
Finally we run our app in the last two lines. debug=True is an optional argument (default is False) which reloads the web page automatically when you make changes to the code. It will be helpful when you do the styling of your app.
How to Style the App the Way You Want
To keep things simple, I have showed you the simplest way to build a machine learning web app. But you can do a lot with it.
I styled my app into three separate web pages for home, form/ questions, and results. I also added a little bit of JavaScript to render random health related news from all over the globe to the homepage and a little bit of styling to make things look pretty.
The way to link CSS and JavaScript files when working with Flask is this:
 <link rel="stylesheet" href="{{ url_for('static',filename='css/style.css') }}">
 <script type="text/javascript"
  src="{{ url_for('static',filename='script/script.js') }}"></script>
To add more than one web page, you just need to add more routes to the Python file like we did in the previous step. Let's suppose we want to add a separate results page to show predictions. The /predict route will look like this:
@app.route('/predict',methods=['POST'])
def predict():
    int_features = [int(x) for x in request.form.values()]
    features = [np.array(int_features)]
    prediction = model.predict(features)
    result = prediction[0]

    return render_template('results.html', prediction=result)
Instead of rendering index.html, we are rendering results.html with our prediction. You can structure and style your results.html file the way you want and add the prediction to it.
How to Deploy the App to the Web
Now that we are done with styling, the app is ready to be pushed to the cloud. PythonAnywhere is easy to use and has a free plan to deploy Python applications. You will have to create an account first and choose the free plan.
Next, you will need to give your app a name and go to the files tab and delete the existing site there. Upload all your files in the same directory structure discussed above. Then go to the web tab and click the blue reload button.
 Uploaded files
If you have CSS and JavaScript files in your project, you will need to define their URL and directory path in the static files section on the web tab.
The URL will be /static/ since we are serving static files and the directory will be /home/yourwebsitename/mysite/assets since our CSS and JavaScript files are saved in the static directory.
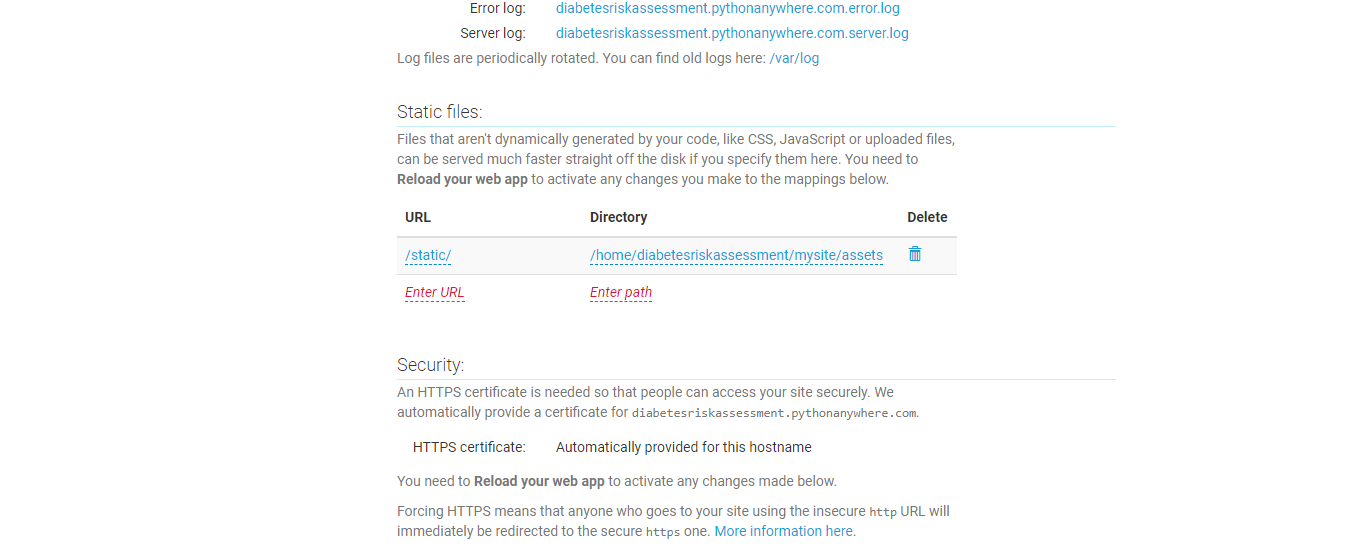 Static files section
Reload the website by clicking the blue reload button again and CONGRATULATIONS – you have deployed your machine learning web app to the cloud.
Conclusion
Deploying machine learning web apps is not as difficult as it might seem – not at least as learning machine learning theories. And if you have done that, deployment is just a breeze which can take you to greater heights.
I hope this article helped you understand how you can deploy your models and make them look prettier. The code for the diabetes risk assessment web app I built can be found on my GitHub.
Deploy your models and show the world your superpower!
Interested in connecting on LinkedIn? Hit me up at Tooba Jamal