
Serverless architecture is the industry's latest buzzword and many of the largest tech companies have begun to embrace it.
In this article, we'll learn what it is and why you should use it. We'll also set up AWS, create our serverless app, and create a slack app!
What is Serverless?
Serverless is a cloud computing paradigm in which the developer no longer has to worry about maintaining a server – they just focus on the code.
Cloud providers, such as AWS or Azure, are now responsible for executing code and maintaining servers by dynamically allocating their resources. A variety of events can trigger code execution, including cron jobs, http requests, or database events.
The code that developers send to the cloud is usually just a function so, many times, serverless architecture is implemented using Functions-as-a-Service, or FaaS. The major cloud providers provide frameworks for FaaS, such as AWS Lambda and Azure Functions.
Why Serverless?
Not only does serverless allow developers to just focus on code, but it has many other benefits as well.
Since cloud providers are now responsible for executing code and dynamically allocate resources based on event triggers, you typically only pay per request, or when your code is being executed.
Additionally, since cloud providers are handling your servers, you don't have to worry about scaling up – the cloud provider will handle it. This makes serverless apps lower cost, easier to maintain, and easier to scale.
Setting up AWS Lambda
For this tutorial, I will be using AWS Lambda, so first, we'll create an AWS account. I find AWS's UI hard to understand and difficult to navigate, so I will be adding screenshots for each step.
Once you log in, you should see this:

Next, we'll set up an IAM user. An IAM (Identity and Access Management) user interacts with AWS and its resources on your behalf. This allows you to create different IAM users with different permissions and purposes, without compromising the security of your root user account.
Click on the "services" tab at the top of the page, and type "IAM" into the bar:

Click on the first result, and you'll see, on the left-hand sidebar, that you're at the dashboard. Click on the "Users" option to get to create our new IAM user.

Click on the "Add user" button to create a new user. Fill in the details as follows:

You can name your user anything you'd like, but I went with serverless-admin. Be sure that your user has "Programmatic access" to AWS, not "AWS Management Console Access". You'd use the latter for teammates, or other humans who need access to AWS. We just need this user to interact with AWS Lambda, so we can just give them programmatic access.
For permissions, I've chosen to attach existing policies since I don't have any groups, and I don't have any existing users that I want to copy permissions for. In this example, I will create the user with Administrator access since it's just for a personal project; however, if you were to use a serverless app in an actual production environment, your IAM user should be scoped to only access Lambda-necessary parts of AWS. (Instructions can be found here).

I didn't add any tags and created the user. It's vital to save the information given to you on the next screen - the Access ID and Secret Access Key.
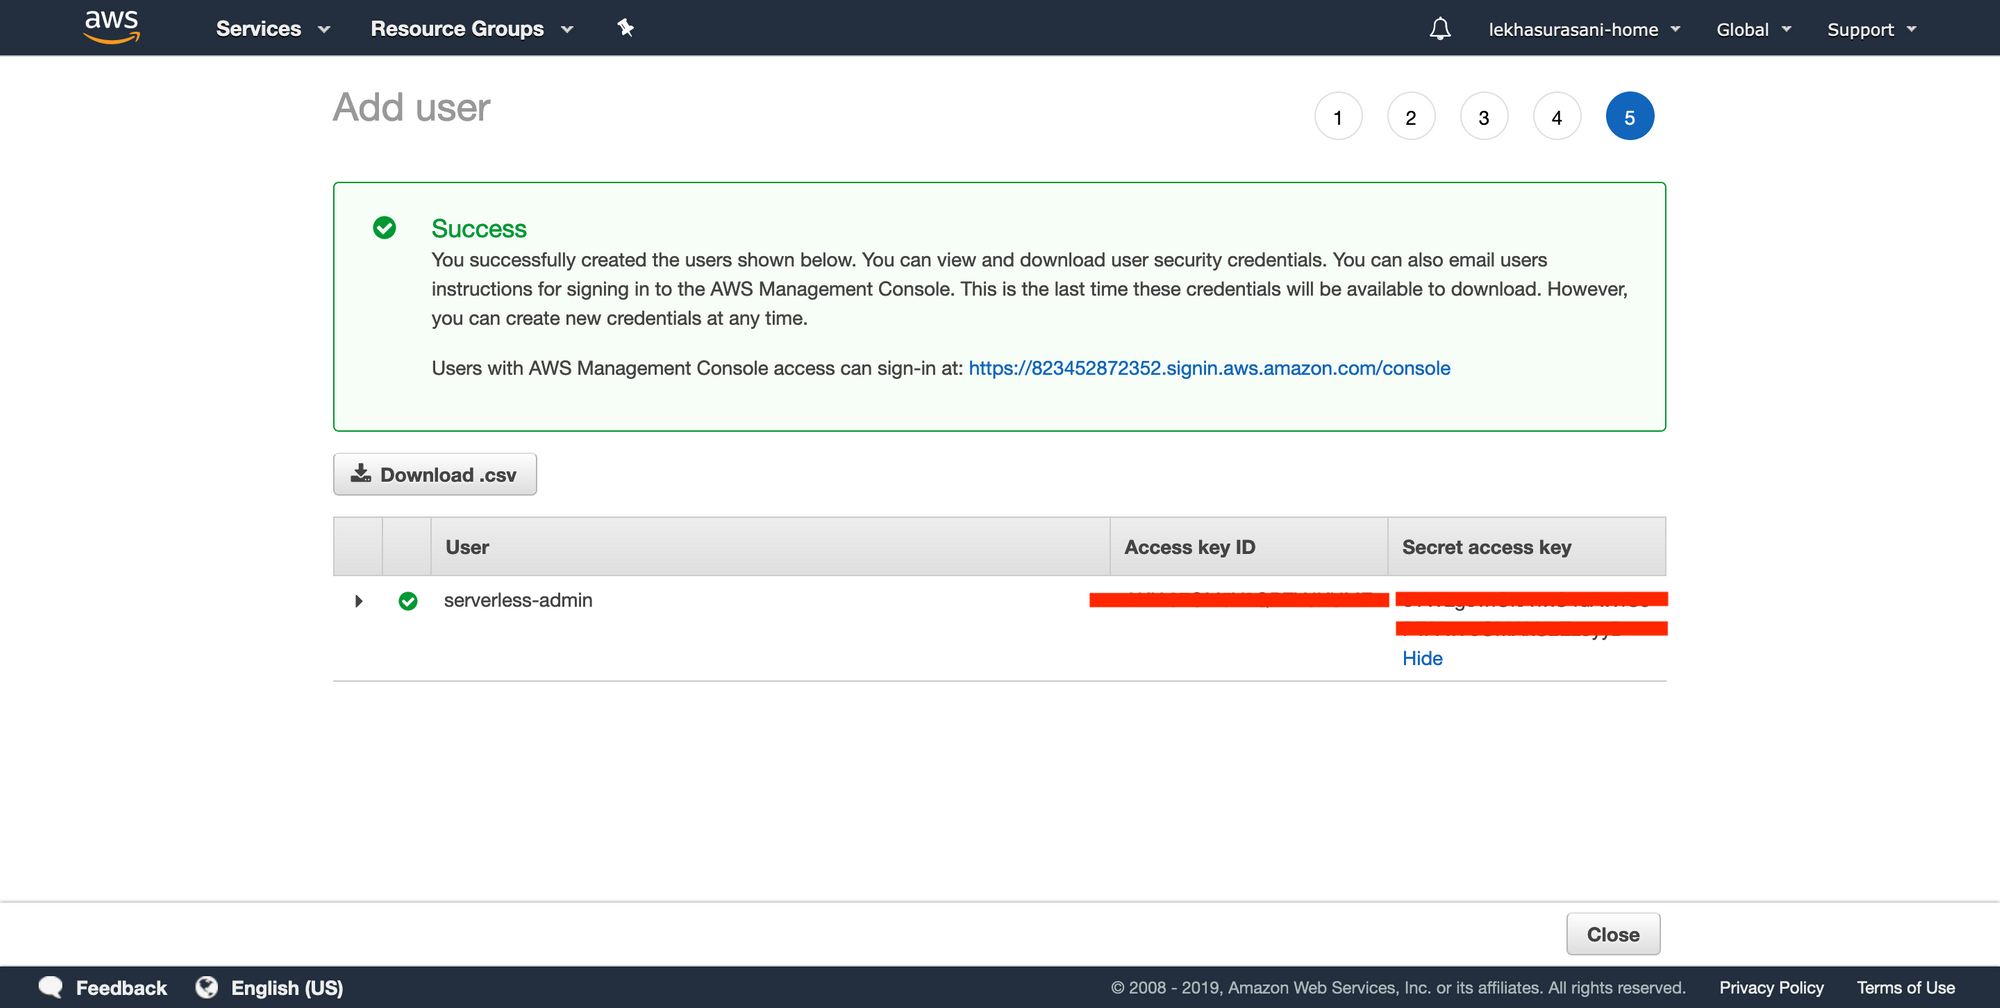
Don't leave this screen without copying down both! You won't be able to see the Secret access key again after this screen.
Finally, we'll add these credentials to command line AWS. Use this guide to get aws cli setup.
Make sure you have it installed by running aws --version. You should see something like this:

Then run aws configure and fill in the prompts:

I have the default region as us-east-2 already set up, but you can use this to determine what your region is.
To make sure that you have your credentials set up correctly, you can run cat ~/.aws/credentials in your terminal.
If you want to configure a profile other than your default, you can run the command as follows: aws configure --profile [profile name].
If you had trouble following the steps, you can also check out AWS's documentation.
Set up serverless
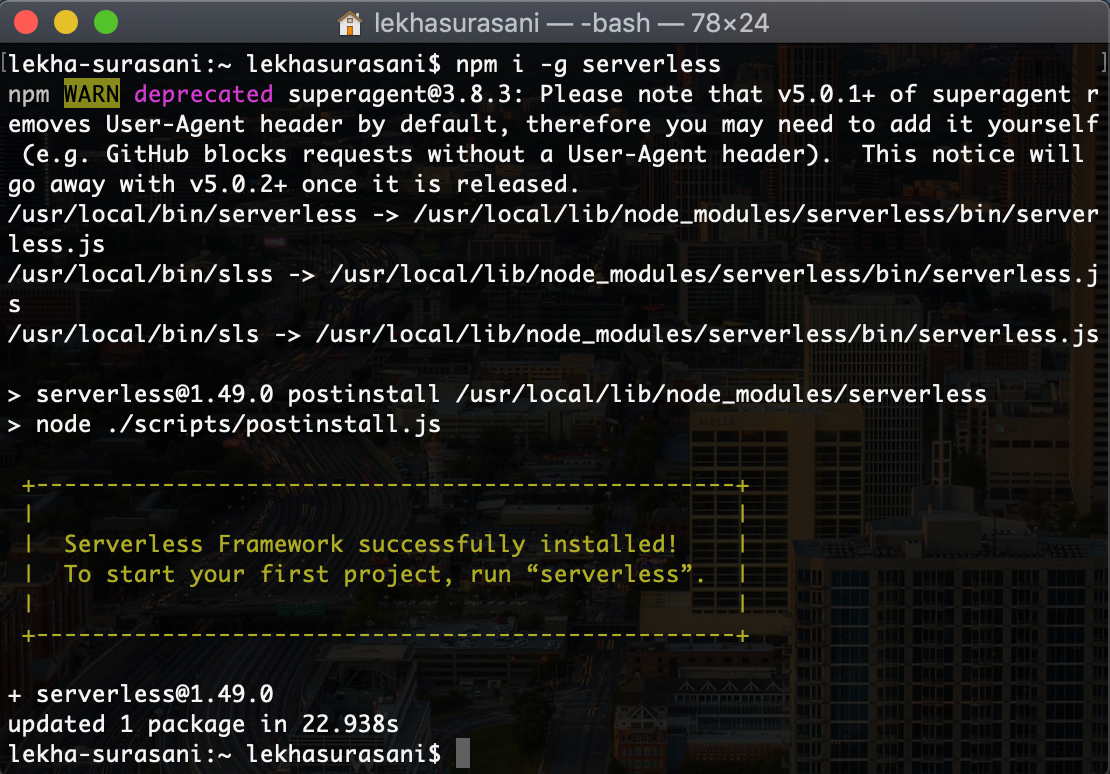
Go to your terminal and install the serverless package globally using npm: npm i -g serverless. (More info on serverless here)
and your terminal should look something like this:
Next, navigate to the directory where you want to create the app, then run serverless and follow the prompts:
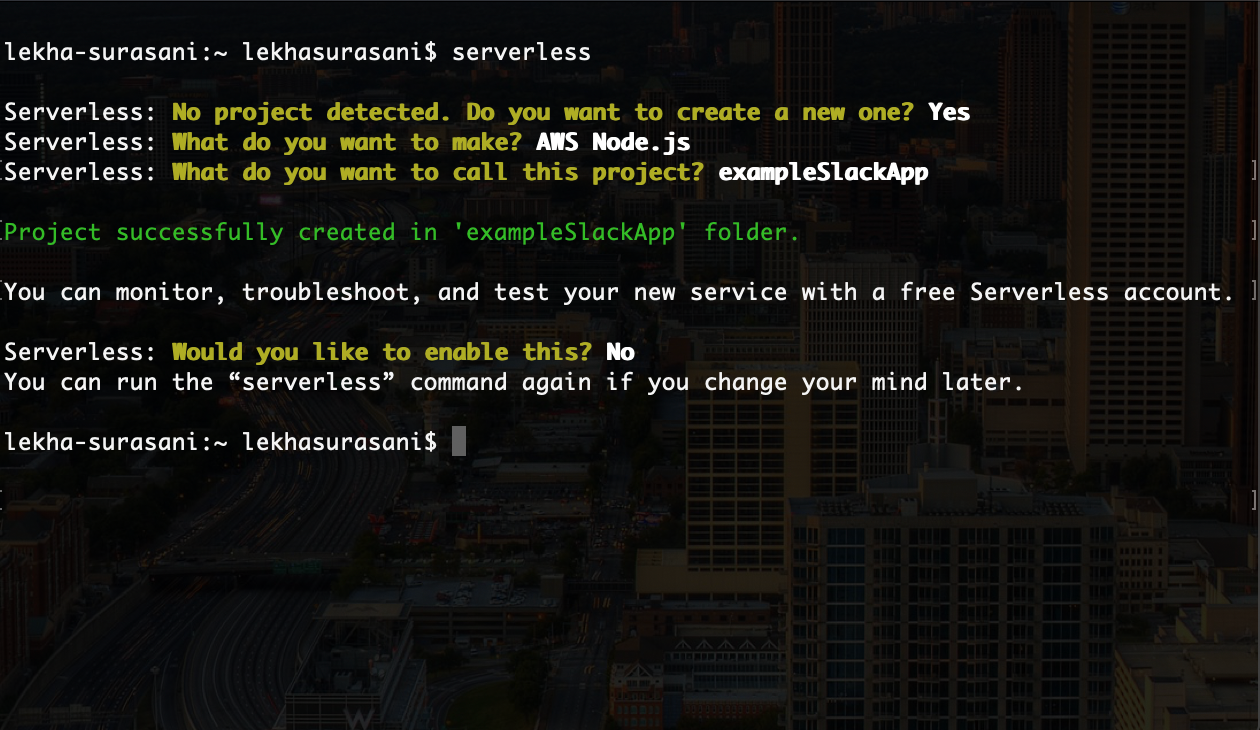
For this application, we'll be using Node.js. You can name your app anything you want, but I've called mine exampleSlackApp.
Open your favorite code editor to the contents in exampleSlackApp (or whatever you've called your application).
First, we'll take a look at serverless.yml. You'll see there's a lot of commented code here describing the different options you can use in the file. Definitely give it a read, but I've deleted it down to just:
service: exampleslackapp

provider:
  name: aws
  runtime: nodejs10.x
  region: us-east-2

functions:
  hello:
handler: handler.hello I've included region since the default is us-east-1 but my aws profile is configured for us-east-2.
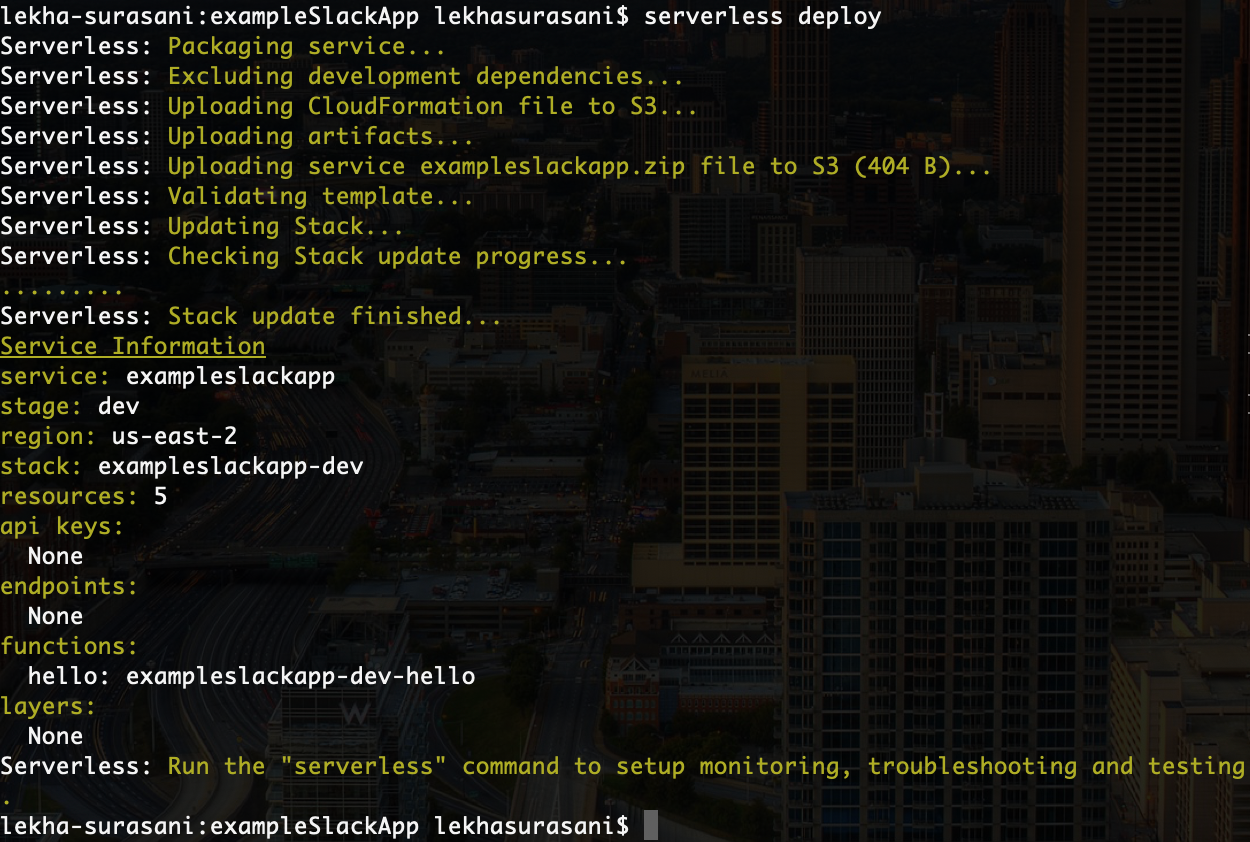
Let's deploy what we already have by running serverless deploy in the directory of the app that serverless just created for us. The output should look something like this:
And if you run serverless invoke -f hello in your terminal, it'll run the app, and you should see:
{
    "statusCode": 200,
    "body": "{\n  \"message\": \"Go Serverless v1.0! Your function executed successfully!\",\n  \"input\": {}\n}"
}
For further proof that our slack app is live, you can head back to AWS console. Go to the services dropdown, search for "Lambda", and click on the first option ("Run code without thinking about servers").

And here's your app!

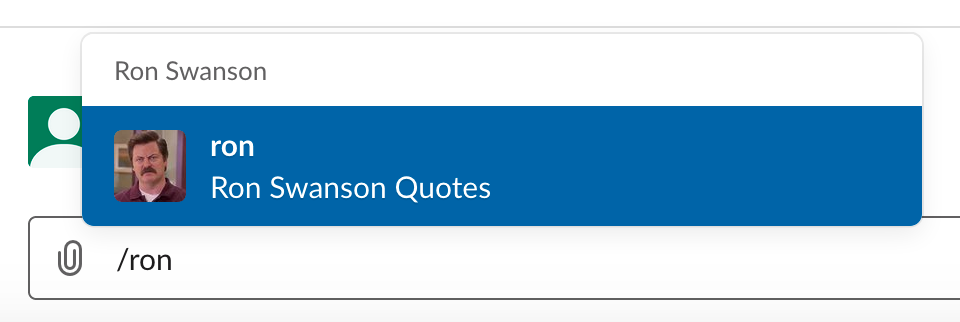
Next, we'll explore actually using serverless by building our slack app. Our slack app will post a random Ron Swanson quote to slack using a slash command like this:
The following steps don't necessarily have to be done in the order that I've done them, so if you want to skip around, feel free!
Adding the API to our code
I'm using this API to generate Ron Swanson quotes since the docs are fairly simple (and of course, it's free). To see how requests are make and what gets returned, you can just put this URL in your browser:
https://ron-swanson-quotes.herokuapp.com/v2/quotes
You should see something like this:

So, we can take our initial function and modify it as such:
module.exports.hello = (event) => {
  getRon();
};and getRon looks like:
function getRon() {
  request('https://ron-swanson-quotes.herokuapp.com/v2/quotes', function (err, resp, body) {
    console.log('error:', err)
    console.log('statusCode:', resp && resp.statusCode)
    console.log('body', body)
  })
}
Now, let's check if it works. To test this code locally, in your terminal: serverless invoke local -f hello. Your output should look something like:

serverless invoke -f hello would run the code that you've deployed, as we saw in previous sections. serverless invoke local -f hello, however, runs your local code, so it's useful for testing. Go ahead and deploy using serverless deploy!
Create your Slack App
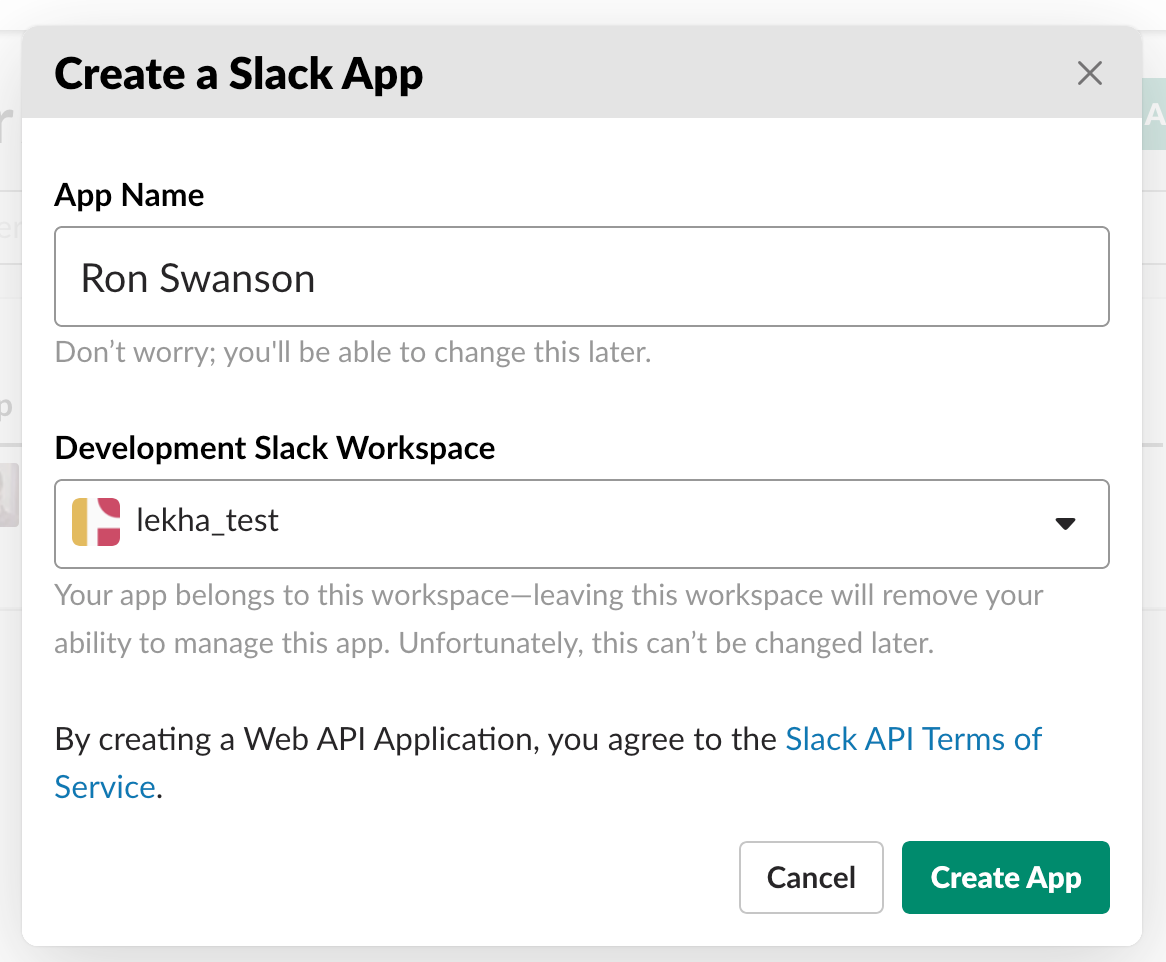
To create your slack app, follow this link. It'll make you sign into a slack workspace first, so be sure you're a part of one that you can add this app to. I've created a testing one for my purposes. You'll be prompted with this modal. You can fill in whatever you want, but here's what I have as an example:
From there, you'll be taken to the homepage for your app. You should definitely explore these pages and the options. For example, I've added the following customization to my app:

Next, we need to add some permissions to the app:
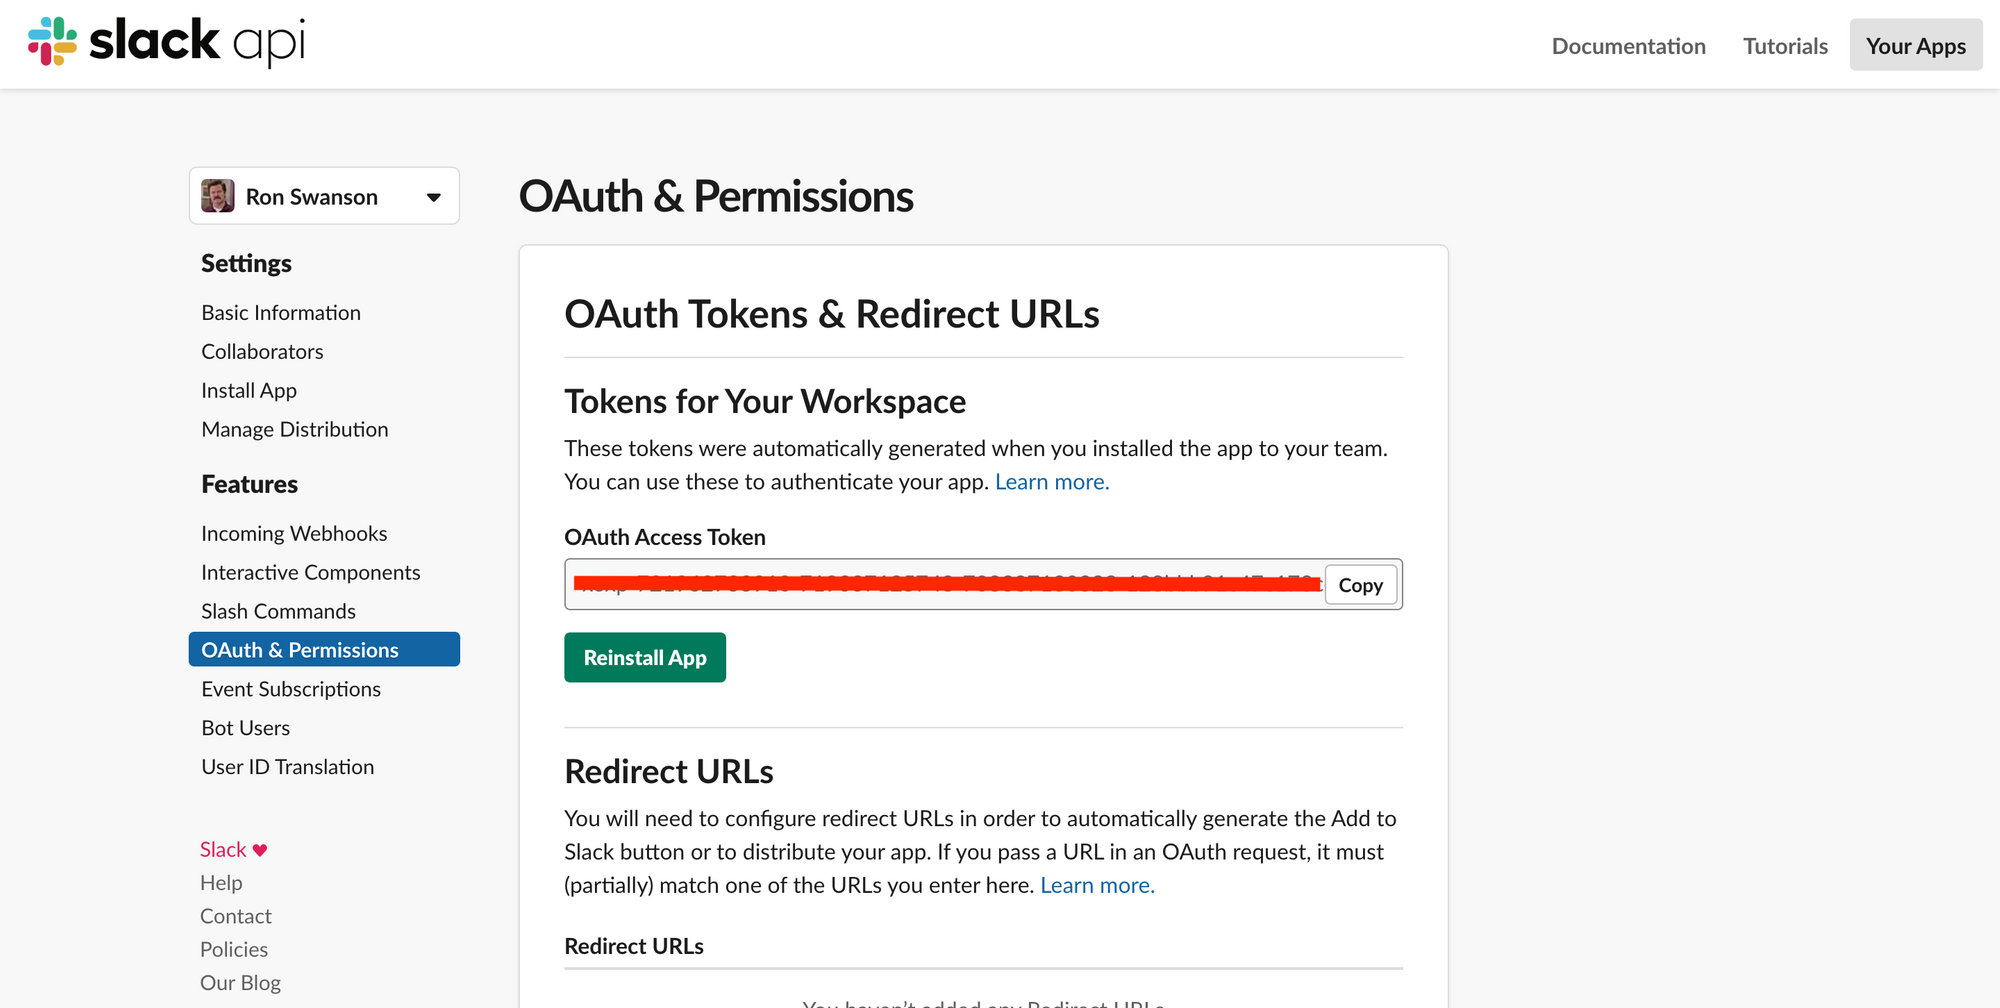
To get an OAuth Access Token, you have to add some scope and permissions, which you can do by scrolling down:
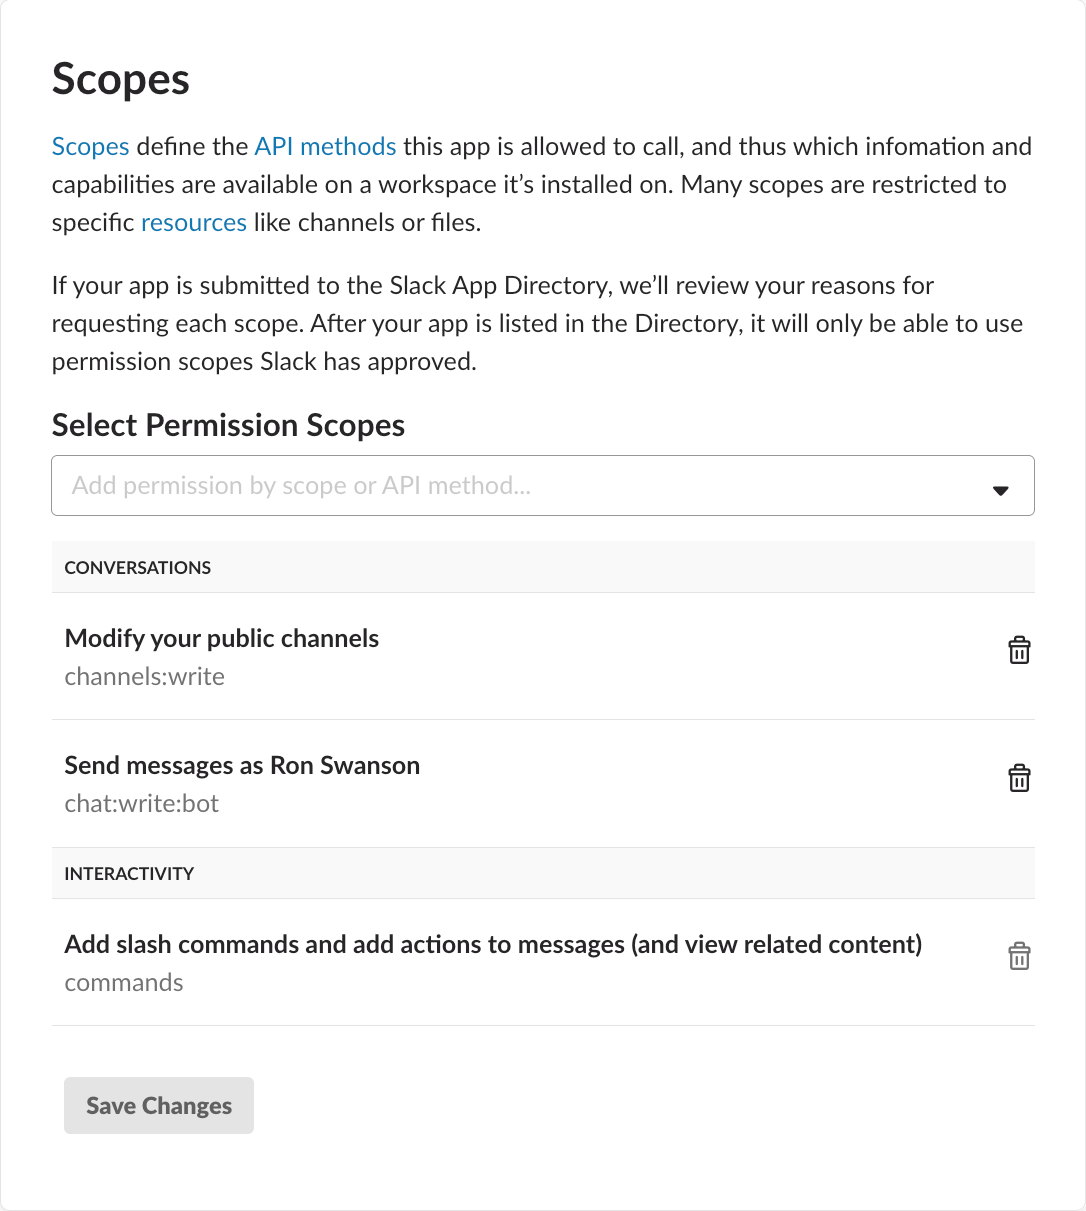
I've added "Modify your public channels" so that the bot could write to a channel, "Send messages as Ron Swanson" so when the message gets posted, it looks like a user called Ron Swanson is posting the message, and slash commands so the user can "request" a quote as shown in the screenshot at the beginning of the article. After you save the changes, you should be able to scroll back up to OAuths & Permissions to see:

Click the button to Install App to Workspace, and you'll have an OAuth Access Token! We'll come back to this in a second, so either copy it down or remember it's in this spot.
Connect Code and Slack App
In AWS Lambda, find your slack app function. Your Function Code section should show our updated code with the call to our Ron Swanson API (if it does not, go back to your terminal and run serverless deploy).
Scroll below that to the section that says "Environment Variables", and put your Slack OAuth Access Token here (you can name the key whatever you'd like):

Let's go back to our code and add Slack into our function. At the top of our file, we can declare a const with our new OAuth Token:
const SLACK_OAUTH_TOKEN = process.env.OAUTH_TOKEN.
process.env just grabs our environment variables (additional reading). Next, let's take a look at the Slack API to figure out how to post a message to a channel.
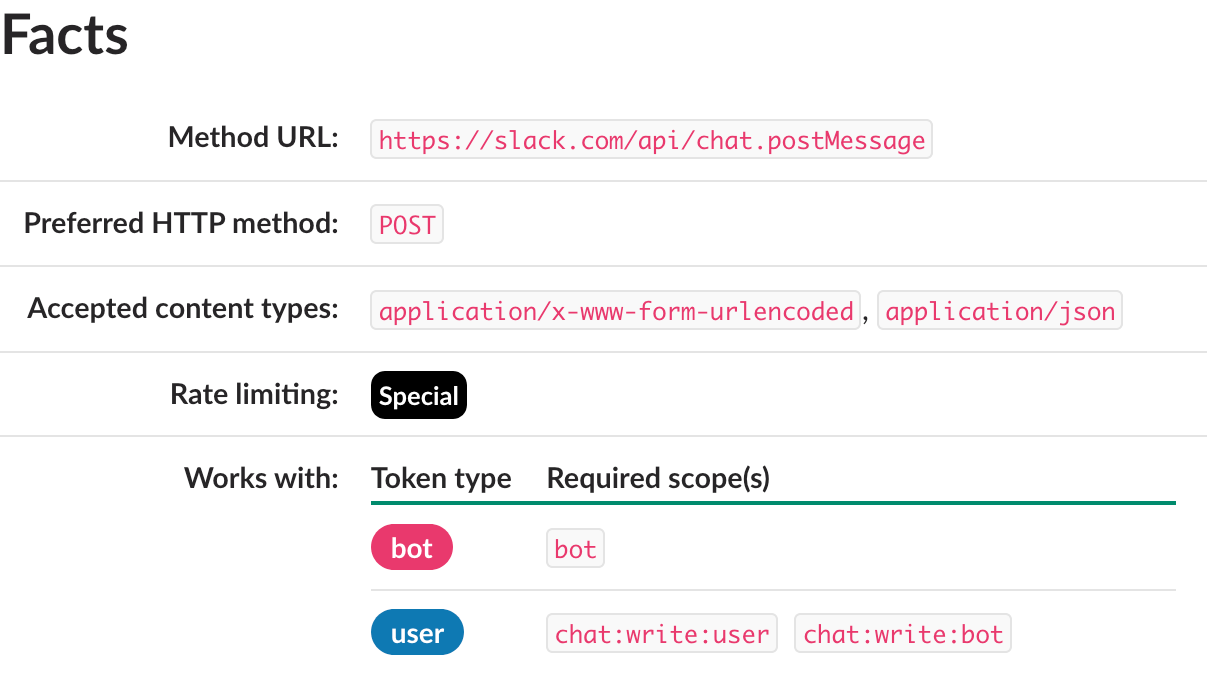

The two pictures above I've taken from the API are the most relevant to us. So, to make this API request, I'll use request by passing in an object called options:
  let options = {
    url: 'https://slack.com/api/chat.postMessage',
    headers: {
      'Accept': 'application/json',
    },
    method: 'POST',
    form: {
      token: SLACK_OAUTH_TOKEN,
      channel: 'general', // hard coding for now
      text: 'I am here',
    }
  }
and we can make the request:
  request(options, function(err, resp, body) {
    console.log('error:', err)
    console.log('statusCode:', resp && resp.statusCode)
    console.log('body', body)
  })
Finally, I'll wrap the whole thing in a function:
function postRon(quote) {
  let options = {
    url: 'https://slack.com/api/chat.postMessage',
    headers: {
      'Accept': 'application/json',
    },
    method: 'POST',
    form: {
      token: SLACK_OAUTH_TOKEN,
      channel: 'general',
      text: quote,
    }
  }

  request(options, function(err, resp, body) {
    console.log('error:', err)
    console.log('statusCode:', resp && resp.statusCode)
    console.log('body', body)
  })
}
and we can call it from getRon like this:
function getRon() {
  request('https://ron-swanson-quotes.herokuapp.com/v2/quotes', function (err, resp, body) {
    console.log('error:', err)
    console.log('statusCode:', resp && resp.statusCode)
    console.log('body', body)
    postRon(body.substring(2, body.length - 2)) // here for parsing, remove if you want to see how/why I did it
  })
}
So our code should all in all look like this:
'use strict';
let request = require('request');

const SLACK_OAUTH_TOKEN = process.env.OAUTH_TOKEN

module.exports.hello = (event) => {
  getRon();
};

function getRon() {
  request('https://ron-swanson-quotes.herokuapp.com/v2/quotes', function (err, resp, body) {
    console.log('error:', err)
    console.log('statusCode:', resp && resp.statusCode)
    console.log('body', body)
    postRon(body.substring(2, body.length - 2))
  })
}

function postRon(quote) {
  let options = {
    url: 'https://slack.com/api/chat.postMessage',
    headers: {
      'Accept': 'application/json',
    },
    method: 'POST',
    form: {
      token: SLACK_OAUTH_TOKEN,
      channel: 'general',
      text: quote,
    }
  }

  request(options, function(err, resp, body) {
    console.log('error:', err)
    console.log('statusCode:', resp && resp.statusCode)
    console.log('body', body)
  })
}
Now let's test! Unfortunately, our environment variable in AWS Lambda isn't available to us when we run serverless invoke local -f hello. There are a few ways you can approach this, but for our purposes, you can just replace the value for SLACK_OAUTH_TOKEN with your actual OAuth Token (make sure it's a string). But be sure you switch it back before you push it up to version control!
Run serverless invoke local -f hello, and hopefully you should see a message like this in your #general channel:

Please note that I put down my channel name as 'general' since it's my test workspace; however, if you're in an actual workspace, you should create a separate channel for testing apps, and put the message there instead while you're testing.
And in your terminal, you should see something like:

If that works, go ahead and deploy it using serverless deploy. If it does not, the best way to debug this is to adjust code and run serverless invoke local -f hello.
Adding slash command
The last and final part is adding a slash command! Go back to your function's home page in AWS Lambda and look for the button that says "Add trigger":

Click on the button to get to the "Add trigger" page, and select "API Gateway" from the list:

I've filled in the information based on defaults mostly:
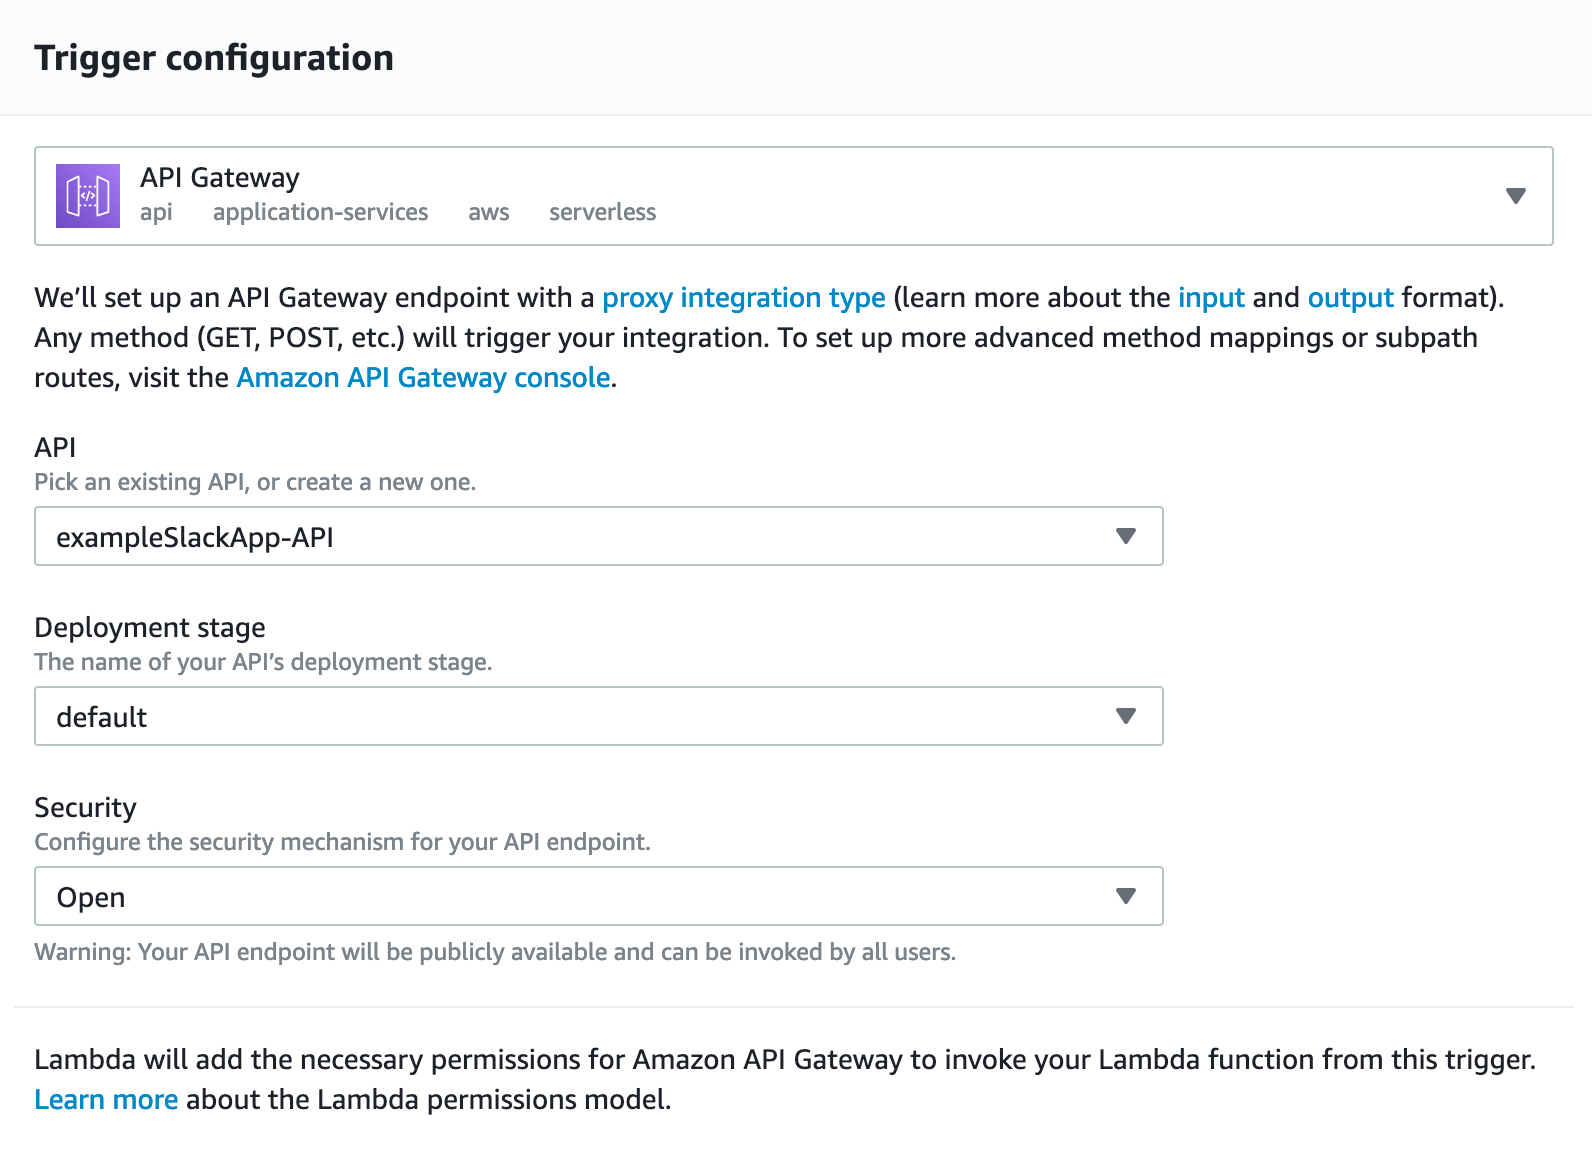
I've also left this API open for use – however, if you're using this in production, you should discuss what standard protocol would be with your team. "Add" the API, and you should receive an API endpoint. Hold on to this, because we'll need it for the next step.
Let's switch back over to our slack app and add a slash command:

Click on "Create New Command" and it should pop up with a new window to create a command. Here's how I filled mine out:
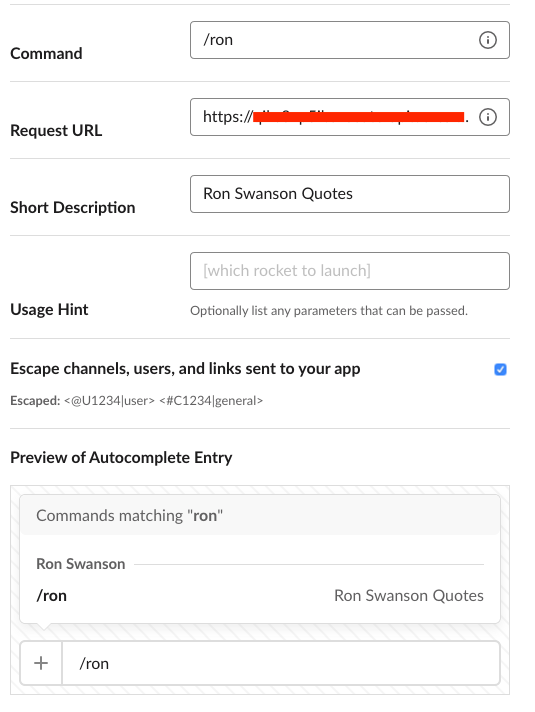
You can enter anything you want for "command" and "short description" but for "request URL", you should put your API endpoint.
Finally, we'll go back to our code to make some final adjustments. If you try to use the slash command, you should receive some kind of error back – this is because slack expects a response and AWS expects you to give a response when the endpoint is hit. So, we'll change our function to allow a callback (for reference):
module.exports.hello = (event,context,callback) => {
  getRon(callback);
};
and then we'll change getRon to do something with the callback:
function getRon(callback) {
  request('https://ron-swanson-quotes.herokuapp.com/v2/quotes', function (err, resp, body) {
    console.log('error:', err)
    console.log('statusCode:', resp && resp.statusCode)
    console.log('body', body)
    callback(null, SUCCESS_RESPONSE)
    postRon(body.substring(2, body.length - 2))
  })
}
where SUCCESS_RESPONSE is at the top of the file:
const SUCCESS_RESPONSE = {
  statusCode: 200,
  body: null
}
You can put the callback here or in postRon – it just depends on what your purposes are with the callback.
Our code at this point now looks something like:
'use strict';
let request = require('request');
const SLACK_OAUTH_TOKEN = OAUTH_TOKEN
const SUCCESS_RESPONSE = {
statusCode: 200,
body: null
}
module.exports.hello = (event,context,callback) => {
getRon(callback);
};
function getRon(callback) {
request('https://ron-swanson-quotes.herokuapp.com/v2/quotes', function (err, resp, body) {
console.log('error:', err)
console.log('statusCode:', resp && resp.statusCode)
console.log('body', body)
callback(null, SUCCESS_RESPONSE)
postRon(body.substring(2, body.length - 2))
})
}
function postRon(quote) {
let options = {
url: 'https://slack.com/api/chat.postMessage',
headers: {
'Accept': 'application/json',
},
method: 'POST',
form: {
token: SLACK_OAUTH_TOKEN,
channel: 'general',
text: quote,
}
}
request(options, function(err, resp, body) {
console.log('error:', err)
console.log('statusCode:', resp && resp.statusCode)
console.log('body', body)
})
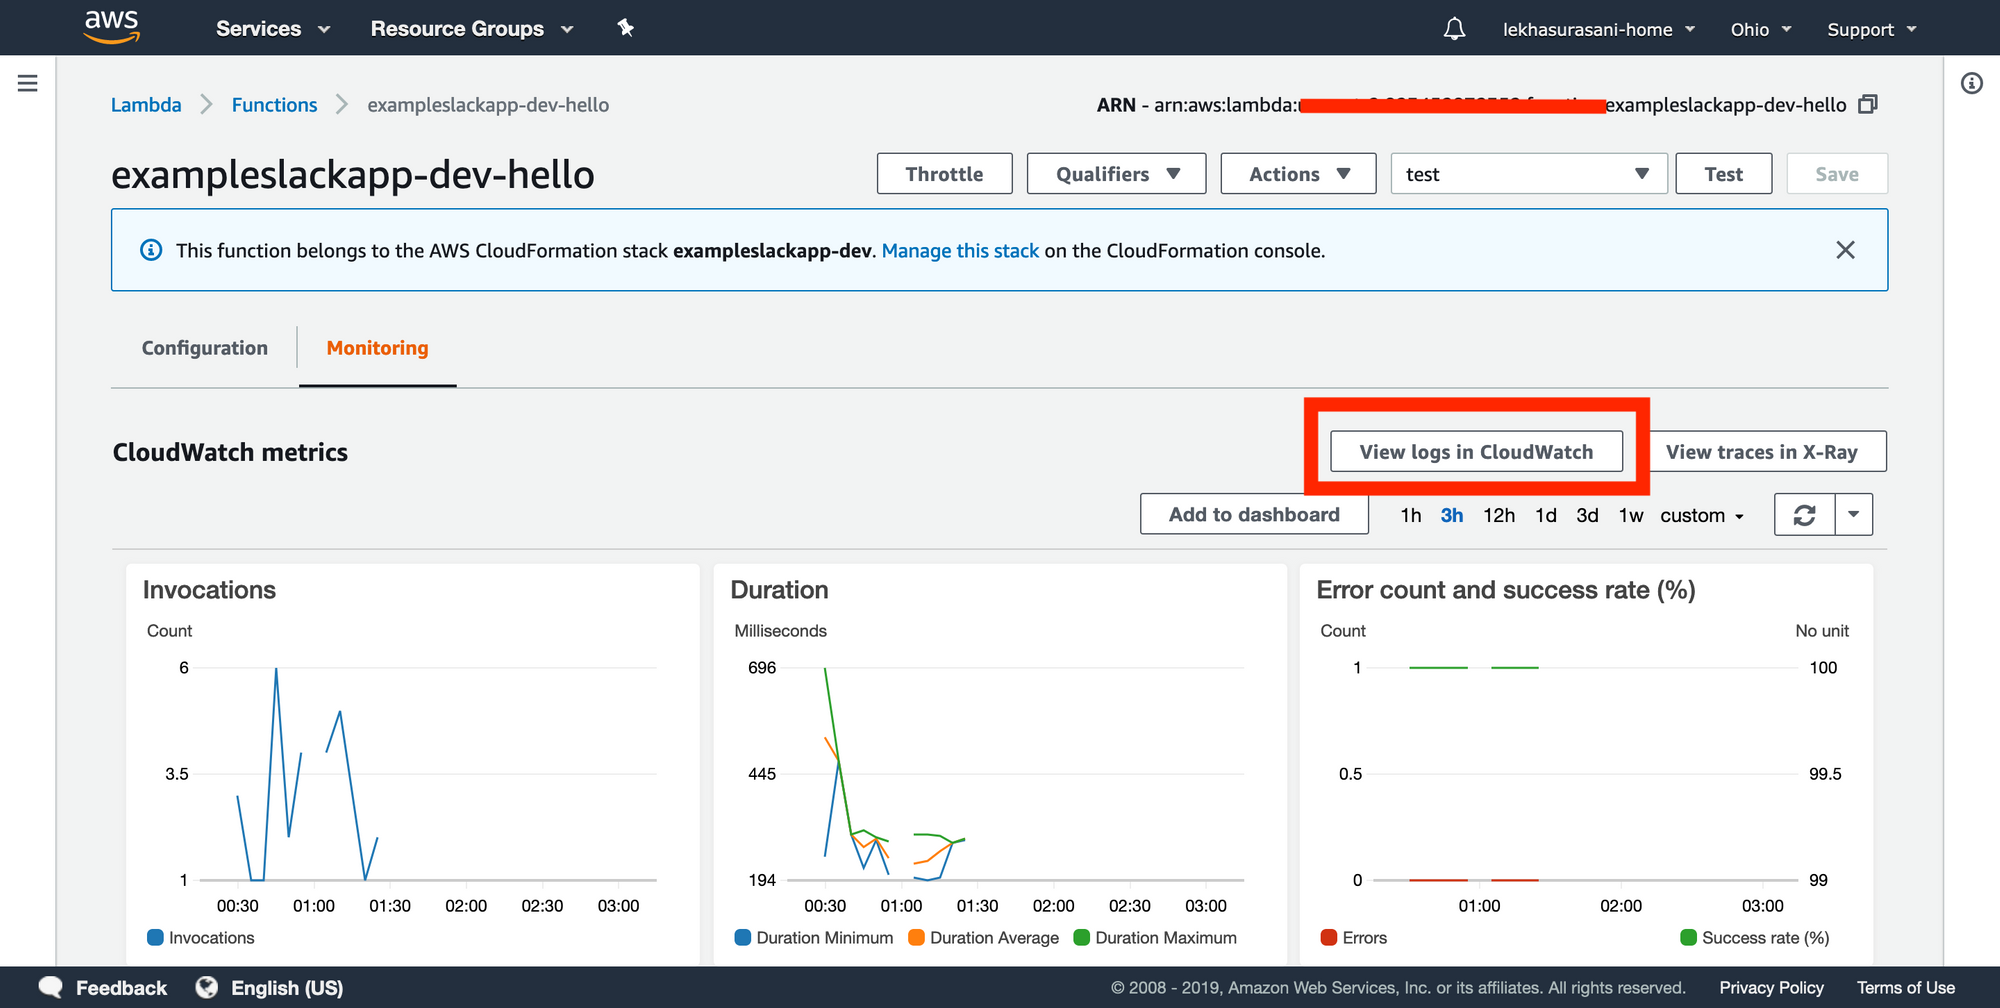
}You should be able to use the /ron command in slack now and get a Ron Swanson quote back. If you don't, you can use Cloudwatch logs to see what went wrong:
The way our code works now, we've hardcoded in the channel name. But, what we actually want is for the quote to get posted in the message where you used /ron.
So, we can now use the event portion of our function.
module.exports.hello = (event,context,callback) => {
  console.log(event)
  getRon(callback);
};
Use /ron to run the function, and then check your Cloudwatch logs to see what gets logged to the console (you may need to refresh). Check on the most recent logs and you should see something like this:

The first item in this list (where it says "resource", "path", etc.) is the event, so if you expand that, you'll see a long list of things, but what we're looking for is 'body' all the way down at the bottom:

Body is a string with some relevant information in it, one of them being "channel_id". We can use channel_id (or channel_name) and pass it into the function that creates our slack message. For your convenience, I've already parsed this string: event.body.split("&")[3].split("=")[1] should give you the channel_id. I hardcoded in which entry (3) the channel_id was for simplicity.
Now, we can alter our code to save that string as a variable:
let channel = 'general' (as our fallback)
module.exports.hello = (event,context,callback) => {
  console.log(event)
  channel = event.body.split("&")[3].split("=")[1]
  console.log(context)
  getGoat(callback);
};
and in postRon:
  let options = {
    url: 'https://slack.com/api/chat.postMessage',
    headers: {
      'Accept': 'application/json',
    },
    method: 'POST',
    form: {
      token: SLACK_OAUTH_TOKEN,
      channel: channel,
      text: quote,
    }
}Finally, if you use a slack command in any channel in your workspace, you should be able to see a Ron Swanson quote pop up! If not, as I mentioned before, the most common tools I use to debug serverless apps are serverless invoke local -f <function name> and Cloudwatch logs.
Hopefully you were successfully able to create a functioning Slack application! I've included resources and background reading dispersed throughout the article and I'm happy to answer any questions you may have!
Final Repo with code: https://github.com/lsurasani/ron-swanson-slack-app/