
By Carmen Chung
Ever felt like your website takes forever to load?
The good news is that you’re not alone. A report published by Google found that 70% of the pages they analysed took more than 10 seconds to load — for just one page.
The bad news is…well, that’s bad. That same report found that 53% of visitors will leave a webpage on mobile if it takes longer than three seconds to load. That means that every second your website fails to load, a potential customer or client is dropping off.
Fortunately, there is still some good news left: the WebP file format can compress your images to a size even smaller than a JPG file, with almost no reduction in quality, making your website load more than twice as fast. And best of all, with less than 0.1% of websites optimising their images with WebP (more on why later), you can gain a real advantage over your competitors.

Back it up a second: what is WebP?
WebP is an image format that provides lossless and lossy compression for images on the Internet using predictive coding to encode an image. It was introduced in 2010, and is currently being developed and supported by Google. But it’s not just Google that is using WebP: Pinterest, Facebook (on Android devices), and YouTube’s thumbnails all use WebP images, as well as other big players.
Google claims that a WebP lossless image is 26% smaller than its PNG equivalent, and that a WebP lossy image is 25–34% smaller than its JPG equivalent (as of Feb. 2019).
Let’s take WebP images for a test. When I ran my JPG image through the WebP converter, I got the following results:
- JPG image (already compressed): 279 KB
- WebP at 100% lossless: 451 KB (yes, this is higher — more on why below!)
- WebP at 80% lossy: 156 KB (56% of the original size)

(Above photos too small to see the difference? If you want to see the 80% lossy WebP image live in action, head on over to my website.)
So you’re probably wondering why the lossless WebP image is actually bigger than the original JPG. This is because my original image was actually a lossless PNG file, which I then converted and ran through an image compressor to produce a smaller JPG file. During this compression process, the converter adds what is known as artifacts.
When you reverse the process and try to convert the lossy JPG back to a lossless file format (like WebP), the algorithm will strip out unnecessary metadata (good) — but it will also encode each artifact it finds to reproduce it pixel-perfect (bad), often resulting in a file size increase, but no visual benefits. As a result, the final file will end up even larger than if you had converted it directly from the original PNG file!
Pro tip: if your original image is a lossless file format (like PNG, BMP, or Raw), convert it straight to a WebP image. Do not convert it to a lossy file format (like JPG or GIF) first.
Lossy compression (the one on the right above) creates images that are approximately the same as the original: but because of the compression, the size is smaller (and quality sometimes suffers — although in this case, it’s barely noticeable). In addition, lossy images lose their quality irreversibly — you can’t go back once you’ve converted it to a lossy format, which means that if you compress the same lossy image over and over, each time, the quality deteriorates.
Pro tip: if you compress to lossy formats, you should always compress the original image. Don’t compress already compressed files over and over, or you will compound the quality deterioration.
I’m not convinced. Show me the results.
I placed the three images above on standalone test pages, and put all three pages simultaneously under siege (a benchmark utility testing tool I’ll talk about more in another post), hitting my test pages with around 25 simultaneous users to see how quickly their response times would be.
Unsurprisingly, the 80% lossy WebP file (i.e. the smallest one) was the fastest, clocking in with an average response time of 5.33 seconds to fully load; the JPG then took an average of 8.34 seconds; and the 100% lossless WebP file took an average of 12.28 seconds.
So the 80% lossy WebP file was 2.3 times faster than the 100% lossless WebP file, and 1.56 times faster than the JPG.
For websites that are even more image heavy (such as photography websites, blogs or visual portfolios), I would expect that the speed load difference would be even greater.
Why isn’t everyone using the WebP file format for their images then?
As of February 2019, browser support for WebP files is close to 72%, with Chrome, Firefox, Opera and the latest Edge version supporting it. Unfortunately, Safari and IE don’t (yet) support WebP files, so you still need to have a fallback for those browsers — more on that below.
Okay, I’m interested. How do I implement WebP?
First, you’ll need to convert your images to a WebP format. There are a few ways you can do this, including easy-to-use converters like this one or this one. For those who use Photoshop, you can also convert your image using a WebP plugin.
Alternatively, you can download Google’s WebP converter here, which converts JPGs and PNGs to WebP, and WebP files to PNG or PPM. I prefer this option, because I trust the quality of Google’s software conversion more, and I can specify precise options with each conversion.
For example, to convert a PNG file to 80% lossy WebP, you can runcwebp -q 80 mypicture.png -o mypicture.webp in Terminal/Command Line. Straight forward instructions on how to convert using this option can be found here.
Don’t forget that once you’ve converted your image, to keep your original JPG or PNG file, because you’ll need that as a fallback file in case the user’s browser does not support WebP.
I have my WebP images. Now what?
Let’s just assume that you want to show your image in the normal HTML way (rather than inside a CSS class, which I’ll discuss later). To do this, use the following code (obviously replace references to mypicture with the name of your image file):
HTML:
<picture>
<source srcset="images/mypicture.webp" type="image/webp">
<source srcset="images/mypicture.jpg" type="image/jpeg">
<img alt="This is my face" src="images/mypicture.jpg">
</picture>
What is happening here is that we’re first checking to see if the browser supports the <picture> tag. If it does, we’ll serve up the WebP image; if it doesn’t, we will serve up the JPG image. If the browser doesn’t even support the <;picture> tag, then we’ll have a final fallback of the normal tag.
Great. But what if I have an image inside a CSS class, like a background image url?
This requires a bit more work.
First, you’ll need to know when a user’s browser can’t handle your WebP files, so that you can load the back up JPG or PNG files (which will be in another CSS class) instead.
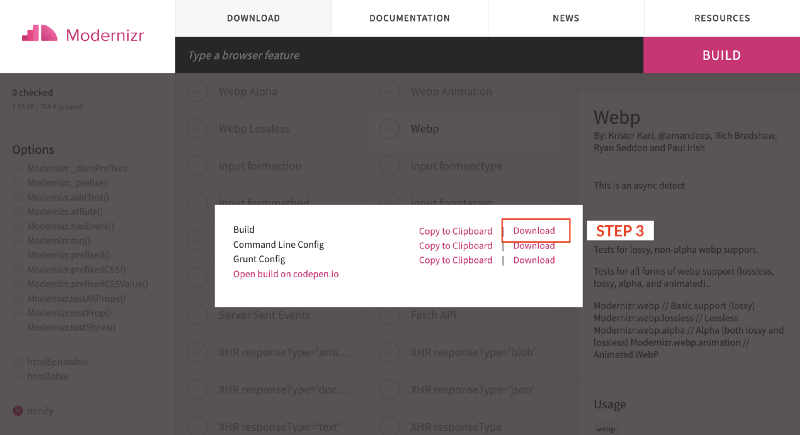
In order to do this, I use Modernizr to help me detect what sort of browser the user is using (and therefore what features their browser supports). You can go to their website, click on “WebP” and then click on “Build”.

A popup will then appear — hit “Download” next to the Build command.
After that, a file namedmodernizr-custom.js will be downloaded — move that file into your website directory (let’s say your root folder). In order to call and trigger Modernizr, put this at the bottom of the HTML page where you are displaying your WebP files:
HTML:
// First, refer to the location of your downloaded Modernizr script. I have just left mine in the root folder.
<script src="modernizr-custom.js"></script>
// Second, trigger Modernizr to detect WebP compatibility.
<script>
Modernizr.on('webp', function (result) {
if (result) {
// supported
} else {
// not-supported
}
});
</script>
Modernizr will now automatically apply either a webp or no-webp class to the HTML element (in my example, the container holding the image), depending on whether it detects browser support for WebP or not. That means you can specify which images you want within your CSS class, by targeting either of those classes like this:
CSS:
.no-webp .container { background-image: url("mypicture.jpg"); }
.webp .container { background-image: url("mypicture.webp"); }
What happens if the user doesn’t have Javascript enabled?
Ugh! Why would they do that? (I’m looking at you, Internet Explorer!)
Modernizr does rely on Javascript being enabled on your user’s browser, so to get around this, you will need to add an HTML class at the top of the page, say <html class=”no-js”>.
Then, add Javascript code that will successfully remove this class if Javascript is enabled:
HTML:
<script> document.documentElement.classList.remove("no-js"); </script>
If Javascript is not enabled, then the class will automatically be applied to all the HTML elements on your page — and you can create a no-js class with the JPG image as the background image:
CSS:
.no-js .container { background-image: url("mypicture.jpg"); }
Conclusion
WebP images are relatively easy to implement when you are simply displaying images in your HTML code (you won’t need Modernizr or the no-js class), but become slightly more time-consuming when you use images within your CSS (say, as background images).
Keep in mind that how long your website takes to load has a direct impact on the amount of time your visitors will spend on your site— and therefore, affect your lead conversion rate— so the time you spend in making the switch to WebP images is worth it, for the extra time your users will stay on your website.
If you implement WebP images, please let me know in the comments — I’d love to hear how much faster your website is!