
In JavaScript, the HTML DOM (Document Object Model) represents the structure and content of an HTML document as a tree-like structure. In it, each element, attribute, and text node in the HTML document is represented as a node in the DOM tree.
In this article you're going to learn how you can use that structure to more effectively control the way your HTML elements behave. You'll also learn how to use it to add dynamic interactivity to your users' experience.
This article comes from my Complete LPI Web Development Essentials Study Guide course. If you'd like, you can follow the video version here:
Understanding DOM elements
The HTML DOM provides a way to interact with and manipulate the elements of an HTML document using JavaScript. It allows you to access, modify, and add elements dynamically, change styles and classes, handle events, and perform other operations on the document.
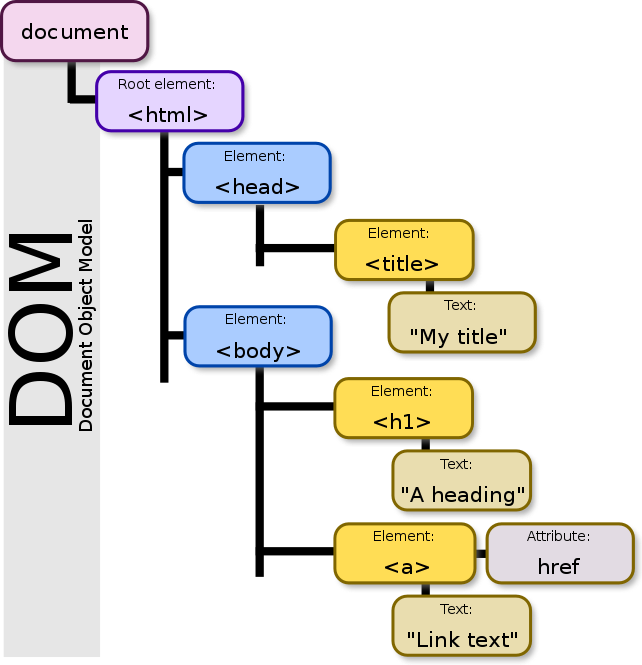 commons.wikimedia.org/wiki/File:DOM-model.svg using the CC Attribution-Share Alike 3.0 Unported license
As you can see from that illustration, Document is the top-level object representing an HTML document. It serves as the entry point for accessing the DOM tree and provides methods for navigating and manipulating the document.
Element represents an HTML element in the DOM tree. Elements have properties that allow you to access and modify attributes, styles, and content. You can select elements using various methods like:
getElementByIdgetElementsByTagNamegetElementsByClassNamequerySelectorquerySelectorAll
Node is the base class for all types of nodes in the DOM tree. Nodes can be elements, text nodes, comment nodes, and so on. They have properties and methods for common operations, such as accessing parent and child nodes, manipulating node content, and more.
The DOM provides an event system to handle user interactions and other events. You can attach event listeners to elements to respond to events like clicks, keypresses, and mouse movements.
How to Interact with the DOM using JavaScript
Using JavaScript, you can interact with the HTML DOM to dynamically modify the content and behavior of an HTML page. This allows you to create interactive web applications, implement dynamic user interfaces, and perform various operations on the document based on user actions or programmatic logic.
Here's a simple example that actually does something surprising:
<!DOCTYPE html>
<html>
<head>
  <title>DOM Manipulation Example</title>
</head>
<body>
  <h1 id="myHeading">Hello, World!</h1>
  <p id="myParagraph">This is a paragraph.</p>

  <script>
    // Changing the contents and properties of HTML elements
    document.getElementById("myHeading").innerHTML = "New Heading";
    document.getElementById("myParagraph").style.color = "red";
    document.getElementById("myParagraph").textContent = "This is updated.";
  </script>
</body>
</html>
We have an HTML document that contains a heading <h1> element with an id of myHeading and a paragraph <p> element with an id of myParagraph.
  <h1 id="myHeading">Hello, World!</h1>
  <p id="myParagraph">This is a paragraph.</p>
The JavaScript code within the <script> tags manipulates these elements through the DOM.
 <script>
    // Changing the contents and properties of HTML elements
    document.getElementById("myHeading").innerHTML = "New Heading";
    document.getElementById("myParagraph").style.color = "red";
    document.getElementById("myParagraph").textContent = "This is updated.";
 </script>
The code uses the getElementById method to select elements by their id attribute. It then modifies the elements' contents and properties using the following DOM manipulation techniques:
innerHTMLsets the HTML content inside the selected element. In this case, we change the heading's text to "New Heading".styleaccesses the CSS styles of the selected element. We set the paragraph's text color to red.textContentsets the text content of the selected element. We update the paragraph's text to "This is an updated paragraph."
When we load the HTML document in a web browser, the JavaScript code executes immediately. You'll never see the original HTML styling, but just the "updates" ordered by the JavaScript. The heading text will be "New Heading", the paragraph text color will be red, and the paragraph content will be "This is updated."
This demonstrates how JavaScript can interact with the DOM to dynamically modify the contents and properties of HTML elements based on programmatic logic or user interactions.
How to Make Your Websites More Interactive
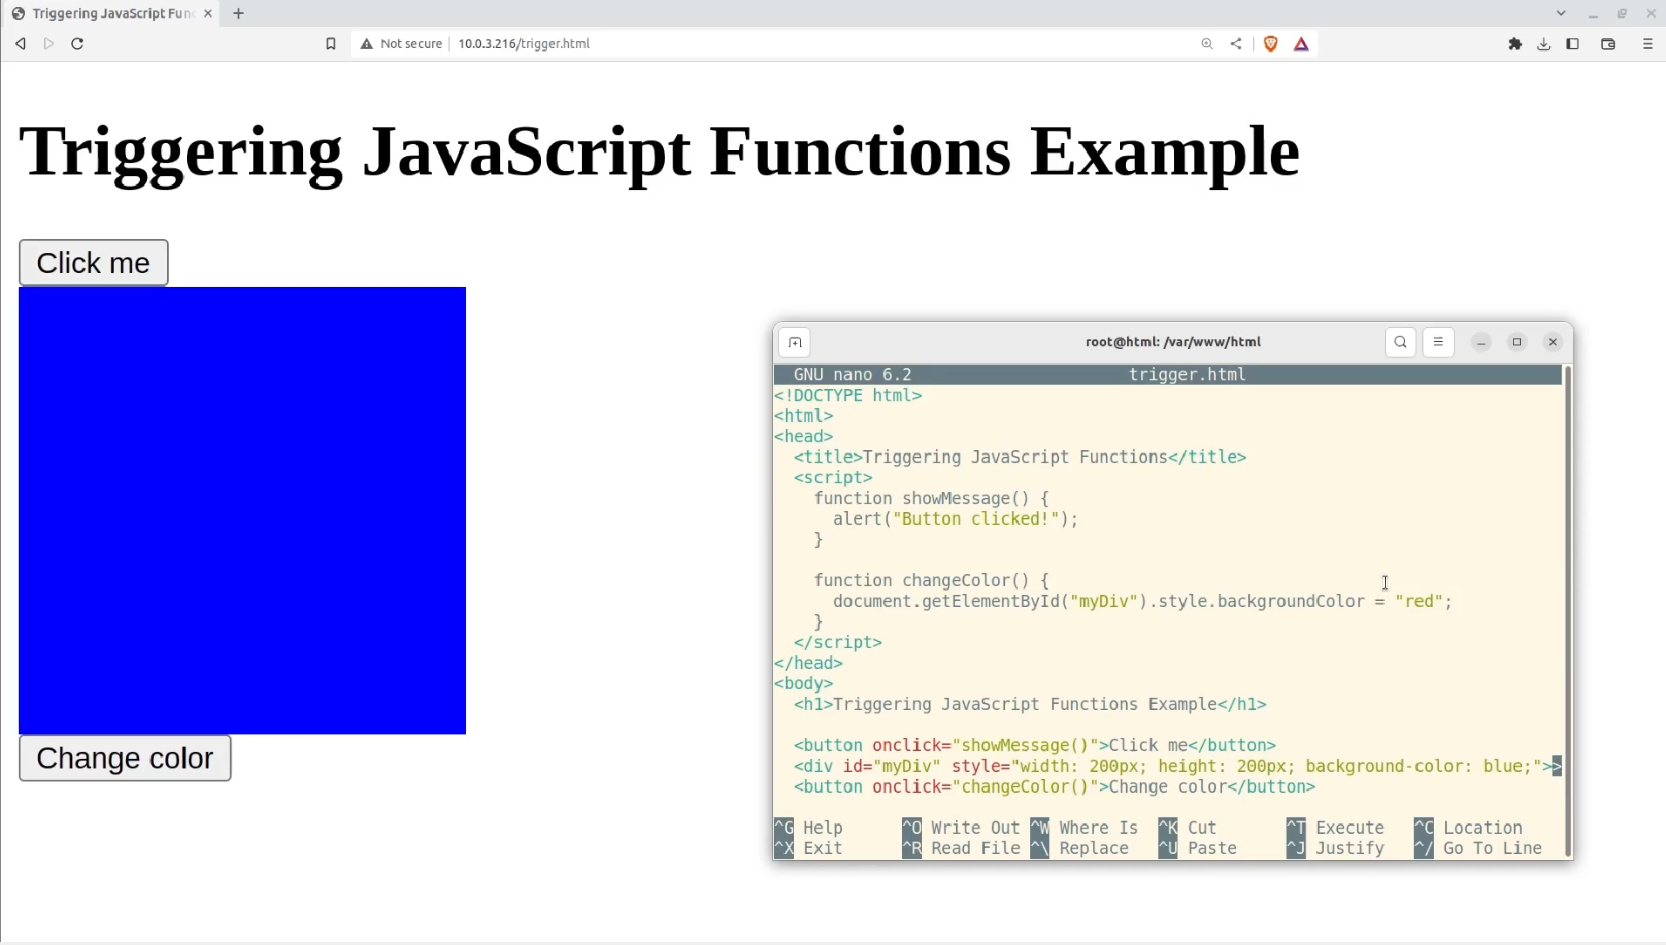
You can also trigger changes to an HTML page in response to user activities. In this example, we define two JavaScript functions: showMessage and changeColor. These functions are triggered from HTML elements using the onclick attribute.
<!DOCTYPE html>
<html>
<head>
  <title>Triggering JavaScript Functions</title>
  <script>
    function showMessage() {
      alert("Button clicked!");
    }

    function changeColor() {
      document.getElementById("myDiv").style.backgroundColor = "red";
    }
  </script>
</head>
<body>
  <h1>Triggering JavaScript Functions Example</h1>

  <button onclick="showMessage()">Click me</button>
  <div id="myDiv" style="width: 200px; height: 200px; background-color: blue;"></div>
  <button onclick="changeColor()">Change color</button>
</body>
</html>
The showMessage function displays an alert box with the message "Button clicked!" when the button is clicked.
    function showMessage() {
      alert("Button clicked!");
    }
The changeColor function changes the background color of the <div> element with the id of myDiv to red when the button is clicked.
    function changeColor() {
      document.getElementById("myDiv").style.backgroundColor = "red";
    }
The HTML code includes a button with the onclick attribute set to showMessage(), which triggers the showMessage function when the button is clicked.
Similarly, there's another button with the onclick attribute set to changeColor(), which triggers the changeColor function when the button is clicked.
  <button onclick="showMessage()">Click me</button>
  <div id="myDiv" style="width: 200px; height: 200px; background-color: blue;"></div>
  <button onclick="changeColor()">Change color</button>
When you load the HTML document in a web browser, you'll see the heading, two buttons, and a colored <div> element. Clicking the "Click me" button will trigger the showMessage function and display an alert.
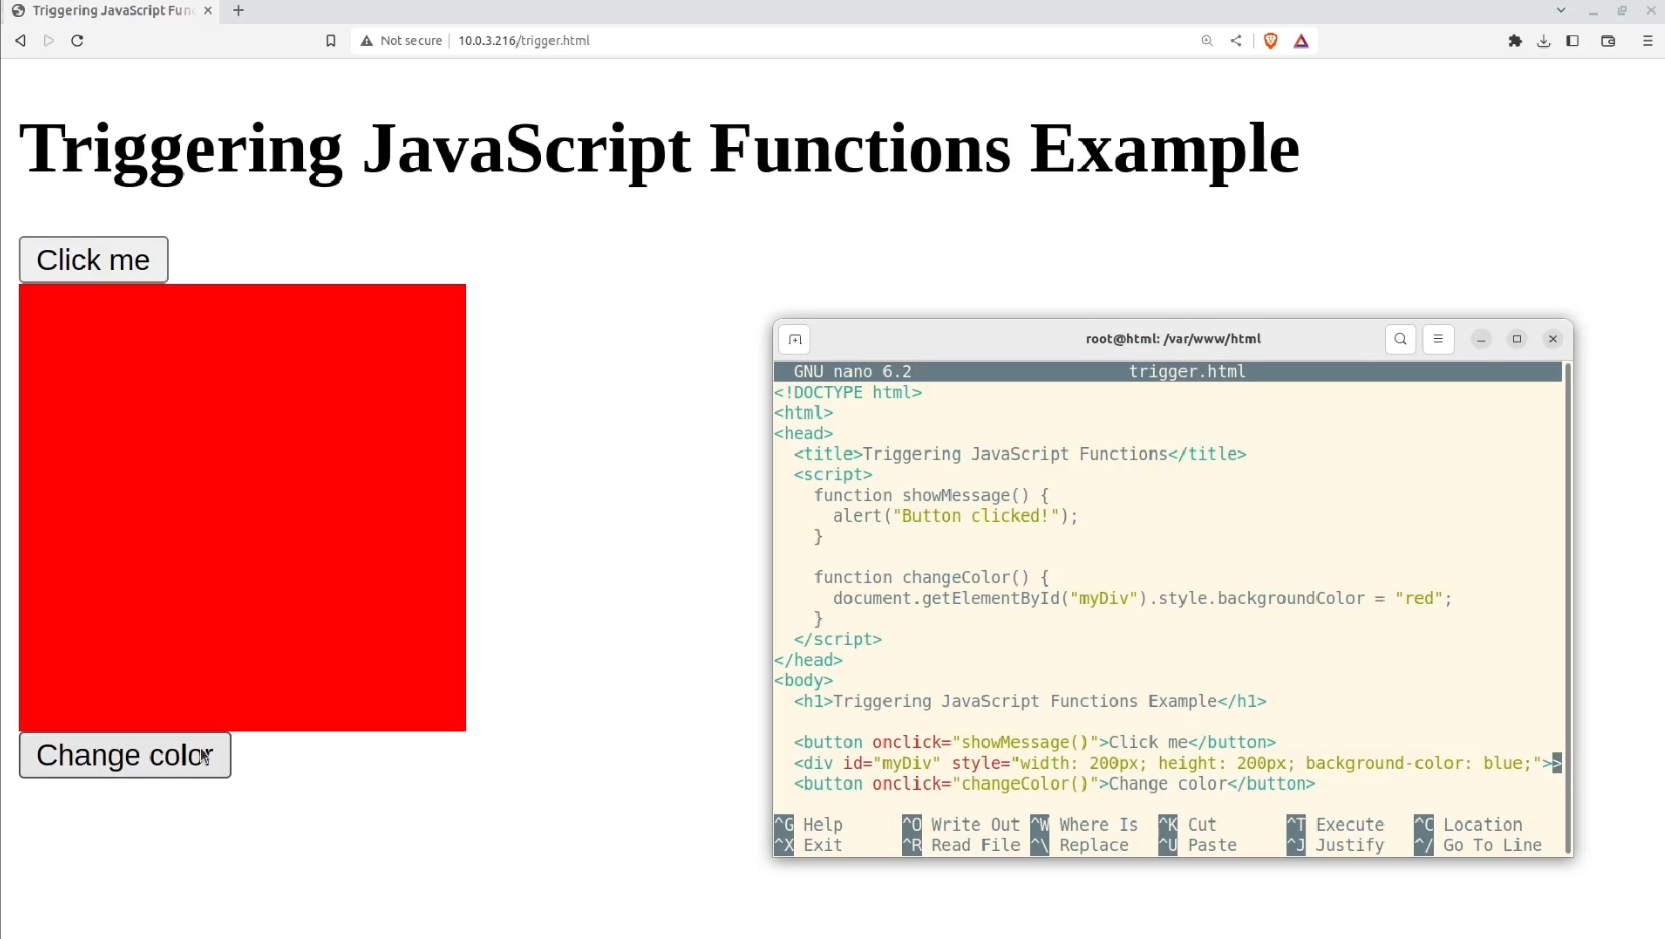
Clicking the "Change color" button will trigger the changeColor function and change the background color of the <div> element to red.
As I'm sure you can guess, this barely scratches the surface on what you can do with DOM. Here's a longer list of DOM-friendly elements and methods and HTML attributes that you can also play with:
- document.getElementById()
- document.getElementsByClassName()
- document.getElementsByTagName()
- document.querySelector()
- document.querySelectorAll()
- innerHTML, setAttribute()
- removeAttribute()
- classList
- classList.add()
- classList.remove()
- classList.toggle()
- onClick
- onMouseOver
- onMouseOut
Wrapping Up
This was a brief introduction to DOM elements, where you caught a quick glimpse of the how and whys of controlling HTML elements. You also learned how you can add dynamic interactivity and fine-tuned programmatic versatility to your website.
This article comes from my Complete LPI Web Development Essentials Study Guide course. And there's much more technology goodness available at bootstrap-it.com