
By Jared Wolff
This post is a bit lengthy. If you prefer, signup to get the full PDF here. ?
After Particle's Mesh deprecation announcement, many have been left to figure out how to deploy their low power sensor networks. There was always the option of using Particle's Built in Bluetooth stack but as it stands today it's not secure.
Previously I had helped form a very simple nRF SDK-based hub and spoke IoT deployment. Unfortunately, it was closed source and the company is no longer around.
So what's a guy to do?
Build another one and make it open. (BSD licensed to be exact!) Open and free for anyone to use adopt and improve upon. Plus if you're building a product that's using the code, you don't have to share your improvements or proprietary code with anyone.
In this post I'll be talking about how to get started with Pyrinas. It uses Nordic's time tested SDK as a basis for the kernel of the system. The main concept of Pyrinas is to abstract as much IoT cruft away so you can focus on your application.
So without further ado, let's chat about what Pyrinas is and what it isn't.
What Pyrinas is
- Is an embedded "kernel", written in C. It's open and permissive IoT development environment you can use for anything you want. Seriously. It's BSD licensed and can be used in closed source applications.
- Using the power of Bluetooth 5.0 Long Range, Pyrinas allows you to communicate with many peripheral devices at one time. Currently Pyrinas has been tested with 3 simultaneous peripheral connections. Theoretically, it can support up to 20 simultaneous connections. (Thanks to Nordic's S140 Softdevice)
Pyrinas transports its data in two ways
- In a familiar string format used by Particle
- A custom Protocol Buffer for raw data transmission.
That way you have a choice of how you want to process and publish your data!
What Pyrinas isn't
- Pyrinas is not a RTOS (real time operating system). If you have a need to run multiple threaded applications on embedded, Pyrinas is not for you.
- Pyrinas, at this time, does not support Mesh.
- An OS for every single kind of Bluetooth SoC on the market. Due to the tight coupling with Nordic's nRF SDK, Pyrinas only works with Nordic's SoCs.
- A turnkey solution for IoT. Pyrinas is early on it it's development process. The aim is for it to become a viable option for anyone to develop and publish IoT applications the way they want to. There's no vendor lock in. There's no surprises.
Things you'll need
There are a few things you'll need in order to get going with Pyrinas.
- At least 2 Particle Xenons
- At least 1 nRF Development board or J-link programmer
- Associated USB cables
Getting started with an example
Getting started with Pyrinas involves two repositories.
The OS directory has all the source, SDK dependencies and toolchain you need to use Pyrinas.
The template is where you add all your application code. The template provides a starting point for you and your project.
Here's how everything goes together:
Clone the OS directory to some place on your machine:
git clone https://github.com/pyrinas-iot/pyrinas-os.git --recurse-submodules
Once complete, change directories to pyrinas-os and run make setup
cd pyrinas-os
make setup
This will download your toolchain and SDK dependencies.
In order to use OTA DFU, you will need to also generate the DFU key for the process:
make gen_key
The files generated by this process will be used later.
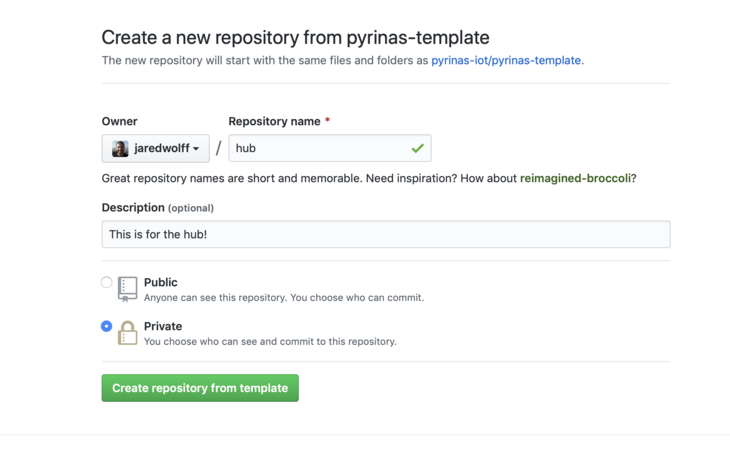
Next, we'll want to use the template to make two new projects. In this example we'll have one "hub" and one "sensor." Simply navigate to the template repository and click the Use this template button.
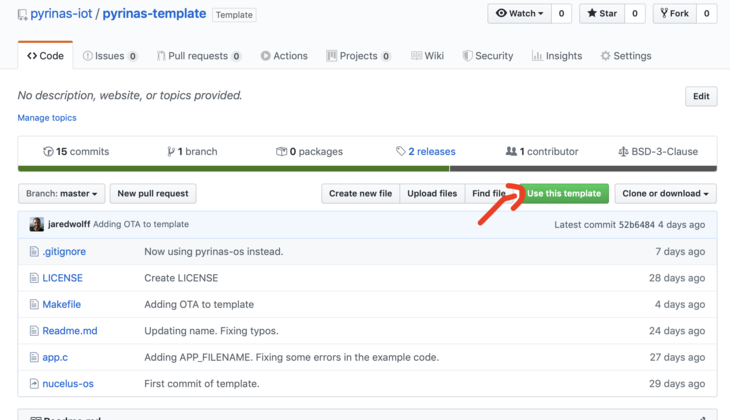
Then name your new repository. Click the Create repository from template button when you're happy with everything.
Then clone your repository to the same directory as pyrinas-os. Make sure you replace <your username> and <repo name> with your own.
cd ..
git clone https://github.com/<your username>/<repo name>.git hub
After this is done, go back and create a new repository from the template. We'll be using this one for the sensor node.
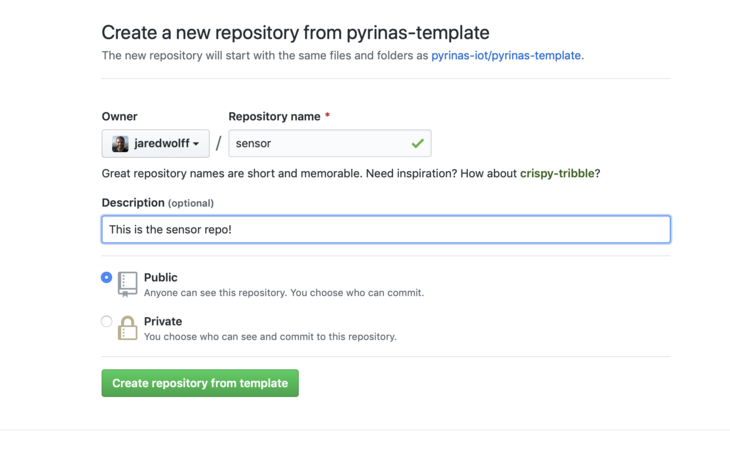
Clone this repository once you're done setting it up in the same place as your hub and pyrinas-os repositories.
Now that we have all our repositories, let's start with our sensor node.
Setting up the sensor node repository
Open up the sensor repository using a program like Microsoft's VS Code. If you have the command line shortcuts you can use code to open it from the terminal:
code sensor
Before we do anything we'll need to set up the symbolic link to pyrinas-os. Make sure you're in the sensor directory and then run ln -s ../pyrinas-os/ using the terminal.
cd sensor
ln -s ../pyrinas-os/ .
This allows your project to use all the code, SDK and toolchains within the pyrinas-os repository! As an added bonus you can do this as many times as you want. Have multiple Pyrinas projects? No problem.
Alright! Now, let's check out the Makefile. You'll want to customize some of the definitions within the file:
# Start: Your configuration!

# Set this to the directory of pyrinas-os
# If you used a symbolic link this points to
# the `pyrinas-os` folder in this repository
OS_DIR := pyrinas-os

# This should be the serial number of your Jlink programmer.
# To find simply run `jlinkexe`
PROG_SERIAL=1234678

# This is your debugger port for Jlink's RTT. If you
# have mulitple, you will have to change this on each app
# your're using
PROG_PORT=19021

# This is where you set your board type. Here are the supported boards:
# xenon - Particle Xenon
BOARD=xenon

# This is where you can name your app something. Make it specific
APP_FILENAME=pyrinas-template

# This determines whether or not you're using debug mode
# Comment this out or change to false
DEBUG=true

# End: Your Configuration
For example, you may want to setup your programmer serial. This allows you to use multiple programmers at the same time. (Very helpful in debugging both devices at the same time) To get your programmer's serial plug in your development board and run jlinkexe.
jlinkexe SEGGER J-Link Commander V6.62a (Compiled Jan 31 2020 12:59:22) DLL version V6.62a, compiled Jan 31 2020 12:59:05
Connecting to J-Link via USB...O.K. Firmware: J-Link OB-SAM3U128-V2-NordicSemi compiled Jan 21 2020 17:30:48 Hardware version: V1.00 S/N: 581758669 License(s): RDI, FlashBP, FlashDL, JFlash, GDB VTref=3.300V
Type "connect" to establish a target connection, '?' for help J-Link>
Find the S/N area. This is your serial number!
Alternatively you can look at the sticker on your development kit. It will contain the serial number for your device.
For the PROG_PORT you want to use different ports for each device you're simultaneously debugging. I've found 19021 and 19020 are perfectly good options for most two-device debugging sessions.
The Makefile also includes the ability to choose a board. In our case there's only one option: xenon. Future revisions of Pyrinas will have multiple options.
APP_FILENAME is the name of your app. We'll rename ours to pyrinas-sensor
Finally, DEBUG is used to halt execution either on an error or restart. For production this should be commented out or set to false. We can leave it as is for now.
The Makefile is also the source for some of the most important commands you'll need during development:
make build- builds your app.make clean- cleans all remnants of your app.make debug- opens up thejlinkexedebugger console.make erase- erases the chip attached to your programmer.make flash- flashes the current app to your connected device.make flash_softdevice- flashes the soft_devicemake rtt- opens up the debug console.make ota- generates a zip file used for BLE DFU
Basic sensor node code

Now that we have some of the basics out of the way, let's create a very simple application that publishes on a set interval. If you look at app.c, you'll see some code in the setup() function. Let's delete all the commented out code. (We'll use it later for the hub though)
Your code should now look something like:
#include "app.h"

void setup()
{
  BLE_STACK_PERIPH_DEF(init);

  // Configuration for ble stack
  ble_stack_init(&init);

  // Start advertising
  advertising_start();
}

void loop()
{
}
Now let's create a timer that we'll use to publish on a set interval. Under #include "app.h" create a new timer:
#include "app.h"

timer_define(m_sensor_timer);
We also need to set it up in the setup() function:
// Sensor timer
timer_create(&m_sensor_timer, TIMER_REPEATED, sensor_timer_evt);
You'll notice that timer_create is referring to a event callback called sensor_timer_evt. We'll need to create that guy as well:
static void sensor_timer_evt() {
    // We'll come back in a sec
}
The last thing is to start the timer. Let's do that underneath timer_create:
// Start
timer_start(&m_sensor_timer, 1000);
This will start our repeating timer on a 1 second interval. (timer_start is configured using milliseconds)
Now, inside sensor_timer_evt we'll publish some data. First though we need to make sure that Bluetooth is connected using ble_is_connected.
static void sensor_timer_evt
{
  // Check if we're connected
  if (ble_is_connected())
  {
    // Sends "ping" with the event name of "data"
    ble_publish("data", "ping");
  }
}
Inside the if statement, we'll use ble_publish. The first argument is the name of the event and the second is the value.
Next, in order to receive messages from the other end we'll need to setup a callback:
// Configuration for ble stack
ble_stack_init(&init);

// Setup BLE callback
ble_subscribe("data", ble_evt);
We'll define ble_evt at the top of the file:
static void ble_evt(char *name, char *data)
{
  NRF_LOG_INFO("%s: %s", name, data);
}
In this case we'll use NRF_LOG_INFO to print out the message from the hub.
Finally, in order to get the MAC address easily, we'll have to add a call to print it out in setup().
// Print the address
util_print_device_address();
In the end your file should look something like this:
#include "app.h"

timer_define(m_sensor_timer);

// Catch events sent over Bluetooth
static void ble_evt(char *name, char *data)
{
  NRF_LOG_INFO("%s: %s", name, data);
}

static void sensor_timer_evt()
{
  // Check if we're connected
  if (ble_is_connected())
  {
    // Sends "ping" with the event name of "data"
    ble_publish("data", "ping");
  }
}

void setup()
{
  BLE_STACK_PERIPH_DEF(init);

  // Configuration for ble stack
  ble_stack_init(&init);

  // Setup BLE callback
  ble_subscribe("data", ble_evt);

  // Start advertising
  advertising_start();

  // Sensor sensor timer.
  timer_create(&m_sensor_timer, TIMER_REPEATED, sensor_timer_evt);

  // Start
  timer_start(&m_sensor_timer, 1000);

  // Print the address
  util_print_device_address();
}

void loop()
{
}
Next, we'll program it to some hardware!
Flashing the basic sensor code:
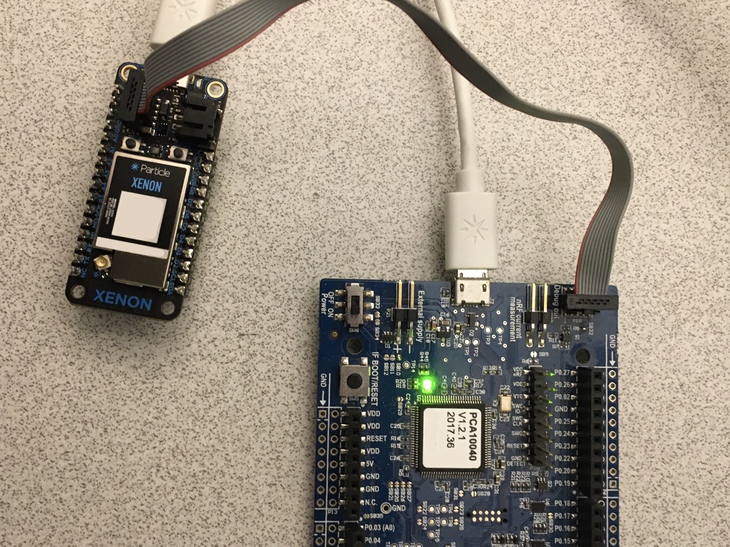
For this step you'll need to have a Xenon handy. You'll also need a programmer, programming cable and two Micro-B USB cables. Here's a picture of everything connected:
Once connected and powered run these commands:
make erase
make flash_softdevice
make flash
make debug
Then in a separate terminal window run
make rtt
make debug and make rtt will create a debugging session. You can issue commands in the make debug terminal to control the device as well. For instance, r followed by Enter will restart the device. (By far my most common use case).
If you've flashed everything successfully, your device should start blinking green. That's a good sign!
Additionally, if you take a look at the make rtt side your output should be similar to this:
###RTT Client: Connecting to J-Link RTT Server via localhost:19021 ...
###RTT Client: Connected.
SEGGER J-Link V6.62a - Real time terminal output J-Link OB-SAM3U128-V2-NordicSemi compiled Jan 21 2020 17:30:48 V1.0, SN=581758669 Process: JLinkExe app_timer: RTC: initialized. app: Boot count: 4 app: Pyrinas started. app: Address: 11:22:33:44:55:66
Take note of the address displayed above. We'll need that for the hub code!
Setting up the hub repository

If you haven't already, clone your hub repository locally. We'll want to do some of the same steps as we did with the sensor repo like:
- Setting up the symbolic link
- Updating the Makefile
- Setting your
PROG_SERIAL - Setting
PROG_PORTto a port not used by the sensor setup.19020in this case is fine. - Setting
APP_FILENAMEtopyrinas-hub
- Setting your
If you need a reminder how any of these steps work, go back and review the earlier section.
Next, we'll want to open app.c and uncomment the central/hub based code. Plus you'll want to remove the default un-commented code. Your setup() should look something like this:
void setup()
{
  // Default config for central mode
  BLE_STACK_CENTRAL_DEF(init);

  // Add an addresses to scan for
  ble_gap_addr_t first = {
      .addr_type = BLE_GAP_ADDR_TYPE_RANDOM_STATIC,
      .addr = {0x81, 0x64, 0x4C, 0xAD, 0x7D, 0xC0}};
  init.config.devices[0] = first;

  ble_gap_addr_t second = {
      .addr_type = BLE_GAP_ADDR_TYPE_RANDOM_STATIC,
      .addr = {0x7c, 0x84, 0x9d, 0x32, 0x8d, 0xe4}};
  init.config.devices[1] = second;

  // Increment the device_count
  init.config.device_count = 2;

  // Configuration for ble stack
  ble_stack_init(&init);

  // Start scanning.
  scan_start();
}
You'll notice immediately that there are two clients/devices defined here. Let's remove the second one. Should you, in the future, want to connect more devices this is an example of how to do it.
Reminder: also make sure that you change the init.config.device_count to 1.
Then, you'll want to update the .addr field in ble_gap_addr_t first to match the address we got earlier from make rtt:
// Add an addresses to scan for
ble_gap_addr_t first = {
    .addr_type = BLE_GAP_ADDR_TYPE_RANDOM_STATIC,
    .addr = {0x11,0x22,0x33,0x44,0x55,0x66}};
init.config.devices[0] = first;
The address field uses raw bytes, so it has to be represented that way. Remove the : and place 0x in front of each byte. We end up going from 11:22:33:44:55:66 to {0x11,0x22,0x33,0x44,0x55,0x66}
Now before we flash anything, let's also set up the Bluetooth event handler. As with earlier we'll use ble_subscribe to attach an event handler:
// Setup BLE callback
ble_subscribe("data", ble_evt);

Then place the function at the top of the file:

// Catch events sent over Bluetooth
static void ble_evt(char *name, char *data)
{
  NRF_LOG_INFO("%s: %s", name, data);

  ble_publish("data", "pong");
}
You'll notice we're printing out the message using NRF_LOG_INFO. We're also sending a message back to the sensor in the form of ble_publish("data","pong"); In other-words we're playing a game of ping-pong between the two devices!
In the end your code should look something like this:
#include "app.h"

// Catch events sent over Bluetooth
static void ble_evt(char *name, char *data)
{
  NRF_LOG_INFO("%s: %s", name, data);

  ble_publish("data", "pong");
}

void setup()
{
  // Default config for central mode
  BLE_STACK_CENTRAL_DEF(init);

  // Add an addresses to scan for
  ble_gap_addr_t first = {
      .addr_type = BLE_GAP_ADDR_TYPE_RANDOM_STATIC,
      .addr = {0x11, 0x22, 0x33, 0x44, 0x55, 0x66}};
  init.config.devices[0] = first;

  // Increment the device_count
  init.config.device_count = 1;

  // Configuration for ble stack
  ble_stack_init(&init);

  // Setup BLE callback
  ble_subscribe("data", ble_evt);

  // Start scanning.
  scan_start();
}

void loop()
{
}
Reminder: make sure you set ble_gap_addr_t first or the two devices will not connect!
To program, connect the Xenon to program as you did before. We'll flash it using the same methods as before:
make erase
make flash_softdevice
make flash
make debug
Then in a separate terminal window run
make rtt
Then take a look at each of the make rtt screens. There should be some output! For the hub it should look something like this:
Process: JLinkExe app: Boot count: 4 app: Pyrinas started. ble_m_central: Connected to handle 0x0 ble_m_central: Protobuf Service discovered app: data: ping app: data: ping
And the sensor side like this:
Process: JLinkExe app_timer: RTC: initialized. app: Boot count: 4 app: Pyrinas started. app: Address: 11:22:33:44:55:66 ble_m_periph: Notifications enabled! app: data: pong app: data: pong
The ping and pong messages should continue until you stop them. Awesome! If you get any warnings like this one:
Unable to write. Notifications not enabled!
Use the reset button on either of the devices. This should fix the problem.
Side note: the pairing process for Bluetooth is inherently insecure. Once the pairing process is complete though, the devices are secure. (With the caveat that no one was sniffing the pairing process!) There may be improvements on security in the future.
Congrats! ?If you've made it this far, you've deployed your first Pyrinas hub and sensor client!
For more information about what Pyrinas can do you should check out the header files under pyrinas-os/include/. Also, Pyrinas can do anything that you'd normally be able to do with Nordic's SDK. Nordic's Infocenter is a great resource for learning more about what the SDK has to offer.
What does the future hold for Pyrinas?

All future tasks for Pyrinas are shared openly on the Github Repo. Here are some of the high level improvements on the roadmap:
- Particle Boron + LTE support - That's right! Cellular will be coming to Pyrinas. As of this writing, the first board to support Pyrinas LTE will be Particle's Boron.
- MQTT (over TLS) and HTTPS support - Once we have cellular, we need something to communicate with. That's where MQTT and HTTPS come in. They're some of the most popular protocols for IoT today.
- Built in remote OTA support - As it stands today, devices programmed with Pyrinas uses Nordic's Secure Bootloader. That means they can be updated over the air by a computer or cellphone nearby. This isn't sustainable for long term deployments though! Instead, you will be able to push updates to Pyrinas devices over the Cloud. Yup. No reason to get off your couch, you can deploy your updates from anywhere.
- Dynamic configuration and management - adding and removing devices from a Pyrinas system currently takes some effort. In future revisions, it will be easier to add and remove devices on the fly. This allows for remote device management with zero headaches.
- Support for pre-certified modules and other development boards based on Nordic's nRF52840. Currently the Xenon is the only supported board. Development boards aren't great for full production though. Stay tuned for support for pre-certified modules from vendors like Fanstel and more..
- Support for more development environments. Currently Pyrinas supports Mac only.
Star and Watch!
This is only the tip of the iceberg! Stay tuned for more updates and make you you star and watch the repository.
Or, better yet, looking to help out? Contributions are welcome!
You can read other articles on my blog, jaredwolff.com