
When you're developing programs, certain services can block or slow down the speed of your application. For example, CPU-intensive tasks like audio transcribing or file processing.
So you might wonder – how do you make sure your application runs without breaking? To handle this, you can send tasks to a queue outside your application's flow.
What is a Message Queue?
A message queue is a tool that facilitates the communication and transfer of data between services within a single application (or externally). It stores these data or messages using the First-In-First-Out (FIFO) principle. This means that older data that's passed into these queues gets processed before newer data.
Different components make up a message queue, such as:
- Messages: These are the data that are sent to the queue. They are often referred to as jobs.
- Queues: These are the data structures used for storing messages.
- Producers: These are a service that sends messages or data into the queue system.
- Consumers: These are a service that listens to the queue and executes messages passed in it.
Message Queuing Tools
Now, there are various message queuing tools you can use in asynchronous systems, like the following:
- RabbitMQ: a reliable and flexible option for implementing message queues in applications.
- Apache Kafka: an efficient message queuing tool, also very good at event stream processing.
- Redis: an in-memory store used for message queuing, caching, and data processing.
Note that some of these tools are not limited to message queuing but can be used for other purposes as well, like stream processing.
In this article, you will create a simple Nest.js project which will use RabbitMQ as the Message Queue Service Provider.
The tutorial will be divided into 3 parts:
- How to Set Up a Nest.js Project for Basic User Registration Flow
- How to Set Up an Email Service for User Registration
- How to Integrate a Queue Service using RabbitMQ
Prerequisites
- You'll need to have Node installed on your system. If you don't have it, here is its official site: https://nodejs.org/en.
- You'll need to have Node Package Manager (NPM) installed, which you can download here if you don't have it: https://docs.npmjs.com/downloading-and-installing-node-js-and-npm.
- You'll need to have installed RabbitMQ. Here is where you can get it in case you haven't yet: https://www.rabbitmq.com/download.html
- You'll need to have a text editor. For this article, I'll use VSCode. You can download it here: https://code.visualstudio.com/download or use the code editor of your choice.
How to Set Up a Nest.js Project
Spinning up a Nest.js application is fast and simple if you use the Nest CLI. Open up your terminal and enter this command below to install the CLI:
$ npm install -g @nestjs/cli
This installs the Nest.js CLI globally on your system, meaning you can call the CLI commands regardless of the directory you are currently in.
Moving forward, to create a simple REST API project, you will enter the command below:
nest new simple-queue
Simple-queue here is the directory name that will be created. Inputting this command gives you a prompt to select a package manager.
When that's done, navigate to the created directory and open it in your text editor by entering this command:
cd simple-queue && code .
This opens up your text editor. We want to work on a project that will best show how a message queue can be used in a real-world scenario – so let's set up a basic user registration form. On successful data entry it sends an email to the user, but you'll handle the email service separately by passing it into a queue to improve performance.
For this, we'll be using an SQLite database, TypeOrm, class-validators, and the dotenv package so you can secure your config variables. Go ahead to install them by typing this command in your terminal:
npm install --save @nestjs/typeorm typeorm sqlite3 class-validator dotenv
When the installation is complete, go to your root app module, and then include the TypeOrm configuration for your database.
SQLite is a lightweight SQL database which allows us to quickly spin up and test data. It's optimal for this use case – and now we'll configure it.
Configuring the SQLite Database
import { Module } from "@nestjs/common";
import { TypeOrmModule } from "@nestjs/typeorm";
import { AppController } from "./app.controller";
import { AppService } from "./app.service";

@Module({
  imports: [
    TypeOrmModule.forRoot({
      type:'sqlite',
      database: 'mini-db.sqlite',
      entities: [__dirname + '/**/*.entity{.ts,.js}'],
      synchronize: true,
  })],
  controllers: [AppController],
  providers: [AppService],
})
export class AppModule {}
Congrats! You have successfully connected a DB to your project. Now it's time to create the services that will handle the user registration.
In order to do this, you will have to go back to your dear friend the Nest CLI. There, you'll be inputting a different command to help generate a resource folder for the User, which will contain the entity, service, dto, and the controller.
To do this, open your terminal and enter in this command:
nest generate resource users
A prompt to select your transport layer will be shown. Select the first one which is the REST API. Then, another prompt will ask if you would like to generate CRUD endpoints – you can type Yes. Then you can make modifications according to your requirements.
To proceed, you first have to define what information each user should have. First, create a User entity. You can do this by navigating to the user entity file in the created entity subfolder in the user folder. Then define the user data like this:
import { Entity, PrimaryGeneratedColumn, Column } from "typeorm";

@Entity('users')
export class User {
  @PrimaryGeneratedColumn('uuid')
  id: string;

  @Column({ length: 100, unique: true })
  username: string;

  @Column({ length: 100, unique: true })
  email: string;
}
For this mini-project, you'll use basic user data to make the process faster. The username and email field have been set to be unique, meaning that there won't be a duplicate of the data instance passed in for this user table.
Now having done this, modify the create user dto file that was generated like this:
import { IsNotEmpty, IsString, IsEmail } from "class-validator";

export class CreateUserDto {
    @IsNotEmpty()
    @IsString()
    username: string;

    @IsNotEmpty()
    @IsString()
    @IsEmail()
    email: string;
  }
This was created to validate the payload that will be sent in your request by using the class-validator package.
Now, modify the create method in the user service file.
import { Injectable } from "@nestjs/common";
import { InjectRepository } from "@nestjs/typeorm";
import { Repository } from "typeorm";
import { CreateUserDto } from "./dto/create-user.dto";
import { User } from "./entities/user.entity";

@Injectable()
export class UsersService {
  constructor(
    @InjectRepository(User)
    private readonly userRepository: Repository<User>
  ) {}
  async create(createUserDto: CreateUserDto): Promise<User> {
    const newUser = this.userRepository.create(createUserDto);
    return await this.userRepository.save(newUser);
  }
}
Next you'll modify the controller file. You've already defined the create endpoint, so you'll just have to clean up the other endpoints that are not needed.
import { Controller, Post, Body } from "@nestjs/common";
import { CreateUserDto } from "./dto/create-user.dto";
import { UsersService } from "./users.service";

@Controller('users')
export class UsersController {
 constructor(private readonly usersService: UsersService) {}
  @Post()
  create(@Body() createUserDto: CreateUserDto) {
    return this.usersService.create(createUserDto);
  }
}
Open up the user module file and make some adjustments by adding the import field to the Module decorator and using the TypeOrmModule property.
import { Module } from '@nestjs/common';
import { UsersService } from './users.service';
import { UsersController } from './users.controller';
import { TypeOrmModule } from '@nestjs/typeorm';
import { User } from './entities/user.entity';

@Module({
  imports: [TypeOrmModule.forFeature([User])],
  controllers: [UsersController],
  providers: [UsersService],
})
export class UsersModule {}
Next, start up your server by entering this command on your terminal: npm run start:dev. Once the server is up and running, open up your API client of choice. For this article, we'll use Postman. Then make a POST request to the endpoint, which will be localhost:3000/users, providing the payload data required.
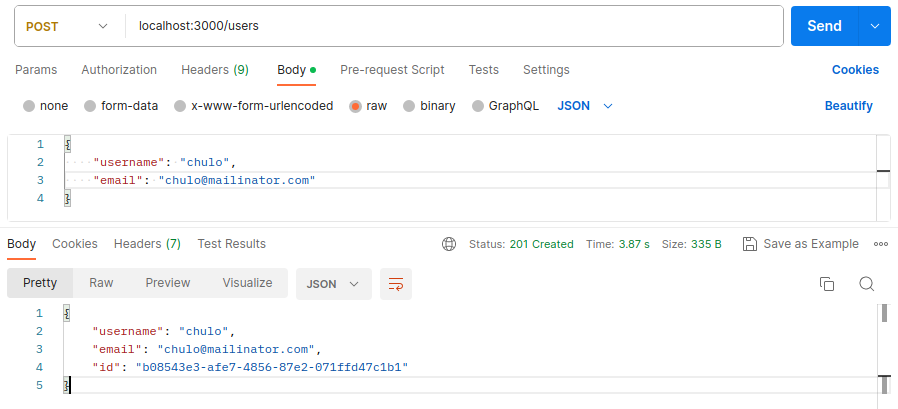 A request was made and a user instance was created.
Next up is adding an email service to your project which will help notify new users who are registering.
How to Set Up an Email Service for User Registration
For this, you'll use some packages which are required to create an email service. Open up your terminal and input the command below to install these packages:
npm install --save @nestjs-modules/mailer nodemailer
When these packages are installed, you can now implement the mail service. Using the Nest CLI, create a mailer module and service by entering this command in your terminal:
nest generate module email && nest generate service email
When it's done, open up the newly created module file in the mail folder. You'll use the MailerModule property of the @nestjs-modules/mailer package to configure your mail service here. It requires an SMTP client whose keys you'll need to configure this MailerModule.
For that you can use https://app.elasticemail.com to get these SMTP keys. Sign up and connect to the SMTP API. You'll then be given keys for your private use.
Note that this free mode of the SMTP client has limitations and it cannot send to all emails – so you should use a test email service.
How to Configure the Mailer Module
Once you have gotten that set up, go back to your application and create a .env file. Set your secrets for the SMTP keys. Then configure your MailerModule like this:
import { Global, Module } from "@nestjs/common";
import { EmailService } from "./email.service";
import { MailerModule } from "@nestjs-modules/mailer";

require('dotenv').config();
@Global()
@Module({
  imports: [
    MailerModule.forRoot({
      transport: {
        service: 'QueueTest',
        host: process.env.SMTP_HOST,
        port: process.env.SMTP_PORT,
        auth: {
          user: process.env.SMTP_USER,
          pass: process.env.SMTP_PASSWORD,
        },
      },
      defaults: {
        from: process.env.FROM_EMAIL,
      },
    }),
  ],
  providers: [EmailService]
})
export class EmailModule {}
The global decorator was set in order to make sure the MailModule can be called anywhere in your application. Make sure your secrets are properly loaded and thaqt you have a valid Email set in the from: process.env.FROM_EMAIL.
Check to make sure that the EmailModule is also imported in the root App Module the same way your UsersModule was imported in the Imports Array of the App Module.
Next, open your email service file – you'll need to make some modifications to the EmailService class. Add a constructor and call the MailService property from the @nestjs-modules/mailer package. Then go ahead and create a function that will handle sending the emails.
Below is a class and method that does this:
import { MailerService } from '@nestjs-modules/mailer';
import { HttpException, HttpStatus, Injectable } from '@nestjs/common';

@Injectable()
export class EmailService {
  constructor(private mailerService: MailerService) {}
  async sendEmail(options: { email: string; subject: string; html: string;
  }) {
    try {
      const message = {
        to: options.email,
        subject: options.subject,
        html: options.html
      };
      const emailSend = await this.mailerService.sendMail({
        ...message,
      });
      return emailSend;
    } catch (error) {
      throw new HttpException('Error', HttpStatus.INTERNAL_SERVER_ERROR);
    }
  }
}
Now you've defined the method to send an email. You've also put an exception handler in place for better error handling.
Now it's time to add this newly created service to your user registration flow.
Navigate to your user service file, and add the mail service to your constructor as a provider. Then call the service in your create user method like this:
@Injectable()
export class UsersService {
  constructor(
    @InjectRepository(User)
    private readonly userRepository: Repository<User>,
    private emailService: EmailService
  ) {}
  async create(createUserDto: CreateUserDto): Promise<User> {
    const newUser = this.userRepository.create(createUserDto);
    const user =  await this.userRepository.save(newUser);
      const emailData = {
        email: user.email,
        subject: 'Welcome to Our Community',
        html: `<p>Hello ${user.username},</p>
        <p>Welcome to our community! Your account is now active.</p>
        <p>Enjoy your time with us!</p>`,
      };
      await this.emailService.sendEmail(emailData)
    return user
  }
}
Make sure to modify your modules in order to correct any dependency injection errors. In your email module file, add the EmailService to the exports array:
 providers: [EmailService],
 exports: [EmailService]
Add it below your providers to export the Email Service so it can be accessed in other modules. Then import the EmailModule to your User module file and add it to your import array like this:
@Module({
  imports: [TypeOrmModule.forFeature([User]), EmailModule],
  controllers: [UsersController],
  providers: [UsersService],
})
export class UsersModule {}
Now it's time to test it. Get a free account from any online email testing platform and open Postman. Make a request to the create user endpoint with your valid email. You should get an email response like this:
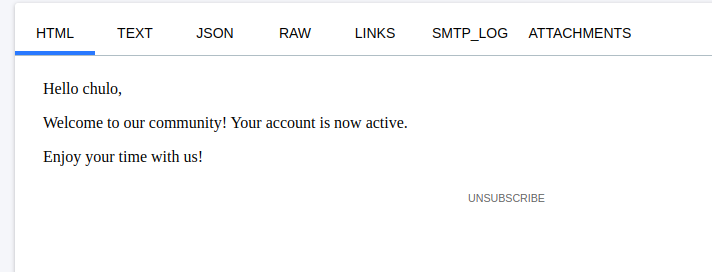 Email response you should get
How to Integrate a Queue Service using RabbitMQ
To get started with this, you'll have to install some packages that let you implement queues using RabbitMQ. Enter the command below to install these packages:
npm install --save amqplib @types/amqplib amqp-connection-manager
Configure the Producer Service
Once installation is complete, it's time to configure RabbitMQ. You'll create a new folder in your src directory and name it queues. Then create the queue producer file. Import these packages and set them up like this:
import { HttpException, HttpStatus, Injectable, Logger } from '@nestjs/common';
import amqp, { ChannelWrapper } from 'amqp-connection-manager';
import { Channel } from 'amqplib';

@Injectable()
export class ProducerService {
  private channelWrapper: ChannelWrapper;
  constructor() {
    const connection = amqp.connect(['amqp://localhost']);
    this.channelWrapper = connection.createChannel({
      setup: (channel: Channel) => {
        return channel.assertQueue('emailQueue', { durable: true });
      },
    });
  }

  async addToEmailQueue(mail: any) {
    try {
      await this.channelWrapper.sendToQueue(
        'emailQueue',
        Buffer.from(JSON.stringify(mail)),
        {
          persistent: true,
        },
      );
      Logger.log('Sent To Queue');
    } catch (error) {
      throw new HttpException(
        'Error adding mail to queue',
        HttpStatus.INTERNAL_SERVER_ERROR,
      );
    }
  }
}
The AMQP connection was set and is running on localhost with the default RabittMQ port which is 5432. You also established a channel on that connection with an option input which is executed anytime a new channel is created. This helps if you have any configuration for that channel.
You also created an emailQueue with the assertQueue property which checks that a queue with that name does not already exist. If it does exist, it has no effect so it's idempotent.
Then you created an option durable: true to make sure that the queue will survive a server restart.
Next, you defined the method to add the email data to a queue. This calls the sendToQueue property of the channelWrapper, passing in the queue name you want to send the data to. Ideally, it should be the same name as the one you defined with the assertQueue property.
The second argument is the mail data, but firstly you converted it to a JSON string then to a Buffer. You do this because messages in RabbitMQ are mostly transmitted as binary data.
You can then set an option persistent: true to ensure that the data being sent to the queue won't be lost if the server crashes. Then with some error handling and the method to send messages to the queue, it's good to go.
Set Up the Consumer Service
Now that you've configured the producer service, it's time to set up the consumer service.
Create another file in the queue sub-folder. It's quite similar, but in this case, you will be consuming the data from the queue. Below is the configuration for the consumer service:
import { Injectable, OnModuleInit, Logger } from '@nestjs/common';
import amqp, { ChannelWrapper } from 'amqp-connection-manager';
import { ConfirmChannel } from 'amqplib';
import { EmailService } from 'src/email/email.service';

@Injectable()
export class ConsumerService implements OnModuleInit {
  private channelWrapper: ChannelWrapper;
  private readonly logger = new Logger(ConsumerService.name);
  constructor(private emailService: EmailService) {
    const connection = amqp.connect(['amqp://localhost']);
    this.channelWrapper = connection.createChannel();
  }

  public async onModuleInit() {
    try {
      await this.channelWrapper.addSetup(async (channel: ConfirmChannel) => {
        await channel.assertQueue('emailQueue', { durable: true });
        await channel.consume('emailQueue', async (message) => {
          if (message) {
            const content = JSON.parse(message.content.toString());
            this.logger.log('Received message:', content);
            await this.emailService.sendEmail(content);
            channel.ack(message);
          }
        });
      });
      this.logger.log('Consumer service started and listening for messages.');
    } catch (err) {
      this.logger.error('Error starting the consumer:', err);
    }
  }
}
First, you defined your consumer class. For this, it implements the onModuleInit interface which is provided by @nestJs/common. This specifies that the defined class should have a method named onModuleInit().
Like the name says, the method will be called automatically during the module initialization which is when the module containing this class is loaded.
In the class constructor, you added the emailService because you'll be using the sendEmail method of that class.
In the onModuleInit() method, you defined a channel. This is necessary because you need a channel to consume messages from a queue.
From this, the channel is then used to assert a queue which should be similar in name and options to what you have on your producer service. If it's not, you won't be able to listen to the queue created on the producer service.
Then you used the consume method of channel to listen and execute the message coming from the queue you have registered.
Recall that before, you had to convert the message to Buffer in order to send it into a queue. Now, you have to convert it to a JavaScript object. Then call the emailService method to send an email and pass in the converted JavaScript object as the argument of that method.
Finally, you called the ack method which is used to inform the queue that the message has been received and processed successfully in order for it to be removed from the queue.
Now that you've defined these services, create a module file and set them in the providers array. Then export the producer service because you will be calling it in another module.
import { Module } from '@nestjs/common';
import { ConsumerService } from './consumer.file';
import { ProducerService } from './producer.file';

@Module({
  providers: [ProducerService, ConsumerService],
  exports: [ProducerService],
})
export class QueueModule {}
Next up is to add the emails being sent on user registration to the queue service that you just created.
Navigate back to your user service file and make some modifications: replace the email service with the producer service as a provider in the constructor, and then call the service and the method to add to the email queue as shown below:
import { Injectable } from "@nestjs/common";
import { InjectRepository } from "@nestjs/typeorm";
import { Repository } from "typeorm";
import { CreateUserDto } from "./dto/create-user.dto";
import { User } from "./entities/user.entity";
import { ProducerService } from "src/queues/producer.file";

@Injectable()
export class UsersService {
  constructor(
    @InjectRepository(User)
    private readonly userRepository: Repository<User>,
    private producerService: ProducerService,
  ) {}
  async create(createUserDto: CreateUserDto): Promise<User> {
    const newUser = this.userRepository.create(createUserDto);
    const user = await this.userRepository.save(newUser);
    const emailData = {
      email: user.email,
      subject: 'Welcome to Our Community',
      html: `<p>Hello ${user.username},</p>
        <p>Welcome to our community! Your account is now active.</p>
        <p>Enjoy your time with us!</p>`,
    };
    await this.producerService.addToEmailQueue(emailData);
    return user;
  }
}
Also in the user module file, replace the EmailModule with that of the QueueModule to avoid dependency injection errors when you start up your server.
import { Module } from '@nestjs/common';
import { UsersService } from './users.service';
import { UsersController } from './users.controller';
import { TypeOrmModule } from '@nestjs/typeorm';
import { User } from './entities/user.entity';
import { QueueModule } from 'src/queues/queue.module';

@Module({
  imports: [TypeOrmModule.forFeature([User]), QueueModule],
  controllers: [UsersController],
  providers: [UsersService],
})
export class UsersModule {}
Now finally, it's time to test the user registration flow again. So navigate back to Postman and then type in a valid email and username and hit enter. On the terminal of your server running, you will see logs that were set in order to track the way the message got sent and how it was received and executed.
 Logs that help you track the message
You can also open up the RabbitMQ dashboard to view queue activity on http://localhost:15672, By default the user is "guest", so enter in guest for the username and password.
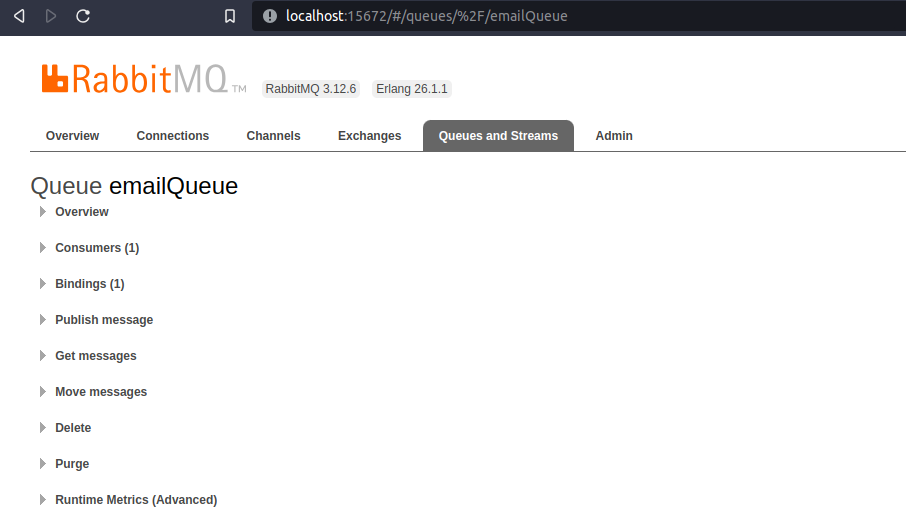 RabbitMQ Queues and Streams
Here's the link to the GitHub repository. Feel free to check it out whenever you're stuck.
Conclusion
In this article you learned what a message queue is along with some major components of how they work. You also built a mini Nest.js project and implemented an email service in it. Finally, you integrated the queue service into your project, showing how it works in a real-life scenario.
Understanding message queue behaviors and patterns is an essential skill when developing scalable applications. This helps reduce lag and improves the speed and efficiency of your applications.
I hope you enjoyed reading this article. You can follow me on Twitter.