
Hi everyone! In this article we're going to take a look at modules in JavaScript.
Modules are a technique heavily used in today's software design/architecture.
First we're going to learn what they are and the different types of modules that exist. Then we're going to discuss why modules are useful. Then we're going to see examples and basic syntax for the most used module types, and finally we're going to discuss bundling, why is it necessary, and how to do it.
Enough cháchara, let's go! =D
Table of Contents
What are modules and why are they useful
A module is just a piece of code in a file that you can call and use from other files. A modular design is the opposite of having all your project's code in one single file.
When developing a big project, it's very useful to divide our code into modules for the following reasons:
It's good for dividing concerns and features into different files, which helps visualization and organization of code.
Code tends to be easier to maintain and less prone to errors and bugs when it's clearly organized.
Modules can be easily used and reused in different files and parts of our project, without needing to rewrite the same code again.
Instead of having all of our program's components in a single file, we can divide it into parts or modules, and make each of them responsible for a single feature/concern.
If this concept isn't clear enough now, don't worry. We'll see some examples in a sec.
Types of modules
As with almost everything in life, and especially in JavaScript, there are many ways for us to implement modules.
As JavaScript was first created to be just a small scripting language for websites, a feature for big projects like modules wasn't supported at the beginning.
But as the language and the ecosystem grew, developers started to see the need for this feature. And so different options and libraries were developed to add this feature to JavaScript.
Of the many available, we're only going to take a look at CommonJS and ESmodules, which are the most recent and widely used ones.
Side comment: Did you know that Javascript was originally created in just 10 days of work?
When analyzing the complexities of JavaScript and understanding how the language has evolved, I think it's important to have in mind that the language wasn't originally created to do what it does nowadays. It's the growth of the Javascript ecosystem that pushed for many of the changes that have come about.
CommonJS modules
CommonJS is a set of standards used to implement modules on JavaScript. The project was started by Mozilla engineer Kevin Dangoor in 2009.
CommonJS is mainly used in server-side JS apps with Node, as browsers don't support the use of CommonJS.
As a side comment, Node used to only support CommonJS to implement modules, but nowadays it also supports ESmodules which is a more modern approach.
So let's see how CommonJS looks in actual code.
To implement modules, you need a Node app on your computer first. So create one by running npm init -y.
First let's create a main.js file with a simple function in it.
const testFunction = () => {
    console.log('Im the main function')
}

testFunction()
Ok now let's say we want to have another function called from our main file, but we don't want the function in it as it's not part of our core feature. For this, let's create a mod1.js file and add this code to it:
const mod1Function = () => console.log('Mod1 is alive!')
module.exports = mod1Function
module.exports is the keyword we use to declare all we want to export from that file.
To use this function in our main.js file, we can do it like this:
mod1Function = require('./mod1.js')

const testFunction = () => {
    console.log('Im the main function')
    mod1Function()
}

testFunction()
See that we declare whatever we want to use and then assign that to the require of the file we want to use. Piece of cake. ;)
If we wanted to export more than one thing from a single module, we can do it like this:
const mod1Function = () => console.log('Mod1 is alive!')
const mod1Function2 = () => console.log('Mod1 is rolling, baby!')

module.exports = { mod1Function, mod1Function2 }
And on the main.js file we can use both functions like this:
({ mod1Function, mod1Function2 } = require('./mod1.js'))

const testFunction = () => {
    console.log('Im the main function')
    mod1Function()
    mod1Function2()
}

testFunction()
And that's pretty much it. Quite simple, right? It is simple but it's a powerful tool to use. =)
ESmodules
Now let's review ESmodules. ESmodules is a standard that was introduced with ES6 (2015). The idea was to standarize how JS modules work and implement this features in browsers (which didn't previously support modules).
ESmodules is a more modern approach that is currently supported by browser and server-side apps with Node.
Let's see this in code. Once again we start by creating a Node app with npm init -y.
Now we go to our package.json and add "type": "module" to it, like this:
{
  "name": "modulestestapp",
  "version": "1.0.0",
  "description": "",
  "main": "index.js",
  "scripts": {
    "test": "echo \"Error: no test specified\" && exit 1"
  },
  "keywords": [],
  "author": "",
  "license": "ISC",
  "type": "module"
}
If we don't do this and try to implement ESmodules on Node, we'll get an error like this:
(node:29568) Warning: To load an ES module, set "type": "module" in the package.json or use the .mjs extension.
...
SyntaxError: Cannot use import statement outside a module
Now let's repeat the exact same example. In our main.js file we'll have the following code:
// main.js
import { mod1Function } from './mod1.js'

const testFunction = () => {
    console.log('Im the main function')
    mod1Function()
}

testFunction()
And on mod1.js we'll have this:
// mod1.js
const mod1Function = () => console.log('Mod1 is alive!')
export { mod1Function }
Notice instead of require we're using import and instead of module.exports we're using export. The syntaxt is a bit different but the behaviour is very similar.
Again if we wanted to export more than one thing from the same file we could do it like this:
// main.js
import { mod1Function, mod1Function2 } from './mod1.js'

const testFunction = () => {
    console.log('Im the main function')
    mod1Function()
    mod1Function2()
}

testFunction()
// mod1.js
const mod1Function = () => console.log('Mod1 is alive!')
const mod1Function2 = () => console.log('Mod1 is rolling, baby!')

export { mod1Function, mod1Function2 }
Another feature available in ESmodules is import renaming, which can be done like this:
// main.js
import { mod1Function as funct1, mod1Function2 as funct2 } from './mod1.js'

const testFunction = () => {
    console.log('Im the main function')
    funct1()
    funct2()
}

testFunction()
Notice we use the as keyword after each function, and then rename it however we want. Later in our code, we can use that new name instead of the original name the import has. ;)
Another thing you could do is import all exports together and put them together in an object, like this:
// main.js
import * as mod1 from './mod1.js'

const testFunction = () => {
    console.log('Im the main function')
    mod1.mod1Function()
    mod1.mod1Function2()
}

testFunction()
This may be useful in cases when, throughout our code, we want to be explicit about where each import is coming from. See that functions are now being called like mod1.mod1Function().
The last thing worth mentioning is the default keyword. With it we can set a default export for a given module. Like this:
// mod1.js
const mod1Function = () => console.log('Mod1 is alive!')
const mod1Function2 = () => console.log('Mod1 is rolling, baby!')

export default mod1Function
export { mod1Function2 }
And what does it mean to have a default export? Well, it means we don't have to destructure it when we import it. We can use it just like this:
// main.js
import mod1Function, { mod1Function2 } from './mod1.js'

const testFunction = () => {
    console.log('Im the main function')
    mod1Function()
    mod1Function2()
}

testFunction()
We can even rename the import whatever we want without the as keyword, since JavaScript "knows" that if we're not destructuring we'll be referring to the default import.
// main.js
import lalala, { mod1Function2 } from './mod1.js'

const testFunction = () => {
    console.log('Im the main function')
    lalala()
    mod1Function2()
}

testFunction()
And that pretty much sums it up about ESmodules too. Straightforward I hope. =)
Using modules
Ok now that we're clear about the different types of modules available and how they work, let's see how we can implement modules in a website using HMTL and Vanilla JS.
Let's create a simple HTML file with a heading, two buttons, and a script tag linking to our main.js file.
<!-- index.html -->
<!DOCTYPE html>
<html lang="en">
<head>
    <meta charset="UTF-8">
    <meta http-equiv="X-UA-Compatible" content="IE=edge">
    <meta name="viewport" content="width=device-width, initial-scale=1.0">
    <title>Document</title>
</head>
<body>
    <h1>I'm just a test...</h1>
    <button id="isAlive">Is mod1 alive?</button>
    <button id="isRolling">Is mod1 rolling?</button>
    <script src="./main.js" type="module"></script>
</body>
</html>
Pay attention to the fact that I'm declaring type="module" on the script tag. We need to do this in order to use the JS module feature. If we don't, we'll get an error like this:
Uncaught SyntaxError: Cannot use import statement outside a module
If we open our HTML file we should get something like this:

Our main.js file will have this code:
// main.js
import { mod1Function, mod1Function2 } from './mod1.js'

const testFunction = () => console.log('Im the main function')

document.getElementById('isAlive').addEventListener('click', () => mod1Function())
document.getElementById('isRolling').addEventListener('click', () => mod1Function2())

testFunction()
We're just adding a click event listener to each button so the functions that come from the mod1.js file get executed.
Ok so now we can serve our HTML file and see if this works. We need to serve the file, we can't just open the HTML in the browser because we would get a CORS error like this:
Access to script at ... from origin 'null' has been blocked by CORS policy: Cross origin requests are only supported for protocol schemes: http, data, chrome, chrome-extension, brave, chrome-untrusted, https.
To serve it quickly you can use the Live server VS code extension, or create a Node app by running npm init -y and then running npx serve.
Anyway, once the file is served we can click on each button and test that our functions execute correctly. Our console should look like this:

But there's one more thing about this. If we go to the network tab of the browser's developer tools, and filter by JS files, we can see that the website is loading two files, main.js and mod1.js:
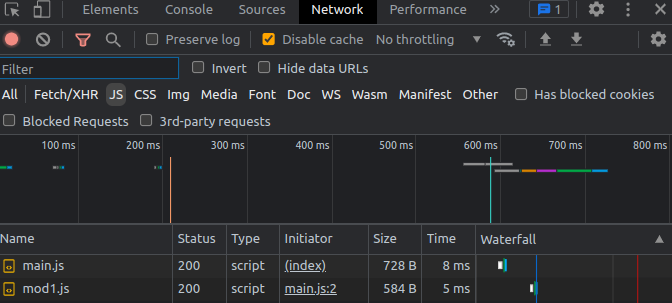
Of course if we're going to use the code inside each file, both need to be loaded – but this is not the best thing to do. That's because the browser needs to perform two different requests to load all the JS necessary.
We should always try to reduce the requests to the minimun to increase the performance of our projects. So let's see how we can do this with the help of a module bundler.
Side comment: if you'd like a video explanation, Kent C Dodds has a great one. I really recommend that you follow him, he's one of the best JS teachers out there. And here's another cool video by Fireship. ;)
Bundling modules
As previously mentioned, dividing our code into modules is nice because our codebase will be more organized and it will be easier to reuse our code.
But these are advantages only for the development phase of a project. When in production, modules are not the best thing, as forcing the browser to make a request for each JS file might hurt the site's performance.
This problem can be easily solved with the use of a module bundler. Simply put, module bundlers are programs that take JS modules as input and combine them into a single file (many module bundlers have many more features but that's their core concept).
Thanks to this, as developers we can code our project dividing it into nicely organized pieces, and then run a module bundler to obtain the final code that will be used in production.
This step of converting "development code" to "production code" is normally recognized as "build".
There're many options to use for this (like Browserify, Parcel, Rollup.js, Snowpack...) but the most widely used is Webpack. So let's see an example using Webpack.
Side comment 1: If you want to dig deeper into module bundlers and how they work, this awesome video by Fireship might be a good place to start.
Side comment 2: Webpack is a very robust and sophisticated tool that can do many things besides bundling JS files. Check out their docs if you want to learn more.
Great, so now we can start off by creating a Node app (if you haven't already) by running npm init -y. Then we'll need to install Webpack and the Webpack CLI by running npm i --save-dev webpack webpack-cli.
Next we'll create a webpack.config.js file and put this code inside it:
/* webpack.config.js */
const path = require('path');

module.exports = {
  entry: './main.js',
  output: {
    path: path.resolve(__dirname, 'dist'),
    filename: 'bundle.js',
  },
};
This file will be responsible for the configuration of Webpack and how it will work in our app.
What we're doing here first is setting the entry file (entry: './main.js'). Webpack will start by reading that file and then analyzing all the dependencies (modules imported from that file). In other words, the entry file is our main JS file where all other modules are imported.
Then we're declaring the output – first declaring the path where it will be stored and then declaring the name of the bundled file.
output: {
    path: path.resolve(__dirname, 'dist'),
    filename: 'bundle.js',
},
Super! Now let's go to our package.json file and add a build script, like this:
{
  "name": "testappv2",
  "version": "1.0.0",
  "description": "",
  "main": "main.js",
  "scripts": {
    "test": "echo \"Error: no test specified\" && exit 1",
    "build": "webpack"
  },
  "keywords": [],
  "author": "",
  "license": "ISC",
  "devDependencies": {
    "webpack": "^5.72.0",
    "webpack-cli": "^4.9.2"
  }
}
Then we can go back to our terminal and run npm run build. That should create a dist directory within our project, and inside it a bundle.js file.
If you check that file out, you'll see this code within it:
(()=>{"use strict";document.getElementById("isAlive").addEventListener("click",(()=>console.log("Mod1 is alive!"))),document.getElementById("isRolling").addEventListener("click",(()=>console.log("Mod1 is rolling, baby!"))),console.log("Im the main function")})();
You'll see that it's practically the same code we had distributed in our files, but all bundled in a single file and minified.
The only thing left is to change the script tag in our index.html file so it consumes the bundled JS now, like this:
<!-- index.html -->
<!DOCTYPE html>
<html lang="en">
<head>
    <meta charset="UTF-8">
    <meta http-equiv="X-UA-Compatible" content="IE=edge">
    <meta name="viewport" content="width=device-width, initial-scale=1.0">
    <title>Document</title>
</head>
<body>
    <h1>I'm just a test...</h1>
    <button id="isAlive">Is mod1 alive?</button>
    <button id="isRolling">Is mod1 rolling?</button>
    <script src="./dist/bundle.js" type="module"></script>
</body>
</html>
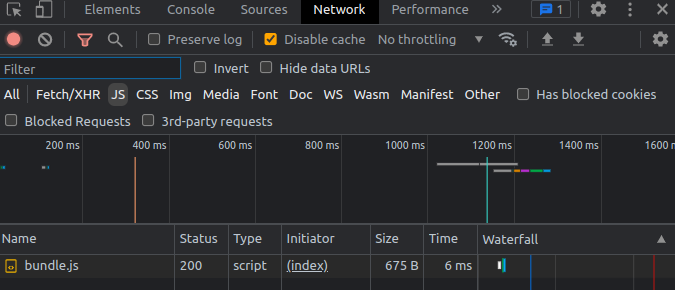
Now we can serve it again, check that the JS still works perfectly, and if we open the network tab again we should see just a single file being loaded! =D
I hope this simple example helped you understand the relevance of module bundlers and how they help us combine the great development experience of modular architecture with good site performance.
Roundup
Well, we're done for today. In this article we've seen what modules are, why are they cool, the different ways you can implement modules in JavaScript, and a practical example of bundling our code with Webpack.
For a complete guide on JS modules, you can take a look at this article.
As always, I hope you enjoyed the article and learned something new. If you want, you can also follow me on linkedin or twitter.
Cheers and see you in the next one! =D