

ReactJS is one of the most popular UI libraries in the front-end development world. And one of the reasons I love React is because of the team behind it and the community's enthusiasm for it.
And when the community speaks up about the need for new features and improvements, the team listens.
The future of React is exciting and interesting. If I had to summarise it in one line, I'd say this pretty much sums it up: 'Write Less, Do More.'
In this article, I will share what's new in React 19 so you can start experimenting with some of the features and learn about what's changing.
Just keep in mind that as I write this, React 19 is still work in progress. Make sure you follow the official guide on GitHub and the official team on social media to stay updated with the latest developments.
Here's what we'll cover:
- New Features in React v19 – Overview
- React Compiler
- Server Components
- Actions
- Web Components
- Document Metadata
- Asset Loading
- New React Hooks
– The newuse()hook
– TheuseFormStatus()hook
– TheuseFormState()hook
– TheuseOptimistic()hook - Can I use React 19 Now?
- Summary
🧩 Pre-requisites:
- Working knowledge of ReactJS
- Working knowledge of HTML, and JavaScript
- Basic hands-on experience in developing web apps in ReactJS
If you'd like, you can also watch the video version of this article.
🌟 New Features in React v19 – Overview
Here's a quick overview of the new features React 19 will have:
- 🤖 React compiler: React is working on implementing a new compiler. Currently, Instagram is already leveraging this technology, and it will be released in future versions of React.
- 🔥 Server components: React has introduced the concept of server components after years of development. You'll now be able to use this feature with Next.js.
- 💪 Actions: Actions will also revolutionise how we interact with DOM elements.
- 🌇 Document Metadata: Another much-needed improvement is on the horizon, empowering developers to accomplish more with less code.
- 💼 Assets Loading: This will enable assets to load in the background, which will improve both the application's load time and the user experience.
- ⚙️ Web components: This is particularly fascinating: React code will now enable us to incorporate web components. I'm incredibly excited about this development, as it will unlock a myriad of possibilities.
- 🪝 Enhanced hooks: Exciting new hooks are on the horizon, poised to revolutionise our coding experience.
React 19 is set to tackle one of React's longstanding challenges: the issue of excessive re-rendering. Developers have historically spent countless hours addressing this problem, which often leads to performance issues.
The constant hunt for code causing re-rendering and the subsequent optimisation efforts have been a recurring task for engineers. But with React 19, this concern will be alleviated. The framework will handle re-rendering automatically, streamlining the development process.
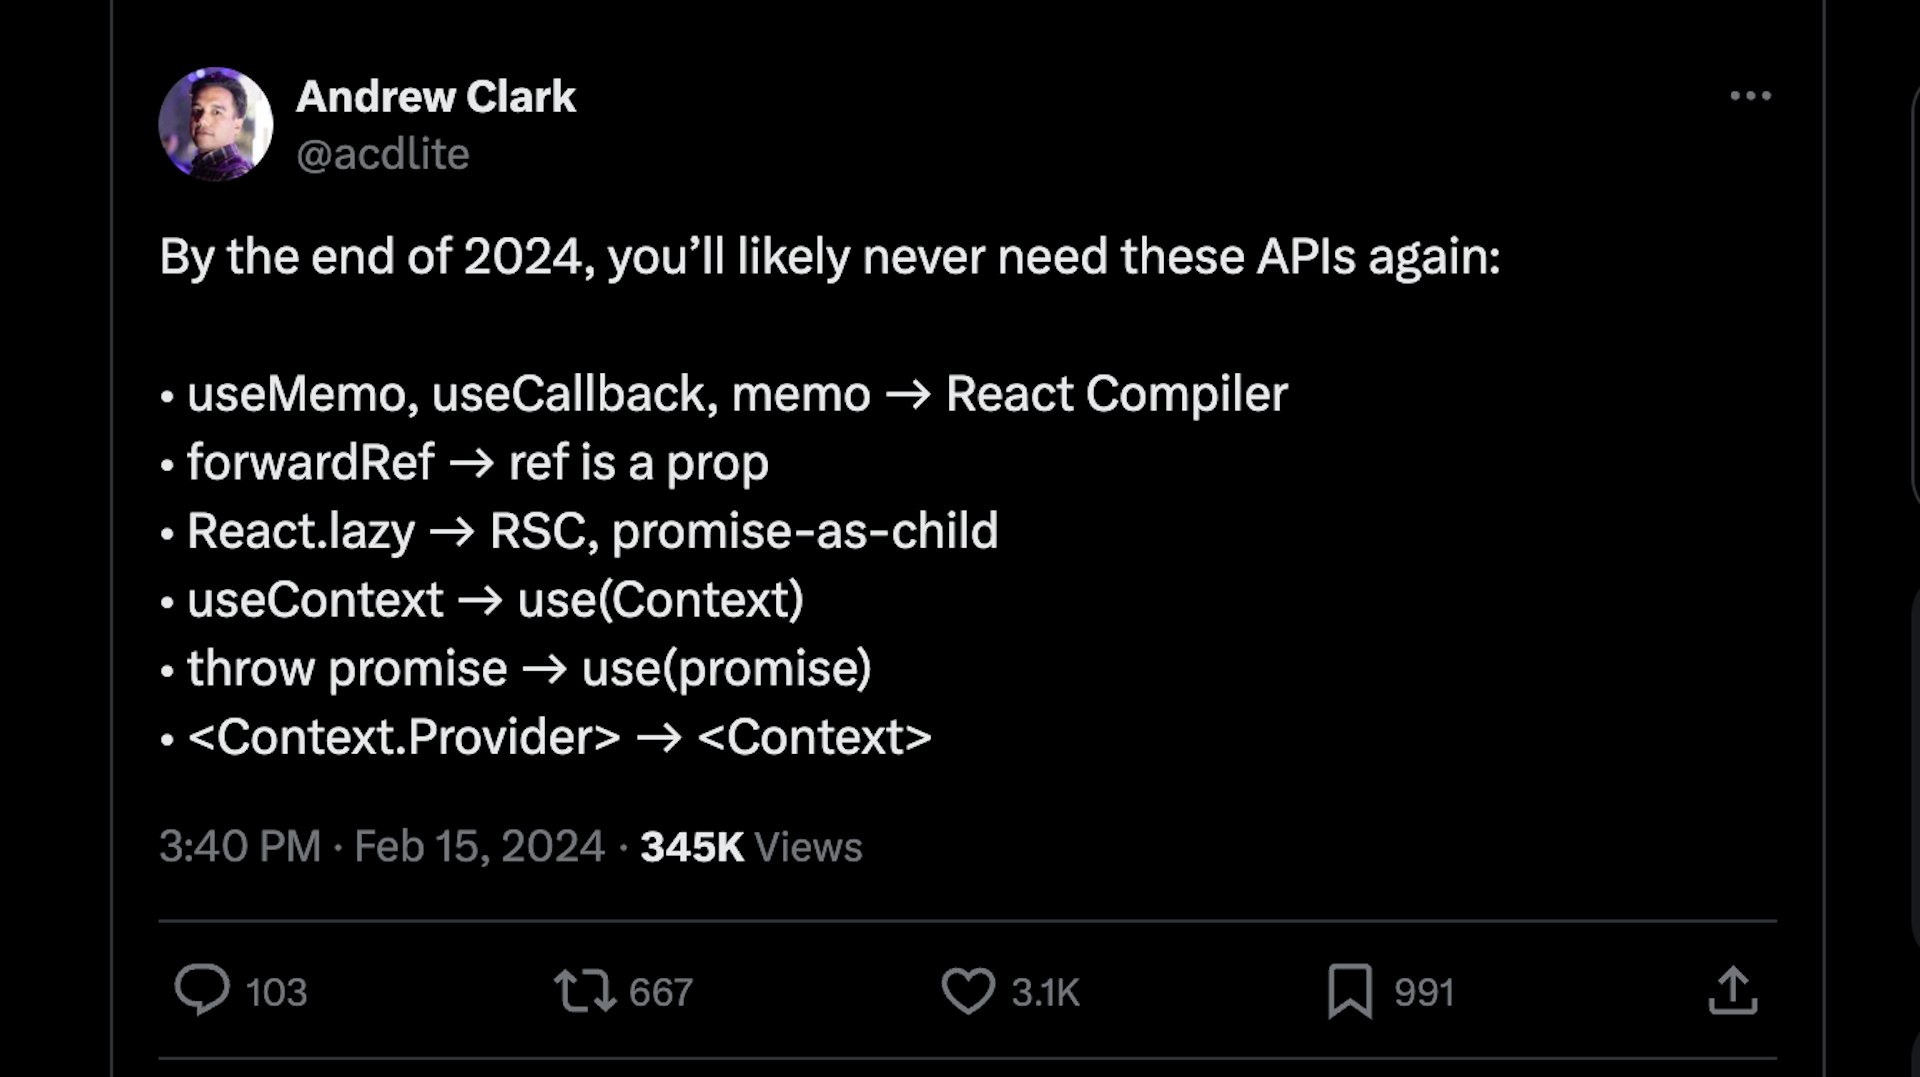
Previously, developers relied on techniques such as useMemo(), useCallback(), memo, and so on to manage re-rendering. But with React 19, such manual interventions will no longer be necessary.
The framework will intelligently identify and memoize code under the hood, resulting in cleaner and more efficient code.
💻 You can find the code for all the examples on my GitHub here.
1. 🤖 🤖 React Compiler 🤖 🤖
Currently, React doesn't automatically re-render on state change. A way to optimise these re-renders is to manually use useMemo(), useCallback(), and memo APIs. As per React's team, this was a "reasonable manual compromise". Their vision was to let React manage these re-renders.
But the React team realized that manual optimisation is cumbersome, and the feedback from the community encouraged them to solve this issue.
And so the React Team has created the "React compiler". The React compiler will now manage these re-renders. React will decide automatically how and when to change the state and update the UI.
With this, we developers don't need to do this manually anymore. It also means no need to use useMemo(), useCallback(), and memo.
While this will be released in an upcoming version of React, you can learn more about the compiler from these resources:
As a result, React will decide which components to optimise and when, along with what to re-render.
One thing I love about React is that before introducing new breaking changes to the outer world, the React teams use these new features first on their production products 😍. Currently, React Compiler is powering Instagram in production.
2. 🔥🔥 Server components 🔥🔥
If you haven't heard about server components yet, you're missing out on one of the most exciting developments in React and Next.js.
Up until now, React components have primarily run on the client side. But React is introducing the groundbreaking concept of running components on the server side.
The idea of server components has been circulating for years, with Next.js being the pioneer in implementing them for production. Starting from Next.js 13, all components are server components by default. To make a component run on the client side, you need to use the "use client" directive.
In React 19, server components will be integrated directly into React, bringing a host of advantages:
- SEO: Server-rendered components enhance search engine optimisation by providing more accessible content to web crawlers.
- Performance Boost: Server components contribute to faster initial page loads and improved overall performance, particularly for content-heavy applications.
- Server-Side Execution: Server components enable executing code on the server, making tasks like API calls seamless and efficient.
These advantages underscore the transformative potential of server components in modern web development.
All the components in React by default are client side. Only when you use 'use server' will the component be a server component.
The below code is in React but will run on the server. You just need to add 'use server' as the first line of the component. This will make the component a "server component". It won't run on the client side and will only run on the server side.
So how can you use a server component?
We can import requestUsername in any React component in the same project. After importing the server component in any React component, we can use "Actions" (we will learn about this soon) to do a specific task.
'use server';

export default async function requestUsername(formData) {
  const username = formData.get('username');
  if (canRequest(username)) {
    // ...
    return 'successful';
  }
  return 'failed';
}
In the Actions section, you'll learn more about how to use server components.
Currently Next.js has sever-side component support. You can read more about server components in Next here. With React19, server component support will be available directly in React.
3. 💪💪 Actions 💪💪
In version 19, another exciting addition will be Actions. This is going to be a game-changer for how we work with forms.
Actions will let you integrate actions with the HTML tag <form/>. In simpler terms, you'll be able to replace the onSubmit event with Actions. These actions are HTML form attributes.
Before Actions:
In the code snippet below, we'll utilize the onSubmit React event, which triggers the execution of the search method upon form submission. But it's important to note that currently, the search method runs solely on the client-side. We're limited to using React events for form submission, meaning the search cannot be executed on the server side.
<form onSubmit={search}>
  <input name="query" />
  <button type="submit">Search</button>
</form>
After Actions:
With the introduction of server components, Actions can be executed on the server side. In our JSX, with <form/>, we can drop the onSubmit event and use the action attribute. The value of the action attribute will be a method to submit the data either on the client or server side.
You can execute both synchronous and asynchronous operations with actions, streamlining data submission management and state updates. The goal is to make the working with forms and handling data easier.
Let's look at an example to see how this works:
"use server"

const submitData = async (userData) => {
    const newUser = {
        username: userData.get('username'),
        email: userData.get('email')
    }
    console.log(newUser)
}
const Form = () => {
return <form action={submitData}>
<div>
<label>Name</label>
<input type="text" name='username'/>
</div>
<div>
<label>Name</label>
<input type="text" name="email" />
</div>
<button type='submit'>Submit</button>
</form>
}
export default Form;In the above code, submitData is the action in the server component. form is a client side component which is using the submitData as action. submitData will be execute on the server. The communication of the client (form), and server (submitData) components is only possible because of the action attribute.
We can use the form and action to handle data submission on the client side as well as on the server side. You can check out this code on GitHub and read more about it here.
In the Enhanced Hooks section, you will learn three new hooks that will also enhance how you can work with forms.
4. ⚙️⚙️ Web components ⚙️⚙️
Around 5 years ago, I delved into the world of web components. Ever since, I've been captivated by their potential. If you're not familiar with web components, let me break them down for you:
Web components allow you to create custom components using native HTML, CSS, and JavaScript, seamlessly incorporating them into your web applications as if they were standard HTML tags. Pretty amazing, right?
Currently, integrating web components into React isn't straightforward. Typically, you either need to convert the web component to a React component or install extra packages and write additional code to make web components work with React. This can be frustrating.
Luckily, React 19 will help you integrate web components into your React code much more easily. If you come across a really useful web component, such as a carousel, you can seamlessly incorporate it into your React projects without the need to convert it into React code.
This streamlines development and allows you to leverage the vast ecosystem of existing web components in your React applications.
But as of now, there are no further details on how the code will look. Still, I am hopeful that it will involve simply importing a web component into a React codebase, similar to module federation. I'm eagerly awaiting further details on this implementation from the React team.
5. 🌇🌇 Document Metadata 🌇🌇
Elements like "title," "meta tags," and "description" are crucial in optimising SEO and ensuring accessibility. In React, where single-page applications are prevalent, managing these elements across different routes can be a bit of a hassle.
Currently, developers often resort to writing custom code, or using packages like react-helmet to handle route changes and update metadata accordingly. This process can be repetitive and error-prone, especially when dealing with SEO-sensitive elements like meta tags.
Before:
import React, { useEffect } from 'react';

const HeadDocument = ({ title }) => {
  useEffect(() => {
    document.title = title;

 	const metaDescriptionTag = document.querySelector('meta[name="description"]');
    if (metaDescriptionTag) {
    metaDescriptionTag.setAttribute('content', 'New description');
    }
  }, [title]);

  return null;
};

export default HeadDocument;
In the above code, we have a component HeadDocument which is responsible for updating the title and meta tags based on the props. We are updating these in the useEffect hook. We're also using JavaScript to update the title and meta tags. This component will be updated on route change. This is not a clean way to do this.
After:
With React19, we can use the title and meta tags directly in our React components:
Const HomePage = () => {
  return (
    <>
      <title>Freecodecamp</title>
      <meta name="description" content="Freecode camp blogs" />
      // Page content
    </>
  );
}
This was not possible before in React. The only way was to use a package like react-helmet.
👉 You can read more in these resources about link, meta, script, style, and title.
6. 💼💼 Asset Loading 💼💼
In React, you'll need to carefully manage the loading experience and performance of your applications, particularly with images and other asset files.
Often, the view renders first in the browser, followed by stylesheets, fonts, and images. This can result in a flicker from non-styled (or flash of unstyled content) to a styled view.
To mitigate this issue, developers often resort to adding custom code to detect when these assets are ready, ensuring that the view is displayed only after everything has loaded.
In React 19, images and other files will load in the background as users explore the current page. This improvement should help improve page load times and reduce waiting periods.
Also, React is introducing lifecycle Suspense for assets loading, including scripts, stylesheets, and fonts. This feature enables React to determine when the content is ready to be displayed, eliminating any "unstyled" flickering.
There are new Resource Loading APIs like preload and preinit to provide greater control for when a resource should load and initialise.
By allowing assets to load asynchronously in the background, React 19 minimizes waiting times and ensures that users can interact with the content without interruptions. This optimization not only enhances the performance of React applications but also contributes to a more enjoyable browsing experience for users.
7. 🪝🪝 New React Hooks 🪝🪝
React Hooks have been one of the most loved features introduced in the library. You have likely used React's built-in hooks many times, and perhaps you've tried making your own custom hooks, too. Hooks are so popular that they've become a React programming pattern.
In React 19, the way we use useMemo, forwardRef, useEffect, and useContext will change. This is mainly because a new hook, use, will be introduced.
🥁 useMemo():
You won't need to use the useMemo() hook after React19, as React Compiler will memoize by itself.
Before:
import React, { useState, useMemo } from 'react';

function ExampleComponent() {
  const [inputValue, setInputValue] = useState('');

  // Memoize the result of checking if the input value is empty
  const isInputEmpty = useMemo(() => {
    console.log('Checking if input is empty...');
    return inputValue.trim() === '';
  }, [inputValue]);

  return (
    <div>
      <input
        type="text"
        value={inputValue}
        onChange={(e) => setInputValue(e.target.value)}
        placeholder="Type something..."
      />
      <p>{isInputEmpty ? 'Input is empty' : 'Input is not empty'}</p>
    </div>
  );
}

export default ExampleComponent;
After:
In the below example, you can see that after React19, we don't need to memo the values – React19 will do it by itself under the hood. The code is much cleaner:
import React, { useState, useMemo } from 'react';

function ExampleComponent() {
  const [inputValue, setInputValue] = useState('');

  const isInputEmpty = () => {
    console.log('Checking if input is empty...');
    return inputValue.trim() === '';
  });

  return (
    <div>
      <input
        type="text"
        value={inputValue}
        onChange={(e) => setInputValue(e.target.value)}
        placeholder="Type something..."
      />
      <p>{isInputEmpty ? 'Input is empty' : 'Input is not empty'}</p>
    </div>
  );
}

export default ExampleComponent;
🥁 forwardRef()
ref will be now passed as props rather than using the forwardRef() hook. This will simplify the code. So after React19, you won't need to use forwardRef().
Before:
Here's an example of how you'd use forwardRef() before React 19:
import React, { forwardRef } from 'react';

const ExampleButton = forwardRef((props, ref) => (
  <button ref={ref}>
    {props.children}
  </button>
));
After:
ref can be passed as a prop. No more forwardRef() is required.
import React from 'react';

const ExampleButton = ({ ref, children }) => (
  <button ref={ref}>
    {children}
  </button>
);
🥁 The new use() hook
React19 will introduce a new hook called use(). This hook will simplify how we use promises, async code, and context.
Here is the syntax of hook:
const value = use(resource);The below code is an example of how you can use the use hook to make a fetch request:
import { use } from "react";

const fetchUsers = async () => {
    const res = await fetch('https://jsonplaceholder.typicode.com/users');
    return res.json();
  };

  const UsersItems = () => {
    const users = use(fetchUsers());

    return (
      <ul>
        {users.map((user) => (
          <div key={user.id} className='bg-blue-50 shadow-md p-4 my-6 rounded-lg'>
            <h2 className='text-xl font-bold'>{user.name}</h2>
            <p>{user.email}</p>
          </div>
        ))}
      </ul>
    );
  };
export default UsersItems;
Let's understand the code:
fetchUsersis responsible for the GET request.- We are using the
usehook to execute thefetchUsersinstead of using theuseEffectoruseStatehooks. - The return of the
useStatehook isuserswhich will have the response of the GET request (users). - In the return block, we are using
usersto map over it and create the list.
💻 You can check out this code on GitHub.
Another place we can use the new hook is with Context. The Context API is a popular way to manage global states in React without using any state management libraries. With the use hook, the context hook will look like the below code.
Now, instead of useContext(), we will have use(context).
import { createContext, useState, use } from 'react';

const ThemeContext = createContext();

const ThemeProvider = ({ children }) => {
  const [theme, setTheme] = useState('light');

  const toggleTheme = () => {
    setTheme((prevTheme) => (prevTheme === 'light' ? 'dark' : 'light'));
  };

  return (
    <ThemeContext.Provider value={{ theme, toggleTheme }}>
      {children}
    </ThemeContext.Provider>
  );
};

const Card = () => {
  // use Hook()
  const { theme, toggleTheme } = use(ThemeContext);

  return (
    <div
      className={`p-4 rounded-md ${
        theme === 'light' ? 'bg-white' : 'bg-gray-800'
      }`}
    >
      <h1
        className={`my-4 text-xl ${
          theme === 'light' ? 'text-gray-800' : 'text-white'
        }`}
      >
        Theme Card
      </h1>
      <p className={theme === 'light' ? 'text-gray-800' : 'text-white'}>
       Hello!! use() hook
      </p>
      <button
        onClick={toggleTheme}
        className='bg-blue-500 hover:bg-blue-600 text-white rounded-md mt-4 p-4'
      >
        {theme === 'light' ? 'Switch to Dark Mode' : 'Switch to Light Mode'}
      </button>
    </div>
  );
};

const Theme = () => {
  return (
    <ThemeProvider>
      <Card />
    </ThemeProvider>
  );
};

export default Theme
Let's understand the code:
ThemeProvideris responsible for the context providing.cardis the component where we will consume the context. For this we will be using new hookuseto consume the context. The rest is the same as before React19.
💻 You can check out the above code examples on GitHub.
In React19, we have new hooks to handle form status and data as well. This will make working with forms smoother and easier. Combining these hooks with actions (new React19 feature) will make working with forms and handling data easier.
🥁 The useFormStatus() hook
This new hook in React19 will help you have more control over the forms you create. It will give you status information about the last form submission.
Here's the syntax:
const { pending, data, method, action } = useFormStatus();or the simple version:
const { status } = useFormStatus()Let's see what's going on here:
- pending: if the form is in a pending state, then it will be
true, otherwise it will befalse. - data: an object implementing the
FormData interfacethat contains the data the parent<form>is submitting. - method: the HTTP method –
GET, orPOST. By default it will beGET. - action: a function reference.
This hook will be used to display a pending state and what data is being submitted by the user.
Here's a code example:
import { useFormStatus } from "react-dom";

function Submit() {
  const status = useFormStatus();
  return <button disabled={status.pending}>{status.pending ? 'Submitting...' : 'Submit'}</button>;
}

const formAction = async () => {
  // Simulate a delay of 2 seconds
  await new Promise((resolve) => setTimeout(resolve, 3000));
}

const FormStatus = () => {
  return (
    <form action={formAction}>
      <Submit />
    </form>
  );
};

export default FormStatus;
Let's understand what's happening in the above code:
Submitis a method – a form's action to submit the form. This method will check thestatusfromuseFormStatuswhich will let us know if thestatus.pendingis true or false.- Based on
status.pendingwe can display the message in the UI. formActionis a faker method to delay the form submission.
In the above code, on the form submission, from the useFormStatus hook we will get a pending status. While pending is true, the text "Submitting..." will display on the UI. Once pending is false, the Submitting text will be changed to "Submitted".
This hook is powerful and will be helpful when you want to know the status of a form submission (pending or not) and accordingly display the data.
💻 You can check out this code here.
🥁 The useFormState() hook
Another new hook in React19 is useFormState. It allows you to update state based on the result of a form submission.
Here's the syntax:
const [state, formAction] = useFormState(fn, initialState, permalink?);fn: the function to be called when the form is submitted or button is pressed.initialState: the value you want the state to be initially. It can be any serializable value. This argument is ignored after the action is first invoked.permalink: this is optional. A URL or page link, iffnis going to be run on server then the page will redirect topermalink.
This hook will return:
state: the initial state will be the value we have passed toinitialState.formAction: an action that will be passed to the form action. The return value of this will be available in the state.
Here's an example of how it works:
import { useFormState} from 'react-dom';

const FormState = () => {
    const submitForm = (prevState, queryData) => {
        const name =  queryData.get("username");
        console.log(prevState); // previous form state
        if(name === 'john'){
            return {
                success: true,
                text: "Welcome"
            }
        }
        else{
            return {
                success: false,
                text: "Error"
            }
        }
    }
    const [ message, formAction ] = useFormState(submitForm, null)
    return <form action={formAction}>
        <label>Name</label>
        <input type="text" name="username" />
        <button>Submit</button>
        {message && <h1>{message.text}</h1>}
    </form>
}

export default FormState;
Let's understand what is happening in the above code:
submitFormis the method responsible for the form submission. This is the Action (remember Action new React19 feature).- Inside
submitForm, we are checking the value of the form. Then, depending on whether it's successful or shows an error, we return the specific value and message. In the above code example, if there is any value other than "John", then it will return an error. - We can also check the
prevStateof the form. The initial state would benull, and after that it will return theprevStateof the form.
On running this example, you will see a "welcome" message if the name is John – otherwise it will return "error".
💻 You can check out this code here.
🥁 The useOptimistic() hook
useOptimistic is a React Hook that lets you show a different state while an async action is underway, according to the React docs.
This hook will help enhance the user experience and should result in faster responses. This will be useful for applications that need to interact with the server.
Here's the syntax of the useOptimistic hook:
const [ optimisticMessage, addOptimisticMessage] = useOptimistic(state, updatefn)For example, while a response is on the way, we can show a "state" to give the user an immediate response. Once the actual response is returned from the server, the "optimistic" state will be replaced by it.
The useOptimistic hook will immediately update the UI assuming the request will succeed. The name is "optimistic" because the user will see the optimistic (success) result of performing an action, even though the action actually takes time to complete.
Let's look at how we can implement the useOptimistic hook. The below code shows the optimistic state on click of the button submit <form input> (Sending...) until the response doesn't come.
import { useOptimistic, useState } from "react";

const Optimistic = () => {
  const [messages, setMessages] = useState([
    { text: "Hey, I am initial!", sending: false, key: 1 },
  ]);
  const [optimisticMessages, addOptimisticMessage] = useOptimistic(
    messages,
    (state, newMessage) => [
      ...state,
      {
        text: newMessage,
        sending: true,
      },
    ]
  );

  async function sendFormData(formData) {
    const sentMessage = await fakeDelayAction(formData.get("message"));
    setMessages((messages) => [...messages, { text: sentMessage }]);
  }

  async function fakeDelayAction(message) {
    await new Promise((res) => setTimeout(res, 1000));
    return message;
  }

  const submitData = async (userData) => {
    addOptimisticMessage(userData.get("username"));

    await sendFormData(userData);
  };

  return (
    <>
      {optimisticMessages.map((message, index) => (
        <div key={index}>
          {message.text}
          {!!message.sending && <small> (Sending...)</small>}
        </div>
      ))}
      <form action={submitData}>
        <h1>OptimisticState Hook</h1>
        <div>
          <label>Username</label>
          <input type="text" name="username" />
        </div>
        <button type="submit">Submit</button>
      </form>
    </>
  );
};

export default Optimistic;
fakeDelayActionis a fake method to delay the submit event. This is to show the optimistic state.submitDatais the action. This method is responsible for the form submission. This could be async, too.sendFormDatais responsible for sending the form tofakeDelayAction- Setting the default state.
messageswill be used in theuseOptimistic()as input and will return inoptimisticMessages.
const [messages, setMessages] = useState([{ text: "Hey, I am initial!", sending: false, key: 1 },]);Now, let's get into more details:
Inside submitData, we are using addOptimisticMessage. This will add the form data so that it will be available in optimisticMessage. We will use this to show a message in the UI:
{optimisticMessages.map((message, index) => (
        <div key={index}>
          {message.text}
          {!!message.sending && <small> (Sending...)</small>}
        </div>
      ))}
💻 You can check out this code here.
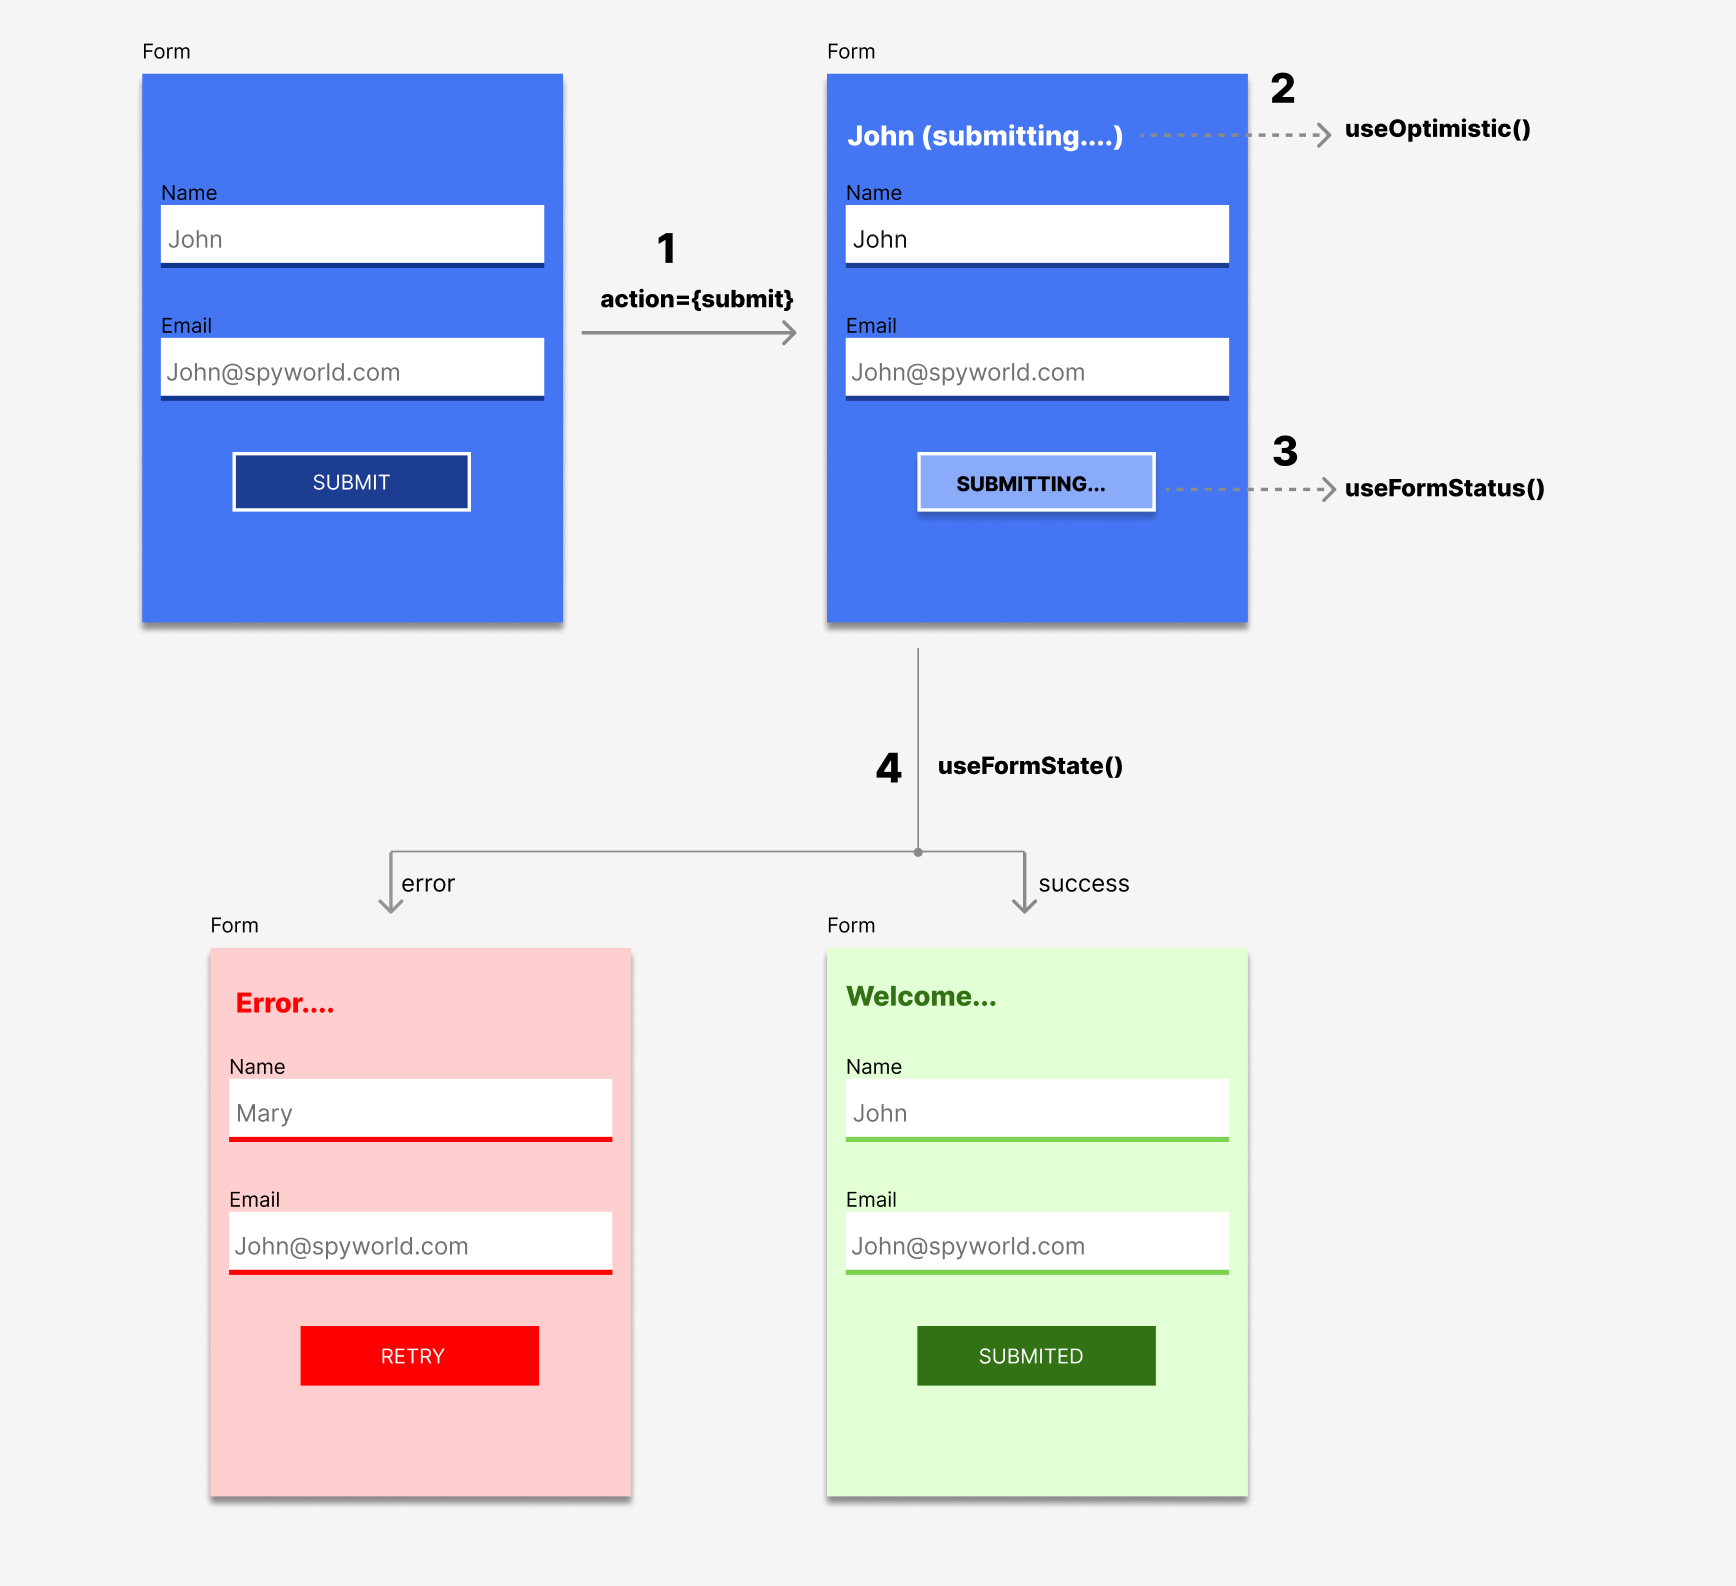
Here is a summary of the 3 form hooks we learned about:
❓Can I Use React 19 Now?
As of now, all the features mentioned above are available in the canary release. You can learn more here. As suggested by the React team, do not use these for customer/user facing apps at the moment. Feel free to play around for your own learning, or for fun only.
If you're wondering when React19 is scheduled to release, you can follow the Canary Releases for updates.
To know more, you can follow the React team in the following places to stay updated:
🌟 Summary
We've covered a lot in this article. Here's a quick summary of the exciting changes coming to React v19:
- 🤖 There will be a new React compiler that will be introduced in a future version of React.
- 🙌🏽 We'll now have auto re-rendering, memoization, and optimisation of state and UI.
- 🔮 There will be some new hooks like
use()that will help simplify promises and async code. - ⚙️ There will now be server side component support in React.
- 📝 We'll have better form handling using actions,
useFormStatus(),useStatusForm(), anduseOptimistic(). - 🖼 React will optimise asset loading to enhance performance by using suspense under the hood.
- 🔗 We'll have web component integration in React.
If you liked this article, found something you'd like to discuss, or just want to stay connected, come and say hi on Linkedln, Twitter, and YouTube.