By Said Hayani
Nextjs is JavaScript framework that helps you build web applications using Reactjs. It offers a ton of features and tools that make building a complete app simpler and easier.
Nextjs provides a great developer experience in many areas. It has also simplified many features that were complicated in the past, like server-side rendering, static website generation, and working with REST APIs.
In this article, I will walk you through the Nextjs features that I personally use the most.
How to set up and configure Nextjs
You can run and build an entire web app with zero configuration with Nextjs. It’s super easy to use – you can simply bootstrap a complete Nextjs app with just one command, like this:
yarn create next-app
Then you just run yarn dev and your app is up!
Add a custom config to the Nextjs app
Nextjs allows you to add a custom config for webpack. You can also add and integrate plugins.
Sometimes you might need to add a plugin to handle image processing or to support a package that is not supported by Nextjs by default, like CSS processing for example.
To do that you can create next.config.js in the route directory of the app. The example below shows you how to add a plugin to load environment files.
require("dotenv").config();
const webpack = require("webpack");
module.exports = {

  webpack: (config) => {
    config.plugins.push(new webpack.EnvironmentPlugin(process.env));
    return config;
  },
};
How to integrate your favorite tools
It's simple to add tools like TypeScript, Firebase, or AWS. Nextjs also offers many boilerplates for each case in its GitHub repository. Check them out to see which ones you want to use.
Add Firebase to Nextjs
For example if you want to add firebase out of the box, you can run the following command:
yarn create next-app --example with-firebase with-firebase-app
It will bootstrap a Nextjs app with firebase pre-configured and install the packages that Firebase needs to run. You can take a look at the full example here.
Add TypeScript support
One command is enough to add TypeScript support to Nextjs:
touch tsconfig.json
This will create a tsconfig.json file for the TypeScript compiler. Nextjs will detect the file automatically and generate a default TypeScript config for you. You can add your custom config later on, just make sure to add a ts extension to your components so the compiler can interpret your files as TypeScript files.
Server side rendering
Server side rendering helps your site's SEO. So if search is one of your priorities, then Nextjs is a good choice for you.
Nextjs gives you better options as to how to render your app. For example, you can enable or disable server-side rendering for each page.
If you use getServerSideProps it makes the page server-side rendered by default and gives you access to the server-side props.
Static websites and components
You can export your app as a static site, and host it on a static web hosting tool like Netlify.
The next export command will generate a static component for you.
To build and export the app as static HTML, run the following command:
next build && next export
Check out the official Nextjs docs to explore more options when exporting as HTML.
Routing
Routing comes built-in with Nextjs – you don’t need to use any third-party library to handle it. It also comes with two different approaches, dynamic routing and imperial (pre-defined) routes.
Dynamic routes let you to create dynamic slugs and paths. Imagine you have a blog and you want to display the details of each post. Instead of creating multiple (predefined) pages for each post, you would use a dynamic and reusable page.
Dynamic routing can be implemented in the following way:
- Inside the pages folder create a folder that will be used to render the dynamic path. We can call it
page. - To make it dynamic, we can just add a slash and param, like this:
page/[pid]. The param should be inside two brackets. - Then we create an
index.jsfile inside thepage/[pid]folder. It contains the following code:
import React from 'react'
import {useRouter, Router} from 'next/router'
import {route} from 'next/dist/next-server/server/router'

export default function pid() {
  const router = useRouter()
  const {pid} = router.query
  return <div>Page id :{pid}</div>
}
http://localhost:3000/page/2 is an example path. We can also use route.query to access all the params like in the example above.
How to build a REST API
On the top of other features, you can build REST API endpoints within your Nextjs app and consume it within the same app or any other app.
The example below is a small demo of a simple endpoint that returns a list of posts.
If you are using nextjs 9.5.2 or higher, it comes with an api folder by default, usually in the pages folder.
Here is an example of using an endpoint that returns a json response.
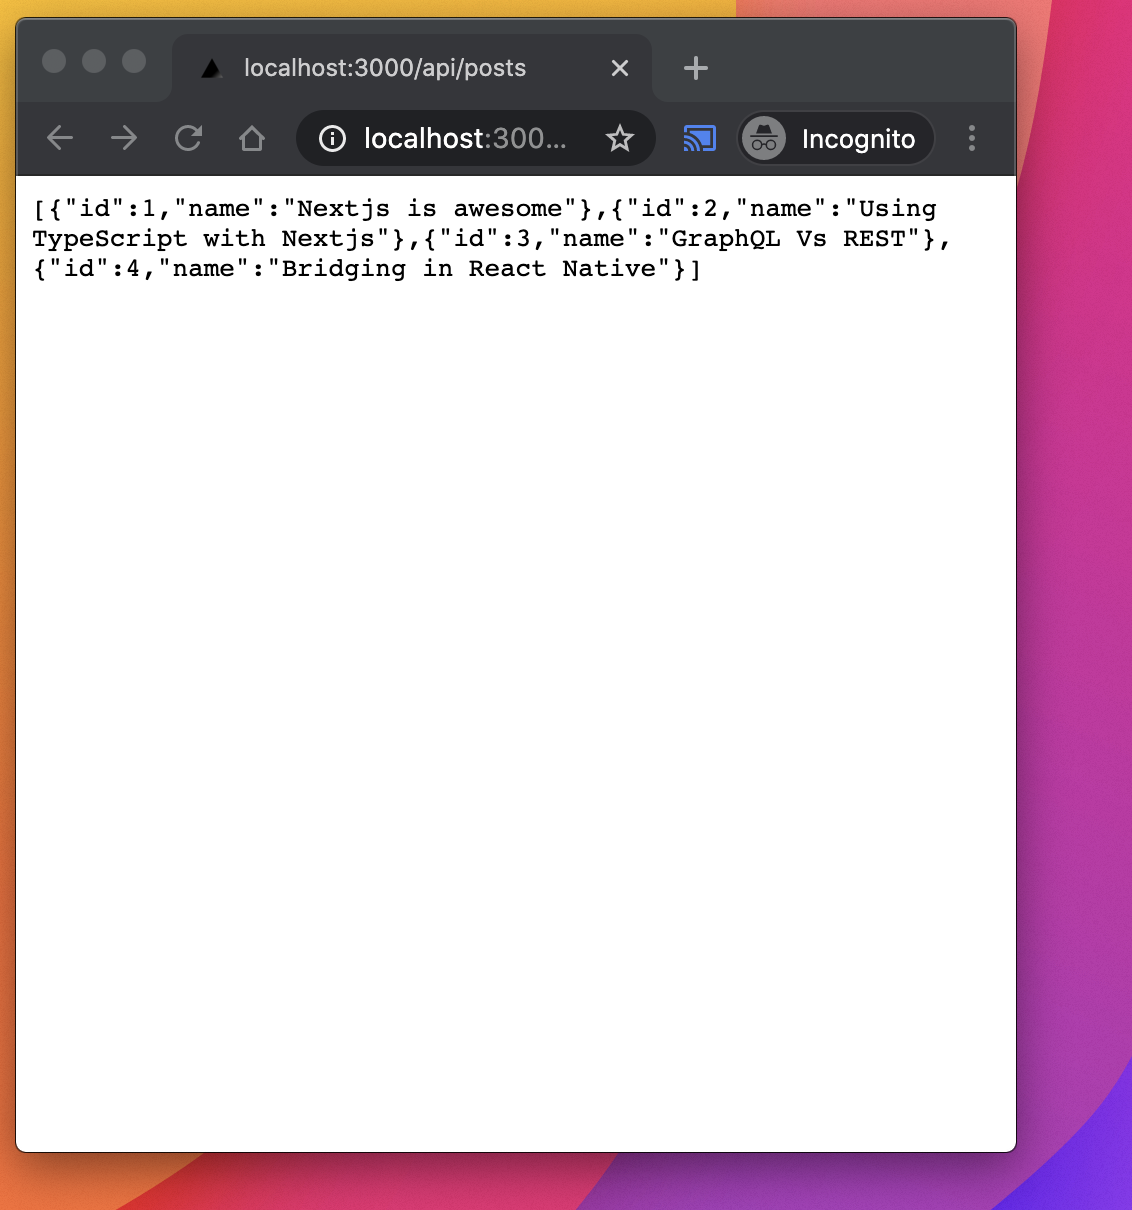
/api/posts
// Next.js API route support: https://nextjs.org/docs/api-routes/introduction

const posts = [
  {
    id: 1,
    name: 'Nextjs is awesome'
  },
  {
    id: 2,
    name: 'Using TypeScript with Nextjs'
  },
  {
    id: 3,
    name: 'GraphQL Vs REST'
  },
  {
    id: 4,
    name: 'Bridging in React Native'
  }
]
export default (req, res) => {
  res.statusCode = 200
  res.json(posts)
}
And if you go to https://localhost:5000/api/posts it will return a JSON response of posts.
Additional features
CSS modules
Nextjs supports CSS modules by default. You can directly create a CSS module with the style.module.css command and import it within any component like this:
import styles from './style.module.css'
You can also use CSS in JS just as you can in React.
<div style={{
  width:300
}>
   Card
</div>
I recommend that you check out nextjs.org to learn more about additional features.
The source code of the examples used in this blog can be found on GitHub.
You should follow me on Twitter, and subscribe to my Mailing-list.
Hi, my name is Said Hayani. I created subscribi.io to help creators, bloggers and influencers grow their audience through the newsletter.