
By Srinivasan C
Recently, we built a chat bot for the AWS ChatBot Challenge using Amazon Lex. I learned a ton of things from that experience, and thought I would put up a tutorial so that people can get started easily with building a basic bot. Let’s dive right into it.
First Things First
Amazon Lex is an engine which parses natural language (whatever the user says) and converts it into actions that the bot can act on. So basically when you say “I want to order a pizza”, Lex understands that this order is an action that the user wants to perform. It then tells the bot so that it can place an order for pizza.
The first step is understanding the different moving parts involved in Amazon Lex.
Intent
Intent is a particular goal that the user wants to achieve. When the user says “I want to order a pizza,” order is the intent, that is, the action which the user wants to happen. There are two types of intents:
- Built-in Intents — These are basic intents provided by Lex. You can use them to do standard actions like allowing a user to cancel, get help, and so on.
- Custom Intents — Custom intents are provided by developers to carry out a specific set of actions. We will discuss creating a custom intent in detail in the later half of this post.
Utterances
Utterances are the phrases which are used to invoke an intent. “I want to order a pizza” is the utterance which is used to invoke OrderIntent.
Slots
Slots are the inputs which the user needs to provide for fulfilling the intent. You may want to know the type of pizza for OrderIntent, which is a slot. You can either create custom slot types for your purpose, or use the built-in types. Built-in types provide values for standard enumerations like date, name, country name, and so on which you may want to get from the user.
Prompts
Prompts are the questions which are asked to get input from the user. They are used to request values for slots from the user. They wait for the user’s response and fill the slot with the response given by the user. A prompt can be “What type of pizza would you like to order?” for the OrderIntent.
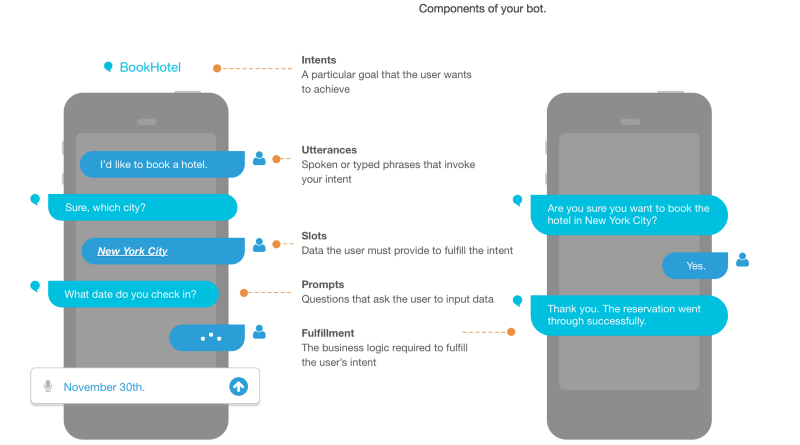 Components of a chatbot
Hands on
If you do not have an Amazon account, create one and go to Lex in your Amazon console.
Now let’s build a small greeter bot. The greeter bot asks your name and greets you by your name. Pretty simple, isn’t it? Lets get right down to building a working bot.
- Create a new bot and name it “Greeter” or whatever you want.
- Go to the bot you created and create a new custom intent.
- When you create a custom intent, you need to provide utterances for invoking the intent. For our greeter, the utterances can be Hi, hey, hello, and so on.
- Now we need to provide a slot for getting the name from the user. We can use the built-in slot type AMAZON.US_FIRST_NAME for this purpose. Give the name as “Name” (case matters for the code provided later to work) and the prompt as “What’s your name?” or whatever you like, and save the slot.
- Provide the fulfillment as Return parameters to the client for now and save the intent.
The intent should look something like the below:
 Greeter Intent
You can now build your bot and test it. You can invoke it by saying hi and it will prompt you for your name and wait for your input. If you provide the name, it will print ReadyForFulfillment and the name you gave.
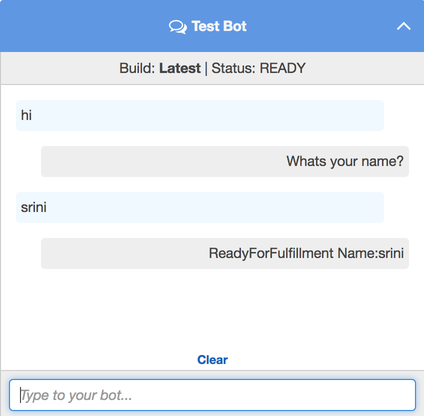 Initial bot test
JSON Responses and Dialog Actions
What we’ve done so far is enough if your bot just wants to read your name. But we want the bot to call you back by your name, so we need to provide a response to the bot in the format which it understands. Lex defines a JSON format which it expects for the bot conversation. The basic format is something like that given below:
{
    "sessionAttributes": {
    "key1": "value1",
    "key2": "value2"
    ...
  },
  "
dialogAction": {
    "type": "ElicitIntent, ElicitSlot, ConfirmIntent, Delegate, or Close"
  }
}
Dialog action allows you to decide the next course of action for your bot. We need the Close type dialog action to carry out our intended task. You can read more about the other dialog actions and their response formats here.
Close action allows you to close the conversation with/without sending a response to the user. So we can use it to call the user by the name and close the conversation. Our response will look like this:
{
 "dialogAction":
 {
  "fulfillmentState":"Fulfilled",
  "type":"
Close",
  "message":{
   "contentType":"PlainText","content": "Hi "+
name +", good to see you!"
  }
 }
}
You may have noticed that we need to read the name from the user response. So we need to write a bit of code and get the name from the params and send the above response to the bot. This is where Lambda comes in.
Introducing Lambda
AWS Lambda lets you run code without provisioning or managing servers. So you can write a Lambda function and hook it up to your intent to send the specific response you expect for that intent.
Let’s create the Lambda we need.
- Go to the lambda console and click Create a new lambda function.
- Select Blank Function and click next.
- We do not need any triggers, so click next.
- Provide a name for the lamdba and choose the runtime as Python 2.7.
- Copy paste the below code in the editor:
def lambda_handler(event, context):
    name = event["currentIntent"]["slots"]["Name"].title()
    response = {
                "dialogAction":
                    {
                     "fulfillmentState":"Fulfilled",
                     "type":"Close","message":
                        {
                          "contentType":"PlainText",
                          "content": "Hi "+name+", good to see you!"
                        }
                    }
                }
    return response
- Provide an existing role or create a new role for the Lamdba and create the Lamdba.
Now that our Lambda is created, the only thing we need to do is wire it up to serve our intent.
Wiring up Lamdba and intent
- Go to the Lex console and select the bot.
- Go to the Greeter intent we created.
- Select the version dropdown near intent name as latest to edit it.
- Change the fulfillment type to AWS Lambda function.
- Select the Lambda we created from the dropdown and save the intent.
Thats it! Our bot is now ready. You can build the bot and test it, and the conversation should go something like this.
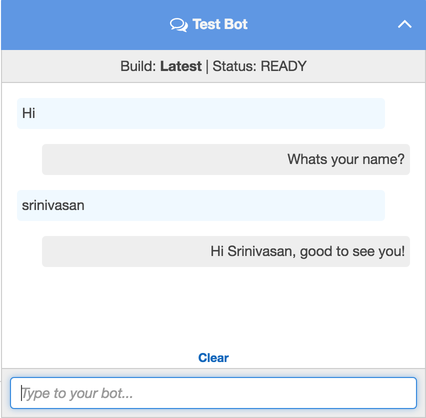 Greeter Bot!
Thanks for reading my post. Hope you have learned something from it. Planning to write a follow-up to this, which allows us to integrate this bot with Facebook or Slack. Feel free to leave your comments and feedback.
If you liked this article, feel free to reach out to me at https://kaizencoder.com/contact.