By RomRoc
Let’s continue our journey to explore the best machine learning frameworks in computer vision.
In the first article we explored object detection with the official Tensorflow APIs. The second article was dedicated to an excellent framework for instance segmentation, Matterport Mask R-CNN based on Keras.
In this article we examine Keras implementation of RetinaNet object detection developed by Fizyr. RetinaNet, as described in Focal Loss for Dense Object Detection, is the state of the art for object detection.
The object to detect with the trained model will be my little goat Rosa.

The colab notebook and dataset are available in my Github repo.
In this article, we go through all the steps in a single Google Colab netebook to train a model starting from a custom dataset.
We will keep in mind these principles:
- illustrate how to make the annotation dataset
- describe all the steps in a single Notebook
- use free software, Google Colab and Google Drive, so it’s based exclusively on free cloud resources
At the end of the article you will be surprised by the simplicity of use and the good results we will obtain through this object detection framework.
Despite its ease of use, Fizyr is a great framework, also used by the winner of the Kaggle competition “RSNA Pneumonia Detection Challenge”.
Making the dataset
We start by creating annotations for the training and validation dataset, using the tool LabelImg. This excellent annotation tool let you quickly annotate the bounding boxes of the objects to train the machine learning model.
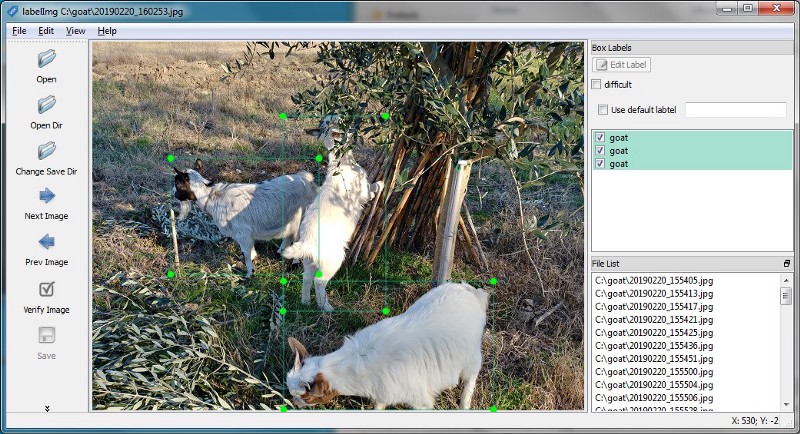
LabelImg creates annotations in PascalVoc format, so we need to convert annotations to Fizyr format:
- create a zip file containing training dataset images and annotations with the same filename (check my example dataset in Github)
objdet_dataset.zip|- img1.jpg|- img1.xml|- img2.jpg|- img2.xml...
- Upload zip file in Google Drive, get Drive file id, and substitute the DATASET_DRIVEID value
- Run cell that iterates over the xml files and creates annotations.csv file
Note: you can see my answer on Stackoverflow to get the Drive file id.
Model training
Model training is the core of the notebook. Fizyr offers various parameters, described in Github, to run and optimize this step.
It’s a good option to start from a pretrained model instead of training a model from scratch. Fizyr released a model based on ResNet50 architecture, pretrained on Coco dataset.
URL_MODEL = 'https://github.com/fizyr/keras-retinanet/releases/download/0.5.0/resnet50_coco_best_v2.1.0.h5'
We can even use our pretrained model, and continue the training from it. This option is particularly useful to train for some epochs, so save it in Google Drive, and later restart the training from the saved model. In this way we can bypass the 12-hour execution limit in Colab, and we can train the model for many epochs.
From my tests, a high value of batch_size and steps offers better results, but they greatly increase the execution time of each epoch.
We can start training from our custom dataset with:
!keras_retinanet/bin/train.py --freeze-backbone --random-transform --weights {PRETRAINED_MODEL} --batch-size 8 --steps 500 --epochs 10 csv annotations.csv classes.csv
Let’s analyze each argument passed to the script train.py.
- freeze-backbone: freeze the backbone layers, particularly useful when we use a small dataset, to avoid overfitting
- random-transform: randomly transform the dataset to get data augmentation
- weights: initialize the model with a pretrained model (your own model or one released by Fizyr)
- batch-size: training batch size, higher value gives smoother learning curve
- steps: number of steps for epochs
- epochs: number of epochs to train
- csv: annotations files generated by the script above
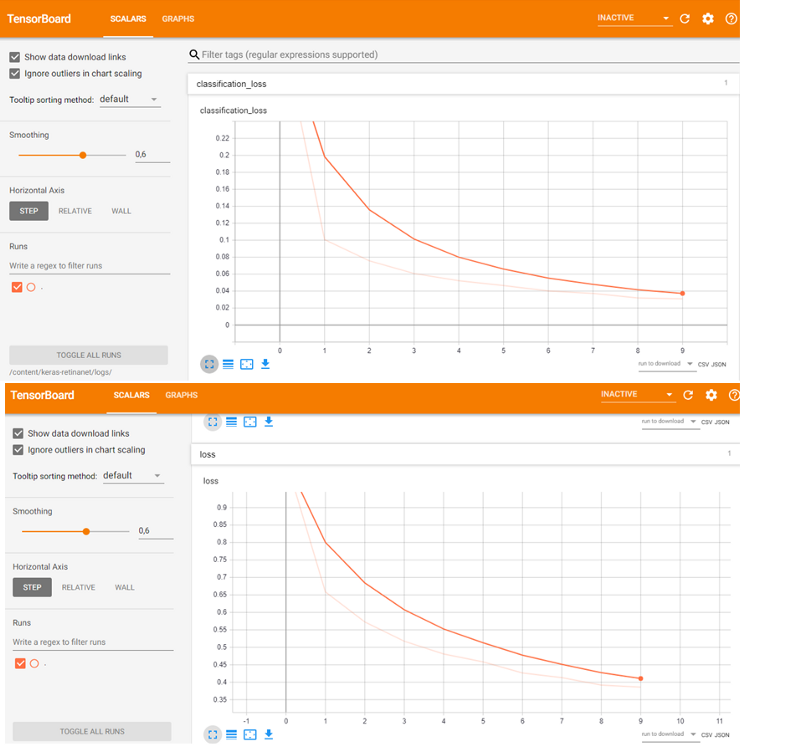
The training process output contains a description of layers and loss metrics during training, and as you can see, loss metrics decrease during each epoch:
Using TensorFlow backend....Layer (type) Output Shape Param # Connected toinput_1 (InputLayer) (None, None, None, 3 0padding_conv1 (ZeroPadding2D) (None, None, None, 3 0 input_1[0][0] ...Total params: 36,382,957Trainable params: 12,821,805Non-trainable params: 23,561,152NoneEpoch 1/10500/500 [==============================] - 1314s 3s/step - loss: 1.0659 - regression_loss: 0.6996 - classification_loss: 0.3663Epoch 2/10500/500 [==============================] - 1296s 3s/step - loss: 0.6747 - regression_loss: 0.5698 - classification_loss: 0.1048Epoch 3/10500/500 [==============================] - 1304s 3s/step - loss: 0.5763 - regression_loss: 0.5010 - classification_loss: 0.0753
Epoch 3/10500/500 [==============================] - 1257s 3s/step - loss: 0.5705 - regression_loss: 0.4974 - classification_loss: 0.0732
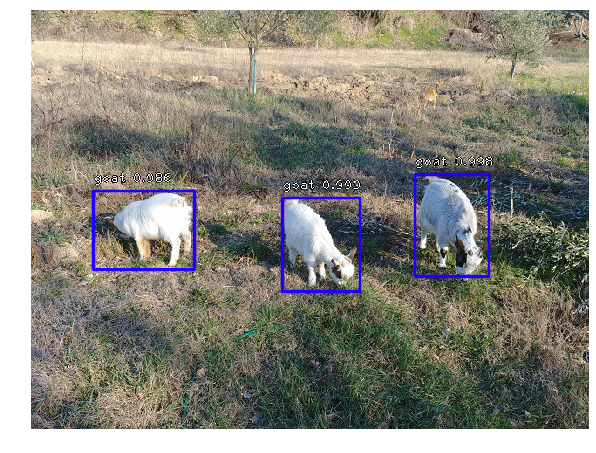
Inference
The last step performs inference of test images with the trained model.
The Fizyr framework allows us to perform inference using CPU, even if you trained the model with GPU. This feature is important in typical production environments, where people usually opt for less expensive hardware infrastructures for inference, without GPUs.
Let’s examine the following lines in detail:
model_path = os.path.join('snapshots', sorted(os.listdir('snapshots'), reverse=True)[0])print(model_path)
# load retinanet modelmodel = models.load_model(model_path, backbone_name='resnet50')model = models.convert_model(model)
The first line sets the model file as the last model generated by the training process in /snapshots directory. Then the model is loaded from the filesystem and converted to run inference.
You can change the values of THRES_SCORE, which represents the confidence threshold to show an object detection.

Conclusions
We went through the complete journey to make object detection with Fizyr implementation of RetinaNet. We created a dataset, trained a model, and ran inference (here is my Github repo for the notebook and dataset).
I was impressed by the following aspects of this excellent framework:
- this framework is easy to use to get good inference, even without much customization
- it was simple to transform annotations to Fizyr’s dataset format, compared to other frameworks.
In general Fizyr is a good choice to start an object detection project, in particular if you need to quickly get good results.
If you enjoyed this article, leave a few claps, it will encourage me to explore further machine learning opportunities :)