

Improve your Python programming skills by coding everyone's favorite Windows 3.1 game: Minesweeper.
We just published a Python course on the freeCodeCamp.org YouTube channel that will teach you how to code Minesweeper using the tkinter library.
Jim from JimShapedCoding developed this course. He has published many popular programming courses both on the freeCodeCamp channel and his own channel.
The game is fully implemented using Object Oriented Programming.
Here are the sections covered in this tutorial:
- Getting Started
- Creating Cells & Mines
- Minesweeper Algorithms
- Display Game data
- Finishing touches and playing the game
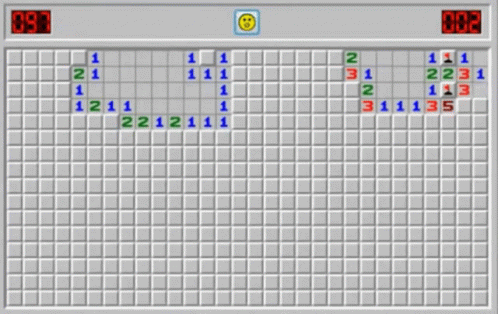 Minesweeper (but not the version you will create)
Watch the full course below or on the freeCodeCamp.org YouTube channel (3-hour watch).
Transcript
(autogenerated)
In this course, Jim will help you improve your Python skills by teaching you how to build a minesweeper game.
Jim has created many popular courses on our channel, and is an excellent teacher.
So he just started to learn Python and you will want to develop a cool project after learning the basics.
Well, this series of videos is exactly for you, because in this series of videos, we are going to develop a game with Python.
Now if you know the basics, and you took some basic course, no matter what channel or what course it is, then this is the series that you are looking for, because it will give you the basics of how to start structuring a Python project.
Now in this series, we will develop a game that is called Minesweeper, which is known as a single player game that is very fun to play, and also challenging.
Let's see what game you will learn to develop in that series.
Alright, so that's going to be the game that we will be developing throughout the series.
Now we can see that we have some amount of sales that we can go click and open them.
Now the main goal in Minesweeper is to not click on a sale that has a mind behind the sale.
So what that means it means that if I was to go and open it, then you can see I receive a number back.
Now this means that in the surrounding sales of that sale, there is one mind that I should not click on.
So I'm going to guess and say that you don't have in mind here.
And you also don't have in mind there.
And you can see that I'm quite right.
So I'm going to click with my right click of the mouse to mark it as a mind because if I was to click that with my left mouse click, then y will lose the game, right.
So what I'm going to do now is to try to get the rest of the locations that are mindless locations, right, so I'm going to click there.
And you can see that I received some numbers, you can see that, for example, around the sale, I have zero mine, so it is safe to click here, here and as well as there.
And now let's try to left click on that location.
And you can see that it says you clicked on a mind and I lost a game.
And the main goal is really to get all the locations that are not having a mind and then you will win the game.
So that's going to be a lot of thinking that we have to do in order to develop that game.
And it's going to be cool dealing with all the challenges that this game brings with it.
So before we get started, I'd appreciate if you can click on a like button on that video, it will help to spread the video to the entire YouTube.
And also if you know people that are just starting to learn Python, and they want to develop a cool project, then welcome them to watch my series as well, it could be very helpful for those videos that are just in the level of between getting started and to being an expert.
So with that being said, let's get started.
Now before we get into writing this project, I will expect to you to have Python installed on your computer.
And as well as a an IDE that is ready to go with and it recognizes the Python interpreter on your computer, I'm going to use Python 3.8.
But as long as you have a version that is above that version, then you should be fine writing this project.
Now we are not going to use too much external libraries, or too much code that is dependent on the version of the Python.
So that's okay, if you even use python three point 10 Or python three point 11 That will upcoming in the future probably.
All right.
So let's go ahead and get started.
Now for writing a board game a 2d game, then we can use a lot of libraries that are available in Python.
In this one, we are going to use TK inter which is very nice and a great library to practice because it comes with a lot of useful classes that we are going to instantiate to create our window.
So we're going to start by importing this in the following way.
So I will say from tkinter, import everything.
And that will be a great starter for us.
So the next line that I'm going to write here is to instantiate a window instance.
And we probably want to do that because our project is going to be in a window, and I'm going to name my variable root and this one is going to be equal to an instantiation of that key role the T K.
And that's just the most basic elements that you can create.
This is just a regular window.
Now when we will run this then nothing is going to happen because we need to tell to that TK that it should run until we close it with the X button on the top right.
So that will be by saying route dot main loop like that, right.
So we need to call that method and all the code is going to be between those two lines.
So if we were to run that, and you can see that we have the most basic window that is possible.
Now just a quick sidenote, the reason that I used the root variable is just a convention in TK inter project.
So it will be easier for you to look up for problems in Stack Overflow.
For example, if you follow those conventions or So let's go ahead and see some of the attributes that we can change here to make our window nicer.
So the first one is going to be obviously to change the size of the window.
And we can do that by calling the geometry function, I mean method of this route.
And this accepts a string that is looking like the following weight, X, the height.
And here, obviously, you can put any numbers you would like to now pay attention what will happen if I was to replace those with actual numbers like the following, then you will see the difference immediately.
And if I was to run that, then you can see how it changes.
Now we can also pay attention that it uses this string as the title of our window, we can change that by calling a method that is called Title and give it any title that we like to.
So we can go with a minesweeper game, and re execute our program.
And you can see the changes.
Now, I did not talk about this.
But by default, all the windows are resizeable.
And that might be something annoying when you create a lot of elements inside this window like buttons or frames.
So that's why we probably look to avoid resizing this window, because it will just give us an easier life when we go ahead and put some more elements in that window.
So the way that this is achievable, is by calling the resizeable method like that, and basically specify that we are not allowed to resize the width and the height of this window.
And that is achievable by basically passing in false twice, one for the weight, and the other one for the height.
Now, if I was to again, rerun our program, then you can see the effect of that you can see that this maximize here is disabled.
And that's just something that's going to make us an easier life in the future when we develop this game.
Now after we reach that stage, then we might also be curious about how to change the background color of our window.
Now, you could go ahead and use hexadecimal values if you know how to use them.
But basically, it gives them supports a lot of keywords for specifying the colors.
Now we don't want to too much deal with styling, we pretty much want to focus on the logic in the algorithm of how to write such a game.
So for that purpose, I'm going to keep it simple.
But still, we want to obviously have a nice visualized window in here.
So I'm going to go to that fifth line.
And I'm going to say router dot Configure.
And we're going to need to configure the background color for our window.
So we need to go ahead and call this method and we need to pass in BG equals to whatever color we like to.
Now in the description, you can find a list of colors that are available by using key word colors.
So in the description, there is a link with a large list of colors that are available, I'm just going to use black for this window.
And that will be added so you can see the immediate effect of changing the background color.
Alright, so now that we understood this, then let's go ahead and see how we can create some elements inside our window.
Now we are going to start with the most basic elements that you can create in a window, which is called a frame.
Now frame is just like a container that could contain more elements that we will create in the future.
Now we want to use those frames, because obviously we want to divide our window into some sections.
So it will be easier to understand where we want to locate each of our buttons or texts in the future.
For example, we could dedicate that area of our window for a title, right, so we will have the title over here.
And we could decide that we'd like to have a left sidebar.
So we could dedicate the left area of our window into being the sidebar to display the score, for example, something like that.
And we could have another frame right here.
So we call display the game here.
So it is just a great idea to divide the window into multiple frames, it's going to be just helpful to visualize different elements later on.
So what I'm going to do now is writing here a comment that will say override the settings of the window.
And right before the root.me loop, I'm also going to comment out run the window and then here is the exact location that we will start creating some frames.
So let's go ahead and get started.
So we said that we'd like to have a frame that is located on the top.
So I will name this variable top frame and that will be equal to a class that is named frame.
And once we will instantiate from this frame class, then it will be responsible to instantiate a frame which we will decide later on where we'd like to Located on our Windows.
Now the first argument that this frame must receive is what is the element that we'd like to locate the frame in.
So it is going to be located in the window.
So we will pass in root.
And then I'm going to separate those into multiple lines.
So it will be easier to read.
And as you can see, the parentheses are open here, close in here.
Now let's go ahead and give it more attributes.
So first things first, we'd like to give a different background.
So we can really differentiate between the frame and the window because it is going to be hard to understand where the frame is located, if we keep the same color, so just for debugging reasons, I'm keeping this red change later to black.
And we'll comment that here.
And then down here, I will decide the weight and the height.
So I will say that the weight should be equal to the exact same width size we gave to the window because we'd like to cover the entire window.
So this should be the entire weight, like the window, and the height should be probably one ad like that.
So it is just seven on the 20 divided to foreign, that makes totally sense.
And now that we got this, then we need to decide where we'd like to start this frame from.
So in order to do this, then I'm going to go ahead and say top underscore frame dot place.
Now this place will receive two arguments that are mandatory.
And before I go ahead and pass those, let me show you how the placement works in the window here.
So when we use the placement, then it needs to receive the pixels value.
Now we know that we have a frame that we'd like to start exactly from here.
And we know that it should probably cover this area, right.
But how we are going to tell it to start it from here.
Well in place, we need to specify the axis x and axis Y, meaning that if we want to start from the top left, then we need to give it the values of 0.0.
Because that is where everything starts in terms of pixels.
Now, the entire area here is 1400 for the because that is the axis x and axis, y is 720 pixels.
So the entire height here is 720.
Now if for example, we would want to have a button just for example, I'm not going to do that that time.
But let's say that we'd like to have a button that we wanted to start here.
So we wanted to place it in the middle of our page, right, so we need to take that value and divide it with two, so the axis x is 720.
And we know that we would like to have it in the top position as much as possible.
So this should be the value of axis y which will be zero.
So that's how the place method works, we need to specify the pixel value four axis x and axis y.
And let me clean everything that I draw here and go back to Python and give here the values of x equals to zero and y equals to zero.
And now check out how this frame will be visualized.
If I stop and rerun, then you can see that this is the expected result just like we wanted, it started from here and took the entire area of weight, and it took 180 pixels from the height.
So that's exactly what we want it now just for really making sure that you understood this, I am going to change this to x to 20.
And you will guess what will happen.
So if we were to read on that, then obviously it will start from a little bit left positional you can see where it is located right it starts just in here.
And if we were to jump to y by 20 and stop and rerun this, then you can see the results.
So this is how the place method works.
Obviously, I'm going to change those back to zero and continue from here.
Alright, so now that we understood that, then let's go ahead and try to create one more frame.
Now this time I want to make a frame that we will use as a left sidebar, where we will display maybe the score or something else that is useful.
So I'm going to go ahead and create a left frame variable and that's going to be equal to the frame.
So we will instantiate one more from that class.
And we want this frame in the crude and then we will say something like BG equals to another color.
I will just copy that line and paste it In a and let's use something like blue so we can separate between different frames, and the weight will be 360, I'm intentionally using the value that is just a quarter of that value.
So it will be easier for me to understand how much percentage of the entire weight I covered with my frames.
Now that I specify the width, I'm going to specify the height.
So I'm going to say that this should cover the entire height of our window.
Now pay attention that we already covered 100 ad pixels for the top frame.
So we cannot just say 700 ad, I mean, seven and 20.
Like that, we need to go ahead and remember our height size of the entire window and subtract this number by that number, right.
So we should be passing year 500.
For the now, don't worry if you think that we hardcode too much values, I am going to make sure that we don't really have any hard coded values later on, when we will be restructuring this project in the future.
So now we are focusing on understanding how TK inter works.
So now that we understood that, then let's go ahead and say that left frame should be placed in x equals to zero, but the y should be equal to 180, right, because we want to start it right after where the top frame is located.
And if I was to run our program, then you can see that we have the perfect result.
Just to really understand that again, if we were to take that Y axis and jump that by 20, then you can see that it starts right from here, because it jumped 20 pixels in the y axis.
So that's why I want to make sure that we keep the value of 100 ad.
Alright, so now that we have reached that stage, you can notice probably that we are going to have too much hard coded numbers in terms of using the weight and the height and the pixels, etc.
So that's a great time having a separated file for all of our constants, and have at least some variables stored in somewhere.
Now, I'm not going to make that in our main.py file, because that might be too much information that needs to be stored in one file, besides I'm going to grab in a new Python file, and I'm going to call that settings.
So inside here, I can use some constants that will be helpful.
And to really show you those windows side by side, let me use the right click and split vertically option.
So we can start thinking about some good candidates for variables that we'd like to store here.
For example, we can start with the width size of our window, we can say that width is equal to 1440, we can say that the height is equal to 720.
And we can immediately go back to our main.py file and say something like import settings.
And then we could go here and use a formatted string.
And we could just convert those into that string, right, we can say here, settings, dot width.
And we can go with settings dot height, like that.
And that's just a great change in our project.
Now, if I was to run our main file, then you can see that nothing is really changed.
And we are in good position to continue doing those manipulations to store more variables.
Now, if you remember, I said in the tutorial that I used intentionally those numbers, so we could have an accurate percentage of the weight size.
For example, there was a great reason that I use the 100 ad value in the top frames height, because one of the ad times for is similar to 20.
So I can say that I like to consume 25% of the entire height of our window.
And those are things that are important because we will not have too much hard coded values.
So what we can do now is having a file for some functions that could be helpful to calculate those stuff.
For example, we could have a function that will calculate how much is 20% of the entire height of our window, right? So we can go ahead and use another Python file for that.
We can call it utilities or utils.
And we could have a function that will calculate the percentage amount of our height.
At first we could go ahead and use import settings so we We'll import the settings of our project.
And we could go ahead and use a function.
So let's call this function height underscore PRC T, just a shortened version of percentage, right, so we could go ahead and receive here, the percentage amount as a parameter, we make this a bit smaller.
And then I can just go ahead and inside that, I can return the value relying on the received argument in here.
So I can go ahead and use return.
And I can say, settings dot height, divided by 100.
And I can cover this thing with parentheses.
And I can multiply that with the percentage amount.
So now I want to validate that I have done a great job of writing this function, right, I don't immediately want to call my functions, and just try to use them because I might have a bug when I write a function.
And that's also a great advantage locating different functions in different files, because it will give you a huge advantage of debugging your stuff.
So for example, I could temporarily only execute the utils.py file and just test my function, I could go ahead and try to call it and passing il 25.
and validate that I will really receive 100 ad back.
So I can go ahead and use print, and execute utils.
So I'm not executing my original project.
And now if you go ahead and you see the value here, you can see that I really receive one ad.
And that's good.
That means that we have done a great job of writing this function.
And now I can really start using it in our original project meaning in the main.py file, so I can go ahead and import all the utils file as well I can say import utils.
And I can go ahead and call the height percentage function, I can use utils dot height, PRT CT and pass in 25.
And again, this will have no effect.
This means that we have done a great job only now we are more dynamic and we do not hard code values.
We are going to repeat ourselves with the weight very quickly.
And then we will move on to the next topic, right, so I'm going to go here, and I'm going to use this height, I mean weight, PR city, we will receive again percentage, and we will say return open a parenthesis just so we can have a cleaner look in this formula.
And we can say settings dot width divided into 100 multiplied by the present age.
So now I can go ahead and do pretty much the same in the different hard coded values here.
So let's take a look.
So in the top frame, we use the entire window.
So it makes sense to change this just to the value of settings dot width, right because it is already 1440.
Let's go to our left frame.
So in the left frame, we see that we use 25% of the entire width.
So we can go ahead and use utils dot height PR CT, excuse me, with brct I will change that.
And then I will pass in 25.
And you can also see that in the height, we use 75% of our entire height.
So that means that I can just use here utils dot height Poct and passing year 75.
And I can do the same when I want to locate my left frame.
And you can notice how the y axis value here is again 25% of the entire height.
So I can say utils dot height brct and pass in here 25%.
Now let's see if we have done a great job, you can see that the result is again perfect.
Alright, so now that we got this, then let me change those to the original values and continue from here to creating our last frame here.
So we said that we like to have also one more frame that is going to be in the center of our page.
So that we will have a frame that will be dedicated for our game, right.
So I will quickly go ahead and create a center frame that will be again equal to a frame and this should be inside route the background should be maybe green so we can separate it.
I will need to change all of those to Black just in a few minutes.
And then I like to say weight is equal to utils dot weight PR city and this time I'd like to use 75% of our entire width and the height is going to be again utils dot height ferocity and this will be 75 percent as well, now the place method will receive the following arguments.
So the x value should be utils dot with PRC at 25%.
Because we want to start it from here, and the height, meaning the y axis should be the same, right, so I'm going to duplicate that, and Y and change this to height periodicity.
Like that, because we want this one to start from here, right, so it's going to take 360 pixels from the left, and 180 pixels from the top.
So now, if we were to test our code, then you're going to see that we have just the expected result.
So now it's a great time to change our frames to black.
Because we have done a great job, we can go ahead and change those to black.
Now what you're going to see is just a window that is looking like a pure black window.
But in the background, in the real Python code, we have two frames that are divided, just like we wanted.
So now that I have changed the entire background to black thing, we are just going to see the same.
But in the background in the original code, we really have two frames, I mean three frames, okay, so until this point, we know that we have a frame here.
And we also have a frame that is here.
Now, we said that around here we are going to write some information about the game.
And here we will have the Minesweeper title like that, right.
But what we want to do here in the center is actually developing the board, right, the each cell that a player is going to click on should be here.
And here, we should locate all of our cells.
Now creating hard coded 36 cells or 49 cells, basically just a huge amount of sales is going to be hard.
So here's the exact location that we want to make our stuff a little bit more dynamic, we want to be able to go ahead and do a for loop that will go ahead and create those kinds of cells dynamically.
Now, we also want to do behavior for each sell the kind of a button behavior so called because we want the ability to click on something.
And then next thing is something will happen in the game right, we will see some information about that sale.
So that is the exact time for creating a class that we can name it cell because we know that for each cell, we also like to give some attributes like if the cell is mine or not.
Or if this is a cell that is already opened or it is closed.
So that's exactly the time that it is a great idea thinking about creating a class that we could name Sal.
And we could create some instances of that later on.
Now, just as a quick example, I'm going to delete that after I'm going to show you the basic example.
But here's how you can create a button on a window using the TK Inter Library, right, so let's use a random variable like button one.
And that will be equal to button like that.
Now this button is going to receive several arguments.
Let's say that we want this inside our center frame.
And we want to give the background color of blue.
And let's give it a text.
Sorry for missing the comma here.
Let's give it a text like first button.
And then what I'm going to do now is going to say button one dot place, we will place it in the first pixel in x axis and y axis in the center frame.
So it should be in the very top left position have that center frame, right.
So if we were to go ahead and run this, then you can see that I have a button right there and it is clickable.
Now we know that we want to abstract it with our custom class because we need to give that cell so called some attributes as I described earlier.
So that's why I want to create a cell class.
And then we will also see how the button class is going to be involved within that cell class we will start developing but let's actually go ahead and start working on this right.
So I just wanted to show you how to create a button before we go ahead and write some more code.
So I will go here and create a cell Python file right and I will zoom in a bit so everyone can see and I will use class.
So now temporarily, I don't want to inherit from the button class right because it is not quite correct to say that a cell is a kind of button we know that we use inheritance to describe kinds of things like dog is a kind of animal.
So dog class should inherit from a class that is an animal class.
But that is not exactly the case you will.
So I'm not doing that.
And now that I created this class, let's go ahead and write the constructor of our class.
Now as we know constructor is a metal that is going to be called immediately once a class is being instantiated.
Now I will receive temporarily here, one parameter, which I'm also going to provide it a default value of false.
And you can see that it is called is mine, right, and I'm going to say self.is underscore mine is equal to is underscore mine, like the following.
Alright, so now that we have this, let's see how we are going to use it in our code.
So I will go to my main.py file.
And we'll scroll just above this comment here, run the window.
And I will need to import the class for sure.
So let's go ahead and use from cell which is the file, import the sale class like that, right, and I'm just going to place it in that line.
So we will have a cleaner look.
And now I'm going to go here, and I'm just going to say c one is equal to sell.
And then I'm just going to leave it as it is because it has a default value of false.
And now that I have this, then I can just go ahead and run it.
And you can see that the class the instantiation is probably a good because we don't receive any arrows.
Now obviously, we don't see any button here because we just created a custom class without relating it to the button class that comes from this TK inter library.
So now this is exactly what we are going to do.
Right, we are going to go to our cell file, and we are going to create a button instance that is going to be belong to each cell object.
So what that means, it means that this self is going to receive one more attribute that we could name it sell button object, something like that.
And then we are going to assign it a button object.
And that's how the relationship between the sale objects and the button object is going to be accomplished.
So first things first, I'm going to close the game temporarily.
And I'm going to go here and say from T A inter import.
You know what, let's import just the button class.
Let's not use a wildcard import here.
And now I'm going to go ahead and say that this should be equal to none at first.
And then what we're going to do now is going to create an instance method that will create this button for us and I will assign it to self dot sale button object.
Let's take a look how we are going to do that.
So I'm going to say Create button object.
And we will receive self only for now.
And we are going to say here button is equal to a button like that.
And we are just instantiating an instance of that button class.
Now currently, we do not receive any additional parameters other than the self, which is mandatory in instance methods.
So we need to be receiving at least one parameter that is quite important, which we can name it location, because we know that for each element that we'd like to create in our window, we should be passing in a piece of information that will make TK into to understand where it should locate that element.
So if we receive a parameter that is called location, then I can just pass in the location directly.
And then whenever I call this method, I will refer to the actual sensor frame which will be from the main.py.
That's why I'm receiving here the location parameter, right.
And just for a temporarily example, let's give it also a random text like text like that just as a beginner.
And then I'm going to say that self dot sale btn object is going to be equal to the object of the button that I have just created.
And that is going to be helpful because that will help me to later on customize this button once I assign these attributes into a button object, and you're going to see just in a minute how that is going to be extremely helpful.
So let's go ahead and split now vertically so we can understand what we have done here.
So on the left side, we have the cell file and on the left side, I'm going to work on my main.py file.
So what I'm going to do now here is going to go ahead and say c one dot Create button object because I can allow myself to call that button and then I have the ability to pass in the location because center frame is a variable that is accessible from the main.py file, right so I can directly say center frame as a parameter.
And then I can keep working with my button object thanks to the attribute With a sine wave that I have done here, right, so I can go down and I can say c one, dot cell btn object, dot place like that.
And I can say that I would like to place it in x equals to zero and y equals to zero, just like we have done in the beginning of this episode.
And now that I have done this, then it is a great time testing our code.
So I'm going to run this application and you're gonna see that we are having that button.
So that's a very fine start developing this application and spreading the code in different files.
So it will be more maintainable and more readable.
Alright, so now that we have done this, then we need to understand that we are going to have some problems in the future, if we will keep using that placement or in order to place our elements.
Now in order to show you the problem that I'm talking about, I'm going to create here one more instance of the same class that we came up with.
So I'm going to say that c two is equal to a cell, like the following.
And then I'm going to say c two dot Create button object, and it's going to be center frame again.
And then I want the cell just near the first sale, right.
So I shouldn't be saying something like see to that sale button object dot place.
And then we should know dynamically how much pixels we should jump, right in order to place it exactly in the location that we want.
But that's going to be a lot of headache, and a lot of trouble, always knowing the exact location that we want to pass.
Because, for example, let's say that I will pass in x equals to 20 and y equals to zero and run our game.
Now, you can see here that the right button looks like it is before the left button, because we can almost not see the text on the left button here.
So we can try to increase this amount of X to 40, something like that, and re execute our game.
And you can see that now it is much better.
But when we want to deal around creating multiple elements dynamically, then maybe using the placement or isn't the best option here.
So we need to consider changing our placement method when we use TK inter when it comes to 10s of elements that we want to create dynamically.
And we can do this by changing our method from place to grid.
Now what grid does, it takes the parent element, which is quite right there, and it turns the parent element into columns and rows.
Now the beauty is it counts from zero the columns and rows.
So for example, if we want to place a button right there, then we can say that we'd like to greet that, and then give it some values that will be considered as the column number and the roll number.
Let's see this in action, right.
So it might be a little bit confusing to understand in the theory.
But now that we will go ahead and code this, it will be easier to understand.
So I'm going to delete everything from here and go back to pi charm.
And actually go ahead and change the placement method from grid on both of those buttons here.
So I'm going to go to my C one and I'm going to say grid, and then I'm going to pass in here column equals to zero and row equals to zero like that.
Now I'm going to grab those arguments and pass in the same changing this method to greet as well.
And then you're going to see the difference when I will be saying here rho equals to one.
And now if we were to go ahead and run our program, then you can see that we have a difference.
This text here is used to be at column zero, row zero, but this one used to be placed at column zero row one and that is the reason you see the second button under the first button.
And if I was to change this to zero, and make that one, meaning column equals to one, then you're gonna see those buttons one near each other, which is perfect.
And it will be helpful when we want to create tons of buttons in order to start preparing for the Minesweeper game.
Alright, so now that we understood how the grid method works, then we are going to start creating those cells like we want in our minds, we put game now that's something that we can achieve with a nested for loop.
So let me show you how it's going to look like so it will be easier to maintain in the future.
And let's delete this first.
So I'm going to start my first for loop and I'm going to say for x in range of five for example.
Now range is just a function that is responsible to generate all the integers in the given the range of numbers.
If I was only passing your five, then it will generate 0123 and four like that.
Right.
So I'm going to go inside here and then I I'm going to say for y in range of five.
So I'm basically achieving here the behavior of creating 25 buttons because I have a loop that iterates, five times inside and a loop that iterates as well, five times.
So now I can go inside of that.
And I can say that c is equal to sell.
So I'm instantiating an object of it.
And then I can go ahead and say, create btn object.
And as the location, I will pass in central frame for sure.
So now that we have created the button object, then I can access it with the property that we have created previously, which was cell btn object and I can use the grid option.
And then I can pass in column equals to y.
And I can say row is equal to Wickes.
Like that.
And now let's see the result of that.
So I'm going to run that.
And you can see how beautiful it looks like.
Right, so we are already starting to see something similar to a minesweeper game.
And that's perfect.
Now what we can do, instead of hard coding in the five on those four loops, we can actually allow ourselves to go to the settings file, and write here a new setting that can look like grid size.
And then we can decide that it is equal to any number we like to I will say six, just because this was the number that I showed in the beginning of this entire series as an example game.
And then I'm going to go here and say, settings, dot grid size.
Now, remember, I import the entire settings file right there, right, so I can access the grid size variable.
And I can also say here, the same thing.
And then I can just run our program again, and you can see how it looks like.
So we have a six columns and rows like that.
And that's just a great starter.
Now, before we go ahead, sorry about the confusion here, I think it will be better if we will say column equals to x and row equals to y.
Because if we were to, for example, change this to three and not the settings dot grid size, then it's going to be more accurate to say that we have three rows, right, one, two, and three.
So that's why I'm going to stick for those column equals to x and row equals to y, like the following.
And then now I can just convert this back to Settings dot grid size, and continue from here.
Alright, so now that we totally understood this, then we probably want to also understand how we can assign events to our buttons.
Now an event is basically a list of actions that you want to take once you click on a button.
Now we said in the beginning of this entire series that we like to differentiate between the action that we are taking when we left click on a button or when we right click on a button, right because those are two different actions in a minesweeper game.
So that is going to be very cool designing this thing in the Minesweeper game, giving the events for our buttons is actually very fun part of our game.
So let's see how we can do that.
So I'm going to go to my cell.py file.
And here's the exact location that we can start assigning some events to the buttons that we create.
Because that's exactly the location that we create our button object, we can also go ahead and assign it an event.
Now let's go ahead and write this.
So when we want to assign an event to a button, then we want to work with a specific method that is called bind.
So with bind, we can actually go ahead and say that we like to print something when we left click on a button.
And let's see how we are going to do that.
So we're going to need to pass in two arguments, the first argument being the key that is clicked on the button.
And as well as what is the function that you want to be executing once you click on whatever button you click at.
So first things first, we want to say that we want to do something when we left click on a button.
And the convention with the TK enter for passing in the left click is going to be something like the following.
So I'm going to use the less than sign.
And I'm going to say button capitalized dash one greater than sign.
So button dash one is just a convention of saying left click button dash three is going to be right click and we're gonna see this just in a second.
And then we also like to say that we'd like to execute some function, right? That's going to be the second argument of the bind method.
So let's start with the most minimalistic function that we can come up with.
So I'm going to create a metal inside my soul class, which I'm going to be calling left click Actions like that and that's going to also receive silver for sure it's an instance man Third, and then it's only going to say, I am left clicked, just as a basic example, I'm going to leave it as it is.
And now that we have done this, then I can easily pass in the reference for that method.
So it's not going to be like left click Actions.
And I'm going to call this method like that, besides, I'm just going to give it the reference, like the following.
So pay attention that you are not calling this method, you are only passing the reference of that method.
So now that we got this, then let's check it out and see if that is going to work for us.
So I'm going to go here and make this a little bit bigger.
And I'm going to try to click on one of those cells here.
And you can see that we have an error.
Now you can see that it says here, a left click Actions takes one positional argument, but two were given.
Now that might be a familiar arrow that you may be so in my op series, but basically, this means that this self click Actions tries to pass in two arguments, when it tries to call the left click Actions method.
Now, that means that this method needs to be receiving one more additional parameter in order to make this event assignment successfully.
And that comes from just as a convention of Kindle, it needs to be receiving one more parameter, when you assign something to an event might be a little bit confusing, but that's the way that events are working in TK into.
So by convention, I am only going to receive in an initial parameter that I'm going to call it event.
Now this will be enough because tkinter tries to pass into arguments.
So passing year, another parameter here shouldn't be perfect.
So I'm going to re execute the program.
And then I'm going to try to click on some buttons.
And you can see that we have a great result here.
For each button that I'm clicking, I am receiving this text of I am left clicked and that is perfect.
Now I'd also like to add in here, one more line, which will be responsible to print in the info that comes to that event parameter.
And you're gonna see that it is actually filled in with some information that TK into passes in, in the background.
So now let's again run our game.
And if I was to click on something, then you can see that I received some info about what was the event that is all killed.
So you can see that I have a button press event state equals to mod one, just basically some metadata about the event that has been occurred in that moment.
And you can also see that I received the values of x axis and y axis for the exact location that it was clicked.
So that is just a great background information that you can go ahead and do something with it.
If you'd like to.
Now you can clearly see why this bind method requires from us to receive one more parameter, when we assign a function as a event that needs to be called.
Now it might be a great idea to also prepare the bind method for our right clicks.
So I'm going to minimize this console.
And I'm just going to duplicate this line.
And I'm going to say that we should be also binding the button dash three.
So this will stand for right click, and this will stand for left, click.
Now you might also want to try button dash two if button dash three doesn't work for you.
Just for safety.
If three doesn't work when you right click three, also button dash two.
If you have any further troubles, then let me know this in the comment section.
Alright, so I'm going to say here, right click Actions.
And obviously, I'm going to go here and say this right click Actions.
And again, I'm going to receive this event.
And I'm just going to do the same right.
So at first I'm going to print the event.
And I'm going to say I am right click, so we can differentiate between the two.
And I'm going to again, execute our game.
And I know we can see this, but I'm going to right click on that.
And you can see that now we have the text in the console.
That is the exact same like the right click actions.
So that is great.
And we were able to actually assign some events to all of our buttons dynamically.
Alright, so in that episode, we are going to focus a lot in our cell class, because we're going to need to write some logic to prepare the Minesweeper game.
That's going to be very fun to write all of those new attributes that we'd like to receive in this cell class.
And as well as writing all the methods that will be responsible to write the logic of our Minesweeper game.
So there's going to be a lot of object oriented stuff that we're going to write in that episode.
And that's going to be very cool doing all of those.
Alright, so first things first, we might want to start by increasing the size of our buttons to make them more readable.
And that is achievable by going ahead to the instantiation of our button class inside this Create button object, and passing in some additional arguments that will be responsible to really increase the size of our buttons.
Now, before preparing the project, I figured out that passing in width equals to 12.
And height equals two, four are great values.
When you play Minesweeper, where it has 36 cells, now, you can actually go ahead and pass in here some formula that will be responsible to make the buttons smaller if the grid size gets bigger.
But in order to make that simple, then I'm just going to leave it as it is.
And I'm going to assume throughout the tutorial, that we are only going to play the Minesweeper game with 36 buttons, meaning the grid size being six, which is that value that I'm talking about.
So now I'm going to execute my main file.
And that's how it looks like right now.
And that's just bigger and more readable and more comfortable to play with.
Alright, so now that we came up with this, then we are going to need to take our next steps in order to have some more info about each of our cells.
Now, for example, we don't have even one single indicator about which cell is what, until now, because the only thing that we know about each of our cells is the fact that it is just writing a text in all of those 36 buttons.
But it could have been great if we could have some indicators about each of our cells in here.
So for example, until this point, we know that we have 36 buttons.
So we have those, and we have those, right, but we don't have even one single indicator about each cell.
So for example, it could have been nice if this cell, for example, could have an attribute like x equals to zero and y equals to zero, because that is just something that represents that cell specifically, that means that we could receive some more attributes in that cell in the same goes, for example for that.
So here, right, it could have been great if we could say that this cell had an attribute like x equals to five and y equals to five.
And the reason I use these five and five in here, this because we start to count from zero, so 012345 in the same counting method, from the top to bottom, like that.
So let's go ahead and receive some more attributes in this class.
So I'm going to go to my init method, and I'm going to say X and Y, like that and make sure that you add those comments.
And then I'm going to use the self assignment self dot x equals to x, then I'm going to do the same for self dot y, self dot y is equal to y like that.
And now that I have this, then I can actually go ahead and go to my main.py file and pass in those numbers, because I iterate over those numbers when I create those cells.
So you can already see that we have some problems instantiating the cell, because we need to pass in some mandatory documents.
And once we do that, then we are totally fine.
And now that we have some attributes in each of our cells, we can actually use those to temporarily display different text on our cells.
So we can change this into a formatted string, for example, and we can use the reference to self dot x comma self dot y inside the curly brackets.
And now I can execute our game.
And you can see that now we have some attributes where each attribute represent a unique sale, right, so we know that x equals to five y equals to five is that sale here.
And we know that 2.2 Is that sale over there.
So that's a great starting to prepare the algorithm that we want to write to have the Minesweeper game.
Alright, so now that we have done this, then we want to prepare designing, creating some minds between all of those cells.
Now we know that in a minesweeper game, when we start each game, the game picks up some random cells, and it converts them into cells that are forbidden to click meaning minds.
So we need to somehow write an algorithm that will be responsible to take a couple of cells and turn them into minds.
Now we know that we already have an attribute that is called ease mind.
And by default, all of those are false.
So now we're going to need to write a method that will pick up some cell objects.
And we'll convert those attributes from Bing is mine equals to false to is mine equals to true, so that we will have a great beginning of the Minesweeper game going on.
Now, we know that temporarily, all of the cells are mod minds, because we always assign false but that's something that we are going to change just right now.
So in order to start designing this, then it's a great idea to have a static method, which we can call from the main.py file, right after we instantiate the sale objects.
So it's a great idea to just have a method that is not belong to each instance, besides it is belongs globally to the class.
And that's the definition of a static method.
So I'm going to use that decorator or static method.
And I'm going to say def, randomize mines, like that.
So this means that it takes a couple of cells and turns them into mines.
So that is exactly where we'd like to write some logic to turn some cells into mines.
So temporarily, I'm going to pass in the past, so we will not have any arrows.
And now let's see how we are going to do that.
All right.
So first things first, we need to understand how we can store all of our instances inside the list.
And there is a great reason that we want to do that in that stage, because we instantiate 36 instances, but we don't have any control how we can take further actions with those 36 instances that we instantiate from this sell class that we have here.
So in order to have a collection of all of our instances in one place, then it is a great idea to create a class attribute inside our cell class, which we can name something like all.
And that's going to be a an empty list temporarily.
Now we're going to append the objects of the cell class to that all variable.
And that's something that we can do dynamically inside our init method, because this method is the method that is being called every time that you create an instance.
So it totally makes sense to go ahead and do here something that will be responsible to append the object to the cell dot all list.
So we can have all the instances of this cell class in one place.
And that means that we're going to need to say here, cell dot all.
Now that's the way that you can access class attributes inside your class, you might have thought about using jest all.
But when we work with classes, you always need to specify the class name as a prefix when you access your class attributes.
So we can say cell dot all dot append, and then we could add the object itself, which is self.
So now that we have done this, then we probably like to test if that is something that's going to work.
So we can go to our main.py file.
And right after we instantiate all of those objects in those lines, we can say print cell dot all.
So we should see a list with 36 elements inside this, also here.
So you can see that this is exactly the result, you will see that we have probably told the six elements in here that also we can test.
With using the len built in function.
Before that, you can see that we have 36.
Now you'll probably notice that the objects, the way that the objects were represented in the console was not too much friendly, it could have been great if we could override the setting, that we could see the objects nicer and more friendly.
And that's something that we can do by overriding some magic methods.
So we can go to that soul class.
And we can override some magic method that will be responsible to change the way that the object is being represented.
And I'm talking about a magic method that is called our EPR.
Like that.
So we can go ahead and say that this should return a formatted string that could look like the following cell.
And then we will pass in here self dot x and self dot y.
So that's just more friendly string that will represent each object more friendly.
So besides seeing random IDs, then we can see real friendly names for each of our objects.
Next.
And if we want to test that this is going to work, I can again allow myself to execute this main.py file and confirm that.
And you can see that now I have way more friendly objects in here, you can see that we have perfect result.
All right, so now that we understood this, then I want to work side by side, left side will be the main.py file, and the right side will be the sale.py file.
Now, I want to check out each time that I'm doing a great job in writing some logic inside this randomized mines.
So I'm going to go ahead and right after I instantiate those, I'm going to call this randomize minds static method.
So I'm going to say cell that randomize minds like that.
And I'm going to leave it as it is, and every time that I add a piece of code inside this method, then I want to execute the entire game to see that I did not screw up anything.
All right, so first things first, in order to randomize the things, in order to pick some random things from a collection, we need to work with the library that is called random.
So I'm going to go to the first line here, I mean to the second line, and I'm going to say here, import random.
Now, random has a very specific method that is responsible to pick randomly some elements from the given collection.
Now I'm going to show a simpler example at first.
So I'm going to go here and say that I have a list.
And again, that's going to be just a simple example, to show you how that method I'm talking about works.
So I'm going to have a list with three names.
All right, we're going to have Jim, Michael and Paul.
And then let's say that I want to randomly pick two names each time.
So I'm going to go ahead and say random dot simple, simple is a method that at first accepts the collection that you want to pick randomly elements from, so it will be my list.
And then the second argument is the amount of elements that you want to pick each time.
So since I want to pick two names each time, then I'm going to pass in here, too.
So let's also assign this entire statement to a variable.
So I'm going to call this picked names, right, and then I'm going to just print it.
So print picked names.
Now pay attention that I call this method.
So we should be seeing the results when I execute this game.
So when I go ahead and execute our program, then you can see that I receive Jim and Michael.
And for our next one, we can totally receive different names, you can see that this time I received Jean and Paul.
So that's exactly what we want to do with our minds, we want to randomly pick some cells, some silver objects, and then just change the attributes of ease mind to true because all of them are false.
So now that we understood this, let's go ahead and write the needed logic inside the randomized minds.
So my list is going to be sale dot all because that is the collection that I want to pick some objects randomly from it, right.
So I'm going to delete this line right after we understood how the sample works, I'm going to change this variable to picked cells.
Because that is just a more realistic variable name.
And then I'm going to delete this line temporarily, we're going to jump a line here.
So it will be easier to see the arguments that are passed.
And the collection that I will be passing here will be filled out all because the cell dot all includes all the instances, right, and then we need to decide the form an integer, which will be responsible to be the element count that should be picked.
Now, if we have about 36 cells, then it might be a great idea to pick at least as a quarter of a value of it.
So maybe nine cells to convert them into a mine will not make this game too much difficult to to basically win it right.
So I'm going to pass in here nine temporarily just to see how that is going to work.
Then I'm going to say print picked cells and execute our program.
And then you can see that we have randomly nine cell objects that have been picked in here.
So that's an extremely useful method that we can go ahead and use it to pick up some cells and convert them into minds.
So now that we have a picked cells collection, meaning get picked cells list, then we can actually iterate over the picked cells objects, and only changing the attribute of is mine from false to true.
So let's go ahead and besides print pixels, use a for loop that will look like the following.
So I can say for pixel in pixels.
And then now I'm iterating over each object.
So I can say pixel.is.
Underscore mind equals to true.
Now, the ease mine is coming from here, because we already know that we have such an attribute.
And we just want to change that to true.
And now that we have this, then let's go ahead and run our program.
And we should not be seeing anything but in the background, the attribute has been totally overridden by the value of true.
Now if you really want to test that, you can go ahead and after calling the randomize minds in the left side, you can go ahead and use something like for C in cell dot all then print the c.is mine.
So we should be seeing some truths, some falses.
And that's going to be the final testing, that will really show us that we were able to change some attributes.
And you can see that this is exactly the result.
So we have done a great job picking up some random objects, and just turn them into minds.
And that's just a one way that you can do that.
Okay, so now that we have done this, then it totally makes sense to delete those sorts of debug lines.
Now we need to figure out how we are going to be dynamic deciding the value of this picked minds amount, right, so we can go ahead and use the settings.py file to actually use some formula to calculate how many minds we want in our game.
So we can go ahead and use here one more setting that we can name minds count in that might be equal to something like the following.
So I will open up the parentheses and I will say between those read size power of two, and then I can divide it by four.
Because in that game, currently, we have totally six cells because we iterate over the value of six, two times.
So it makes sense that we write such a formula, right, so six power of two divided by four is nine.
And that is pretty much the value that we look to have, when we want to have at least a fair Minesweeper game, we don't want to have half of the value, we don't want to have like 27 minds, because that's just going to be too difficult to to win that game.
So about a quarter of that value is just fine.
Now, you might also ask yourself, what is going to happen if one day I will change the grid size to seven.
So seven power of two is 49.
And divided by four is 12.
Point 25.
And that is just not good, because mine's count will be an integer.
So I'm just going to add here one more first slash.
And when you use double first slash, it is forcing it to be in an integer, it totally ignores the remainder.
So we can just add here, one more frost slash, and that will be okay.
Now I can go back to my cell.py file, and I can refer to that value settings that mines count.
And I see that we don't have any input line about the settings.
So I can just go ahead and use input settings up top, and we should be fine.
All right, so in that episode, we are going to design what we should do when we left click on a cell.
So first things first, we should be deleting the text that we have wrote to each of the cells here, which represents the x and y axis values.
So let's go ahead and delete this first.
So I'm going to take that line off because this used to be the text of the cell.
So I'm just going to make that we equal to nothing.
And then we need to decide what we're going to display here.
Once we left click on a cell.
So let me re execute the game like that.
And now we can see that we don't have anything.
So the expected reaction here is whenever we click left click excuse me on their cell, then we should be displaying a number, which that number will represent how many minds there are surrounded that cell.
So what that means, it means that if that's a mine, and that's a mine, and as well as this one, then we should be displaying here, three, because this cell should figure out how many mines there are surrounding that cell.
Let's take one more example here.
So let's assume that we clicked here, right? Then this cell should start thinking how many minds there are surrounded the cells.
So this means we talk about all those cells.
And let's say that we have a mind here, right? We have one mind there, and all of those are not mine.
So we should be displaying here.
One, right? So that's going to be the main goal in that episode.
And it's going to take a lot of algorithms that we We'll be writing inside methods inside the cell class.
So it's going to be extremely challenging and also fun doing that.
And let's go ahead and get started.
Alright, so I'm going to start by scrolling down to the left click Actions.
And then I'm going to delete everything here and start writing here some actions that we need to take.
Now one of the first things that we're going to write here is an if conditional that will check if that cell is actually in mind.
And I can do that by writing if self.is Mine.
So the reason that I can do that is because I know that in the beginning of the game, I already call this method that is called randomize mines, which takes a couple of soul objects, and then it sets is mine equals to true, so I can totally do that.
And then if the click cell is a mind, then I want to start taking several actions.
So those several actions are also going to be located under a method that we can write right now.
So if self.is Mine, then I can go ahead and say self dot show underscore mind, something like that.
And that is just a theory.
I know that show mine is not a method that exists right now.
But that's what we're going to do just right, now I'm going to go out of that method.
And then I'm going to say def, show mine.
And I will receive self as a parameter for sure.
All right, so in that method, I am going to basically write the actions that will be responsible to display this cell as a mind.
Now we know that here, we should write a logic to interrupt the game and display a message, a message, that player lost, right, something like that.
But I'm not going to do that temporarily, because it is going to be too much, I'm going to stop and terminate the game every time that I click on a mine while we develop that game.
So converting the background of that cell into a red background color should be enough temporarily.
So I'm going to just say, here's something like the following self dot cell, underscore bottom object, and then I'm going to configure the background color of it.
So if you remember, when we use TK inter objects, we can use this configure method which will be responsible to configure our elements.
So as an example, I can go ahead and say here, Bg equals to red.
Now, that is equivalent to what we have done with the frame.
Let me show you that by splitting vertically, you can see that we took our window here, and we used dot configure BG equals to black.
So what we do here, we do here an action that is quite equivalent.
Whenever we click on a cell, we check if that is a mine.
And if it is, then we'll launch that method, which will be responsible to configure the background color of that to red.
And that is just a perfect beginning.
So if we run our game, and we click on a couple of cells, then you can see that this is a mine.
So that's why it has been colored to red.
So that's a great start.
And I realized that I had a typing mistake here.
So this will be logic to interrupt the game.
And display missing display will last all right.
So now that we have done this, then we should be also designing what we shall do if the cell is not in mind.
So here is the exact location that I should be say else.
And then I should launch a method that will say self dot show underscore, CIL right, and here is going to be the complex stuff because we need to display a number that will represent the amount of minds that are surrounded the click cell.
So I'm going to go here, and I'm going to in and out from this left click Actions.
And I'm going to say here, def show, underscore Sal and we will receive yourself, let's say pass here and explain what we're going to do here just in a second.
Now I zoomed out a bit to the beginning of our class, because in order to explain what we should do now I'm going to again, bring back the text that we used to have here, which was self dot x comma self dot y because I want to display the axis x and x is y values, because that's going to be helpful to explain what I'm about to explain right now.
So I execute the game here, you can see that again, we have the x's, x and y values.
Now in order to start calculating the amount of mines in the surrounded cells, whenever we click somewhere, then we should be using those x's, x and y values for sure.
Because think about the situation that we clicked here, right? Let's say that we clicked here right now.
So we should start iterating over the cells that are surrounding that cell and check if each one of those are mines or not.
And then somehow we should be collecting In the amount of minds and displayed here, so that's a lot of actions that we should be taking.
Now we can understand that having a method that will receive the x and y as a parameter, and then will give us back the object of a soul is going to be extremely helpful, because I think of a situation that you click on that.
So you want to check the attributes of this cell of that cell, and also this cell.
So we can already start understanding that, if we will have a method that will return the cell object, depending on the given x and y values is going to be extremely, extremely helpful.
So that's going to be the first step that we should be taking right now, we should be writing a method that we can call it get cell by exes.
And then this will return us back in object of the cell.
So let's go ahead and write that.
Alright, so I'm going to go here to that line above the show cell.
And I'm going to say something like this, get cell by Asus, and then I'm going to receive here, x and y, like that.
And the actions that we want to do here is basically return a single object based on the values of x and y.
That's all that's everything that we want to do here in this method.
So now, we know that we have this list that is called all and we can basically start iterating over this list of objects to find the sale object that we need based on those x and y values.
So I'm going to go ahead and start with a basic filtration that will help us to give us back the cell object that we need.
So I'm going to say here for cell in cell dot all and just pay attention that I'm using the class name, so c should be in uppercase.
And then I'm going to say something like the following.
If so dot x is equal to do given its argument and sell dot y is equal to the given y value, then we should be using here return cell like that.
Now, the reason that I can do this is because whenever I'm going to have a match in those x and y attributes, then I can immediately stop my iteration and just return that object.
And that's going to be helpful, because whenever we want to display the cell, then we immediately want to see what is going on inside the surrounding cells.
So that's a method that is going to be really helpful again, and that's going to be something that we are going to understand in a couple of minutes.
All right, so the next thing that I want to do now is to call that method and basically print the result of that inside the show sell.
Now just a kind reminder, if we take a look in the left click Actions, if the cleat sale is not in mind, we are entering here in the URL statement and we call this short sale method.
So if we go here and say print, self dot get sale by xs, and we pass in just random values, like I don't know zero, comma zero, then we should see the object specifically, where the X attribute is equal to zero and the Y attribute is equal to zero.
And that is not going to be a matter which So I'm clicking here because I just bring the object where x and y are equal to zero both.
All right, so let me launch the game now and see what is going on here.
So if the click cell is not the mind, then we should see the object right.
So let me make the console bigger.
And I'm just going to click on 05.
And that was a mine.
So we did not see anything on the console.
Let's click on here.
And you can see that I see the object still zero, comma zero, and that was a mind going to click here.
This is a mine as well, that's not a mine.
So that is a perfect result.
I'm also going to click here, you can see that we have a perfect method that returns the object based on the given x and y values.
So let me show you in a separated window, why that's going to be helpful having such a method.
So imagine again, that we are going to click on 1.1 As an example, right? So we're going to need to collect all those eight cells that are surrounded the Clicktale.
So this means that now we have the control to bring this one that one and this and that and this in that and also those two here.
So in order to show what we should be doing right now with the gate sell by access method.
Then I'm going to work on this side note pad that I have here.
So let's imagine a situation that we really clicked on 1.1.
So if we click on 1.1, then we should be bringing the cells that are 0.0 0.1 0.2.
Right.
So those are going to be those three, right.
And then let's continue on.
So we should be also bringing 1.0, and 2.0.
And those are going to be those two.
And let's continue on for again, clicking on 1.1, we should be also bringing the sale of 2.1 2.2.
And those are just going to be those two.
And then we also have 1.2, that we should bring.
And that's going to be also written here.
So you can see that we have a formula that we should be following.
So now let's go ahead and implement this in our code.
So I'm going to delete all the drawings here.
And I'm going to go back to our actual code.
So first things first, I'm going to delete this one.
And then I'm going to just do something like the following, I'm going to make a list that is going to be called surrounded cells.
And that's going to be equal to a list.
And that list is going to include those eight objects.
Now those eight objects could be basically pulled from this get cell by exes method.
So first, it's going to be served dot get cell by exes.
And for 1.1, we should be decreasing the x by one, and we should be also decreasing the Y by one.
So first one is going to be self dot x minus one, the second value is going to be self dot y minus one like that.
So we can allow ourselves to check the first cell that we should be pulling, right.
So let's go to the second one.
And don't forget to add here a comma, because we have a list that is going to include eight elements and we should be comma separating them.
So the second one is going to be self dot get sale by axis.
And now the formula is going to be decreasing the x by one.
And the y value is going to be the same because as you can see the y value here in the here are the same.
So I'm just going to pass in here self dot y, and again, comma separated.
And in order to be organized, I'm also going to say here, V to market as a checked, so So the third one is going to be sold out get sell by axis.
And again, the self dot x is going to be decreased by one.
But this time, the y value is going to be increased by one because that is true here.
So this is now also checked, I met I'm going to add here a comma.
And now I'm going to say self dot get sold by axis, I'm going to pass in the same self dot x because the next value is one, and then the y value is decreased by one.
So it's going to be self dot y minus one like that.
And that's also checked.
And now I'm going to jump on to the next one, it's going to be get sold by exes self dot x plus one because the next one is 2.0.
And then I'm going to pass here self dot y minus one, right, and that's the fifth value, going to check that the sixth one is going to be so the previous one was the fifth value.
And that is that's going to be the sixth value.
So self dot x plus one again, and the y value should be the same.
Going to close that add the comma market as a checked.
So I'm going to do this two more times self dot get sale by axis.
Now we can pay attention that both x and y values are increased by one.
So I'm going to do exactly like that.
Plus one for both.
And then the last value is going to be self dot gets held by axis, we're going to be passing the same x value, and then the self dot y is going to be increased by one.
And we can allow ourselves to basically write a check for all the eight cells.
So now that we have done this, then we can allow ourselves to first print it to see if we have done a great job right.
So I'm going to say print surrounded cells to see that we have done a wonderful job.
And let's go ahead and check ourselves.
So I'm going to execute game Stop and rerun.
So, we are going to click on 1.1.
And we should be see a list with eight objects.
Let's follow up what is going on here.
So 00 0.1 0.2 1.0 2.0 2.1 2.2, and 1.2.
So perfect, right? Perfect job, we brought everything that we need.
And if we count this 12345678, it really seems like we have done a wonderful job.
Now, the problematic thing could be if we click on a sale like 0.0, because this has three surrounded sales.
So this might lead to not working.
But let's see if that's going to work, I believe it's going to work.
And it is going to pull the three objects like expected 1.0 0.1, and 1.1.
So I'm going to click on 0.0.
And you can see that that is quite what's happening.
But you can see that we receive none for all the five, because what is going on here, if we click on 0.0, then at some point, this gate cell by axis is going to receive negative values, because whenever we click on 0.0, then a minus one value could be passed.
So we need to eliminate those nuns when we write the surrounded sales list.
And that's something that we're going to take care of later on.
But until now a perfect job bringing on the surrounded cell objects.
And let's continue from here.
Alright, so now that we have done this, then we said a minute ago that we're going to take care of the non values that we had inside our list.
Now that is something that could be done by list comprehension.
Now a list comprehension means to create a list by a one liner, that is going to immediately take care of something that you want to take care of right now.
So in order to take care of eliminating the non values inside the list, then you can use a list comprehension expression in order to handle the non values and just get them out of your list.
So what we are going to do now is we are going to override the surrounded sales list.
But we're going to need to use a one liner list comprehension, you know, to eliminate the nonce, so that's going to be something like the following.
So surrounded cells is going to be equal to a new list, which is going to look like the following.
So what we really want to do is to have the exact same list, but we want to eliminate the nuns.
So that is achievable by doing something like that.
So you can use a one liner for loop inside your list in order to take care of something immediately.
For example, let me show you how we can do a for loop in one line.
So you can say cell for cell in surrounded cells.
And now that we have done this, let's see the results.
Right, so I'm going to print surrounded cells and pay attention that I'm overriding the value of this one by again using the same value and assigning something new to that.
So I'm going to again, execute our main.py.
And let's show what is going to happen if we click on 1.1, you can see that result is pretty much the same.
And if I was to click on 0.0, then again, the results are same.
But whenever you use a list comprehension, and you include inside of that a one liner for loop, then you can use an if statement, that will take care of something that you don't want right now.
So I can go ahead and use an expression here that will look like if sale, meaning the iterator value is not known.
So that's going to eliminate out our non values.
And that is exactly what we want.
So again, I can re execute our program, and see if that's going to work.
So if we were to click on 0.0, we see the perfect result, right, we see three elements inside our list.
And that's also something that we may want to test with Excel like 0.1.
Because if we count the surrounding cells, then we have here 1234, and five.
So if we click on that, then you can see we have five elements inside our list.
So that is a perfect way of bringing the surrounding sales when we click on some sale.
Alright, so now that we understood this, then I'm going to move all those lines of code into a separated method so that we could have a property that is going to represent the surrounded sales object.
Now a property is basically like an attribute that is read only.
And you can mark those attributes as read only attributes by using a decorator.
So let me show you how that's going to work.
So I'm going to Just copy everything from here.
And you know what, just cut it like CTRL X and not copy.
And then I'm going to say this surrounded cells, and this will receive itself.
And I'm just going to leave those code snippets here.
And then I'm going to say something like, return sales.
And I'm going to be changing those variable names to sales, and also this one.
And as well as that one.
Now, the reason that I'm doing this, it is because I don't want to have the same variable name as the same as the name of my method, because that could lead to a lot of problems.
And I said that I will be converting this into a read only attribute.
And that's achievable by the property, they call this.
So above this method, I'm going to say add property.
And now you can just use it as an attribute exactly like the attributes that we have here in the in it.
So now that we have done this, then I can allow myself to go back to show sell, and validate that I have done a great job.
And I can use here self dot surrounded sales.
And you can see that I have an auto completion.
And that is just perfect.
Now I can access my surrounded cells by accessing this property from here.
All right, so now that we have a method that brings in the surrounded sales objects, then we need to iterate over the surrounded sales objects, and identify which one of those are mines, and which of those are not mines.
So that's going to be taking in one more method that is going to be responsible for that.
So I'm going to again, create a method here that is going to look like surrounded sills mines linked, and you can understand what this method is going to do, it is going to count the minds that are in the surrounded cells whenever a cell is clicked.
So I'm going to make this logic as easy as saying first counter equals to zero.
And then I'm going to iterate over the surrounding sales objects.
So it's going to be for cell in self dot surrounded cells.
And I'm going to check if cell.is underscore mine, then I'm going to increase the counter by one.
So it's going to be countered, plus equals one.
And at the end of the day, I want to return the counter back and just use it.
So it's going to be getting out of those four loops.
And if conditional, and then just use return counter like that.
Now, just like we have done with the self dot surrounded cells, I can also allow myself to use the surrounded cells mines linked as a read only attribute.
So I'm again going to go above this method.
And I'm going to mark it as a property like that by using this decorator.
Now, I did not mention this early on.
But if you don't know what is the property decorator, then I have an object oriented programming series that you can go ahead and take a look.
And I bet that it is going to be a very informative video if you never heard about this property decorator, which is an extremely useful thing when we write object oriented programs.
Alright, so now that we have done this, then I can allow myself to do something like the following.
So I want to go inside the show cell.
And I just want to be seeing the length of the minds meaning the amount of minds that I have, whenever I click on a cell, so that is just going to be a great test for our game.
So if we click on a cell, then we can allow us to print so of that surrounded sales minds length.
And let's go ahead and see if that's going to work.
So I'm going to execute my game.
And for example, let's assume that I'm going to click on 0.0.
And that is a mine and I'm fine with it.
And that's also a mind.
And let's click on here.
So you can see that I see three in the console, right, because I clicked on the 1.1.
And what that means, it means that over here we have three minds.
So let's keep on and continue clicking on some cells.
So we already have two minds here and we shouldn't be having one more inside the surrounding cells.
So not here, not here.
Not here, not here.
Also not here.
Okay, so we have a mind here.
And if we click on here, so that's not the mind as well.
So that is perfect.
That is really perfect.
Because a round this one around this one.
So here we have three minds.
And this means that we have completed writing this logic in the best way that we can.
Alright, so there is going to be one more thing that we want to do immediately when we go ahead and click on a cell and that's going to be displaying the num Have mines that are surrounded that sell.
So now that we have control with the surrounded sales mines linked, then we can allow ourselves to change the behavior of this show sole method.
And we can go ahead and just configure the text of our cell to display the amount of minds surrounded that so so that's going to be something like the following is going to be by accessing to the sell button object and configuring the text.
So I'm going to use the Configure method again.
And I'm just going to say text is equal to self dot surrounded cells mines length.
And that should be enough.
And now I can really allow myself to delete the original text that we had previously.
So I'm going to scroll up, and I'm going to go back to the metal that helps us to create the button object.
And I'm going to take off this text from here, just delete that.
And then I'm going to execute our game, run the program.
And let's click on some cells.
So you can see that we have to, and this means that we have a cell, maybe here, that is not the mind.
So this means that for sure that is a mind and that's a minor as well.
So perfect.
Now we really start to have a real game going on.
In that is pretty much what we want to do.
In that tutorial, we want to write the logic to display the amount of minds that are located in the surrounded cells whenever we click on a cell.
So in this episode, we are going to design some functionalities that will be helpful to display more information about the game.
For example, currently, we know that there are 36 cells that are clickable that we can click on.
But now if I click here, we know that we have 35 cells that we can click, so we need to interactively display this kind of information in our window, that's going to be interesting to see how we can develop such a functionality.
And in addition, we are going to develop a functionality that will be responsible to automatically open all the surrounding cells.
If the clicked cell length is zero, exactly like in this case.
Because obviously, if we know that there are zero mines surrounding the cell, then there is no point to not automatically click on this and that and this and that and that.
So the reason for that is because there are always going to be zero minds surrounding that sales.
So to click on them is safe.
So we are going to develop a functionality that will do this automatically for us, and it will improve the speed of our game.
So let's go ahead and get started by developing everything that we just said here.
Alright, so let's start with the second point that I have mentioned earlier.
And that's going to be how to automatically open the surrounded cells in case we see the number of zero when we click on some cell.
So if we were to take a look in the left click Actions, then you can see that we have a separation between a cell that is actually a mine to a cell that is not a mine.
So here we can actually check if the clicked cell is not mine, for sure.
So this means that our code is going to be here.
But we can also check if the display number is zero or not.
And the way that we can do this is by using the property of surrounded cells minds length, and we can verify if that is equal to zero or not.
So that's going to look like the following.
So if self dot surrounded cells minds length is equal to zero, then we should do something.
So if we are going to enter here, then we want to launch a for loop that will be responsible to basically display the minds length for all the surrounded cells.
Now we already know that we have a property that returns us back at least with all the surrounded save objects.
And that comes from here.
So we are going to use this in that case for sure.
So that's going to be like the following.
So we can say for sale underscore object in self dot surrounded cells.
And we can go ahead and say something like cell object, dot show underscore cell.
Now if you remember, we have a method as well, that is called Show cell which we call here.
So it makes sense to try to open all the cells that are surrounded the click cell, and also calling the show sale method for them as well.
And that's going to work in case of course, if the minds length is zero, so let's launch the game and see if we have the expected behavior here.
So the expected behavior here is if we click here, and that displays zero, then the game should automatically open that in that and that and let's see if we have this.
So I'm I'm going to read Let's try to click here and you can see that we have two.
So that's not a good test for us.
And that's a mine.
So we are looking for zero.
And you can see that this works perfectly, you can see that once I clicked on zero, then we got all the numbers that are surrounded the click cell in the first stage.
So that's something that is going to speed the game and going to be extremely helpful.
And let's continue from here.
Alright, so now that we have done this, then let's go ahead and see how we can add some more elements to our window.
Now, we said that we'd like to display some more information about the game that we play, for example, information, like how many cells left in the game in every situation, because every time you click on a cell, then the amount of cells that left decreases, so let's go ahead and show some text about that.
Because that's going to be helpful to see in what situation of game we are currently at.
So the approach of that is going to be quite equivalent to what we have done with Create button object.
Now, if you remember, we used an instance method that goes ahead and creates a button.
And then we go ahead and use this last line here, which is looking like self dot sell button object equals to btn, which will be the variable that has this button object store.
So we are going to do pretty much the same thing.
When it comes to display the amount of sales that left in the game, we are going to create a method that will create some text element in the window.
And then we are going to call this method from the main.py.
File.
And let's go ahead and start with this.
So I'm going to go ahead and say def, create cell count, labeled.
Now the reason that I'm using label, it is because the name of the class that are responsible to display just text without any special functionality is called label.
And that's going to be the class that we're going to initialize.
So that is the reason I can allow myself to call this function, I mean the method the way it is.
So we're also going to receive here, another parameter that we can name location, and I'm going to go inside of it.
And I'm going to say label, or LBL to make it shorter is equal to a label.
Now we know that we do not import this.
So I'm going to scroll here, and I'm going to say from TK inter Import button and label as well.
And now that we have done this, then I'm going to pass in the location argument.
And then I'm going to pass in some additional arguments.
So this label element accepts a parameter that is called text, like we have seen with the button.
And we can go ahead and say that it's text could be a formatted string, like cells left, and let's use a colon, and then I can go ahead and use something like the following, I can refer to the amount of cells that we already know from the settings.
So settings dot grid size, and if I remember correctly, grid size stores six in here, because we just set it to six.
And so it means that we have six times six cells.
So it makes sense to also use here one more variable that we can name cell count.
And that will be equal to read size power of two like that.
So we can go ahead and as well as replace this with that one.
And that makes totally sense.
And now I can go ahead to my cell.py file and replace this with cell count.
Now things are looking a lot better.
So now that we have done this, then let's go ahead and as well as return the label object that we have here.
And now let's see how we are going to call this from the main.py file.
Now there is something that is quite tricky with this method.
And that is the fact that this label is not something that needs to be belongs to each of our cells, because that is a general information about the game.
So what that means it means that this cannot be an instance method.
Because this is just a one time method that we want to call throughout the game, we do not want to call this method for each cell object.
So that's why this needs to be a static method.
And a static method is a method that is just for use case of the class and not for the use case of the instance.
So that's why it makes sense to mark it as a static method.
Now this also means that we should delete the self because we do not need to receive the self if we do not use an instance method.
So now it's safe to remove this from here and have a metal I'd like the following.
Now, if you never heard about static methods, then there's actually an episode about static methods in the Python op series that I published recently on my channel.
So be sure to watch it at least for a couple of minutes, in order to have a better understanding about static methods.
Alright, so now that we have done this, then let's figure out where we are going to call this method.
Now, if you remember, for the button object, we basically used a statement that looked like the following.
So we said that at the beginning, self dot sale button object is equal to none.
And then we went ahead and we assign this to a button object that is coming from here.
So we are going to do the same thing for the cell count label, because that is going to be helpful when we need to make use of the cell count label from the main.py file.
So now I can go ahead and create an attribute that's going to be belongs to the class level, not to the instance level.
And the reason that I'm doing this, it is because the cell count label should be something that is global should be something that is not belonged to the instance level.
So I'm going to go ahead and say cell count label is equal to none.
And I can actually add here on the score object to keep the same convention like the sell button object.
And now that I have done this, then I can change this thing here to something like cell, that cell count label object is equal to LBL, which is the variable name that we use.
So that actually is quite equivalent to what we have done previously throughout the series with the sell button object.
And now that we have this, then we can go ahead and use this from the main.py, like the following.
So I can go ahead to here.
And I can just call this.
So I'm going to go ahead and say comment, like call the label from the cell class.
And this should look like this.
So we can say cell dot create.
So count label, and the location for that will be the left frame.
Now, left frame is the frame that is used to be stalled in the left area of our window.
Now, if you remember, let me show you that it's going to be right here in that location.
So if I'm drawing here, something, then this is the top frame.
This is the left frame.
And this whole area is the game frame, the center frame that we use it to play the game.
So the widget that I'm talking about should be here.
Alright, so let me clean that and close the game.
Right.
So now we call this method.
So this means that I can access the label object by referring to cell dot cell count label object.
And I can just use here a place in order to place this in somewhere in the frame.
And let's start by placing this in 0x equals to zero and y equals to zero.
Now, if you remember, the numbers are relative to the frame itself.
So this will be in the first pixel of the cell of the left frame, excuse me.
So if I run the main.py file, then you can see that we have this here.
Now I know that it is quite small, and it needs some edits to make it bigger and nicer.
So that's exactly what we're going to do now.
So if we go back to the cell.py file, and we go inside our static method, which creates the label, then we can go ahead and increase the width and the height.
So let's go ahead and use width equals to 12.
And height is equal to four, exactly like the numbers of our button.
And let's also give these attributes like BG, meaning the background color is equal to blue black.
And we can use the foreground color parameter as well.
So we can use f g is equal to white.
And let's see what is going to happen now.
So if we were to run the game, there, you can see that this is not quite changing.
So this means that maybe we need to increase the font, environmental here, so we can go ahead and use font is equals to something like the following.
So formed by default accepts a tupple.
So the first argument of this of these should be the font type.
And you can go ahead and play around with your favorite fonts.
And the second one should be the size of the font.
So I'm going to start by size of maybe for the eighth, see if that's going to be too much and that is, so I'm going to change the to maybe 30.
And that looks just perfect right now.
So I'm going to leave it as it is.
This means that we can delete those attributes and continue from here.
Alright, so now that we understood this, then let's see how we are going to interactively change the text.
Every time that we click on a cell in the clicked cell was actually a cell and not in mind, that finishes the game.
So this means that we need to change the amount of cells left in the text that we have located in the left frame.
So this means that we should be doing this exact action in the method that we have named show SIL.
And the reason that we want to do this here is because that is the perfect location that uses some actions when we click on some cell, and that is actually a cell a regular cell, that is not a mine.
So this is the exact location that we look to take some actions when we want to display regular information about an open cell.
So I'm going to use here a comment that will say, replace the text of cell count label with the knee word count, something like that.
Now, in order to test this out, then I'm going to change this to something that is hard coded, just to see that we are able to do this successfully.
So let's go ahead and test this out.
So at first, it makes sense to check if cell, that cell count label object is none or not.
And I can just do it the way it is, if cell that cell count label object should be enough to test if this object is none, or is filled with some information, meaning a label object.
So if it is, then we want to go ahead and use cell, that cell count label object, and we want to configure its text to a newer text.
So in order to test this, then let's go ahead and use changed like that, and see how it is going to behave.
If I am running that and clicking on a random location, then you can see that we see a change.
And that is perfect.
So this will be the way that this is going to work.
Okay, so in that stage, let's try to understand what will be the most efficient way to store continuously the cells that are left in the game.
So first things first, we could allow ourselves to store one more class attribute that we can name cell count.
Now, we know that the cell count changes every time that the show cell method is being called.
So what that means it means that every time that show sale is being called, we could basically decrease the amount of sales by one.
So let me show you how this could look like.
So we could go and scroll up and create here, a class attribute that we can name cell count, which we can also allow ourselves to set this value to Settings dot cell count.
So it makes sense to at first have the value of 36, for example, for this class attribute.
And we could continuously decrease this value every time that the show cell method is being called.
So we could go here and use as the first line, something like cell dot cell count, minus equals one, and this will be responsible to decrease the sale counter by one.
And now that we are doing this, then we are also going to change the methodology that we store the text in the label that we have.
Now, if you remember, we use to store inside the label information about the left cells meaning the settings, that cell count.
But now it makes sense to change the reference of that to cell dot cell count like that, because that's going to be the variable that we are going to decrease in every time that we click on a cell.
So this means that having it like that is a better idea.
So now I can allow myself to copy this and scroll down.
And every time that show cell is being cold, then I can configure continuously this text with the following information.
So let me delete this from here.
And actually jump align.
And between those parentheses, I'm going to say text is equal to exactly the same thing.
And this needs to be configured every time a cell is being clicked because we need to so called refresh the information that is displayed in that label.
So now that we have done this, then It is about time to test if that is going to work, right.
So if we launch our main.py file, then let's see what is going to happen.
So if we click here, then you can see that the amount here has been decreased.
Now, it could have been great if we will hit a cell that has zero surrounded minds, to see if that is going to work properly as well.
So if we click here, you can see that this yet works great.
And this is 34 to 3233, excuse me, and you can see that here we have a mismatch.
And that's happening, because it thinks that it should also decrease the amounts for the minds that are here as well.
Now, again, let me show you what happened here just right now.
So at first we clicked here, here, and then here, right, and we saw a perfect behavior of 33 in there.
But now we try to click here, but the game thinks that those cells should be open as well.
And that's why not only that, it decreased to 32.
It also decreased by five, because it decreased the amounts for this in that in this in that.
And this and that, right.
So it's important to handle this situation with something that we can do just right now, because that is a bug in our game.
So let's clean here and go ahead and see how we can handle this.
So the way that we can handle this is by setting up a an attribute that is going to be belong to each sale, that we can name something like ease underscore opened.
Now ease underscore open is going to be a Boolean type of variable that we can set by default to false.
And every time that the show cell is called based on that cell object, we can convert this boolean variable into true, and that will mark this cell as being opened.
And in that case, we can conditional our program to only decrease the sale count if the sale is not open yet.
So let's go ahead and design the search functionality.
So I'm going to scroll up.
And I'm going to say here something like the following.
I'm going to say self.is underscore opened.
And I'm going to set this to false, because in the beginning of the game, it makes sense to say that each cell is not opened yet.
And now that we have done this, then every time that we use the method of show cell, then right after we finish all of our functions, then we can go ahead and say something like self.is open, excuse me, is equal to true like that.
And let me use a comment here that will say Mark decyl, as opened, use it as the last line of this method, something like the following should be enough to explain why we are doing this right here.
So now we can allow ourselves to do something like the following we can say if self.is open, and we actually want to test if that is not open.
So this means that I'm going to add here, not.
So this is going to check if the sale is not open yet.
And if that is the case, then I want to indent everything inside this conditional, because the only case that I want to execute this, and this and as well as those lines is in the case if the cell is not open yet.
So that is perfectly making sense to use the code the way that we use it just right now.
So now that we have done all of this, then let's test now if our game is going to behave as expected.
So I'm going to execute this main.py file again.
And I'm going to try to click on that one.
And that is a minus.
So it makes sense that the sales left is not decreasing, because we should be finishing the game in that case, but we did not want to do that because it will interrupt our development process.
So let's actually try to execute our game one more time.
And try to play the game like it needs to be played.
So you can see that now we see two.
So let's try to not click here to not face with a mind.
Try to click here.
So this is 34 still works perfect 33 And that's a mind so let's give it one more try.
If we click here, okay, perfect result because you can see that we have now now nine cells opened and this is decreased by nine.
So let's test if that is going to continue working great.
So if we click on those Free, then those are pretty safe because we have zero here.
So 2625 24.
And you can see that this works really perfect, because once we click in here, it only decreased by two.
And those two, were for this one.
And for that one.
So now we have a great game going on without any bugs.
And we handled a lot of things that could lead to trouble in the future.
Okay, so let's show an example of what we want to do in that episode.
So if we run our game, and we start to play a bit, and for example, we click here, we know that we have three minds around there.
But in order to start figuring out what could be the minds, I mean, the cells that you should not click on, then you need some utility that will say to yourself that you should not click on that in the future.
So it could have been nicer if we could develop a future that will color the cell in a different color.
So we can differentiate between the cells that we mark as mine candidates.
And that's exactly what we're going to design in that episode.
So the way that this feature is going to work is by using the right click of our mouse button.
So if we are going to click right click on a cell, then it is going to color it with a color like orange, maybe some color that will be a good color to differentiate between a mind candidate to an actual mind that basically leads us to lose the game.
So it's basically going to be something that will responsible to color the cell with the given color.
Now say that we clicked on some location that we marked as mine candidate, we also like to develop the opposite action, which is going to be unmarked the cell as a mind candidate.
So those are both of the functionalities that we are going to work just right now.
So let's go ahead and get started.
Okay, so the approach of doing something like this, it is going to be pretty much similar to what we have done with the EAS open the attribute, we could first start with creating a new attribute to each of our cell objects that will go something like self thought is mine candidate, something like that.
And this value could be false for each of our cells at first, the reason that this could happen is because at first we never Mark ourselves as mine candidates, we just start with a new blank game.
So now that we have such an attribute, it makes sense to go ahead and take some actions when we right click on a cell.
And if you remember, we already have a method that is called right click Actions.
And we could find this just by scrolling down a bit, because this should be right here.
Okay, there it is.
So here's the exact location, that I could allow myself to do something when we right click on a cell, and one of the things that I can do is to change the attribute from false to true.
So I can go ahead and say, if not self.is, mine candidate.
So I'm checking if the cell is already not a mind candidate, then I can go ahead and do some things.
Now one of the first things that I want to do is to change the background color of the cell.
So it is going to visually mark it as a mind candidate.
So it will be self dot cell btn object dot Configure.
And we are going to call this method and I'm just going to pass in here BG background color equals to orange.
And now that I have done this, I can also allow myself to change from false to true.
So I can say self.is underscore mine candidate equals to true like the following.
So now let's go ahead and test if that is going to work for us.
So I'm going to execute our game.
And I'm just going to right click on a cell.
And you can see that this works perfectly.
Now we said that we'd also like to design the opposite action, which is just what we are going to do now.
And before we do that, I want you to notice something important in here, you will see that the sales left is not decreased.
And that is good because we did not open the sale, right.
So that's an important behavior that we want to keep.
So it doesn't matter how many times we are going to click right click, it's good that the sales left value is not decreasing here.
So that's something that I wanted to show up.
All right, so now that we have this, then we should also design the opposite action by only saying here else.
So now we are doing something if the cell is already a mind candidate.
Now the next time that we're going to right click on a cell, and we know that the sale is mine candidate, then we just want to do the opposite action.
So the opposite action will be to configure the color to the original color.
So will be served out sale between object dot configure, we're going to call this method.
Now, this might be confusing here.
But there is a specific value for the background color that you should specify, that is already the default color for each of the printer elements that you are creating.
And that is called system button phase.
And that is just the color that you see in the beginning, right the kind of gray color.
So that's the reason that I am writing this thing as the value of the BG.
And then the next thing that I'm going to do is obviously changing this to false.
So I'm going to say save that is my candidate is equal to false like that.
And that's probably going to work without any surprises.
So if I'm right clicking one time, two times, three times, then now let's try to undo our actions.
So I'm going to again, right click here, and again here, and as well as here, you can see that this work.
So that's a great start for having some mind candidates going on.
Now, let's also try to play the game with that, right? See if we did something bad to rest of our game.
So that's a good test for us.
So I'm going to left click basically open some cells.
And you can see that this works, can continue on clicking here, here and there.
And that's working great.
Now let's say that I think that this is a mine here.
So I'm just going to right click, continue opening that.
And as well as that one.
Now, this is actually a mind because for example, if we take a look at this cell, right, you can see that it's supposed to have one mind, in here, here, here, here or there.
So that's the mind for sure.
So that's good future now that we can mark this as a mind candidate.
So we know that we should never click on that with the left mouse click.
Now I just wanted to remind something that could lead you to some problems using this mind candidate feature.
I said earlier in this series, that if you use button dash three, like I did in here, then you might have some problems, because in some males configurations, it expects for button dash to, but since I have the mouse wheel in my mouse, then it should be button dash three for myself.
So if you notice that things are not working for you pretty much as expected, then try to use other combinations of numbers like two or even four, just try to use something that is not three.
And I want to hope that it will work for you.
Alright, so now that we have done this, then let's go ahead and design some final things that we want in order to have the complete game.
Now we already know that we pretty much not finished the game, when we actually click on our mind.
So I'm going to do something that will immediately warn a message that we lost the game, if we click on a mind.
Now in order to do this, I'm going to assume that you are working on a Windows machine.
But the way that you should quit again, with an exception is really up to you.
I'm just going to show one example.
But there are 10s of other options that you can go ahead with it.
And of course, since I'm using a Windows machine, then this example might be more fit for Windows environments.
Okay, so the first thing that I'm going to do here is import some library that will be responsible to throw a general message about how we lost the game or something like that.
So in order to do that, I like the library that is called C types.
And that's just the library that can help you to throw generic messages, warnings, errors, any kind of things that you want to come up with them.
So now that we have this, then I'm going to use this library and basically throw a message if we open the mind.
Now if you remember, we have a method that is called Show mine.
And you'll see that we already have a comment that says a logic to interrupt the game and display a message that player lost.
So here's the exact location that we want to write such a functionality.
And that's what I'm about to do right now.
So if we delete this, now I'm going to go ahead and just write a generic message.
So we are going to use this C types library, and then I'm going to pick up the win DLL sub library, and then I'm going to use the user 32 And then I'm going to say message box, W like that.
Now this is just a generic message box that I'm going to throw out alright, so I'm going to pass in here several arguments.
And once we see the result then I will explain why I did that.
Okay, so I will start by saying zero and then I will say you clicked on a mind and I will pass in one more string that will look like game over and then I will again pass in the argument of zero.
Now before we test this, I want to change the ordering in here.
So first we'd like to change the configuration of this background color to red.
And then we'd like to throw a message.
Alright, so now let's go ahead and play the game and intentionally click on a mind, right, so let's try to click somewhere here.
Okay, so we can see that we receive a general message box.
Now you can see if we show this side by side, like the following, then you can see that at first, what is the message box here with this.
So you can see that the first ring was responsible to the body of our message box, because we see the you clicked on a mine in its body.
And you can see that the second text was responsible to show the title.
Now, those numbers here and here are responsible to deliver your specific kinds of message boxes.
Now, the fact that I have zero here is responsible to give me only one option of a button to click, and that will be okay.
I think if I was to change this to something like two, then I will receive the options of yes, no and cancel something in that kind.
So I'm going to re run our game.
And again, I'm going to lose it.
Okay, so you can see that I was quite right, it is abort, retry and ignore.
And you can try to play around with different numbers, and you will see different results.
But for myself, I only want to receive, okay, just confirm it, and continue with rest of the actions that I want to do.
And I'm going to refer you to a link which will explain you what number is responsible for what.
So if you want to take further actions with this message box, be sure to check the link in the description.
Alright, so I'm going to press somewhere, just turn it back to zero, and maximize our PI charm and continue from here.
Alright, so right after we have this message box, and right after we clicked OK, then we should just terminate the game, we should exit it.
Now you have all the options, what you'd like to do, whenever you click OK, you can also decide that you'd like to develop a functionality to restart the game, I'm just going to exit it.
And the way that you exit a Python process that is running is by Cys dot exit like that.
Now Cys is a library that you should import.
So I'm going to scroll up and say, import Cys.
And let's see if everything together is going to work perfectly for us.
So I'm going to run the game.
And let's try to again lose it intentionally.
Okay, so you clicked on a mine the second that I press OK, it should be terminated.
And that's exactly what is happening.
So that's a perfect thing.
And now we have a complete game that we can try to play, we can try to win it.
And we might also lose it sometimes.
And we just need to play again until we win the Minesweeper game.
Alright, so now that we have done this, then there are several things that we also want to finish out before we have the complete game without any bugs and without any problems.
So now if we try to play the game, and let's assume that we have some minds that are candidates for a mind, so let's just randomly click here.
And then let's assume that I marked this as a mind candidate, although it doesn't make sense.
And right after that, I left click on that, right like the following, then you can see that now we have a bit of problem, because we might also expect to have the original background color again.
So what we need to do, we need to also specify in case we left click on a cell and we open it, we also want to be configuring the background color to the original system button face color that we used.
So that's exactly what we should do now, in order to not face with a situation like the following where we have an open cell, but we also have the cell as being shown like mine candidate, which is pretty funny and we need to handle that.
So, we should go to our open cell method or show cell here it is and we should be doing the exact same action of changing the background color to system rather than face right here.
Right so we can go ahead and say here something like if this was a mind candidate, then for safety, we should configure the background color to system button face something like that.
So we can really understand in the future why we have done this here as well.
And I'm just going to do the same thing like we have done previously.
So it's going to be self dot cell btw and object dot configure So that's going to be BG equals to system, button face, like that.
And let's go ahead and check if this is going to fix the bug for us.
So I'm going to click here, mine candidate, and then left click.
So this looks great.
This looks like it works.
So we can continue to do the next things that we want to do right now.
All right, so now, we might think that we have the perfect game without any bugs.
But let me tell you that we still have some problems that we could figure out in order to have the perfect game and the perfect code for the game.
So if we try to launch our game, then let's try to click on some places here, like here, in as well as there.
Alright, so Brock is great.
But yet, let me tell you that if we click with our left, click on Sunsail, then this still is going to call the left click Actions metal, which that might be something that we want to avoid, because there is no reason to call any method, if we already open a cell.
And it might seem like it doesn't do anything to because the sales left amount is not decreasing.
But actually something is happening in the background.
Okay, let me prove you by also try to click with my right mouse click.
So if we right click now, then you can see that I can still mark those as mine candidates, which is not good.
So the way that we want to handle this is by canceling the events for the buttons, I mean, the cells that already have been opened.
So the way that we can do this is use the opposite action of the method that was responsible to assign the event.
So we assigned some events in the beginning of this entire series.
Now, if a cell has been opened, we want to cancel those events.
So let's go ahead and see how we can do that one.
So we can see that here, we assign events for left click, and for right click.
So if we open a sale, then we should do the opposite action.
And let me tell you that TK inter has a method that is called unbind, meaning cancel all the events that are assigned to that specific button, right.
So that's exactly what we're going to do just right now.
So I'm going to go to our left click Actions.
And I'm going to execute here some lines that will be responsible to cancel all the events on the click till so I'm going to say cancel, left and right click events, if sale is already opened, and that is safe to do that, because in case we left click on a sale, then we open a sale.
And if we lose the game, then the game just exits.
So it makes sense to write here, this functionality.
So it's going to look like self dot cell btn object.on Bind, and we're going to need to call this twice.
So we are going to unbind the events for button dash one.
So I'm going to just copy this string and paste this in here.
And I'm going to do the same for button dash three.
And that should be responsible to cancel all the events.
Now let's check if that's going to work.
So I'm going to launch the game and click somewhere.
And now I'm going to try to right click on that you can see nothing happens.
And that's exactly what we want.
Let's also test with some other locations like here, here and here, maybe so now I will try to left click, you can see nothing really happens.
If I right click, and again, nothing really happens.
But if I right click here, then something's supposed to happen.
So that's exactly what we want.
We want to cancel the events for the sales that are already open.
Alright, so there's going to be one final thing that we want to do before we can play the game from the beginning to the end.
Now the case that we win again, is in case that we have the amount of sales being equal to amount of minds.
Let me repeat that.
Now let's say that in this case, we have nine mines in our game, right? Because if you remember, from settings.py, we know that mines count is cell count divided by four.
Now in our case, it is six power of two, which is 36 divided by four is nine.
So whenever we have nine sales left in the game, but we still able to play the game, then here's the exact case that we can Arrays the message that we want the game, right? Congratulations, something in that kind.
So that's exactly the last thing that we want to do just right now.
All right, so let's go ahead and try to design this, I will go to cell.py file, and it makes sense to raise a message like congratulations.
If on show sale, we have the expected match, right, where sales count is equal to the minds count.
So I can just go under the self dot show sale.
And I can say something like, if minus count is equal to the sales, left count flayer one, something like that.
And let's write this right.
So I'm going to say if cell dot cell count, if you remember, this was a class attribute is equal to settings that mines count, then I'm just going to copy the line that was responsible to show a message.
And I'm only going to change the text inside of that.
So let's find this message.
It should be in the show mine method.
So I'm going to just Ctrl F that, and you can see that, here it is.
So I'm just going to copy that and paste this in right here.
And I'm only going to change the arguments.
So I'm going to say, game over.
Congratulations, you won the game, something like that.
Alright, so now that we have this, let's play our game from the beginning to the end.
All right, so before we go ahead and try the game from the beginning to end, we said that we'd like to have a title for the game.
And that's something that we should do earlier.
So let me do that quickly.
Let's do this together by writing a game on the score title is equal to a label, we said that for creating a pure text, it is a great idea to use the label class or TK inter library.
And we want to position this in the top frame, we want the background color being black, and the foreground color, meaning the text color to be white.
Now we'd also like to pass in here text equals to mine sweepable.
Minesweeper game, and the font should be a tupple.
And the first argument of the tupple should be the font type.
So you can play around with any form type you'd like to, I will just leave it an empty string.
And I will say size is equal to 48.
Like that.
And now that I have this, then I'm also going to say game title dot place.
And let's use 25% of the weight size of the top frame.
We have this utils dot weight brct, which receives the amount of percentage to use from the x axis.
And now that I have this, then I'm going to go out from this parenthesis and I'm going to say y is equal to zero.
And then I'm just going to launch the game and you can see that it looks great.
Alright, so speaking about playing the game, let's try to figure out how we can win that game.
So just going to play it and guess where the mines are located.
Alright, so we have my one mines around here.
And we clicked on a mine.
It might take a few times until we win it.
But let's hope for the best.
Okay, so that's a mine as well.
That was a mind if we click here on the middle, so we have three here, so it's quite dangerous to try to figure out where the minds are located.
Okay, so we have some zeros and that's the best practice probably to go with.
Okay, so you can see that around this one around this one here we have one mind.
So say that we guess that we have a mind here, then we are allowed to click there.
Okay, so we guessed right.
And so you can see that here we have a one.
And there is already a mind here, so we can click here for sure.
Alright, so now we need to figure out where rest of the minds.
So here we have three minds surrounded and as well as here.
So I'm going to assume that we have a mind here for sure.
And as well as here.
So this means that we don't have a mind here, and we lost the game.
So let's give it one more try.
Maybe you can win it let me know in the comment section.
If you can win this Minesweeper game it is quite important.
And let's give it a last try and promise I'm not going to try anymore because the video is just going to be too long.
All right, so if we click here, so we have one mind around here, so I'm not going to get that.
Okay, so some zeros zeros are great for us.
And going to get that here we have a mind.
So here, we don't have a mind.
All right, nice guess.
So now, it means that I can click here, here, here, here and there.
And also here.
So you can see that now looking at this one, you can see that there is a mind here, so I'm also allowed to click there.
Also here, and also here.
Alright, so now that we have this, we can also try to click here because we have a one there.
Okay, so now we know that we have one mind around this one.
So that's a mind for sure.
And this means that if we look in this number, then we can also click here, here and here.
Alright, so looking at this one, we can click here, because that's a mind for sure.
So now we can look on this one.
That's a mind that we marked as a mind candidate, so we can click here.
Alright, so now it is getting complicated.
If we get that here, we have a mind.
Then we can left click here.
Alright, great guess we can continue playing.
So we can see that looking at these three, these in that our minds.
Absolutely right.
So we already found six, three more to go.
It's quite exciting.
All right, so I think I don't have anything left to guess.
So I need to go here up top.
And I'm going to think that that's a mine.
So if I left click here, oh my god.
Alright, so I will leave you the all the time in the world to try to figure out and play the game and win it.
And I think that's pretty much it about this series.
Now, as usual, if you enjoyed this entire course, please be sure to hit the like button.
And that's it.
So I hope you all enjoyed, and see you on my next series.