
OpenStack is an open source software that provides cloud infrastructure for virtual machines, bare metal, and containers.
In this article, you will learn how to use OpenStack to operate your own private cloud.
By the end of the tutorial, you will have a core understanding of what OpenStack is and you will know the basics of setting up and administering OpenStack using the OpenMetal platform. You will also understand some commonly used OpenStack services.
In addition to creating this article version of the tutorial, I also created a video version. You can watch the video on the freeCodeCamp.org YouTube channel.
To follow along with this tutorial, it can be helpful to have a basic understanding of the Linux command line, networking, and virtualization. But none of it is required.
Thanks to OpenMetal for sponsoring this tutorial.
What is OpenStack?
OpenStack is an open source cloud computing platform that is used by organizations to manage and control large scale deployments of virtual machines, such as in a cloud computing or virtual private server environment. OpenStack is a popular choice for organizations because it is scalable, reliable, and provides a high degree of control over the underlying infrastructure.
Besides being used to manage deployments of virtual machines, OpenStack can also be used to manage storage and networking resources in a cloud environment.
In some ways OpenStack can be compared to AWS but here are some key differences between the two:
- OpenStack is an open source platform, while AWS is a proprietary platform.
- OpenStack offers more flexibility and customization options than AWS.
- OpenStack typically requires more technical expertise to set up and manage than AWS since you basically have to set up everything yourself.
Let's go into more details about what OpenStack offers.
Beyond standard infrastructure-as-a-service functionality, additional components provide orchestration, fault & service management, and other services to ensure high availability of user applications.
 OpenStack diagram.
OpenStack is broken up into services to allow you to plug and play components depending on your needs. The OpenStack map below shows common services and how they fit together.
 OpenStack map.
I won't cover every service but here is what some of the more common OpenStack services do.
Object Storage: OpenStack Object Storage (Swift) is a highly scalable, distributed object storage system.
Compute: OpenStack Compute (Nova) is a cloud computing fabric controller, which manages the allocation of compute resources.
Networking: OpenStack Networking (Neutron) is a system for managing networks and IP addresses.
Dashboard: The OpenStack Dashboard (Horizon) is a web-based interface for managing OpenStack resources.
Identity: OpenStack Identity (Keystone) is a system for managing user accounts and access control.
Image: OpenStack Image (Glance) is a service for storing and retrieving virtual machine images.
Block Storage: OpenStack Block Storage (Cinder) is a service for managing block storage devices.
Telemetry: OpenStack Telemetry (Ceilometer) is a service for collecting and storing metering data.
Orchestration: OpenStack Orchestration (Heat) is a service for orchestration and cloud formation.
Bare Metal: OpenStack Bare Metal (Ironic) is a service for provisioning and managing bare metal servers.
Data Processing: OpenStack Data Processing (Sahara) is a service for provisioning and managing Hadoop and Spark clusters.
We will be demonstrating a few of the more common OpenStack services later int his course.
There are a bunch of different ways to deploy and configure OpenStack based on the needs of your application or organization.
In this course, we will learn how to get started with OpenStack and use many of the most common features.
One of the easiest ways to get started with OpenStack is by using the OpenMetal on-demand private cloud. This allows us to quickly deploy OpenStack to the cloud and simplifies the setup process. OpenMetal provided a grant that made this tutorial possible.
While we will be using OpenMetal to learn about OpenStack, the material covered in this tutorial applies to any OpenStack deployment, not just ones that use OpenMetal. So no matter how you want to use OpenStack, this tutorial is for you.
Setting Up OpenStack on OpenMetal
To get OpenStack setup, you need to provision and set up your cloud on OpenMetal. Just follow the prompts on this OpenMetal Central page to get everything setup.
When setting up, you will have to
OpenMetal Private Clouds are deployed with OpenStack to three bare metal servers. These three servers comprise the Private Cloud Core. To OpenStack, these three servers are considered the control plane. Private Clouds are deployed with Ceph, providing your cloud with shared storage. Ceph is an open source software-defined storage solution.
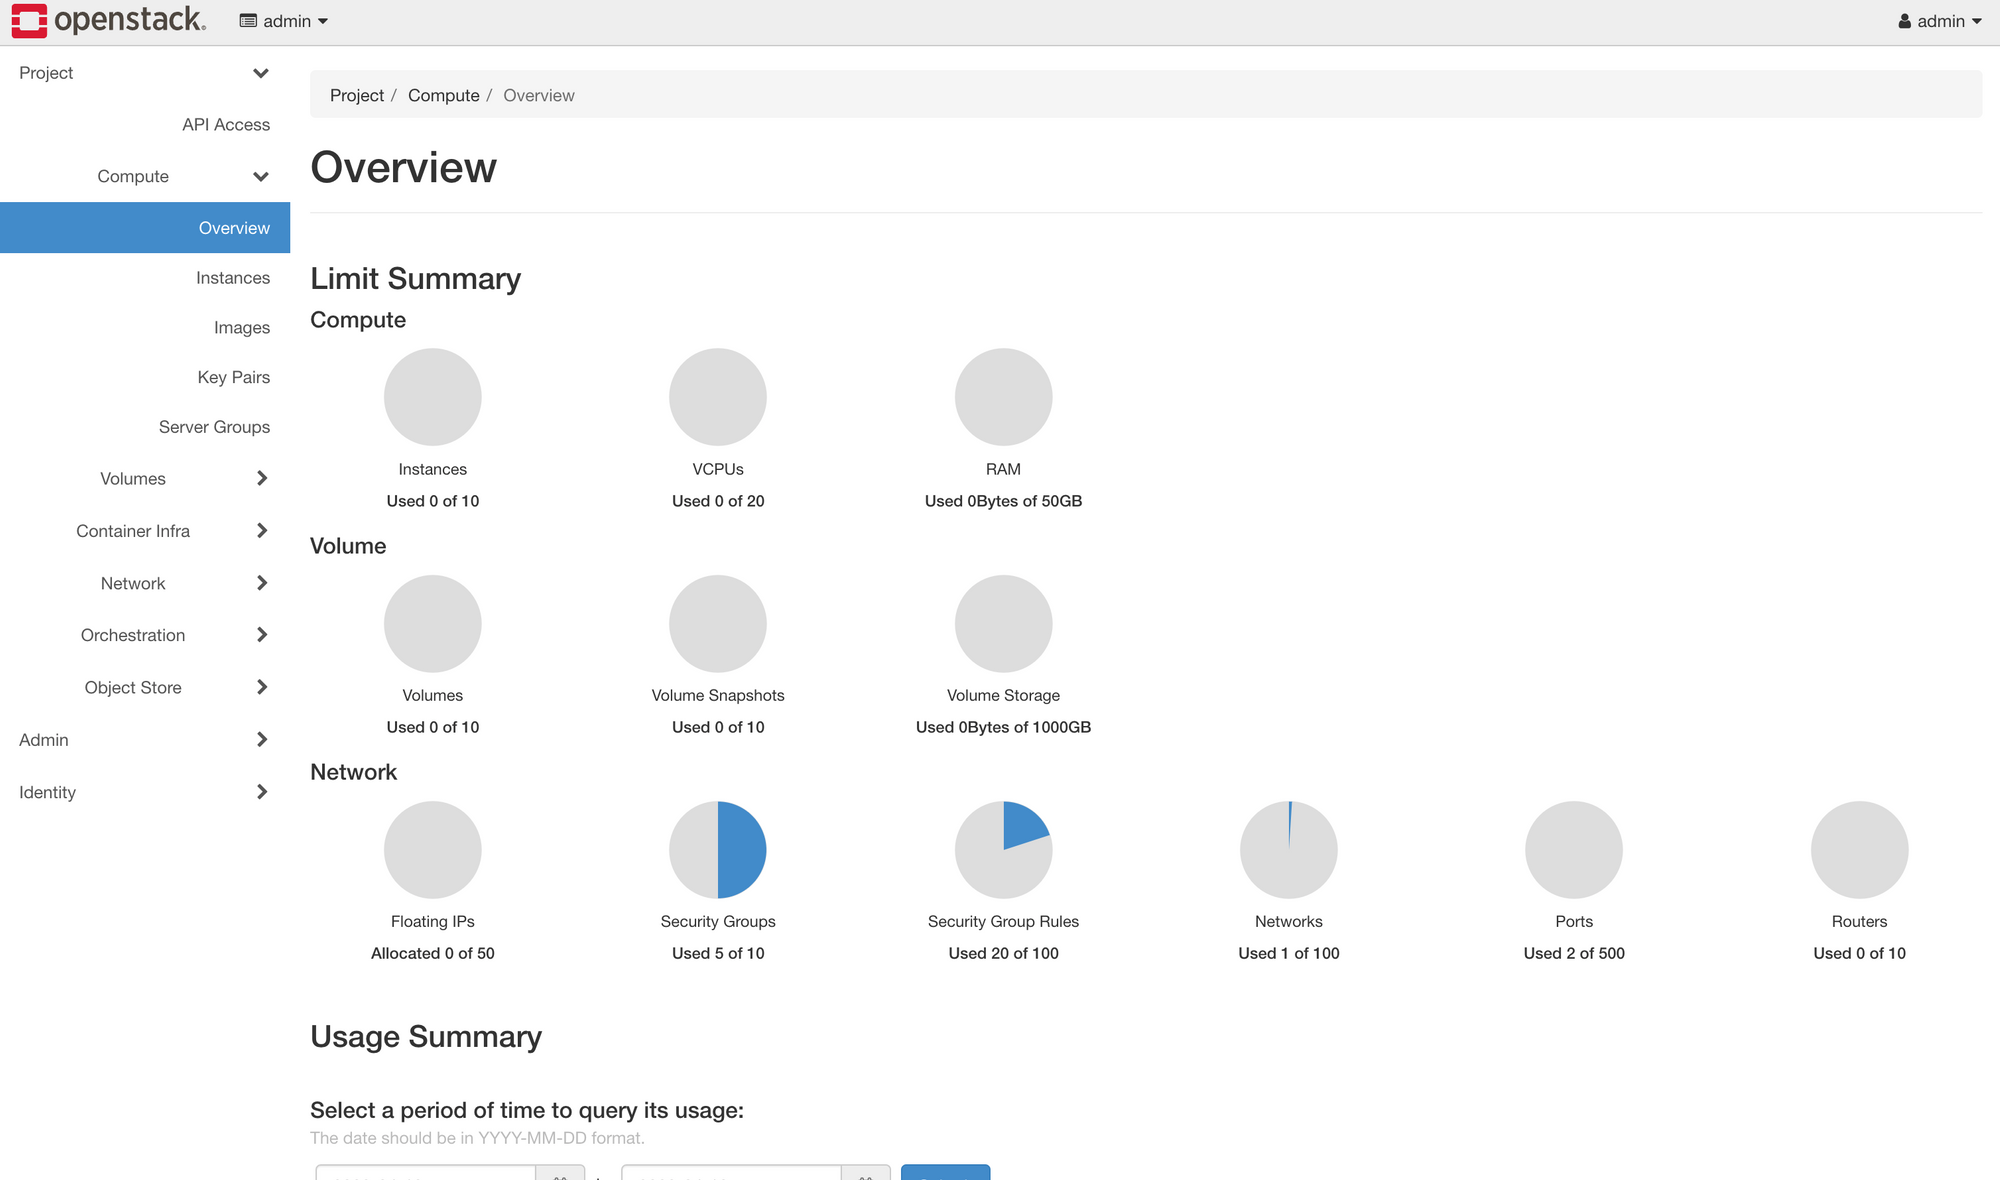
Let's view the hardware assets that were created on OpenMetal. If you just created a cloud, you may already be on on the cloud management page. If not, click "manage". Now click "Assets" on the left side menu.
This page contains a list of assets included with your Private Cloud Deployment. These include your Hardware Control Plane Nodes and IP blocks for Inventory and Provider IP addresses.
 Assets Page of Cloud Management Dashboard for OpenMetal
The screenshot above is a list of assets in a Demo Private Cloud. Your Private Cloud can have different hardware based on the options you have selected in your deployment:
In this example, you will notice three main sections:
- 3 Cloud Core mb_small_v1 Control Plane Nodes
- Inventory IP Address Blocks
- Provider IP Address Blocks
With these Private Clouds, OpenStack is deployed with three hyper-converged control plane nodes.
You can access these Control Plane Nodes directly through SSH as the root user. This access is done through the SSH keys you provided during your Private Cloud Deployment. Use this command to connect (you will have to change the key name and IP to match your information):
ssh -i ~/.ssh/your_key_name root@173.231.217.21
Getting Started with OpenStack Horizon
Horizon is the name of the default OpenStack dashboard, which provides a web based user interface to OpenStack services. It allows a user to manage the cloud.
To access your new cloud's OpenStack dashboard (called Horizon) you will need to obtain Horizon's administrator password. The username is "admin".
To begin, SSH into one of the cloud's servers (you can use any IP address from the "Assets" page). For example:
ssh -i ~/.ssh/your_key_name root@173.231.217.21
Once you are logged in to the server, run this command:
grep keystone_admin_password /etc/kolla/passwords.yml
The password will be shown in the output as in this example:
keystone_admin_password: aB0cD1eF2gH3iJ4kL5mN6oP7qR8sT9uV
Next, launch Horizon. On OpenMetal, you can click the "Horizon" tab on the left menu.

Login using "admin" and the password you just accessed.
 Horizon dashboard.
Create a Project in OpenStack Horizon
In OpenStack, the cloud is divided through the use of projects. Projects have associated with them users, who have differing levels of access, defined by roles. An administrator defines resource limits per project by modifying quotas.
Now we'll learn how to create a project and associate a user with it. And we will learn how project quotas can be adjusted. The Horizon interface will be similar no matter where you deploy OpenStack. This is not specific to OpenMetal.
There are three root-level tabs on the left menu in Horizon: Project, Admin, and Identity. Only users with administrative privileges can see the admin tab.
To create your first project, navigate to Identity -> Projects.
 Projects.
Several projects already exist, including the admin project. These projects are deployed by default and generally should not be modified.
Click the Create Project button near the top right to create a new project.

Under the Name field, specify a name for the project. This example project is called Development. You can also add Project Members and Project Groups but we are not going to cover those yet. Click Create Project to finish creating the first project.
Once created, the project appears in the Project Listing page.
While in the project listing page, you can view and adjust quotas for this project as the admin user. Quotas are limits on resources, like the number of instances.
To view the quotas for this project while in Identity -> Projects tab, find the drop down to the right with the first option being Manage Members. From this menu, click Modify Quotas to view the default quota values.

You will see a form with several tabs and you are presented with the quotas for the Compute service. Quotas exist for the Volume and Network services as well.
You may want to adjust the parameters in this form depending on your workload. Setting a value to -1 means that quota is unlimited.
How to Create a User and Associate with Project
Now that you have a project, you can associate a user with it. There is already the default admin user but now let's see how to create a new user and login with the new user.
First navigate as admin to Identity -> Users. By default, there are several users already listed, and this is expected. These are created during cloud deployment and should generally not be modified.
Click the Create User button.
 Users tab.
On the Create User form set values for User Name, Password, Primary Project, and Role. The Email field is optional but is helpful for password resets. For the Project choose the project we created earlier.
For Role there are several options depending on the level of access required. The default OpenStack roles are reader, member, and admin. Additional roles also exist in the drop down. Reader is the least authoritative role in the hierarchy. For this example, choose member for the role.
Press Create User to create the user.
Next, log out of Horizon as admin, and log back in with your new user. Upon logging back in you are by default in the newly created project. You can see the project you are currently in at the top left and your user can be seen at the top right of Horizon.
Managing and Creating Images
Now let's learn how to upload an image (not a graphical image but a copy of a Linux installation) into OpenStack as well as create images out of an existing instance.
Images contain a bootable operating system that is used to create instances. Within your OpenMetal Cloud, there are several different images that are readily available including CentOS, Debian, Fedora, and Ubuntu. In addition to this, you have the option to upload images from other sources or create your images.
We will learn how to upload images to Glance through Horizon and how to create an image from an instance snapshot. Glance is tool for managing images that allows users to discover, retrieve, and register VM (virtual machine) images and container images. Glance uses Ceph to store images instead of the local file system.
To access images from within your Horizon Dashboard, navigate to the Projects tab. Within the projects tab, select Compute and then select Images. This tab contains a list of all your images within OpenStack.
 Images
Images can be uploaded through your Horizon dashboard by clicking the Create Image button. When creating an image you must choose the Format of the image. With our configuration, the recommended format for images is QCOW2 – QEMU emulator. QCOW2 is the most common format for Linux KVM, expands dynamically, and supports copy on write.
In order to upload an image on Horizon, you must first have the image locally on your machine. In this example, we will upload a CirrOS image. You can download a CirrOS image here.
Now click the Create Image button near the top right.

For this example we'll use the following values for the fields:
- Image Name: Name of the image
- Image Description: Optional description of the image
- File: The source file on your machine
- Format: QCOW2 – QEMU Emulator
Fill out the details as needed and submit the form. It may take some time to complete uploading the image.
Create an Instance in OpenStack Horizon
With OpenStack, instances, or virtual machines, play a large role in a cloud’s workload. OpenStack provides a way to create and manage instances with its compute service, called Nova.
Nova is the OpenStack project that provides a way to provision compute instances (aka virtual servers). Nova supports creating virtual machines, baremetal servers, and has limited support for system containers. Nova runs as a set of daemons on top of existing Linux servers to provide that service.
Now let's learn how to create an instance, including setting up a private network and router, creating a security group, and how to add an SSH key pair.
Create a Private Network
First, let's learn how to create a private network and router. Later we will create an instance on this private network. The router is created so the private network can be connected to your cloud’s public network, allowing you to assign a floating IP address to it, making the instance accessible over the Internet.
To create a private network, begin by navigating to Project -> Network -> Networks. Then click Create Network.
 Networks tab.
For this example, we'll create a network with the following details:
- Network Name: Set a name for the network. This example is called Private.
- Enable Admin State: Leave this checked to enable the network.
- Create Subnet: Leave this checked to create a subnet.
- Availability Zone Hints: Leave this option as default.
Next, move on to the Subnet tab of this form and use these details:
- Subnet Name: Set a name for the subnet. This example subnet is called private-subnet.
- Network Address: Select a private network range. For example:
192.168.0.1/24 - IP Version: Leave this as IPv4.
- Gateway IP: This is optional. If unset, a gateway IP is selected automatically.
- Disable Gateway: Leave this unchecked.
 Create a network.
For now we will keep the default details in the Subnet Details tab.
Click Create to create the network. Once created, it appears in the list of networks.
Create a Router
You next need to create a router to bridge the connection between the private network and the public network. The public network is called External.
To create a router, begin by navigating to Project -> Network -> Routers. Click Create Router.
 Routers.
Input this data for this example:
- Router Name: Set a name for the router here. This example router is called Router.
- Enable Admin State: Leave this checked to enable the router.
- External Network: Choose the network External.
- Availability Zone Hints: Leave this as the default.
Once complete, create the router by pressing Create Router.
Connect Router to Private Network
Next, connect the router to the private network by attaching an interface. Performing this step allows network communication between the Private and External networks.
To attach an interface to the router, first navigate to the list of routers and locate the one previously created.
Click the name of the router to access its details page. This is where the interface is attached. There are three tabs: Overview, Interfaces, and Static Routes. To attach an interface, navigate to the Interfaces tab then load the form to attach an interface by clicking Add Interface near the top right.

On the new interface, choose the private-subnet for Subnet. If you don't set an IP address one is selected automatically. Press Submit to attach the Private network to this router. The interface is then attached and now listed.
You can visually see the network topology for your cloud by navigating to Project -> Network -> Network Topology.

The example above indicates the External network is connected to the Private network through the router called Router.
Security Groups
Security groups allow control of network traffic to and from instances. For example, port 22 can be opened for SSH for a single IP or a range of IPs.
Let's see how to create a security group for SSH access. Later we'll apply the security group we create to an instance.
To view and manage security groups, navigate to Project -> Network -> Security Groups.
You should notice a single security group called default. This security group restricts all incoming (ingress) network traffic and allows all outgoing (egress) network traffic. When an instance is created, this security group is applied by default. To allow the network traffic your instance requires, only open ports as required to just the needed IP ranges.
To create a security group for SSH, click Create Security Group near the top right.

Name the group SSH and then click Create Security Group
After creating the SSH security group, we need to add a rule allowing SSH traffic. We will allow SSH traffic from the first hardware node in this cloud to this instance.
To add a rule, load the form by navigating to Add Rule near the top right.

We'll need to obtain the IP address of the first hardware node of your cloud. You can find this using OpenMetal Central under your cloud’s Assets Page.
 The IP address for the first hardware node.
In the Add Rule menu, add the following information:
- Rule: Select SSH. When adding rules you can choose from predefined options. In this case, we choose the SSH rule from the first drop down.
- Description: Optional. Provide a description of the rule.
- Remote: Select CIDR.
- CIDR: Specify the IP address of your first hardware node.
Press Add to add this rule to the security group.
 Adding a rule.
Create an Instance
We now have almost everything in place to create an instance.
We will need an SSH public key. An SSH public key is required to access an instance over SSH. This key is injected into the instance when created. An SSH key cannot be added to an already running instance.
We will create an instance that can be accessed over SSH from one of the cloud’s hardware nodes. So we will have to create an SSH key pair in one of the hardware nodes. The public portion of that key pair is associated with the instance we'll create soon.
** To learn how to create this key pair, see the supplementary guide: Create SSH Key Pair for an OpenStack Control Plane Node.
To create an instance, begin by navigating to Project -> Compute -> Instances. Then click the Launch Instance button.

On the details tab, fill in the following details:
- Instance Name: Set a name for the instance. This example instance is called Jumpstation.
- Description: Optional. Set a description if this applies.
- Availability Zone: Leave as the default, which is nova.
- Count: Controls the number of instances spawned. Just create 1.
Next, move to the Source tab allowing you to specify an operating system image.
 Source tab.
Fill in the following details:
- Select Boot Source: In this example, we use Image as the boot source.
- Create New Volume: Leave this checked as Yes. This creates a new Cinder volume where the specified operating system image is copied into it. The volume ultimately exists with the Ceph cluster, in the
vmspool. - Volume Size: Allow the system to determine this for you.
- Delete Volume on Instance Delete: Leave this option set as No. If checked, when the instance is deleted, the volume is as well.
- Under the Available section, select the appropriate operating system. This example uses
CentOS 8 Stream (el8-x86_64). Clicking the up arrow will move it to the Allocated section.
This concludes configuring the instance’s source. Next, move to the Flavor tab.
 Flavor tab.
Flavors are a way to define the VCPUs, RAM, and Disk space used by an instance. Pre-built flavors are available for you. For this step, select an appropriate flavor from the options under the Available heading. This example uses the m1.small flavor. Click the up arrow to move it to the Allocated section.
Next, move to the Networks tab.
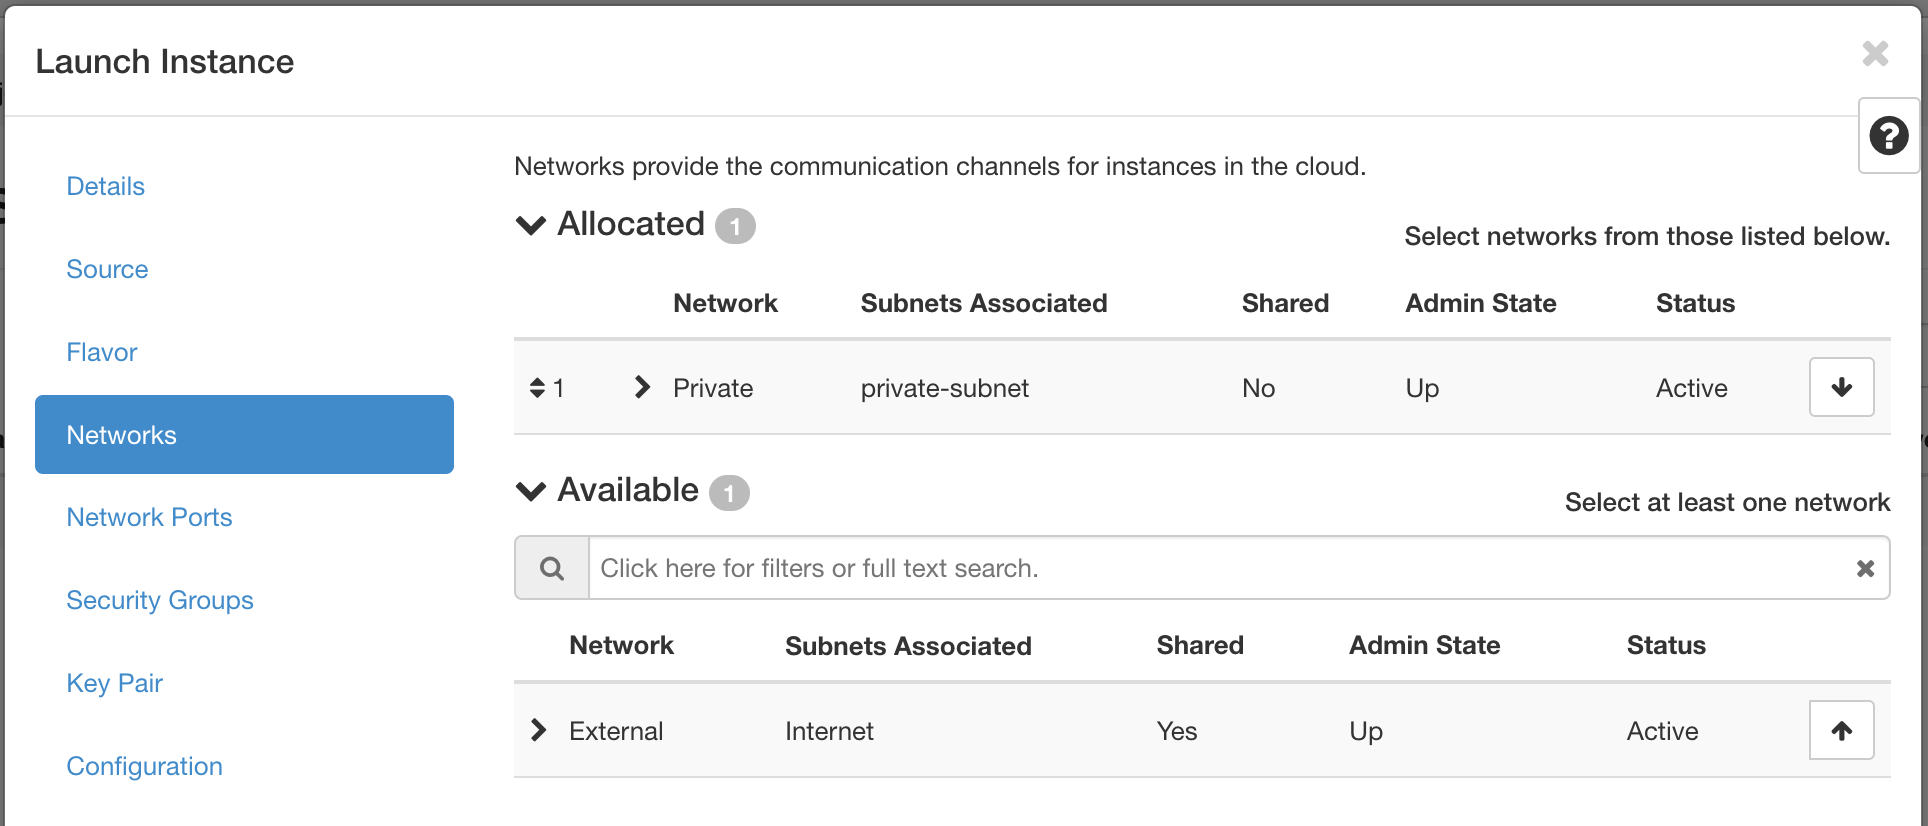 Network tab.
In this section, you specify the network with which the instance is associated. For this example, select the Private network created previously. You can choose the External network as well, but this is generally recommended against in favor of using a floating IP should your instance require Internet connectivity.
You should only expose portions of your network as necessary. This reduces the attack surface and improves application security. If a private network is not created and an instance is created in a default cloud, it is associated with the External network. This means the instance consumes a public IP and it could be reached over the Internet.
Next, skip over the Network Ports tab and move to the Security Groups.
 Security Groups tab.
This is where you select security groups for the instance. This example uses the SSH security group in the Available section. Click the up arrow to move the SSH security group to the Allocated section.
As the final step, move to the Key Pair tab.
In this section, you specify an SSH public key to inject into the instance. You can upload your key at this stage using this form using the Import Key Pair button. You can also create a key pair on this tab.
We will create a key pair from the first hardware node in our cloud so this instance will be accessible over SSH from that node.
To create the SSH key pair from the first hardware node, the first step is to login to the first hardware node. You can get the IP of the hardware node from the Assets tab on OpenMetal. We already connected to this node toward the beginning of the tutorial and the command is the same. It will look something like this:
ssh -i ~/.ssh/your_key_name root@173.231.217.21
After logging in to the node, use ssh-keygen to generate an SSH key pair.
For example:
[root@modest-galliform ~]# ssh-keygen
Generating public/private rsa key pair.
Enter file in which to save the key (/root/.ssh/id_rsa):
Enter passphrase (empty for no passphrase):
Enter same passphrase again:
Your identification has been saved in /root/.ssh/id_rsa.
Your public key has been saved in /root/.ssh/id_rsa.pub.
The key fingerprint is:
SHA256:BNIzHPcqCyjjZqWm88s0zqHrj8J8+gUnkF1cNOEDKZs root@modest-galliform.local
The key's randomart image is:
+---[RSA 3072]----+
|    o=**o        |
|  o..+Bo..       |
| o .+  =. .      |
|  .E   ...       |
|o .+... S        |
|.oo +. o         |
|o*+  ..          |
|BO.+.            |
|*B@+             |
+----[SHA256]-----+
The private key is saved in the default location of /root/.ssh/id_rsa and a passphrase is set for additional security.
To view the contents of the public key, use cat /root/.ssh/id_rsa.pub.
For example:
[root@modest-galliform ~]# cat /root/.ssh/id_rsa.pub
ssh-rsa AAAAB3NzaC1yc2EAAAADAQABAAABgQCv6YOgYbRmXCEFxZP+t+pzh/RRKzsgWpvcnmKwF+uwiKDuihHadScCkgd8dE6ymCjP/+UVdVLGEzXfHXG5EfbcPQYOGjqqOGqOVCHIrhFMG3GjSPao99KaDIAvXsWyTDI9FmrXTiC+0WkmOLNb0UeDic+lQ6KJumw12O1niZjC19jMpWR5amRWEJo6oKFylC8JLHsdfhqr7EBcBzvUJkqh/1zY3qcsABHBrBCWOKC5oNiDAzctQ5MeHq6tv6w6YxdZLLdupczteERN6roroySMtR2JZnOIcnq1aUgD/YDJDeg9zpvUN7stsndONYVOH42+bBu7xEWsm8zobgdfLlmhv+8ab7dKVlYvJUkITqCoKpp8m0f3dbLtQSevCJ9qaeQvmxkjU9OHVPkkTolw4aUHvUsutpVynNfmErf3RGMjQRiQ3ZE7xGKVV7iSFDK9l0mMWBHpYu2OnVKQlP823IC0YKD2dP3qDd/nnvGXVlxfRI+C08n9ehoHwZAIz4SM3dU= root@modest-galliform.local
Copy the entire key. It starts with "ssh-rsa" and continues all the way until the end.
Now back to the Key Pair tab. Click Import Key Pair.

Input the following values:
- Key Pair Name: Set a name for the SSH public key. This example public key is called
jumpstation-keybut it can really be anything you like. - Key Type: This example uses an SSH Key key type.
- Public Key: Paste in the public key you just copied.
Click Import Key Pair.
Once the public key is imported, create the instance by pressing Launch Instance. (The other tabs our outside the scope of this demonstration.)
The instance goes through a build process. Allow a few minutes for this to occur. When complete, the instance appears in the Instances Listing page.
Assign and Attach Floating IP
The instance created previously is associated with a private network. Presently, the only way to access this instance is to connect to it from with the cloud’s hardware nodes. Another option for connecting is to use a floating IP. In this section, we demonstrate how to allocate a floating IP and attach it to this instance.
To allocate a floating IP, first navigate to Project -> Network -> Floating IPs. Then click Allocate IP to Project.
 Floating IPs tab.
In the popup, make sure Pool is set to External (and optionally add a description) and then click Allocate IP to add this floating IP address for use.

In the same section, allocate the IP to the Jumpstation instance by clicking the Associate button at the far right.

Fill in the details:
- IP Address: This field comes pre-selected with the floating IP so there’s no need to change anything here.
- Port to be associated: Select the instance created previously. In this case, we use the Jumpstation instance.
Click Associate. This instance is now accessible over SSH from the first hardware node of your cloud.
To login to this instance, after you login to your hardware node, run the following command [you will have to change the IP address to the one you just associated] :
ssh -i /root/.ssh/id_rsa centos@173.231.255.40
It should look something like this in your terminal:
[root@modest-galliform ~]# ssh -i /root/.ssh/id_rsa centos@173.231.255.40
The authenticity of host '173.231.255.40 (173.231.255.40)' can't be established.
ECDSA key fingerprint is SHA256:z45zzE8fPuKagtyrSGP9AWR4vIVpBppoaqkqj1Kx4SA.
Are you sure you want to continue connecting (yes/no/[fingerprint])? yes
Warning: Permanently added '173.231.255.40' (ECDSA) to the list of known hosts.
Enter passphrase for key '/root/.ssh/id_rsa':
Activate the web console with: systemctl enable --now cockpit.socket

[centos@jumpstation ~]$
In the next section, you will have to do something while logged in to this machine.
How to Install and Use OpenStack’s CLI
So far we've been learning how to manage OpenStack through a web browser. But it is also possible to manage through the command line using OpenStack’s CLI called OpenStackClient.
Using the command line to manage your cloud introduces more flexibility in automation tasks and can generally make an administrator’s life simpler. Let's learn how.
We'll now install the OpenStackClient on the instance we just created that we named Jumpstation.
Before installing OpenStackClient, you must obtain two files from Horizon, which are required to prepare your shell environment. Those two files are clouds.yaml and the OpenStack RC file.
clouds.yaml: Used as a source of configuration for how to connect to a cloud- OpenStack RC file: Used as a source of authentication for your user and project

To collect these files, log in to Horizon as your user. Navigate to Project -> API Access. Then click Download OpenStack RC File and download the OpenStack clouds.yaml and the OpenStack RC files to your machine. The files are associated with the current user and project that user is in.
Prepare and Install OpenStackClient
Next, use SSH to log in to the instance created previously. If you've been following along, then this instance can only be accessed from one of your control plane nodes. Use the instructions recently given to login to the instance.
Here are the steps to prepare and install the OpenStackClient, after you are logged in.
Step 1: Prepare clouds.yaml and OpenStack RC files
The clouds.yaml file obtained previously must be prepared in this instance. For this demonstration, we'll save it to ~/.config/openstack/clouds.yaml. We will have to copy the contents of clouds.yaml that we downloaded to our machine from Horizon and store it as ~/.config/openstack/clouds.yaml.
Here is how you create the directory and then edit the file. Run the commands after the $ on your command line.
# Create the following directory
$ mkdir -p ~/.config/openstack

# Create and open the clouds.yaml to edit
$ vi ~/.config/openstack/clouds.yaml
To get the contents from the clouds.yaml on your local computer into the instance, you will first have to open up the local version in a text editor. Then you will have to copy all the text and then paste it into the version you just created on the instance.
After you paste the text of the file into the vi editor in you terminal, use the command :wq to save and quit the editor.
The clouds.yaml file can actually be placed in several locations. For more see the Configuration Files heading of the OpenStack Victoria’s documentation.
Next, copy the contents of the OpenStack RC file from your local machine into the instance. The file can be placed anywhere so for this example we will store it in the user's home directory. The full path will be ~/Development-openrc.sh.
Create and start editing the file with the following command (don't use the $ when you copy and paste the command).
$ vi ~/Development-openrc.sh
Just like before, you will have to open up the local version of the file, copy all the text, then paste it into the instance version of the file that is open in your terminal. Then, use the command :wq to save and quit the editor.
Now you have to run the file. First change the permissions:
$ chmod +x Development-openrc.sh
Then, run the file:
$ ./Development-openrc.sh
You will have to enter your OpenStack password.
Then run the command:
$ source Development-openrc.sh
Step 2: Create a Python virtual environment
We'll create a virtual environment so we don't interfere with the system’s Python version.
In a default CentOS 8 Stream installation, the system’s Python executable is /usr/libexec/platform-python and is what will be used to create the virtual environment.
Use /usr/libexec/platform-python -m venv ~/venv to create a virtual environment in path ~/venv.
For example:
$ /usr/libexec/platform-python -m venv ~/venv
Step 3: Activate the Python virtual environment
Use source ~/venv/bin/activate to activate the virtual environment.
For example:
$ source ~/venv/bin/activate
After you have activated the virtual environment, the name of it will appear at the beginning of the command line. So it will look something like this:
[centos@jumpstation ~]$ /usr/libexec/platform-python -m venv ~/venv
[centos@jumpstation ~]$ source ~/venv/bin/activate
(venv) [centos@jumpstation ~]$
Step 4: Upgrade pip
Before installing OpenStackClient and to aid in a smooth installation, upgrade pip. Upgrade pip by using pip install --upgrade pip.
For example:
$ pip install --upgrade pip
Step 5: Install OpenStackClient
With everything prepared, OpenStackClient can be installed.
Note! – There exist two OpenStackClient packages: python-openstackclient and openstackclient. I recommend using python-openstackclient because it is maintained much more frequently than the prior package.
Install OpenStackClient using:
$ pip install python-openstackclient
Step 6: List servers associated with your project
For an initial command, list the servers associated with your project by running openstack server list.
For example:
(venv) [centos@jumpstation ~]$ openstack server list
+--------------------------------------+-------------+--------+---------------------------------------+--------------------------+----------+
| ID                                   | Name        | Status | Networks                              | Image                    | Flavor   |
+--------------------------------------+-------------+--------+---------------------------------------+--------------------------+----------+
| 412fc87f-a4d9-40f1-ba07-fe3eee216c38 | Jumpstation | ACTIVE | Private=173.231.255.40, 192.168.0.140 | N/A (booted from volume) | m1.small |
+--------------------------------------+-------------+--------+---------------------------------------+--------------------------+----------+
Here, we can see the server created previously.
Command Structure
When using OpenStackClient, there is typically a common command pattern for what you want to accomplish. All openstack commands begin with openstack. You can execute openstack by itself to enter into a shell, where commands no longer need to be prefixed by openstack:
(venv) [centos@jumpstation ~]# openstack
(openstack)
List all Available Subcommands
Use openstack --help to list all available subcommands. You initially see all the flags you can pass, but after scrolling a bit, the subcommand list starts:
Commands:
  access rule delete  Delete access rule(s)
  access rule list  List access rules
  access rule show  Display access rule details
  access token create  Create an access token
  acl delete  Delete ACLs for a secret or container as identified by its href. (py
thon-barbicanclient)
[...output truncated...]
Learn more about a Subcommand
After seeing available commands, learn more about a command by using openstack help <command>.
For example, to learn more about the openstack server command, use openstack help server:
$ openstack help server
Command "server" matches:
  server add fixed ip
  server add floating ip
  server add network
  server add port
  server add security group
[...output truncated...]
List Items and Show Details
It is very common when using OpenStackClient to list items and the command form is typically openstack <subcommand> list. For example, openstack server list, lists all servers for the currently configured project.
Furthermore, more information about an item can be found by typically running openstack <subcommand> show <item>. For example, openstack server show Jumpstation shows the details about the instance named Jumpstation.
How Private Clouds are Deployed
Now we'll learn more about how your Private Cloud was deployed and learn more about the environment. OpenStack can be deployed in several different ways and this section highlights the characteristics of your Private Cloud. We also explain some of the advantages for this type of deployment and areas that are unique to OpenMetal.
In OpenMetal, OpenStack is containerized through Docker using Kolla Ansible. This is done through an initial deployment container called FM-Deploy. FM-Deploy provides the initial setup changes during the provisioning process of your Private Cloud. The FM-Deploy Container is a necessary part of the current architecture of your Private Cloud. The FM-Deploy Container should remain running in your Private Cloud as it is used by our systems in the event you want to add or remove nodes from your cloud.
Containerization of OpenStack
OpenMetal uses Kolla Ansible to set up Docker containers for all running services. Should you need to make any configuration changes to your nodes, Kolla Ansible should be used to push these changes. If Kolla Ansible is not used then there is a risk of these changes being reverted during any system updates.
Some advantages of containerization through docker are:
- Containers create an isolated environment reducing software dependencies
- Containers can be scaled and allow for services to balance across your cluster
- Containers provide increased flexibility for test releases, patches, and automation
- Containers have a consistent and repeatable deployment and a shorter initialization time
Disk Storage and Ceph
In OpenMetal, disk storage is provided through Ceph. Ceph is an object storage interface that can provide interfaces for multiple different storage types on a single cluster. In OpenMetal Ceph is comprised of two elements: object storage and block storage.
Ceph object storage utilizes Ceph Object Storage Gateway daemon (RADOSGW). With OpenMetal clouds, Ceph’s RGW replaces Swift so there is no Docker container for Swift. Instead, Swift endpoints are connected directly to the RGW. Authentication for RGW is handled through Keystone in /etc/ceph/ceph.conf.
Ceph block storage connects to the Cinder service utilizing Ceph’s RADOS Block Device. Within your cloud, those objects are stored in Ceph pools. Ceph provides a layer of abstraction that allows objects to be recognized as blocks.
Some advantages of using ceph are:
- Data is self-healing and will redistribute data across your cluster in the event of power, hardware, or connectivity issues
- Data is replicated and highly available
- Ceph has the ability to run on commodity hardware and to mix hardware from different vendors
Introduction to Ceph
Ceph is an open-source, distributed storage system that provides object, block and file storage interfaces from a single cluster.
Ceph was selected as the storage solution for Private Cloud Core OpenStack clouds due to its ability store data in a replicated fashion. The data stored in the Ceph cluster is accessible from any of your cloud’s control plane nodes. The storage is considered shared across all nodes, which can make recovering an instance and its data trivial.
Let's learn how to check the status of your Ceph cluster and see available disk usage using the command line.
Check Ceph Status
First, make sure you are logged into one of your cloud’s control plane nodes (not an instance). To check the status of your Ceph cluster, use ceph status.
For example:
[root@modest-galliform ~]# ceph status
  cluster:
    id:     ac5c03ba-fcb8-4963-b235-e9020b5bfcc2
    health: HEALTH_OK

  services:
    mon: 3 daemons, quorum modest-galliform,gifted-badger,hopeful-guineafowl (age 7d)
    mgr: hopeful-guineafowl(active, since 7d), standbys: modest-galliform, gifted-badger
    osd: 3 osds: 3 up (since 7d), 3 in (since 7d)
    rgw: 3 daemons active (gifted-badger.rgw0, hopeful-guineafowl.rgw0, modest-galliform.rgw0)

  task status:

  data:
    pools:   12 pools, 329 pgs
    objects: 2.06k objects, 9.4 GiB
    usage:   31 GiB used, 2.6 TiB / 2.6 TiB avail
    pgs:     329 active+clean

  io:
    client:   2.2 KiB/s rd, 2 op/s rd, 0 op/s wr
Check Ceph Disk Usage
To check the available disk space in your Ceph cluster, use ceph df.
For example:
[root@modest-galliform ~]# ceph df
--- RAW STORAGE ---
CLASS  SIZE     AVAIL    USED    RAW USED  %RAW USED
ssd    2.6 TiB  2.6 TiB  28 GiB    31 GiB       1.15
TOTAL  2.6 TiB  2.6 TiB  28 GiB    31 GiB       1.15

--- POOLS ---
POOL                   ID  PGS  STORED   OBJECTS  USED     %USED  MAX AVAIL
device_health_metrics   1    1  418 KiB        3  1.2 MiB      0    839 GiB
images                  2   32  6.8 GiB      921   20 GiB   0.81    839 GiB
volumes                 3   32  2.4 GiB      662  7.3 GiB   0.29    839 GiB
vms                     4   32  4.2 KiB        6   48 KiB      0    839 GiB
backups                 5   32      0 B        0      0 B      0    839 GiB
metrics                 6   32  2.1 MiB      242  8.4 MiB      0    839 GiB
manila_data             7   32      0 B        0      0 B      0    839 GiB
manila_metadata         8   32      0 B        0      0 B      0    839 GiB
.rgw.root               9   32  2.4 KiB        6   72 KiB      0    839 GiB
default.rgw.log        10   32  3.4 KiB      207  384 KiB      0    839 GiB
default.rgw.control    11   32      0 B        8      0 B      0    839 GiB
default.rgw.meta       12    8      0 B        0      0 B      0    839 GiB
Maintaining OpenStack Software Updates
Software in the OpenStack ecosystem evolves over time, either through new feature additions, bug fixes, or when vulnerabilities are patched. Part of operating an OpenStack cloud involves maintaining its software through updates. In this section, we point out the sections in an OpenMetal cloud where software updates occur and explain best practices when performing updates.
The software of an OpenMetal cloud that can be updated include each hardware node’s package manager and the Kolla Ansible Docker images. Ceph updates are handled through the node’s package manager.
Now we will specifically cover the step to perform package manager updates.
- Migrate Workload
Package manager updates requiring a server reboot to an OpenMetal control plane node can be disruptive to any workload running on it. Prior to performing disruptive actions, it may be possible to migrate instances another node running the Compute service. For information on how to migrate instances, see OpenStack Nova’s documentation.
2. Update One Node at a Time
While performing package manager updates, ensure updates occur successfully for one hardware node before updating another node.
3. Disable Docker
Before updating the package manager, ensure the Docker socket and service within SystemD are stopped and disabled. For example:
systemctl disable docker.socket
systemctl stop docker.socket
systemctl disable docker.service
systemctl stop docker.service
4. Upgrade Host OS Packages
After verifying the Docker socket and service are stopped, perform the package manager updates.:
dnf upgrade
5. Determine Reboot Need
Once package manager completes, check if a reboot is required with dnf-utils needs-restarting and the reboot hint flag (-r):
$ needs-restarting -r
Core libraries or services have been updated since boot-up:
  * kernel
  * systemd
Reboot is required to fully utilize these updates.
More information: https://access.redhat.com/solutions/27943
$
6. Ceph Maintenance
This step is optional and only required if the node needs to be rebooted.
Prior to reboot, if the node is part of the Ceph cluster automatic OSD removal and data rebalance should be temporarily suspended. To do so, perform:
ceph osd set noout
ceph osd set norebalance
This will reduce rebuild time and help ensure the node rejoins the cluster
automatically.
Once the node reboots and a healthy Ceph cluster is confirmed, these parameters must be unset. To unset this configuration, perform:
ceph osd unset noout
ceph osd unset norebalance
Reboot if Required
Reboot the node if required:
shutdown -r now
You may have to wait a minute or two before you can log back in to the control plan node.
Verify Successful Reboot
When the node comes back online, SSH into it to verify the OpenStack Docker containers have started. Additionally, if this node was part of the Ceph cluster, check Ceph’s cluster status.
To verify the Docker containers have started, use docker ps. You should see a number of Docker containers running. Under the STATUS column, each container should reflect the status Up.
For example:
[root@modest-galliform ~]# docker ps
CONTAINER ID   IMAGE                                                                        COMMAND                  CREATED        STATUS                          PORTS     NAMES
6f7590bc2191   harbor.imhadmin.net/kolla/centos-binary-telegraf:victoria                    "dumb-init --single-…"   20 hours ago   Restarting (1) 14 seconds ago             telegraf
67a4d47e8c78   harbor.imhadmin.net/kolla/centos-binary-watcher-api:victoria                 "dumb-init --single-…"   3 days ago     Up 6 minutes                              watcher_api
af815b1dcb5d   harbor.imhadmin.net/kolla/centos-binary-watcher-engine:victoria              "dumb-init --single-…"   3 days ago     Up 6 minutes                              watcher_engine
a52ab61933ac   harbor.imhadmin.net/kolla/centos-binary-watcher-applier:victoria             "dumb-init --single-…"   3 days ago     Up 6 minutes                              watcher_applier
[...output truncated...]
Next, if this node is part of a Ceph cluster, check Ceph’s status using ceph status.
For example:
[root@modest-galliform ~]# ceph status
  cluster:
    id:     06bf4555-7c0c-4b96-a3b7-502bf8f6f213
    health: HEALTH_OK
[...output truncated...]
The above output shows the status as HEALTH_OK, indicating the Ceph cluster is healthy. Ceph is naturally resilient and should recover from a node being rebooted.
View your Private Cloud’s Resource Usage
Now let's look at how to find the resource usage of your private cloud. We will explore how to utilize the Horizon Dashboard to determine the total memory and compute usage for a project as well as how to view instances stored on each node. Next, we'll look at disk usage by explaining how to briefly interact with your cloud’s Ceph cluster using the command line. Finally, we'll go over adding and removing nodes from your Ceph cluster.
There are currently three variations to private cloud deployments: Small, Standard, and Large. All private cloud deployments have a cluster of three hyper-converged servers but will have different allocations of memory, storage, and CPU processing power depending on the configuration and hardware. In addition, you have the option of adding additional hardware nodes to your cluster.
View Memory and Compute Usage in Horizon
To view the resources used by your cloud, you have to be the admin user and assigned to the admin project. Once you are in the admin project, navigate to Admin -> Compute -> Hypervisors. This section, lists the following items:
- VCPU Usage
- Memory Usage
- Local disk usage
View Instance State Across Cluster
There is also an option to see the location of your instances within your cluster. To view this information, navigate to Admin -> Compute -> Instances. You have the option to see the project, the host, as well as the IP address, and state.
 Summary of Instances.
How to Access Resource Information from Ceph
To access information regarding your Ceph cluster’s resource pools, you will need to use Ceph’s CLI. These are a summary of some useful resource monitoring and health commands.
ceph -sto check the status of Cephceph dfto list the disk usage overviewceph health detailprovides details about existing health issuesceph osd pool lsto list pools adddetailfor additional details regarding replication and health metrics
###
Create and Restore Volume Backups
With Private Clouds, you have the ability to create backups and snapshots of your volume data. If a volume’s data goes corrupt or is removed by mistake, having a copy of that data could be invaluable. Now we'll look at how to create and recover volume backups using Horizon.
First of all, let's review what a volume is. Volumes are block storage devices that you attach to instances to enable persistent storage. You can attach a volume to a running instance or detach a volume and attach it to another instance at any time. You can also create a snapshot from or delete a volume.
Create a Volume Backup
Navigate in Horizon to Project -> Volume -> Volumes.
 Volumes List
Create a backup of your volume by selecting from the drop down Create Backup.
 Access Create Volume Backup Form
You will need to fill in the following fields.
- Backup Name: Specify a name for the volume backup
- Description: Provide a description if necessary
- Container Name: Leave this blank otherwise the volume backup cannot be created. Horizon tells you if this field is blank, the backup is stored in a container called
volumebackups, but this is not the case with our configuration. With Private Clouds, all volume backups created this way are stored in the Ceph pool calledbackups. - Backup Snapshot: If applicable specify a snapshot to create a backup from
After submitting the form, you are navigated to Project -> Volume -> Volume Backups where you can see the volume you just created a backup of.
 Volume Backup List
Test Volume Backups
Creating backup copies of your important data is only one part of having a solid backup and recovery plan. Additionally, consider testing backed-up data to ensure if something unexpected does happen that restoring your backups will actually be useful. To test volume backups, you can restore a volume backup within OpenStack alongside the original volume and compare the contents.
Restore a Volume Backup
To restore a volume backup, being by navigating in Horizon to Project -> Volume -> Volume Backups.
Next, find the volume backup you wish to restore and from its drop down on the right, select Restore Backup.
 Restore Volume Backup
Choose the volume to restore to, or have the system restore the backup to a new volume.
Ceph, Volumes, and Data Durability
When volume backups are created, they are stored in your cloud’s Ceph cluster in a pool called backups. By default, the Ceph cluster is configured with host level replication across each of your cloud’s three control plane nodes. With this configuration, your cloud could suffer losing all but one Ceph node and still retain all of the cluster’s data.
Conclusion
You should now have a basic understanding of OpenStack and some of the things you can do with it. Good luck setting up your own OpenStack system.
##