
By Jinwoo Choi
Phone Number Authentication
Many mobile applications require membership. Most of them provide user authentication. This is because you need to check whether the user in use is the same as the subscriber when preventing duplicate subscriptions or changing passwords.
Most mobile applications use a phone number to authenticate users, since they run on mobile phones. Phone number authentication consists of several steps, which means state management is required. You must also change the UI accordingly. This also requires asynchronous event handling, such as requesting a verification code and passing user-entered code to the server.
Therefore, phone number authentication can be a very good topic for writing about development skills. In this article, I will first implement phone number authentication in the usual way. Then I will introduce Reactive Programming.
UI flow of Phone Number Authentication
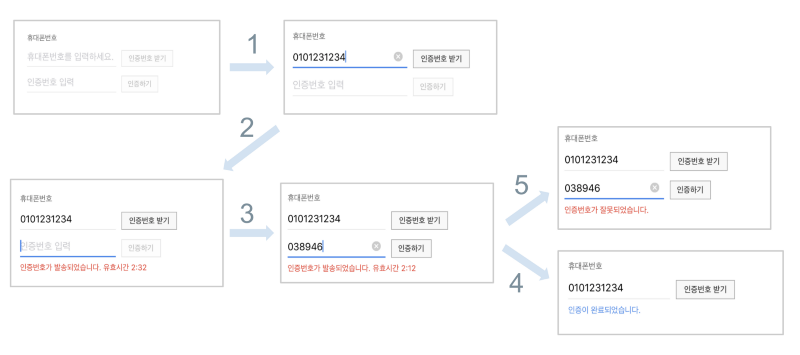
During the authentication process, you must change the user interface for each step. For example, the related Button should be activated depending on the presence of the input value. And the UI component should be displayed or hidden according to the authentication step. Also, the Tip should be displayed to suit the situation. This article focuses on the following three cases.
- Activate [Request verification code] Button when entering a phone number (Step 1)
- Hide [Verification code] TextField and [Authenticate] Button when authentication is successful (Step 4)
- Display related message (tip) when authentication is completed or failed (step 5)
Basic structure
First, we’ll define an Enum with five states for each authentication step as follows. We declare it as a property of the Swift class and it has a didSet observer. We’ll add the code that changes the UI according to the authentication step here.
enum PhoneNumberVerifyStep { case inputPhoneNumber, inputVerifyNumber, verifying, succeed, failed}
UI components consist of two TextFields, two Buttons, and one Label as follows. All are created through InterfaceBuilder and connected to IBOutlet. As mentioned earlier, we’ve declare a class property for storing the authentication step named verifyStep, and we’ve added a didSet observer to handle UI changes.
Change UI based on authentication step
Here is the part that actually changes the UI. Set the isHidden property of the [Verification code] TextField and the [Authentication] Button according to the changed value of verifyStep, and change the text of the [Tip] Label.
After calling the Restful API from the [Authentication] Button’s action method, set the appropriate value for verifyStep according to the response. Since we used the didSet observer for changing the UI, there is an advantage to separating the UI code and data processing code.
Whether the [Request verification code] Button is active depends on the real-time input value of the [Phone number] TextField, not the authentication step. Therefore, we add an action handler to phoneNumberTextField that sets the isEnabled of requestVerifyNumberButton according to the input value.
In this way, we’ve implemented the UI changes according to the phone number authentication step in the usual way. Now, after looking at some of the disadvantages of the old method, I will modify the example and do it in the Reactive way, which is the subject of this article.
First, the internal implementation of the didSet observer in verifyStep may be too large. And the code that sets up one View can exist across multiple cases in the Switch statement. Many parts need to be modified to remove a specific View or add a new View. Above all, it is hard to read if the code gets longer.
Changing the enable property of the Button according to the input value of TextField can be inconvenient: the text input event handler should be added continuously if the number of the TextField and Button that need similar processing is increased. If you need to add real-time validation logic to the input value in the TextField, the inside of the event handler can be complicated.
Now, let’s improve these shortcomings by applying Reactive Programming. Here we use the open source library ReactiveCocoa.
Reactive Programming
Reactive Programming is the process of constructing a program using a function that responds to the stream of data in a time-sequential manner. The basic concept is not new — consider the following use cases. For example, the Button’s click event is basically observing asynchronous events and subscribing through callbacks. In addition, Cocoa has already provided a number of tools to implement Observer Patterns for data as well as UI Events.
Reactive programming is programming with asynchronous data streams.
In a way, this isn’t anything new. Event buses or your typical click events are really an asynchronous event stream, on which you can observe and do some side effects. Reactive is that idea on steroids. You are able to create data streams of anything, not just from click and hover events
However, Reactive Programming goes beyond just using the tools mentioned above, to the use of Observer Pattern as the core of programming.
It abstracts the flow of all types of primitive data handled by the UI — Control Action, Notification, Delegate, and KVO, which are basic tools provided by Cocoa, as a stream. It also provides functions to process and filter the data flowing through it, which can be easily used in various areas.
In other words, reactive programming is a more integrated and easier way to handle chain reaction processing (and programming based on it) due to state changes than traditional methods.
Basically, its function-oriented coding aims to perform a single role in a function connected to a stream. This avoids complicated stateful programs such as the verifyStep didSet observer of the previous example, and makes it easy to handle error handling and concurrency control of asynchronous processing. See ReactiveX.io for more information.
Implement Reactive Programming
Ok, it’s time to stop explaining long, boring theories. From now on, let’s improve the phone number authentication example using the open source library ReactiveCocoa.
First of all, we remove the code that changes the UI according to the authentication step of the previous example, and only the basic skeleton of ViewController is left. We also remove the didSet observer for verifyStep, the editing action handler for the TextField, and the action method for the [Authenticate] Button.
Implement the following code using ReactiveCocoa based on the skeleton. The entire code was attached because it was not long. Let’s first look at Property of ReactiveSwift, and let’s look at the implementation by dividing the authentication step process into three types as shown in the previous example.
(Mutable) Property of ReactiveSwift
Property is a class provided by ReactiveSwift, which is the base of ReactiveCocoa. It provides the ability to handle data as a stream. For example, in the example code, verifyStep is a Holder for PhoneNumberVerifyStep type data. It can generate a signal when changing the value, or change the value in response to other data changes.
var verifyStep = MutableProperty<PhoneNumberVerifyStep(...)
That is, when the value of Property (verifyStep) changes, the UI can be changed. Or when the input value of TextField is changed, the value of variable (verifyStep) can be changed with it. The didSet observer of the Swift class property provides similar functionality. However, MutableProperty has the advantage of being able to change or filter the values passed through the stream as described above, and to connect with the UI change code much more concisely.
UI Binding and <~ operator of ReactiveCocoa
ReactiveCocoa provides Binding to easily handle UI changes due to Property changes. The UI component can create a BindingTarget for each of its configurable attributes. And this has a form of Command Pattern.
For example, ReactiveCocoa provides BindingTarget, which is the command that changes UILabel’s text. The BindingTarget is executed when a Signal is generated from the stream and sets the received value to the text of the UILabel.
The <~ operator is provided to make it easier to connect the Signal to the BindingTarget. For example, the code below sets the value (input value) passed from the Signal (that is generated when the value of textField changes) to the text of the label.
label.reactive.text <~ textField.reactive.continuousTextValues
label.reactive.text returns a BindingTarget instance that changes the text, and textField.reactive.continuousTextValues returns a Signal instance that raises an event when the input value changes. The BindingTarget instance and the Signal instance are bound through <~, so when the input value of the textField changes, the text of the label changes with it.
ReactiveCocoa’s UI Binding is also an important concept playing a key role in implementing the MVVM design. This is because it is possible to separate the data processing code from the UI processing code by binding the properties of the ViewModel with the UI components in the View.
Reactive Chain Reaction
Now go back to the example code and see how the Property and UI Binding are being used. Let’s start with the process of activating the [Request verification code] Button when a phone number is entered. The Button’s BindingTarget subscribes to the input value change Signal generated by the continuousTextValues of the TextField described above.
requestVerifyNumberButton.reactive.isEnabled <~ phoneNumberTextField.reactive.continuousTextValues .map { !($0?.isEmpty ?? true) }
The isEnabled BindingTarget of requestVerifyNumberButton was bound to the input value change Signal of phoneNumberTextField and the <~ operator was used in the process.
The isEnabled property of the Button is a Bool type property. The input value of TextField is a string type, so the value can not be directly assigned.
Therefore, when the string value is passed, it is changed to a Bool type through Signal’s map method. It is clear that stream data, which is a key advantage of Reactive Programming, is easy to process and can be expressed in a short and concise manner.
Let’s take a look at the state change of Button, TextField, and Label depending on the value of verifyStep which occupies the greater part of the example.
var verifyStep = MutableProperty<PhoneNumberVerifyStep>(...)
First, verifyStep is declared as a MutableProperty. verifyStep can now serve as a data stream, and UI Components can subscribe to a value change Signal from it. The value property returns the primitive value of verifyStep.
The following is UI Component Bindings to the Signal of verifyStep. Similarly, the <~ operator connects the BindingTarget that changes the isHidden and text properties of the UI Components with the Signal from verifyStep. That is, if the value of verifyStep is changed, the UI attributes such as isHidden and text are changed accordingly.
verifyNumberTextField.reactive.isHidden <~ verifyStep .map { $0 == .succeed }
verifyButton.reactive.isHidden <~ verifyStep.map { $0 == .succeed }
statusLabel.reactive.isHidden <~ verifyStep.map { !$0.isVerifiedStep }
statusLabel.reactive.text <~ verifyStep.signal .filter { $0.isVerifiedStep }.map { $0 == .succeed ? ... }
Use the map method to bind the Enum type value called PhoneNumberVerifyStep to the Bool type property. Use the filter method to ensure that the text in the statusLabel changes only when verifyStep is .succeed or .failed.
Up to this point, the chain reaction between data and UI has been improved in a reactive way during the implementation of Phone Number Authentication. No more didSet observers are needed. Complex UI change methods have also disappeared.
The Reactive approach allows us to define how a single UI component will change in the future with a concise representation. It also improves the readability of the code. Also, there are fewer things to change when adding or removing UI components.
Finally, let’s look at how to handle the UI Control Event through ReactiveCocoa.
Handling UI Control Events with ReactiveCocoa
ReactiveCocoa also provides a way to handle UI control events as streams. Like the continuousTextValues of the TextField we saw earlier, ReactiveCocoa has added a property that returns a Signal instance for the control event of the UI component. The Signal for the UI Event can be bound to the BindingTarget, or it can have an observer directly.
verifyButton.reactive.controlEvents(.touchUpInside).observeValues { self.api.getUsersVerify(...) .on(value: { _ in self.verifyStep.value = .succeed }) .on(failed: { error in self.verifyStep.value = .failed })}
In the example, we added the Observer directly to the UI Event Signal. The controlEvents method returned a Signal for the touchUpInside event, and the observer handler was added via the observeValues method.
The simple process of changing the Label’s text when the Button is touched is possible by binding through the <~ operator.
label.reactive.text <~ button.reactive.controlEvents(.touchUpInside) .map { _ in "hello" }
Let’s recap the process so far. If a signal occurs while subscribing to a stream of the UI Event, it calls the Remote API. Change the value of MutableProperty according to the value passed to the response handler of the asynchronous call. At the same time, a value change signal is generated from the stream of MutableProperty, and the UI that is bound to the change signal is changed.
Now we’ve changed the Phone Number Authentication example to conform to the definition of Reactive Programming. Most of the processing is done with stream subscription and UI binding.
Conclusion
We have changed the traditional Phone Number Authentication to use Reactive programming. It’s not a new concept — Swift and Cocoa already provide many tools for asynchronous processing, UI event handling, and observer pattern implementation. However, using the Reactive way is more elegant and concise than the classic way. Also, there is an advantage that it can be used to design program structure like MVVM.
Everything in the programming world is related to how well we understand the code. It is important that it is easy it is to maintain. In this respect, adopting the reactive approach is a very smart decision. It is true that it is rather difficult to use for the first time. However, I am convinced that if you get used to it, you can code much more succinctly than before, and easily implement UI and user logic.
Let’s look again at the advantages of Reactive programming:
- The code that responds to changes in specific data or UI components is simplified.
- Because you do not have to create a huge method of focused code that changes the UI, it becomes easier to deal with new states or add or remove UI components.
- Functional coding allows you to write code that can focus on situations and roles.
- With Observing and Binding, you can separate ViewController into ViewModel and View, which is a key factor in applying MVVM design.
I hope that many developers will be able to code more happily through Reactive Programming. Thank you for reading this story.
I am writing about developing iOS applications using Swift. I would also appreciate your interest in the following articles.
Promise Syntax with ReactiveSwift
_Use ReactiveSwift to write code similar to Promise in JavaScript._medium.comUsing Enums in Swift
_How to handle the constants, raw values, and expressions of an Enum type through Swift._medium.comPassing parameters to Restful API with Swift Codable
_How not only the data received from the Restful API, but also the data to be transmitted, can be handled easily through…_medium.com