
By HaKr
NGINX is perhaps the most versatile web server out there, and it can beat other servers when configured correctly. It can also do other important things, such as load balancing, HTTP caching, and can be used as a reverse proxy.
Over the years, we’ve seen so many configurations which improve security and increase the performance of your web application overall — allowing you to keep up with latest trends.
I’m going to share the minimalist NGINX config that I found is most optimised which I have been using for new my new tool VisaList. I had to do a lot of searching and researching for improving the last mile performance of my website, and I thought the process might help at least a few others — so I’m sharing it here.
Why?
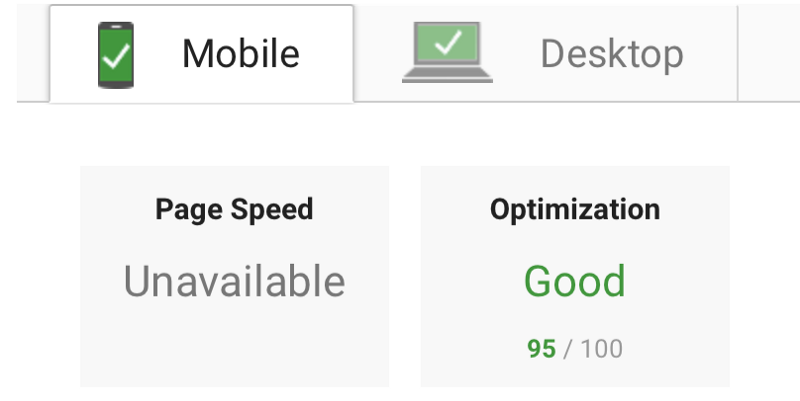
With these changes, I was able to get the result below for my new web app:
Page Speed Score: Page Speed Insights
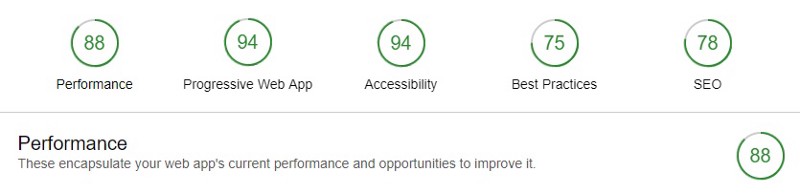
Lighthouse Score: Chrome Dev Tools Lighthouse
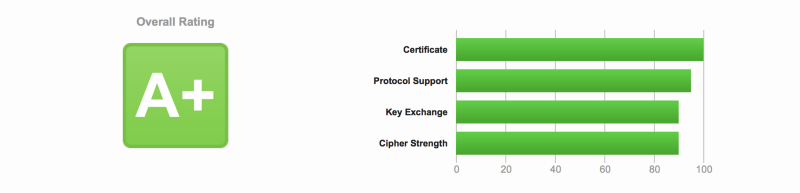
Server Score: Qualys SSL Server Test
You too can get these performance benefits easily. You don’t need to be a DevOps expert to make these optimisations. So anyone who is new to web applications and is using NGINX will find this very useful.
If you are an expert, then you could leave your opinions in the comments so the new devs like me can learn and build a strong and positive web community around us. ✨Go Web Developers!✨
This article assumes that you’ve got an Ubuntu 16.04 (Xenial) server and a server rendered WebApp Vue.js (or any other JS framework) application ready to be served through NGINX along with the API server. If you haven't installed NGINX and need help doing that, you can check out this article.
So what are these optimisations that I’m talking about? Let’s see the code!
Optimisations
The good news is that you only have to bother about two files. One is your overall NGINX config, which applies to all the web apps (you can have multiple web apps like a website, API, static server, and so on). The other is specific to your domain, which, let’s say, is example.com. Replace example.com with your own domain. Here I’m only using the naked domain without www. I will cover that soon.
Open your NGINX config or domain specific config files by using these commands:
sudo nano /etc/nginx/nginx.conf

sudo nano /etc/nginx/sites-available/example.com
Content Compression
Is Brotli better than GZip? Yes and No. When the browser requests a web page, the server doesn't send it directly byte by byte. Instead, it sends it in a compressed state based on the accepted encodings of the browser. Mostly everyone today uses Gzip, and you may ask why? Because its been around for more than a decade.
So here comes Brotli, which is the latest encoding algorithm developed by Google. Brotli is ~20% more efficient than Gzip. Just keep in mind you should send content in Gzip where Brotli is not supported. Brotli works best with static files rather than dynamic content.
Also make sure you enable the Brotli type for API JSON data only when your client side HTTP library supports it. For example, the Axios library doesn't support Brotli encoding yet.
http {

...

    # Gzip Settings
    gzip on;
    gzip_disable "msie6";
    gzip_vary on;
    gzip_proxied any;
    gzip_comp_level 6;
    gzip_buffers 32 16k;
    gzip_http_version 1.1;
    gzip_min_length 250;
    gzip_types image/jpeg image/bmp image/svg+xml text/plain text/css application/json application/javascript application/x-javascript text/xml application/xml application/xml+rss text/javascript image/x-icon;

    # Brotli Settings
    brotli on;
    brotli_comp_level 4;
    brotli_buffers 32 8k;
    brotli_min_length 100;
    brotli_static on;
    brotli_types image/jpeg image/bmp image/svg+xml text/plain text/css application/json application/javascript application/x-javascript text/xml application/xml application/xml+rss text/javascript image/x-icon;
...

}
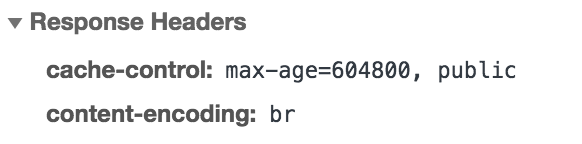
Once you add these changes, you can check that the content-encoding is showing br in the response headers in Chrome developer tools:
Improve Security
By default, your NGINX doesn't have all the important security headers required which is pretty straightforward actually. These prevent clickjacking attacks, cross-site scripting attacks, and other code injection attacks.
Strict-Transport-Security header is for HTTP Strict Transport Security (HSTS) which also protects from protocol downgrade attacks.
http {

...
   # security headers
   add_header X-Frame-Options "SAMEORIGIN" always;
   add_header X-XSS-Protection "1; mode=block" always;
   add_header X-Content-Type-Options "nosniff" always;
   add_header Referrer-Policy "no-referrer-when-downgrade" always;
   add_header Content-Security-Policy "default-src * data: 'unsafe-eval' 'unsafe-inline'" always;

   add_header Strict-Transport-Security "max-age=31536000; includeSubDomains; preload" always;
...

}
Optimize SSL and Sessions
SSL: Use on TLS and disable SSL (SSL is pretty old and outdated and has lot of vulnerabilities ). Optimise cipher suites, as they are the core of TLS. This is where encryption happens.
Session Cache: Creating a cache of TLS connection parameters reduces the number of handshakes, and thus can improve the performance of your application. Caching is configured using ssl_session_cache directive.
Session Tickets: Session tickets are an alternative to session cache. In case of session cache, information about the session is stored on the server.
OSCP: To have a secure connection to a server, the client needs to verify the certificate which the server presented. In order to verify that the certificate is not revoked, the client (browser) will contact the issuer of the certificate. This adds a bit more overhead to connection initialisation (and thus our page load time).
Use these directives in your NGINX config and you are all set for SSL optimisation.
http {

...
   # SSL Settings
   ssl_protocols TLSv1 TLSv1.1 TLSv1.2;
   ssl_prefer_server_ciphers on;
   ssl_ciphers ECDHE-ECDSA-CHACHA20-POLY1305:ECDHE-RSA-CHACHA20-POLY1305:ECDHE-ECDSA-AES128-GCM-SHA256:ECDHE-RSA-AES128-GCM-SHA256:ECDHE-ECDSA-AES256-GCM-SHA384:ECDHE-RSA-AES256-GCM-SHA384:DHE-RSA-AES128-GCM-SHA256:DHE-RSA-AES256-GC$

   # Optimize session cache
   ssl_session_cache shared:SSL:50m;
   ssl_session_timeout 1d;

   # Enable session tickets
   ssl_session_tickets on;

   # OCSP Stapling
   ssl_stapling on;
   ssl_stapling_verify on;
   resolver 8.8.8.8 8.8.4.4 208.67.222.222 208.67.220.220 valid=60s;
   resolver_timeout 2s;
...

}
Improve Performance: HTTP/2 Support
HTTP/2 has lot of benefits over HTTP, like allowing the browser to download files in parallel, and allowing the server to push resources, among others. All you have to do is to replace http with http2 in your default server block. That’s it, and you get lots and lots of benefits.
server{

...

listen 443 http2 default_server;
    listen [::]:443 http2 default_server;
    server_name example.com;
...

}
Type this command curl -I -L https://example.com and verify the response.
HTTP/2 200
server: nginx
date: Wed, 18 Jul 2018 02:13:32 GMT
content-type: text/html; charset=utf-8
content-length: 216641
vary: Accept-Encoding
....
Reduce Scrapping / Attacks
Limiting the requests to the server is critical, as this can easily deplete the resources and can result in huge billings. This is also important to fend off those who want to scrape and attack our servers. There are basically three types of directives:
- Request Limiting
**limit_req**: Limit the number of requests per IP - Connections Limiting
**limit_conn**: Limit the number of Connections per IP - Bandwidth/Rate Limiting
**limit_rate**: Limit the bandwidth rate of data being sent
With the below directive, you can rest easy:
http {

...
   # Limits
   limit_req_log_level warn;
   limit_req_zone $binary_remote_addr zone=reqlimit:10m rate=10r/m;

   limit_conn_zone $binary_remote_addr zone=connlimit:100m;
   limit_conn servers 1000; # Simultaneous Connections
...

}
...
server {
...
   location /api/ {
      # Rate Limiting
      limit_req zone=reqlimit burst=20; # Max burst of request
      limit_req_status 460; # Status to send

      # Connections Limiting
      limit_conn connlimit 20; # Number of downloads per IP

      # Bandwidth Limiting
      limit_rate 4096k; # Speed limit (here is on kb/s)
   }
...
}
Client-side Caching
Caching static files on the browser is easy, and it saves lot of requests to the server. All you have to do is add these two code blocks and specify the expiration as you please. You can include any other static file extension you deem worthy of caching.
server {

...
    location / {
       ...
       ...
    }
    ...
    ...
    location ~* \.(jpg|jpeg|png|gif|ico)$ {
       expires 30d;
    }
    location ~* \.(css|js)$ {
       expires 7d;
    }
...

}
Microcaching
If you haven’t heard about this until now, then you are in luck today! Microcaching is a caching technique in which content is cached for a very short period of time, perhaps as little as 1 second. This effectively means that updates to the site are delayed by no more than a second, which in many cases is perfectly acceptable. This is particularly useful for API responses which are the same for all users.
Use these directives to set microcaching with the path at /tmp/cacheapi with 100MB cache with a max size of 1GB of cache folder that updates cache in the background. Learn more about it here and here.
proxy_cache_path /tmp/cacheapi levels=1:2 keys_zone=microcacheapi:100m max_size=1g inactive=1d use_temp_path=off;
...

server {

...
   location /api/ {

      # Micro caching
      proxy_cache microcacheapi;
      proxy_cache_valid 200 1s;
      proxy_cache_use_stale updating;
      proxy_cache_background_update on;
      proxy_cache_lock on;
      ...
      ...

   }
...

}
http {

...
   add_header X-Cache-Status $upstream_cache_status;
...

}
SSL Certificate
Let’s Encrypt is a Certificate Authority (CA) that provides an easy way to obtain and install free TLS/SSL certificates. This enables encrypted HTTPS on web servers. It simplifies the process by providing a software client, Certbot, that attempts to automate most (if not all) of the required steps.
Install LetsEnctypt:
sudo add-apt-repository ppa:certbot/certbot
sudo apt-get update
sudo apt-get install python-certbot-nginx
Create a LetsEncrypt SSL certificate with this command:
sudo certbot --nginx -d example.com -d www.example.com
and then add these certificates to your domain config file like this:
server {

    listen 443 ssl http2 default_server;
    listen [::]:443 ssl http2 default_server;
...
    ssl_certificate /etc/letsencrypt/live/example.com/fullchain.pem;
    ssl_certificate_key /etc/letsencrypt/live/example.com/privkey.pem;
...

}
Redirect WWW
Google prefers that you choose a domain with www instead of without. It’s better to choose the naked domain as its smaller and removes the redundant www . You can now redirect all www users to your naked domain by adding these below directives.
server {
...
...
}
server {
    listen 80;
    listen [::]:80;
    server_name example.com;
    return 301 https://$server_name$request_uri;
}
server {
    listen 80;
    listen [::]:80;
    listen 443 ssl http2;
    listen [::]:443 ssl http2;
    server_name www.example.com;
    return 301 https://example.com$request_uri;
}
Pagespeed Module
Pagespeed Module is a gem unknown to many. It was originally a Google Project which is now part of Apache Incubator. Pagespeed can automatically take care of almost all the known ways to improve performance on your website.
Install or Upgrade NGINX with Pagespeed. This is not an easy task, and that’s why I have saved it for last. Follow these instructions, and you should be able to do it without any hastle. Once you’re done, all you need to do is enable it and voilà!
server{

...
    # Pagespeed Module
    pagespeed on;

    pagespeed FileCachePath /var/cache/ngx_pagespeed_cache;
    location ~ "\.pagespeed\.([a-z]\.)?[a-z]{2}\.[^.]{10}\.[^.]+" {
    add_header "" "";
    }
    location ~ "^/pagespeed_static/" { }
    location ~ "^/ngx_pagespeed_beacon$" { }

    pagespeed RewriteLevel PassThrough;
    pagespeed EnableCachePurge on;
    pagespeed PurgeMethod PURGE;

    pagespeed EnableFilters prioritize_critical_css;
...
}
There are so many filters that you can enable, but just keep in mind that most of the modern frameworks like (Nuxt.js, Angular, Next.js and so on) have some of these optimisations as part of their build process, so this can be counterintuitive. Choose filters which you need and enable only them. This is not by any means an exhaustive set of filters, but would definitely take your site to 100/100 on pagespeed.
pagespeed EnableFilters rewrite_css;
pagespeed EnableFilters collapse_whitespace,remove_comments;
pagespeed EnableFilters flatten_css_imports;
pagespeed EnableFilters combine_css;
pagespeed EnableFilters combine_javascript;
pagespeed EnableFilters defer_javascript;
pagespeed EnableFilters extend_cache;
pagespeed EnableFilters pedantic;
pagespeed EnableFilters inline_google_font_css;
pagespeed FetchHttps enable;
pagespeed EnableFilters inline_css,move_css_above_scripts;
pagespeed EnableFilters inline_javascript;
pagespeed EnableFilters inline_import_to_link;
pagespeed EnableFilters lazyload_images;
pagespeed EnableFilters insert_dns_prefetch;
pagespeed EnableFilters inline_preview_images;
pagespeed EnableFilters resize_mobile_images;
pagespeed EnableFilters rewrite_images;
pagespeed EnableFilters responsive_images,resize_images;
pagespeed EnableFilters responsive_images_zoom;
pagespeed EnableFilters rewrite_javascript;
pagespeed EnableFilters rewrite_style_attributes,convert_meta_tags;
You can read more about different types of filters available here.
So the final NGINX config and domain config looks something like this:
https://gist.github.com/1hakr/01cb00dfce8c92a15c0d9faee9052042
Now all you have to do is reload your NGINX config file by typing the below commands and you have supercharged your NGINX server:
sudo nginx -t

sudo systemctl restart nginx
Pro Tip: If you find this article beyond your reach, then there is a simple website which can get the final config file for you: check out NGINX Config.
I hope you like this NGINX config and are able to supercharge your web apps. Do you already use something similar or have a different opinion altogether? Let me know in the comments.
This is my new microstartup, VisaList, where I have applied these optimisations. It can help you find visa requirements for all countries in the world in a simple and useful way.
Find countries to visit across the world
Search from list of countries your can travel with Visa free, Visa on arrival and other requirements from more than…
visalist.io
That all folks! This is HaKr signing off. Thanks for reading, and if you found this useful do click ? to recommend this article to others so they can find it, too.
I build microstartups while travelling when I can. If you find this kind of stuff interesting, you can follow me on Twitter and check out my open-source work on GitHub.