By John Mosesman
Everyone says you should learn Git—and you should—but let's be honest: Git is kind of hard.
Even almost ten years into my software development career, I am still learning about the underlying Git fundamentals and how to use Git more effectively.
It wasn't too long ago that I realized I had a fundamental misunderstanding of a key command I'd used countless times.
Like many other areas in programming, I believe the best way to learn is to just start doing.
Just start being productive with the tool—the fundamentals and edge cases will get sorted out over time.
So in this tutorial that's exactly what we'll do. We'll work through a series of examples to build a from-the-ground-up understanding of how to use Git and ultimately collaborate with your teammates.
In doing so, we'll use simple commands and explain the underlying concepts as they're useful—but only to the extent that they aid understanding.
There's definitely a lot more to Git than is presented here, but these are things you'll learn as you work with it over time.
I also will not be using any tree diagrams (like the one below) because they only confuse me, and I've never had to think about Git in this way to be productive as a software developer.
 https://www.atlassian.com/git/tutorials/using-branches/git-checkout
Here's what we'll cover. Don't let this list intimidate you, we'll go step by step.
- Installing git and setting up a GitHub account
- How to create a new repository in GitHub
- Cloning the repository
- Git branches
- How the check the status of a Git project
- How to make our first commit
- How to push up our first commit to GitHub
- How to add another commit in Git
- How to stage changes in Git
- How to view the Git diff
- How to collaborate with others in Git
- Feature branches in Git
- Git workflows for collaboration
- How to merge a branch in Git
- Pull request workflow
- How to bring our local up to date
- How to retrieve remote data
- How to fix merge conflicts in Git
- Review: how to start a new feature workflow
- Conclusion
So with all of that said, I encourage you to follow along with the examples on your own machine—let's start!
How to install Git and set up a GitHub account
First, some boring stuff we need to do to get up and running.
If you already have Git installed, have made a GitHub account (or use any other provider like GitLab or Bitbucket), and you have setup an SSH key, you can skip this section.
If not, you'll first need to install Git.
Secondly, we'll be using GitHub in this tutorial, so signup for a GitHub account here.
After you have a GitHub account, you'll need to create an SSH key to push your code from your local machine to GitHub (this key proves to GitHub when you push code that you are "you").
It's not difficult—just follow the steps here.
How to create a new repository in GitHub
The next thing we'll do is create a new repository in Github.
It's simple. Just click the "New" repository button on your home page:
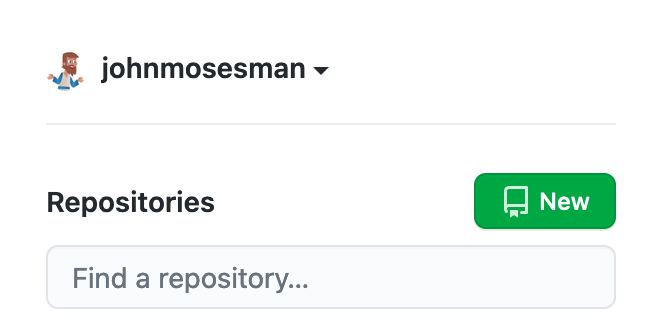 Creating a new repository
Next, choose a name for the repository and whether you want the repo to be public or private. You can optionally add a README file if you'd like, and then click "Create repository."
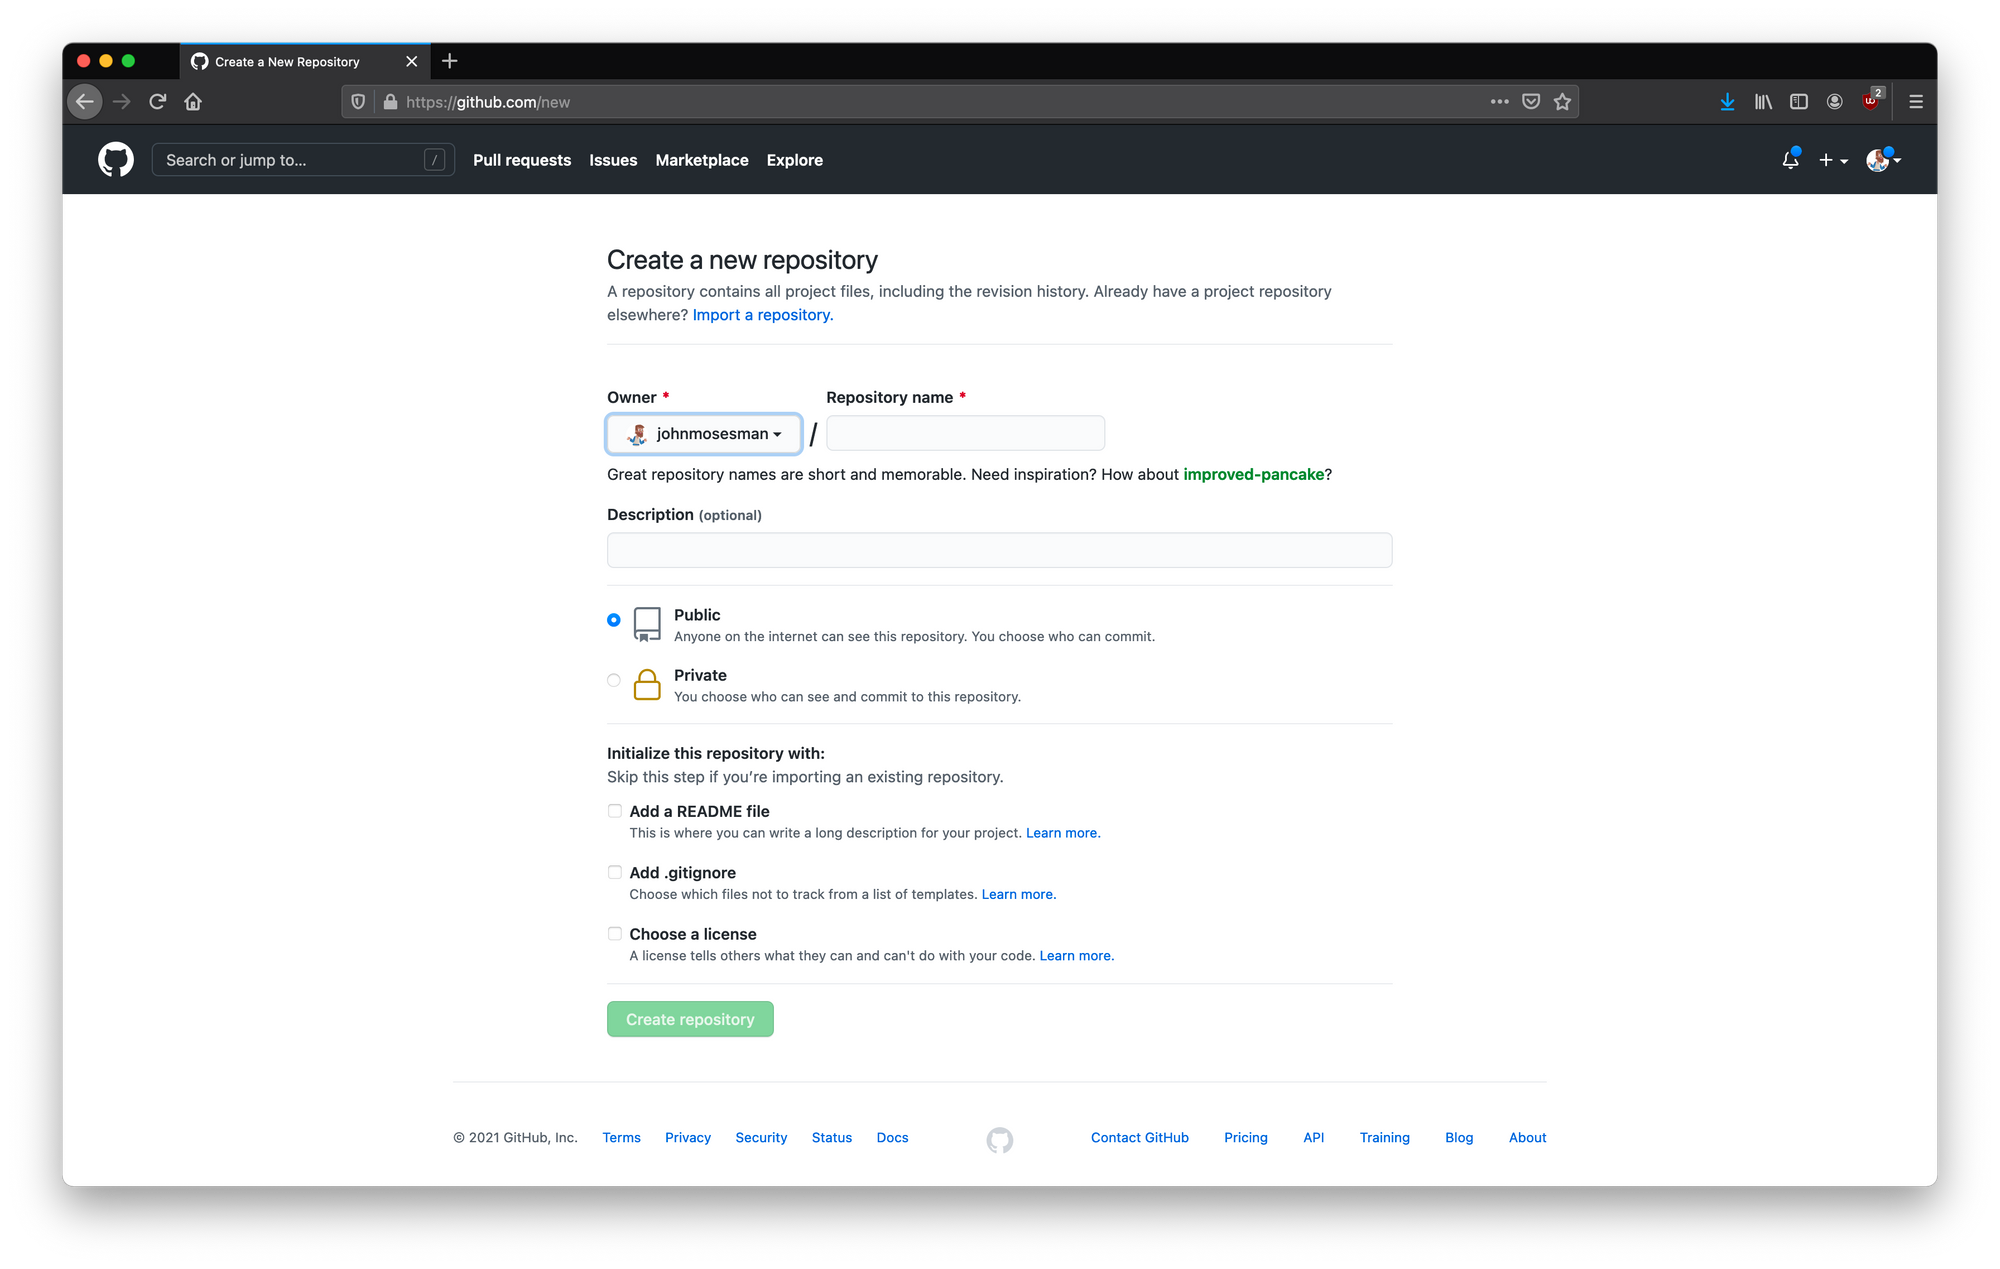 Configuring the new repo
I've called my repository practical-git-tutorial. This repo has all of the finished steps of this tutorial already in it, so if you want to you can always use it as a reference.
How to clone a Git repository
To start, we'll "clone" the repo. Cloning a repo means downloading all of the project's code and metadata from the source—which in this case is GitHub.
To clone a repo, we use git clone <URL>.
I used the URL from the repo I just created, but you should use the URL of your own repository:
$ git clone git@github.com:johnmosesman/practical-git-tutorial.git
Cloning into 'practical-git-tutorial'...
remote: Enumerating objects: 6, done.
remote: Counting objects: 100% (6/6), done.
remote: Compressing objects: 100% (3/3), done.
remote: Total 6 (delta 0), reused 0 (delta 0), pack-reused 0
Receiving objects: 100% (6/6), done.
Note: commands to be run in your terminal will be prefixed with a
$.
We'll go into more detail about what git clone does soon, but for now just know that it downloads the project and places it in a folder in your current working directory.
Next let's change into the new directory using cd:
$ cd practical-git-tutorial/
/practical-git-tutorial (main)$
We've changed into the folder (which is just like any other folder), and your terminal may show you something alongside the directory name: (main).
Git branches
This (main) means that we are currently on a branch called main. You can think of a Git branch as a copy of the project at a specific point in time that can be changed independently of other branches.
For example, if we used Git to track writing a book, we might have branches that look like this:
mainbranchtable-of-contentsbranchchapter-1branchchapter-2branch- etc.
The main branch is, well, the "main" branch—the place where we're going to combine all of the contents of the book into one finalized, finished book.
We can create other branches to separate and track specific pieces of work.
If I was working on Chapter 1 and you were working on Chapter 2, we could create two difference branches, chapter-1 and chapter-2—effectively two different copies of the current status of the book.
We could then both work on our respective chapters without stepping on each others' toes or changing the contents out from under each other—we both have our own working copy that are separate from each other.
When either of us are finished with our chapter, we can add the contents of our chapter branch back into the main branch. When we're both finished, the main branch will contain both Chapter 1 and Chapter 2.
However, there are times where you will overwrite or change the same piece of content as someone else and we'll have to figure out how to settle those differences—and we'll see that soon.
Note: depending on the project you may see a branch named
masterinstead ofmain. It doesn't have any functional difference, just typemastervsmaindepending on what's in your project.
How to check the status of a Git project
One thing we'll do often is check the status of our project. What changes have been made and what do we want to do with them?
To view the status of our project we use git status:
(main)$ git status
On branch main
Your branch is up to date with 'origin/main'.

nothing to commit, working tree clean
There's a few things in the result of this command, so let's break those down.
The first thing git status tells us is we're on the main branch:
On branch main
The second sentence is a little more interesting:
Your branch is up to date with 'origin/main'.
Git is telling us that our branch is "up to date" with something called origin/main.
origin is a new concept known as a remote. A remote is a "remote source" different from your local machine.
In this project we have our local copy of the project, but we can also add remote sources that we can collaborate with. After all, that is one of the biggest benefits of Git: controlled collaboration with others.
Continuing with our book-writing example, if I write Chapter 1 on my machine and you write Chapter 2 on your machine, we could both add each other's computers as "remotes" and send and receive changes from each other.
In practice, the programming community at large has decided that it is best to have a single source of truth for code. One place that is always "correct" about what the current state of the codebase is. By convention, we call this place the origin.
In this case, GitHub is our "origin."
In fact, we can see this by running the command git remote -v (-v for "verbose"):
(main)$ git remote -v
origin  git@github.com:johnmosesman/practical-git-tutorial.git (fetch)
origin  git@github.com:johnmosesman/practical-git-tutorial.git (push)
This command lists all of our remotes. From the result we can see that we have a remote named origin, and the Git URL of this remote points to our repo on Github.com. This remote was automatically setup for us when we ran git clone.
So coming back to this statement in the result of git status:
Your branch is up to date with 'origin/main'.
When we asked for the status of our project, Git told us that our local main branch is up to date with the main branch at our origin—which is GitHub.
In fact, git clone automatically created a main branch for us locally because it saw that the origin we cloned from had a branch called main as its primary branch.
Basically, there are no changes on our local machine different from GitHub or vice versa—our local main branch and the GitHub main branch are identical.
As we make changes we'll see this message change to reflect the differences in our local repository and the origin (GitHub) repository.
The final message from git status is about the state of the local project:
nothing to commit, working tree clean
We'll go into more detail here as we make changes, but this message is basically saying we haven't done anything—so no changes to report.
To summarize the result of git status:
- We're on branch
main - Our local
mainbranch is identical to theorigin's (GitHub's)mainbranch - We haven't made any changes to the project yet
How to make our first commit
Now that we understand the initial state of our project, let's make some changes and look at the result.
Continuing with our book analogy, let's make a new file called chapter-1.txt and insert a sentence into it.
(You can use the terminal commands below, or create and edit the file in any text editor you choose—it doesn't matter.)
(main)$ touch chapter-1.txt
(main)$ echo "Chapter 1 - The Beginning" >> chapter-1.txt
(main)$ cat chapter-1.txt
Chapter 1 - The Beginning
The commands above make a new file called chapter-1.txt using touch, insert the sentence "Chapter 1 - The Beginning" using echo and the >> operator, and, to double-check our work, show the contents of the file using cat.
The result is a simple text file with one sentence in it.
Let's run git status again and see the difference in its output:
(main)$ git status
On branch main
Your branch is up to date with 'origin/main'.

Untracked files:
  (use "git add <file>..." to include in what will be committed)
        chapter-1.txt

nothing added to commit but untracked files present (use "git add" to track)
Here we see a different output than before. We see a section describing "Untracked files," and our new file chapter-1.txt is listed there.
Before Git will start tracking changes to a file we first have to tell Git to track it—and as the bottom of the message states—we can use git add to do that:
(main)$ git add chapter-1.txt
(Instead of specifying the name of the file for git add, you can use a period (.) to add all of the changes in the directory.)
Let's check the status again:
(main)$ git status
On branch main
Your branch is up to date with 'origin/main'.

Changes to be committed:
  (use "git restore --staged <file>..." to unstage)
        new file:   chapter-1.txt

john:~/code/practical-git-tutorial (main)$
The message has changed again. It nows says that we have some changes that are ready to be "committed."
A commit in Git is a saved chunk of work, but it's a little different from the same save you would use to save a text file in a text editor.
You can think of a commit as a completed idea or unit of work.
For example, if we were continuing to write the contents of Chapter 1 in the book, it might look like this:
- Write the title of the chapter. click save in our editor
- Write the first paragraph of the chapter. click save in our editor
- Write the second paragraph of the chapter. click save again
- Write the final paragraph of the chapter. click save again
Here, we've "saved" the document four times, but at the end of those four saves we now have the first draft of our chapter, and that draft is one "unit of work."
We want to save this file on our computer, but we also want to signify that this is a unit of completed work—even if it's just a draft. It's a chunk of work worth holding onto. We may want to return to it in the future, go back and edit it, or merge this draft into the current draft of the entire book.
To do this, we create a new commit to signify this milestone. Each commit gets its own unique identifier, and the order of the commits are preserved.
To commit our changes, they must first be added to the staging area by using git add.
(We'll talk more about the staging area soon.)
Next, we need to finalize the commit by using git commit.
It's best practice to provide a detailed message of what changes you made—and more importantly—why you are committing these changes.
Once the commit history becomes hundreds or thousands of commits long, it becomes near impossible to understand why a change was made without a good commit message. Git will show us what files changed and what the changes were, but the meaning of those changes is up to us to provide.
Let's commit the new file we made with a commit message by using the -m or "message" flag:
(main)$ git commit -m "New chapter 1 file with chapter heading"
[main a8f8b95] New chapter 1 file with chapter heading
 1 file changed, 1 insertion(+)
 create mode 100644 chapter-1.txt
We've now committed that chunk of work, and we can see that by viewing the Git log via git log:
(main)$ git log
commit a8f8b95f19105fe10ed144fead9cab84520181e3 (HEAD -> main)
Author: John Mosesman <johnmosesman@gmail.com>
Date:   Fri Mar 19 12:27:35 2021 -0500

    New chapter 1 file with chapter heading

commit 2592324fae9c615a96f856a0d8b8fe1d2d8439f8 (origin/main, origin/HEAD)
Author: John Mosesman <johnmosesman@users.noreply.github.com>
Date:   Wed Mar 17 08:48:25 2021 -0500

    Update README.md

commit 024ea223ee4055ae82ee31fc605bbd8a5a3673a0
Author: John Mosesman <johnmosesman@users.noreply.github.com>
Date:   Wed Mar 17 08:48:10 2021 -0500

    Initial commit
Looking at this log, we see that there are three commits in the project history.
The latest commit is the one we just made. We can see the same commit message we just used: "New chapter 1 file...".
There are also two previous commits: one when I initialized the project and another when I updated the README.md file on GitHub.
Notice that each commit has a long string of numbers and characters associated with it:
commit a8f8b95f19105fe10ed144fead9cab84520181e3 (HEAD -> main)
This string of characters and numbers is called the SHA—it's the unique ID generated by a hashing algorithm for this commit. Just take note of these for now—we'll come back to this soon.
We also see two other interesting things in the log after the commit SHAs:
(HEAD -> main)next to our latest commit- And
(origin/main, origin/HEAD)next to the commit before that one.
This information tells us the current status of our branches and remotes (as far as we know—but more on this later).
For the latest commit, we see that the HEAD (aka "where we are now" in the project history) is pointing at our local main branch—represented by HEAD -> main.
This makes sense because we just made that commit, and we haven't done anything else—we're still at the point in time where we made that commit.
If we look at the previous commit starting with 25923, we see (origin/main, origin/HEAD). This tells us that, on the origin (aka GitHub), GitHub's HEAD or "current place" is on our previous commit.
Basically, our local machine thinks the latest change for local main branch is the commit where we added Chapter 1, and our local machine also thinks that on GitHub the latest change is the commit where I updated the README before I wrote this post.
And this makes sense—we haven't told GitHub about the newest commit we made. GitHub still thinks that the repo is up to date with what it has seen.
Now let's push up our new commit to GitHub.
How to push up our first commit to GitHub
We have a new commit on our local machine and we need to update our "source of truth"—the origin remote—aka GitHub.
We're currently on the main branch locally, so we need to tell GitHub to update its own main with the new commit that we made.
To do that we use the git push command and we can specify where we want to push and what branch we want to push to.
(main)$ git push origin main
Enumerating objects: 4, done.
Counting objects: 100% (4/4), done.
Delta compression using up to 16 threads
Compressing objects: 100% (2/2), done.
Writing objects: 100% (3/3), 326 bytes | 326.00 KiB/s, done.
Total 3 (delta 0), reused 0 (delta 0)
To github.com:johnmosesman/practical-git-tutorial.git
   2592324..a8f8b95  main -> main
Here we pushed to the origin remote (GitHub) and to the main branch.
The output tells us about some file operations Git did to do that, and the last line of the output tells us which commits it pushed and to where:
To github.com:johnmosesman/practical-git-tutorial.git
   2592324..a8f8b95  main -> main
Here it shows us that we pushed our main branch to GitHub's main branch.
If we look back at the git log output we'll notice that both our local and origin point to the same commit now:
(main)$ git log
commit f5b6e2f18f742e2b851e38f52a969dd921f72d2f (HEAD -> main, origin/main, origin/HEAD)
Author: John Mosesman <johnmosesman@gmail.com>
Date:   Mon Mar 22 10:07:35 2021 -0500

    Added the intro line to chapter 1
In short, on origin (GitHub) the main branch (also written as origin/main) has now placed our new commit as the latest commit in the history.
If we were working with other collaborators, they could now pull down our newest change from GitHub and begin editing the Chapter 1 as well.
How to add another commit in Git
Before we start collaborating with others, let's make another small change to see what happens when we edit an existing file.
Let's add another line into our Chapter 1 file:
(main)$ echo "It was the best of times, it was the worst of times" >> chapter-1.txt
(main)$ cat chapter-1.txt
Chapter 1 - The Beginning
It was the best of times, it was the worst of times
Using cat we can see that our file now contains two lines.
Let's look at the status of our Git repo again:
(main)$ git status
On branch main
Your branch is up to date with 'origin/main'.

Changes not staged for commit:
  (use "git add <file>..." to update what will be committed)
  (use "git restore <file>..." to discard changes in working directory)
        modified:   chapter-1.txt

no changes added to commit (use "git add" and/or "git commit -a")
Starting from the top, we'll notice the output says Your branch is up to date with 'origin/main'.
This might seem odd to you since we just changed a file, but Git is only comparing the commits we've made against the commits in origin/main.
The next section of the output explains it a little more:
Changes not staged for commit:
  (use "git add <file>..." to update what will be committed)
  (use "git restore <file>..." to discard changes in working directory)
        modified:   chapter-1.txt
Here Git tells us that we have "changes not staged for commit."
Before we can commit a set of changes, we first have to stage them.
How to stage changes in Git
To illustrate the usefulness of the staging area, let's first stage our changes by using git add:
(main)$ git add .
(main)$ git status
On branch main
Your branch is up to date with 'origin/main'.

Changes to be committed:
  (use "git restore --staged <file>..." to unstage)
        modified:   chapter-1.txt
These changes are now ready to be committed, but before we commit them let's add another change into our chapter-1.txt file.
I'm going to replace the contents of chapter-1.txt entirely with new text:
Note: I'm using
>here instead of>>which will replace the contents of the file instead of appending to the file.
(main)$ echo "New file contents" > chapter-1.txt

(main)$ cat chapter-1.txt
New file contents

(main)$ git status
On branch main
Your branch is up to date with 'origin/main'.

Changes to be committed:
  (use "git restore --staged <file>..." to unstage)
        modified:   chapter-1.txt

Changes not staged for commit:
  (use "git add <file>..." to update what will be committed)
  (use "git restore <file>..." to discard changes in working directory)
        modified:   chapter-1.txt
From the output we can see that we now have staged changes, and not staged changes.
While the file itself can only contain one thing, Git keeps track of both changes for us—even though they're changes to the same lines!
However, from the output above we can't really tell what those changes were—we just know that they exist.
To view these changes, we'll first look at the command line way (which I never use), and then a way that uses a GUI (which is 100% nicer).
How to view the Git diff
To view the changes, we need to look at the Git diff.
A diff (short for difference) is the difference between two sets of changes. Those changes could be anything from staged changes to not-staged changes to commits.
The command line way to do this is by using git diff.
We'll look at this output in our simple case here just for completeness' sake. But, as I mentioned before, we're interested in effective Git workflows, and once you get to changes of any decent size across multiple files this command line output just becomes not effective.
But for completeness, here it is:
(main)$ git diff
diff --git a/chapter-1.txt b/chapter-1.txt
index 0450d87..4cbeaee 100644
--- a/chapter-1.txt
+++ b/chapter-1.txt
@@ -1,2 +1 @@
-Chapter 1 - The Beginning
-It was the best of times, it was the worst of times
+New file contents
My terminal attempts to colorize this output to help with readability, but the important parts to notice here is it tells us what file we're diffing, chapter-1.txt, and at the bottom it shows us the actual differences. Let's key in on those lines:
-Chapter 1 - The Beginning
-It was the best of times, it was the worst of times
+New file contents
The lines starting with a minus sign (-) are lines we deleted entirely or in part, and the lines starting with a + sign represent lines added entirely or in part.
Now, with multiple files and many lines changed this output becomes unwieldy—fast. There is a better way, and even almost ten years into my programming career I still use a simple GUI program to help look at and manage diffs.
The program I use is called GitX, and it's an old and outdated piece of software that's not even really being maintained anymore. However, I just use it to view and manage file diffs—so it works for me.
I wouldn't particularly recommend this one, but it is free. Although I've never used it, the GitHub Desktop client is probably a good choice.
Now with that little aside out of the way, here's what the diff looks like in my tool.
To start, the staged changes on the right-hand side show our original add of the second sentence:
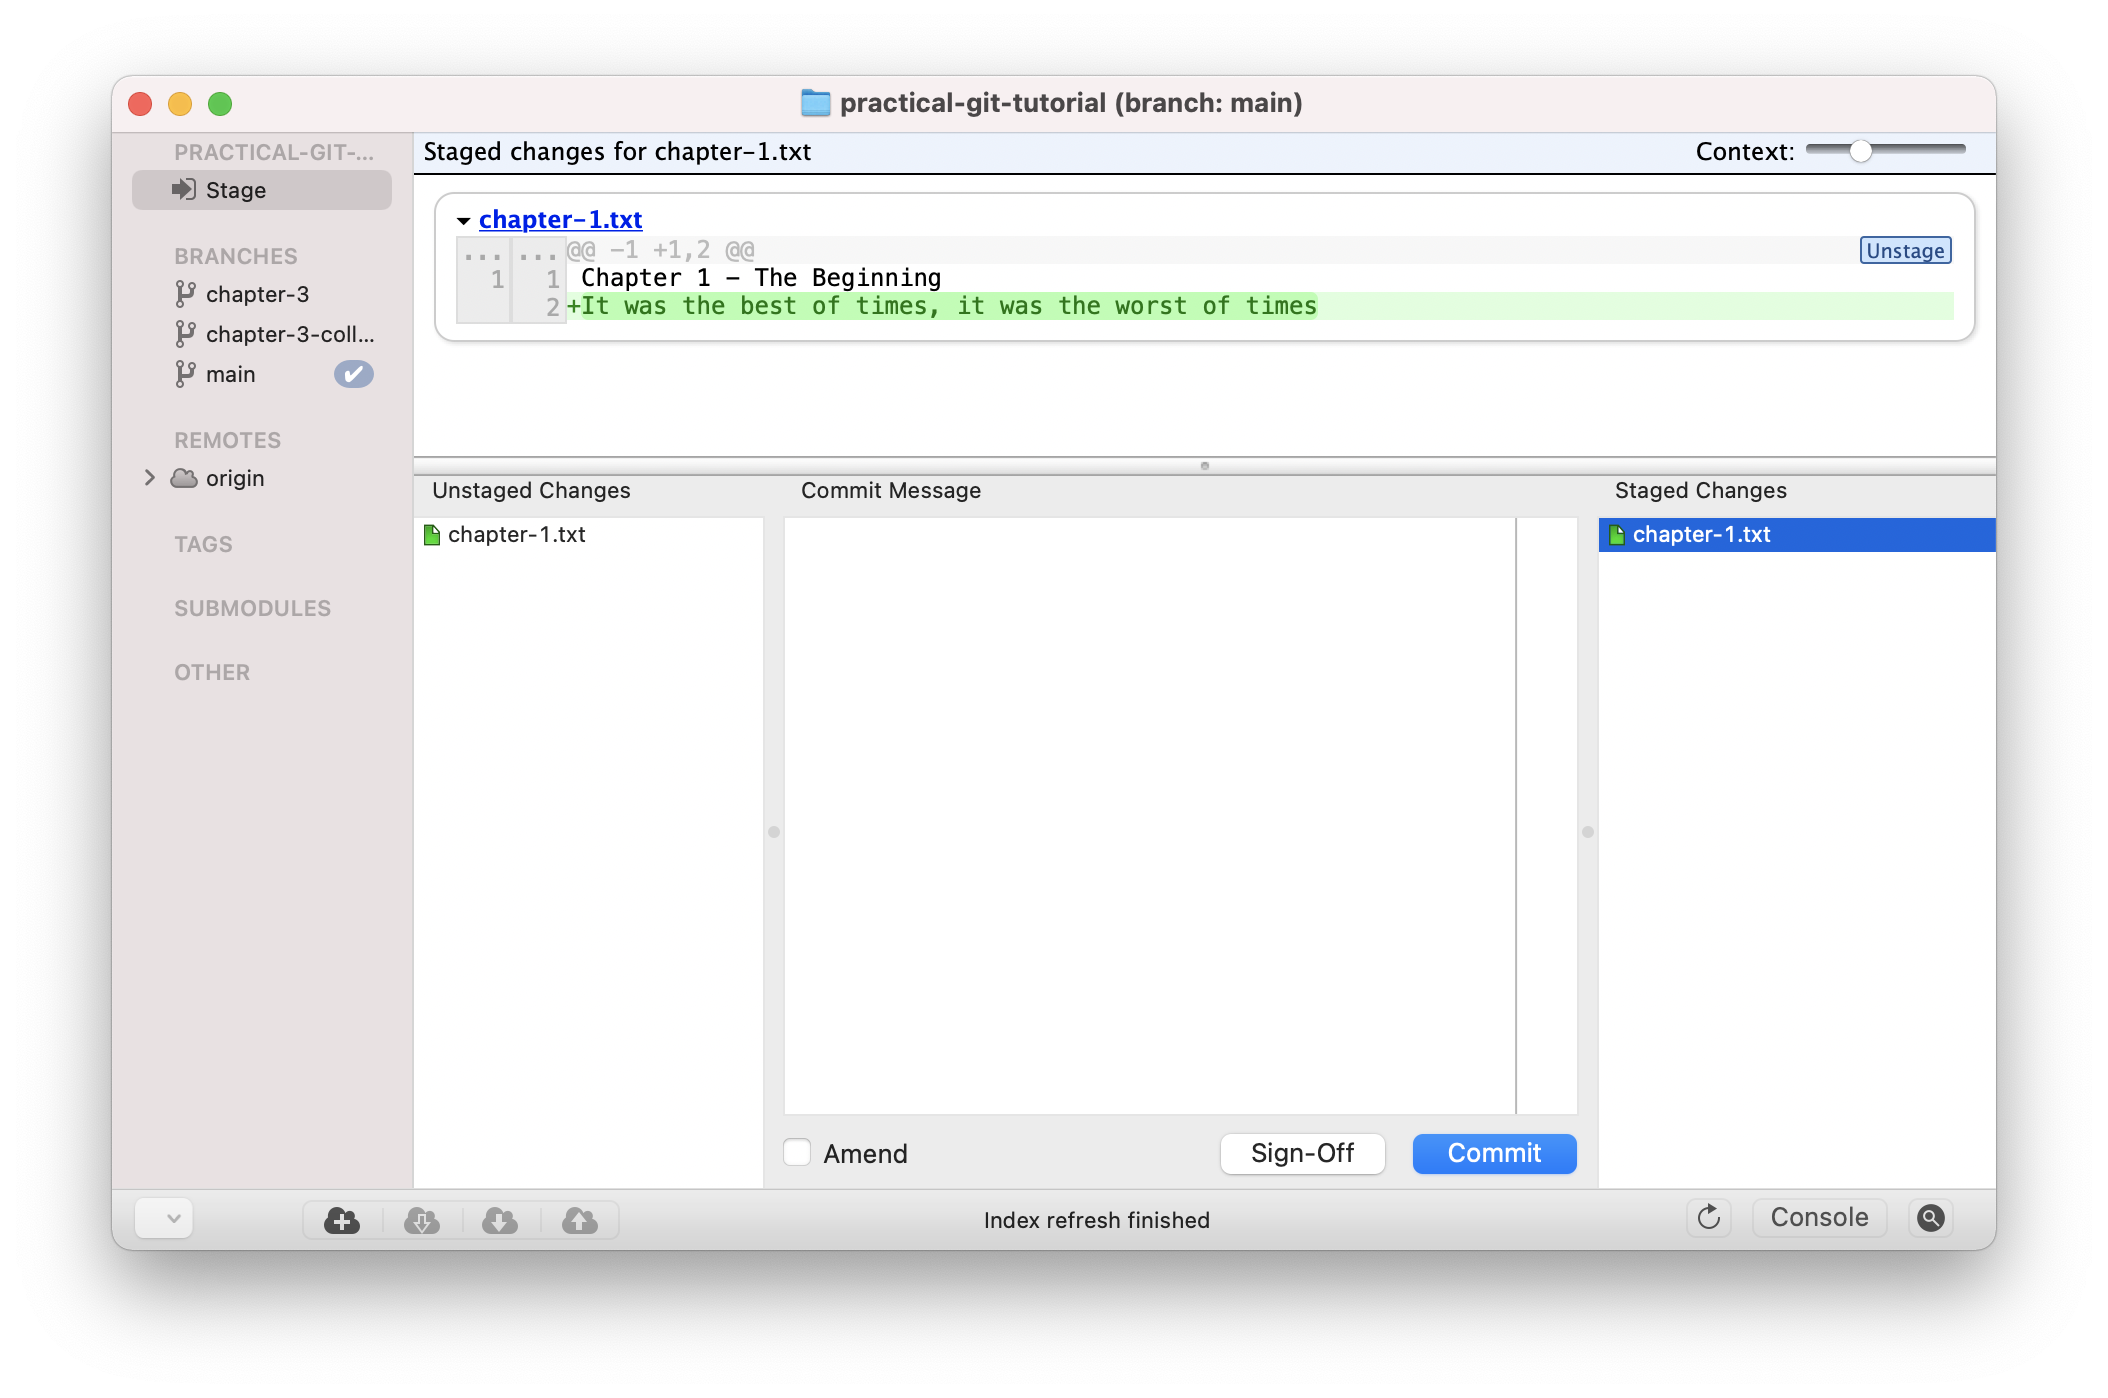 Staged changes in GitX
In the unstaged changes on the left-hand side, we see the removal of those two lines entirely and the addition of a new line:
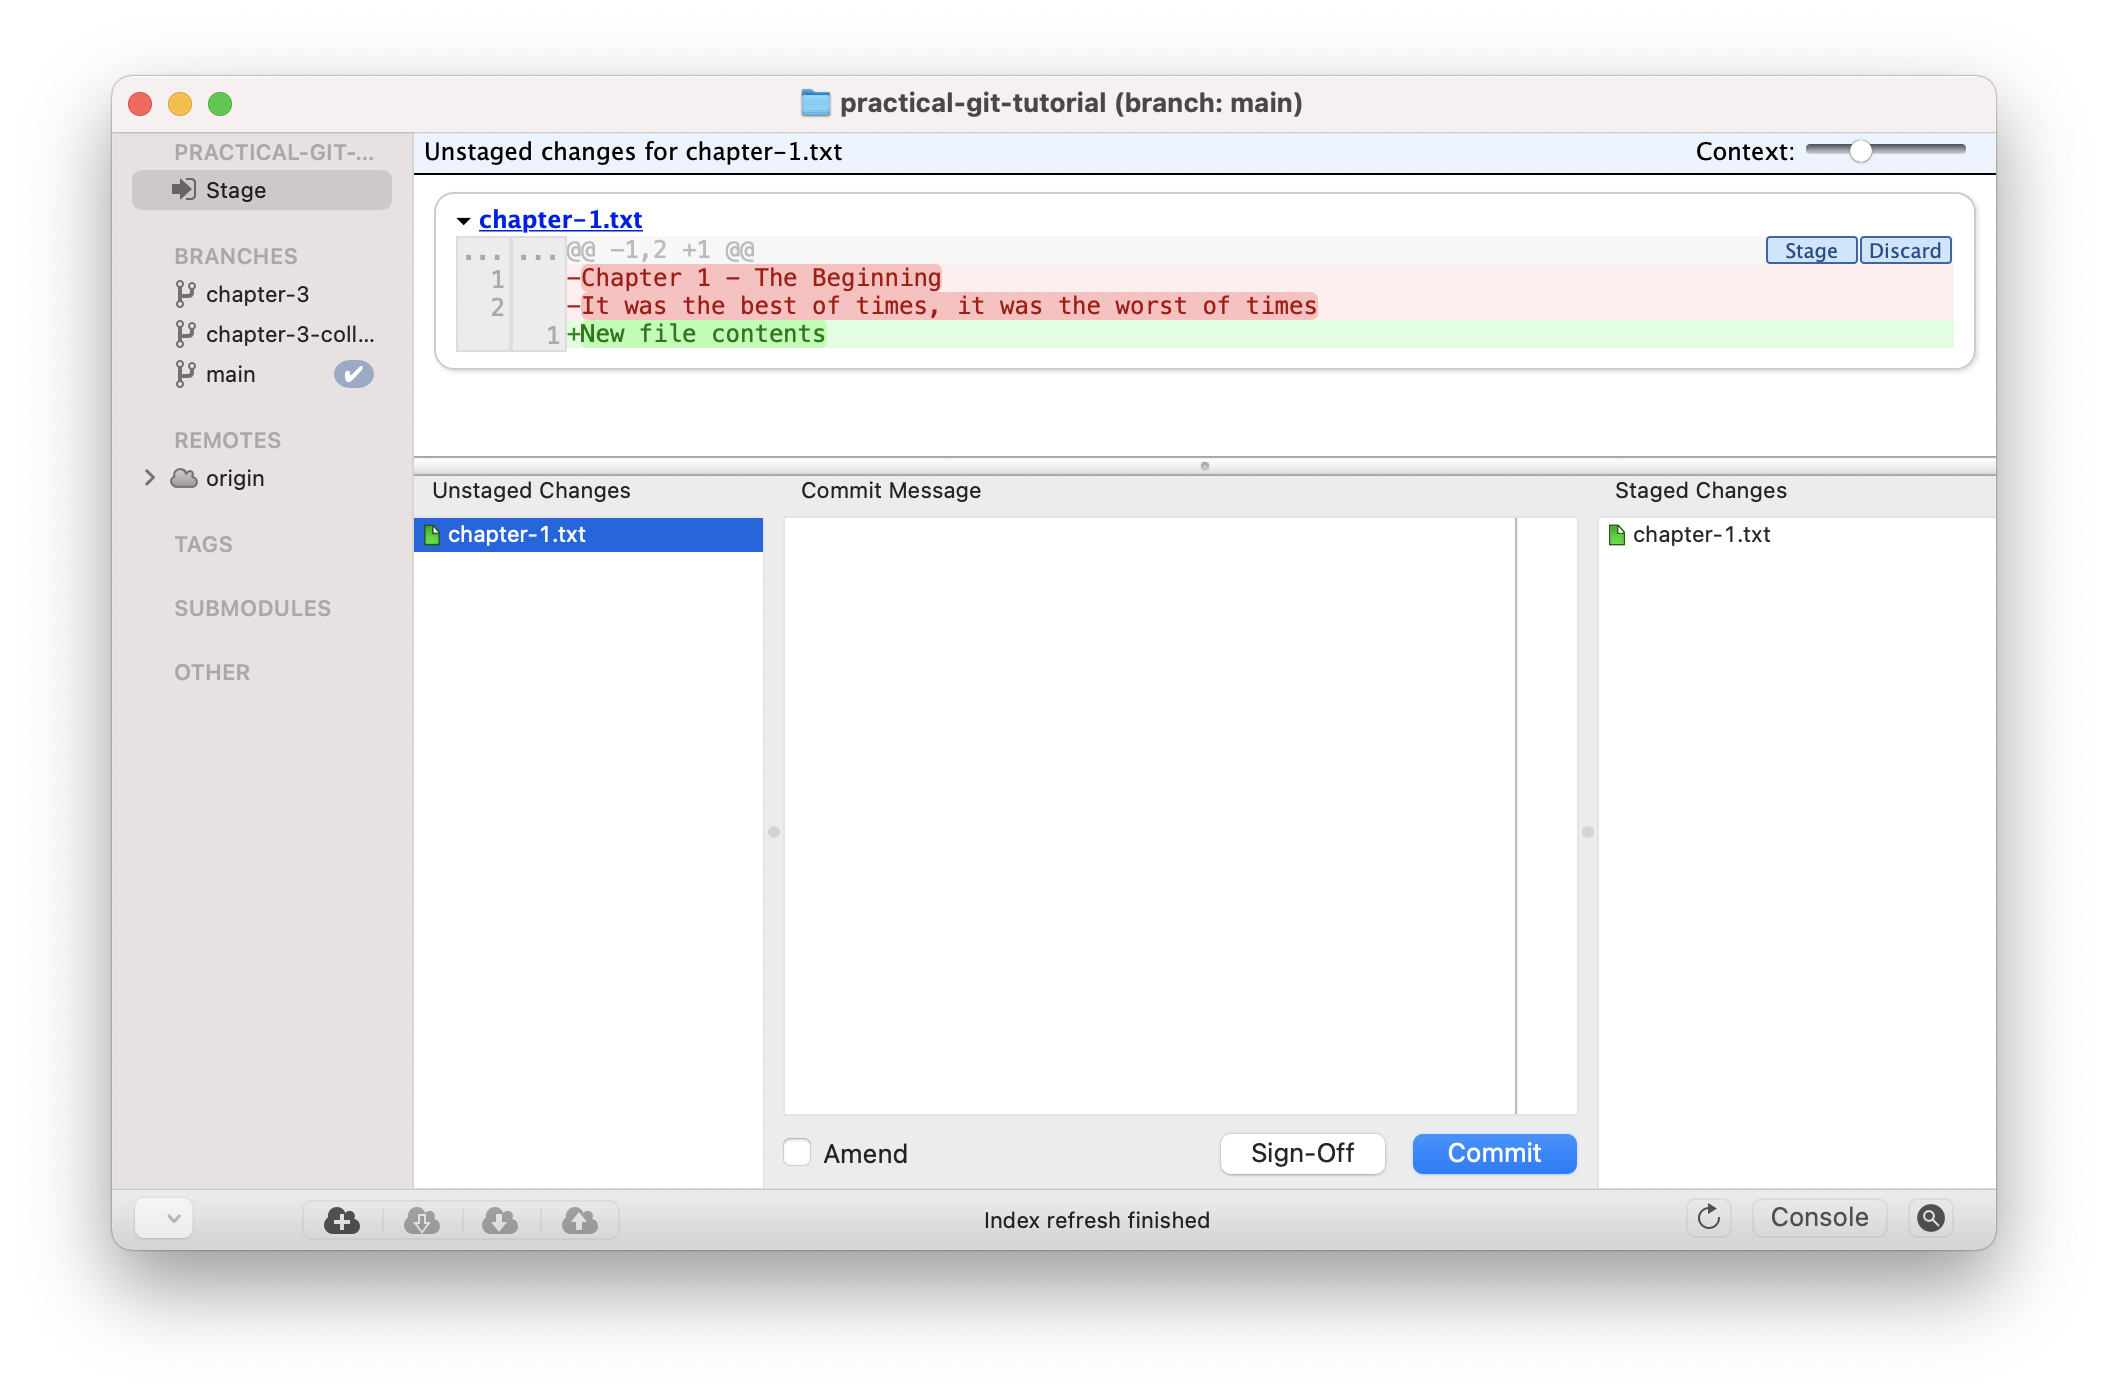 Unstaged changes in GitX
This corresponds to the file replace command we ran.
It is so much easier to understand the diff in a GUI program. This program also allows me to quickly switch between staging and un-staging files by just dragging them around. I can even stage or un-stage individual lines in a file back and forth as well.
There's no bonus points for using the command line vs a GUI program. Use whatever gets the job done for you.
Now that we've seen how the staging area and Git diffs work, let's discard our non-staged changes so we can get back to committing our first change.
In my GUI program I can right-click the file and click "Discard changes", but I'll show the command line version here as well.
The output of our last git status actually showed us how to do this by using git restore. We can pass the file path or just a . for the whole directory:
(main)$ git restore .
If we check the status again we're back to just our staged changes, and we can continue.
Note: Git only commits changes that are staged, so we could have left those unstaged changes in our working directory and it wouldn't interfere with the committing process.
However, it would make our future changes more cumbersome to deal with—so it makes sense to discard those changes to keep our working directory in good shape.
Now let's finally commit these changes with a message about what we did:
(main)$ git commit -m "Added the intro line to chapter 1"
[main f5b6e2f] Added the intro line to chapter 1
 1 file changed, 1 insertion(+)
Checking the status once again shows us that our branch is "ahead of 'origin/main' by 1 commit":
(main)$ git status
On branch main
Your branch is ahead of 'origin/main' by 1 commit.
  (use "git push" to publish your local commits)

nothing to commit, working tree clean
Finally let's push up our change:
(main)$ git push origin main
How to collaborate with others in Git
So far we've been looking at the simplest use case: working by ourselves on one branch.
In reality, we'll usually be working with multiple people working on multiple different branches. This is the real power of Git after all: a system to collaborate and track changes over time amongst many collaborators.
For now, let's continue working as if we're the only person on the project, but let's adjust our workflow a little bit to prepare for when that's not the case.
In general, it's best practice to not work directly on the main branch.
The main branch is supposed to be the "source of truth" for the project—changes to it should be carefully reviewed. Any change in origin/main becomes the new "source of truth" for anyone else working on the project, so we shouldn't just change it without some thought and review by others.
Instead of working on main directly, let's branch off of main into our own feature branch, and then merge those changes back into main.
That's a lot of new terminology, so let's take it one step at a time.
Feature branches in Git
To begin, let's branch off of main and create our own feature branch to work on.
When you create a branch off of another branch, you create a copy of that branch at that point in time. You can now change this new branch independently of the original branch.
To try this out, let's make a new branch called chapter-2. To do this we use git checkout with the -b flag and the name we want the new branch to have:
(main)$ git checkout -b chapter-2
Switched to a new branch 'chapter-2'
(chapter-2)$
Notice that the terminal now shows us on the chapter-2 branch. Changes on the chapter-2 branch will not affect the main branch at all. We essentially have a new playground to make whatever changes we want to make without affecting main.
There are interesting things happening under the hood here, but for the purpose of this tutorial we just need to know that to "checkout" something in Git means to "change my local project to look exactly like the project looked at some specific point in time." You can think of a branch as a pointer to a specific timeline of the Git history.
There's a lot more happening here, but that definition should be good enough for now.
So we have a new branch, and for now that new branch is identical to main (we haven't made any changes yet).
Next let's repeat what we've already done before and create a new file called chapter-2.txt, give it some content, and commit it:
(chapter-2)$ touch chapter-2.txt
(chapter-2)$ echo "Chapter 2 - The next chapter" >> chapter-2.txt

(chapter-2)$ git status
On branch chapter-2
Untracked files:
  (use "git add <file>..." to include in what will be committed)
        chapter-2.txt

nothing added to commit but untracked files present (use "git add" to track)

(chapter-2)$ git add .

(chapter-2)$ git commit -m "Creates chapter 2 and adds the topic sentence"
[chapter-2 741822a] Creates chapter 2 and adds the topic sentence
 1 file changed, 1 insertion(+)
 create mode 100644 chapter-2.txt
Nothing new in there—just the same thing we did for Chapter 1.
Now that we have a new commit on our chapter-2 branch, let's look the Git log and compare this new branch to main:
(chapter-2)$ git log
commit 741822a9fd7b15b6e3caf437dd0617fabf918449 (HEAD -> chapter-2)
Author: John Mosesman <johnmosesman@gmail.com>
Date:   Mon Mar 22 10:33:26 2021 -0500

    Creates chapter 2 and adds the topic sentence

commit f5b6e2f18f742e2b851e38f52a969dd921f72d2f (origin/main, origin/HEAD, main)
Author: John Mosesman <johnmosesman@gmail.com>
Date:   Mon Mar 22 10:07:35 2021 -0500

    Added the intro line to chapter 1

commit a8f8b95f19105fe10ed144fead9cab84520181e3
Author: John Mosesman <johnmosesman@gmail.com>
Date:   Fri Mar 19 12:27:35 2021 -0500

    New chapter 1 file with chapter heading
...
We'll notice in the log that our latest commit is shown at the top, and our HEAD is again different from our origin. This again makes sense—we've made changes locally that aren't in GitHub.
Now we need to get our new changes into the main branch.
Git workflows for collaboration
There are a couple of ways to get our new Chapter 2 into the main branch and into GitHub, and the way we choose depends on the project and what workflow we're using to collaborate with others.
First let's talk about a couple different workflows we could use.
The first one is the most straightforward:
- Merge changes from
chapter-2into our localmainbranch - Push local
mainbranch toorigin/main
The second way is a little more complicated:
- Push our local
chapter-2branch to origin (this creates a new branch onorigincalledorigin/chapter-2) - Merge
origin/chapter-2intoorigin/mainon GitHub - Pull down the new changes from
origin/maininto our localmain
The first workflow is definitely easier, and it is something I would use if I was working on this project by myself without any other collaborators.
However, if I had collaborators, I wouldn't want to push directly to the main branch from my local. By doing so I would be changing and taking control of the history of the project solely on my own changes—without any input or review from collaborators.
For this reason, if there were multiple people working on the same project, I would use the second workflow because it is a better collaboration process for the team.
That being said, we'll go over both workflows, and let's start with the first one which is less complicated.
How to merge a branch in Git
When you want to combine the contents of two branches into one in Git, there are a few methods of doing so. The first and probably simplest way is to do a merge.
A merge, like it sounds, tries to take the contents of one branch and apply (or "merge in") those changes into another branch.
In our scenario, we want to take the contents of the chapter-2 branch and merge them into main. Said another way, we want to take the current state of main and add in our changes from the chapter-2 branch.
We can do this by using git merge, and we'll look at the result of it afterwards.
The first thing we need to do is be on the primary branch that we want to merge changes into. Since we want main to absorb the changes from chapter-2, we first need to be on the main branch.
To switch back to the main branch, we can again use git checkout and specify the branch name of main. This time we don't use the -b flag because we want to switch to an existing branch and not create a new one:
(chapter-2)$ git checkout main
Switched to branch 'main'
Your branch is up to date with 'origin/main'.
(main)$
We're now back on the main branch, and we get a quick status message saying we're up to date with origin/main.
Next, let's merge our chapter-2 branch into main:
(main)$ git merge chapter-2
Updating f5b6e2f..741822a
Fast-forward
 chapter-2.txt | 1 +
 1 file changed, 1 insertion(+)
 create mode 100644 chapter-2.txt
Let's look at the Git log again to see the result:
(main)$ git log
commit 741822a9fd7b15b6e3caf437dd0617fabf918449 (HEAD -> main, chapter-2)
Author: John Mosesman <johnmosesman@gmail.com>
Date:   Mon Mar 22 10:33:26 2021 -0500

    Creates chapter 2 and adds the topic sentence

commit f5b6e2f18f742e2b851e38f52a969dd921f72d2f (origin/main, origin/HEAD)
Author: John Mosesman <johnmosesman@gmail.com>
Date:   Mon Mar 22 10:07:35 2021 -0500

    Added the intro line to chapter 1

...
We can see that our main branch now contains the new commit from chapter-2, and that our origin is still at the previous commit (as we haven't updated origin yet).
Finally, let's push our changes up to origin/main:
(main)$ git push origin main
Total 0 (delta 0), reused 0 (delta 0)
To github.com:johnmosesman/practical-git-tutorial.git
   f5b6e2f..741822a  main -> main
We've successfully merge our chapter-2 branch, and pushed that change up to GitHub!
As a final cleanup step, let's delete the chapter-2 feature branch as it has already been merged into main:
(main)$ git branch -d chapter-2
Deleted branch chapter-2 (was 741822a).
Note: the
git branchcommand without a branch name argument will list all of the branches you have locally.Adding the
-dflag and a branch name deletes the branch passed in.
Pull request workflow
To work through our collaboration workflow, let's repeat the same thing we've done with Chapter 1 & 2 on a new branch called chapter-3:
(Now would be a good time to try this on your own!)
(main)$ git checkout -b chapter-3
(chapter-3)$ touch chapter-3.txt
(chapter-3)$ echo "Chapter 3 - The End?" >> chapter-3.txt
(chapter-3)$ git add .
(chapter-3)$ git commit -m "Adds Chapter 3"
Now we have a new commit on a new branch called chapter-3.
Let's review how we're going to get this new branch merged into main without acting directly on main ourselves:
- Push our local
chapter-3branch to origin (this creates a new branch onorigincalledorigin/chapter-3) - Merge
origin/chapter-3intoorigin/mainon GitHub - Pull down the new changes from
origin/maininto our localmain
A couple more steps—but none that are too complicated.
The first step is to push our new branch to GitHub. Since this branch doesn't exist yet on GitHub, GitHub will make a new branch for us that is a copy of what we pushed:
(chapter-3)$ git push origin chapter-3
Enumerating objects: 4, done.
Counting objects: 100% (4/4), done.
Delta compression using up to 16 threads
Compressing objects: 100% (2/2), done.
Writing objects: 100% (3/3), 299 bytes | 299.00 KiB/s, done.
Total 3 (delta 1), reused 0 (delta 0)
remote: Resolving deltas: 100% (1/1), completed with 1 local object.
remote:
remote: Create a pull request for 'chapter-3' on GitHub by visiting:
remote:      https://github.com/johnmosesman/practical-git-tutorial/pull/new/chapter-3
remote:
To github.com:johnmosesman/practical-git-tutorial.git
 * [new branch]      chapter-3 -> chapter-3
Now that we have our branch on GitHub, we can create a pull request to be reviewed by our teammates.
GitHub even provides us with the URL to visit in our output above: https://github.com/johnmosesman/practical-git-tutorial/pull/new/chapter-3
A couple notes: this next part shows GitHub's UI and process for pull requests, but this process should be very similar for other services (like GitLab, Bitbucket, etc.).
Also keep in mind I'm using my own repo, so some of the URLs you see here will be different from yours.
Visiting the URL above, we arrive at a page to open a new pull request.
We see a few things:
- A place to specify the name of the pull request (a topic sentence to easily understand what this PR is about)
- A box for a description to explain the changes we made and any other context we want to provide (you can also add images, gifs, or videos here as well)
- And below all of that is the list of files we changed and the changes in them (the diff).
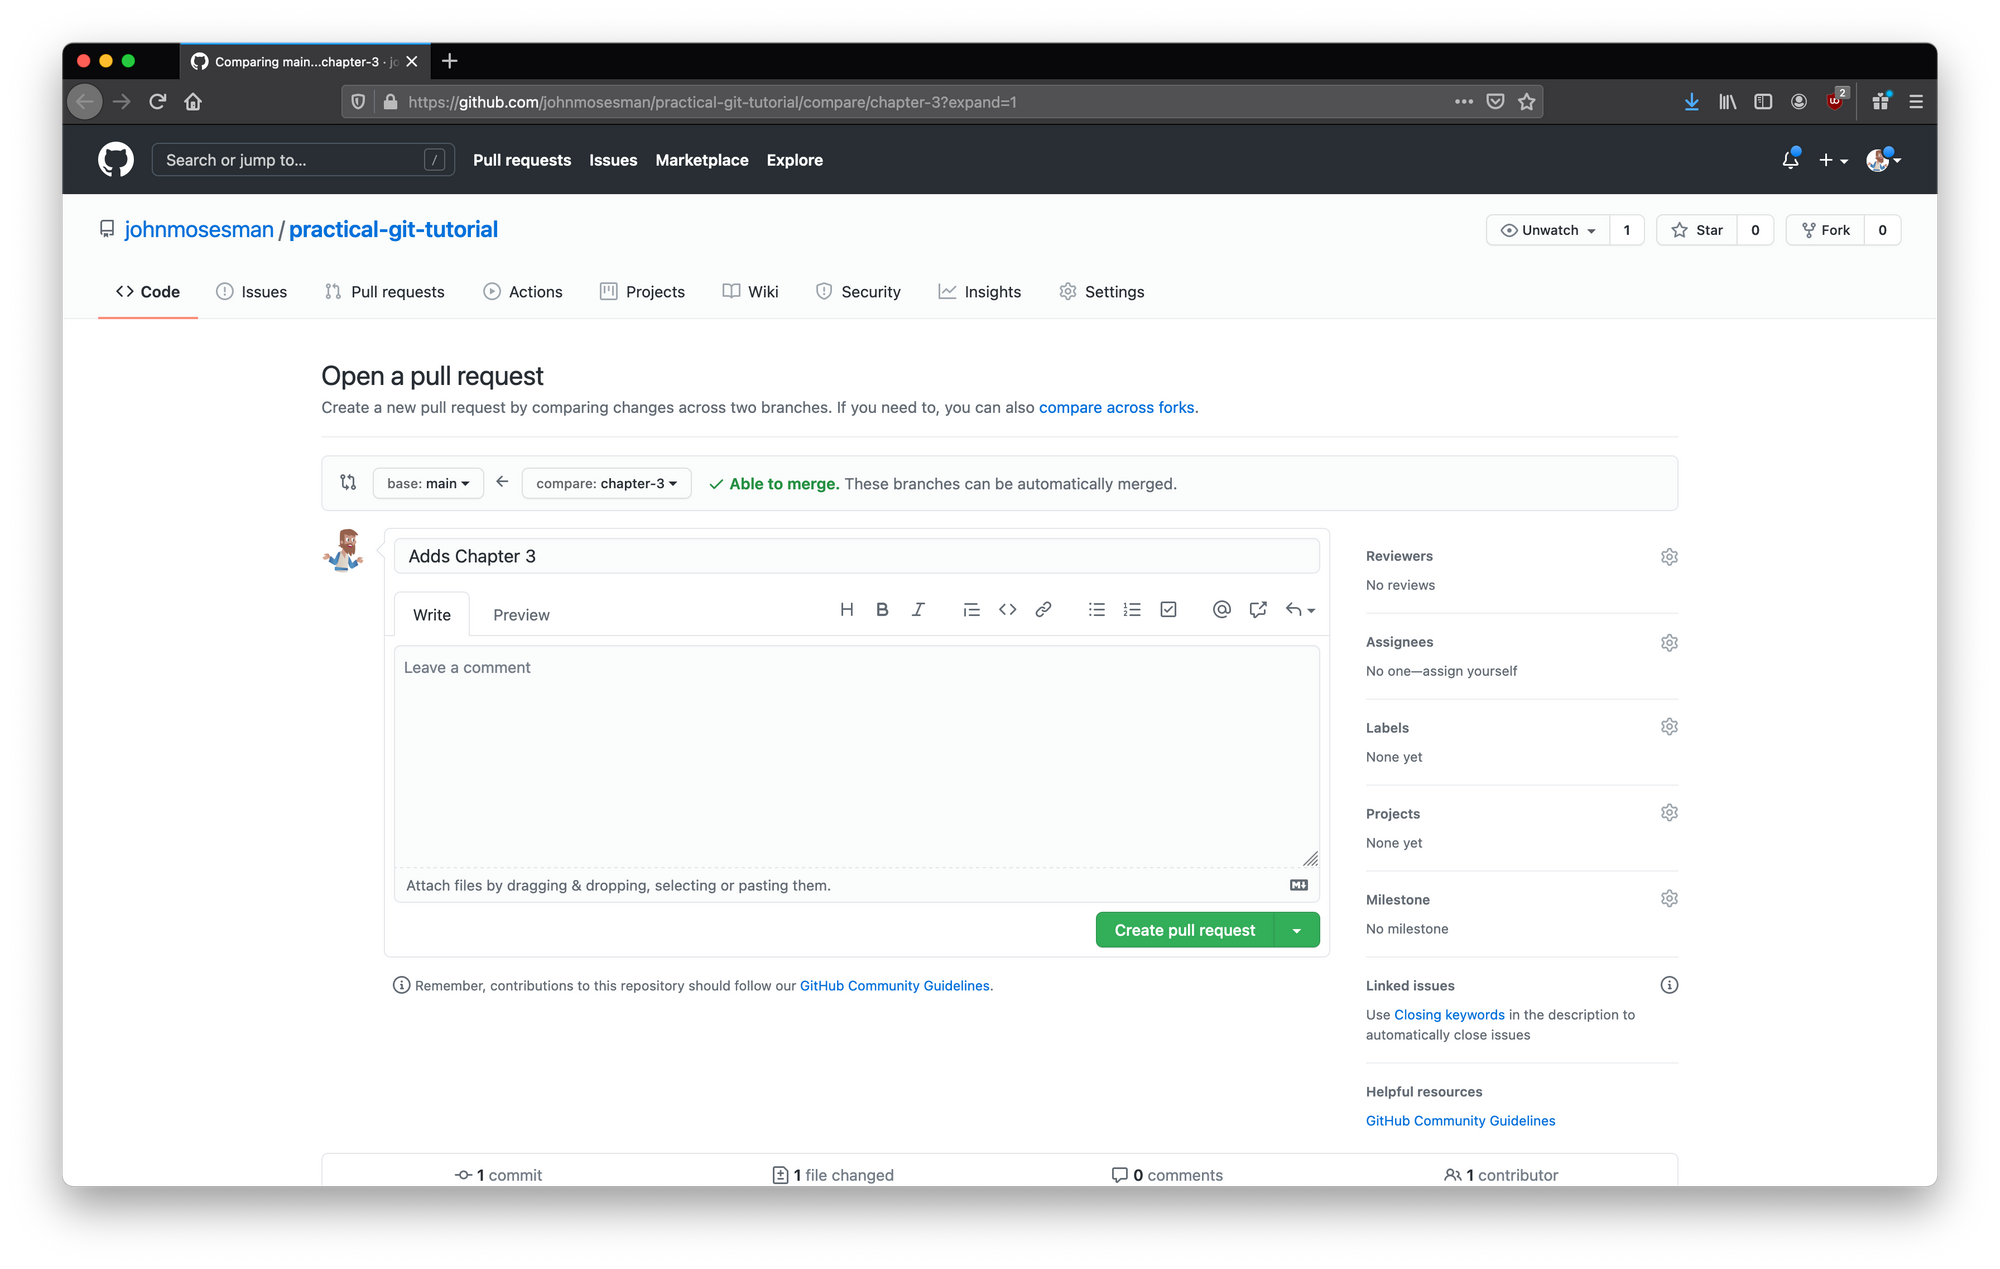 Opening a new pull request
Notice that the UI shows base: main <- compare: chapter-3. This is GitHub telling us that we're setting the pull request to merge chapter-3 into main.
Below the pull request description is the diff of the changes we made:
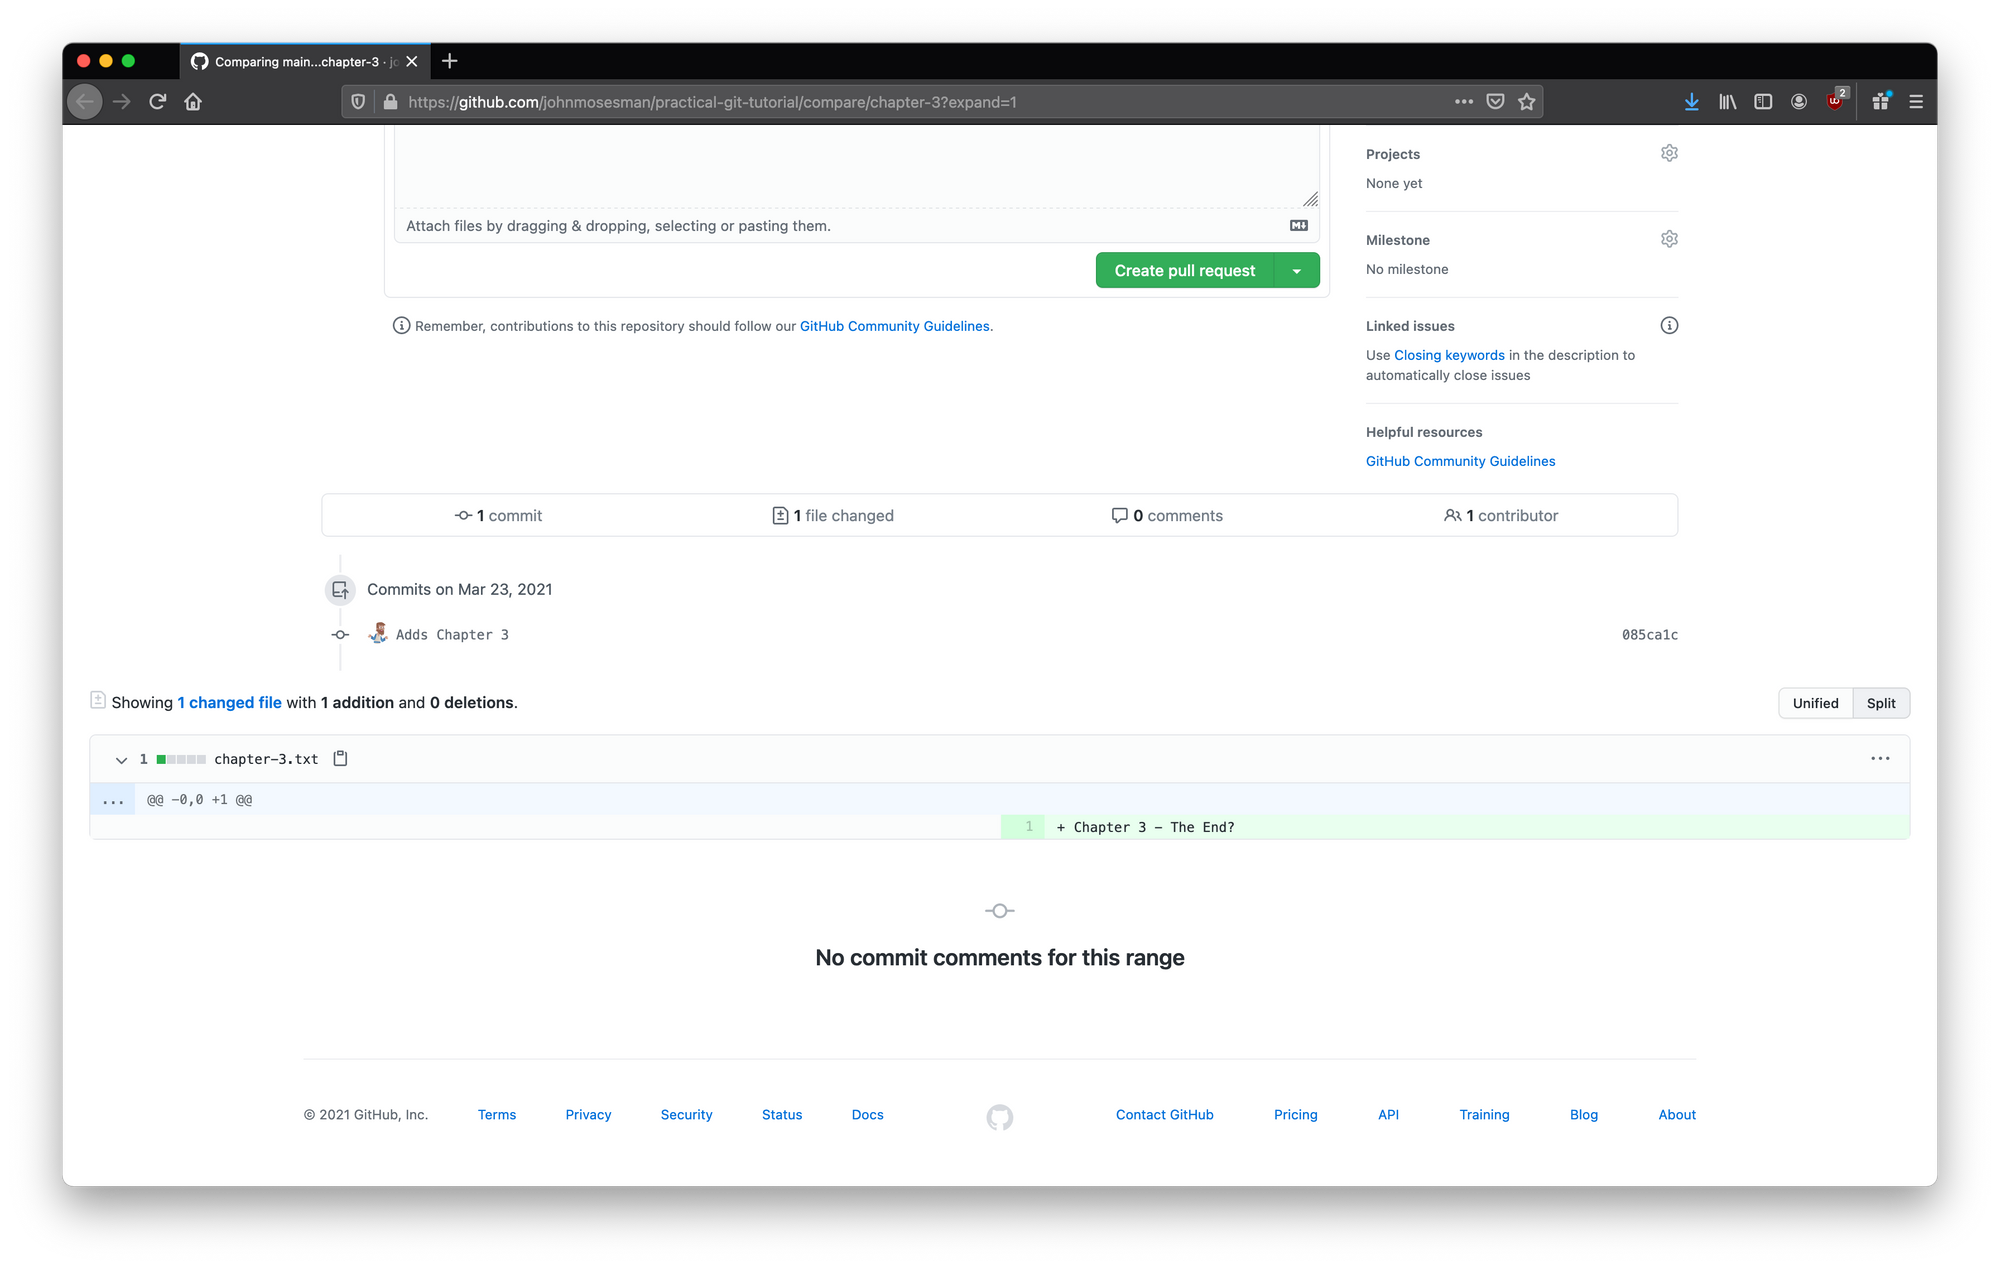 The pull request diff
We'll notice that only the file chapter-3.txt is shown, and this is because it's the only file that we changed.
There are other files currently in our project (chapter-1.txt, chapter-2.txt), but those files didn't change so there's no need to show them.
We see the one line we inserted into chapter-3.txt—signified by a + sign at the start of the line and the green background which signifies an addition to the file.
After clicking "Create Pull Request" we're taken to the new PR we just made.
At this point we could assign a reviewer to the PR and have a back-and-forth discussion around the code by leaving comments on specific lines in the diff. After the code has been reviewed and we make any changes that need to be made, we're ready to merge.
For this sake of this tutorial we'll skip the review process, and just click the big green merge button:
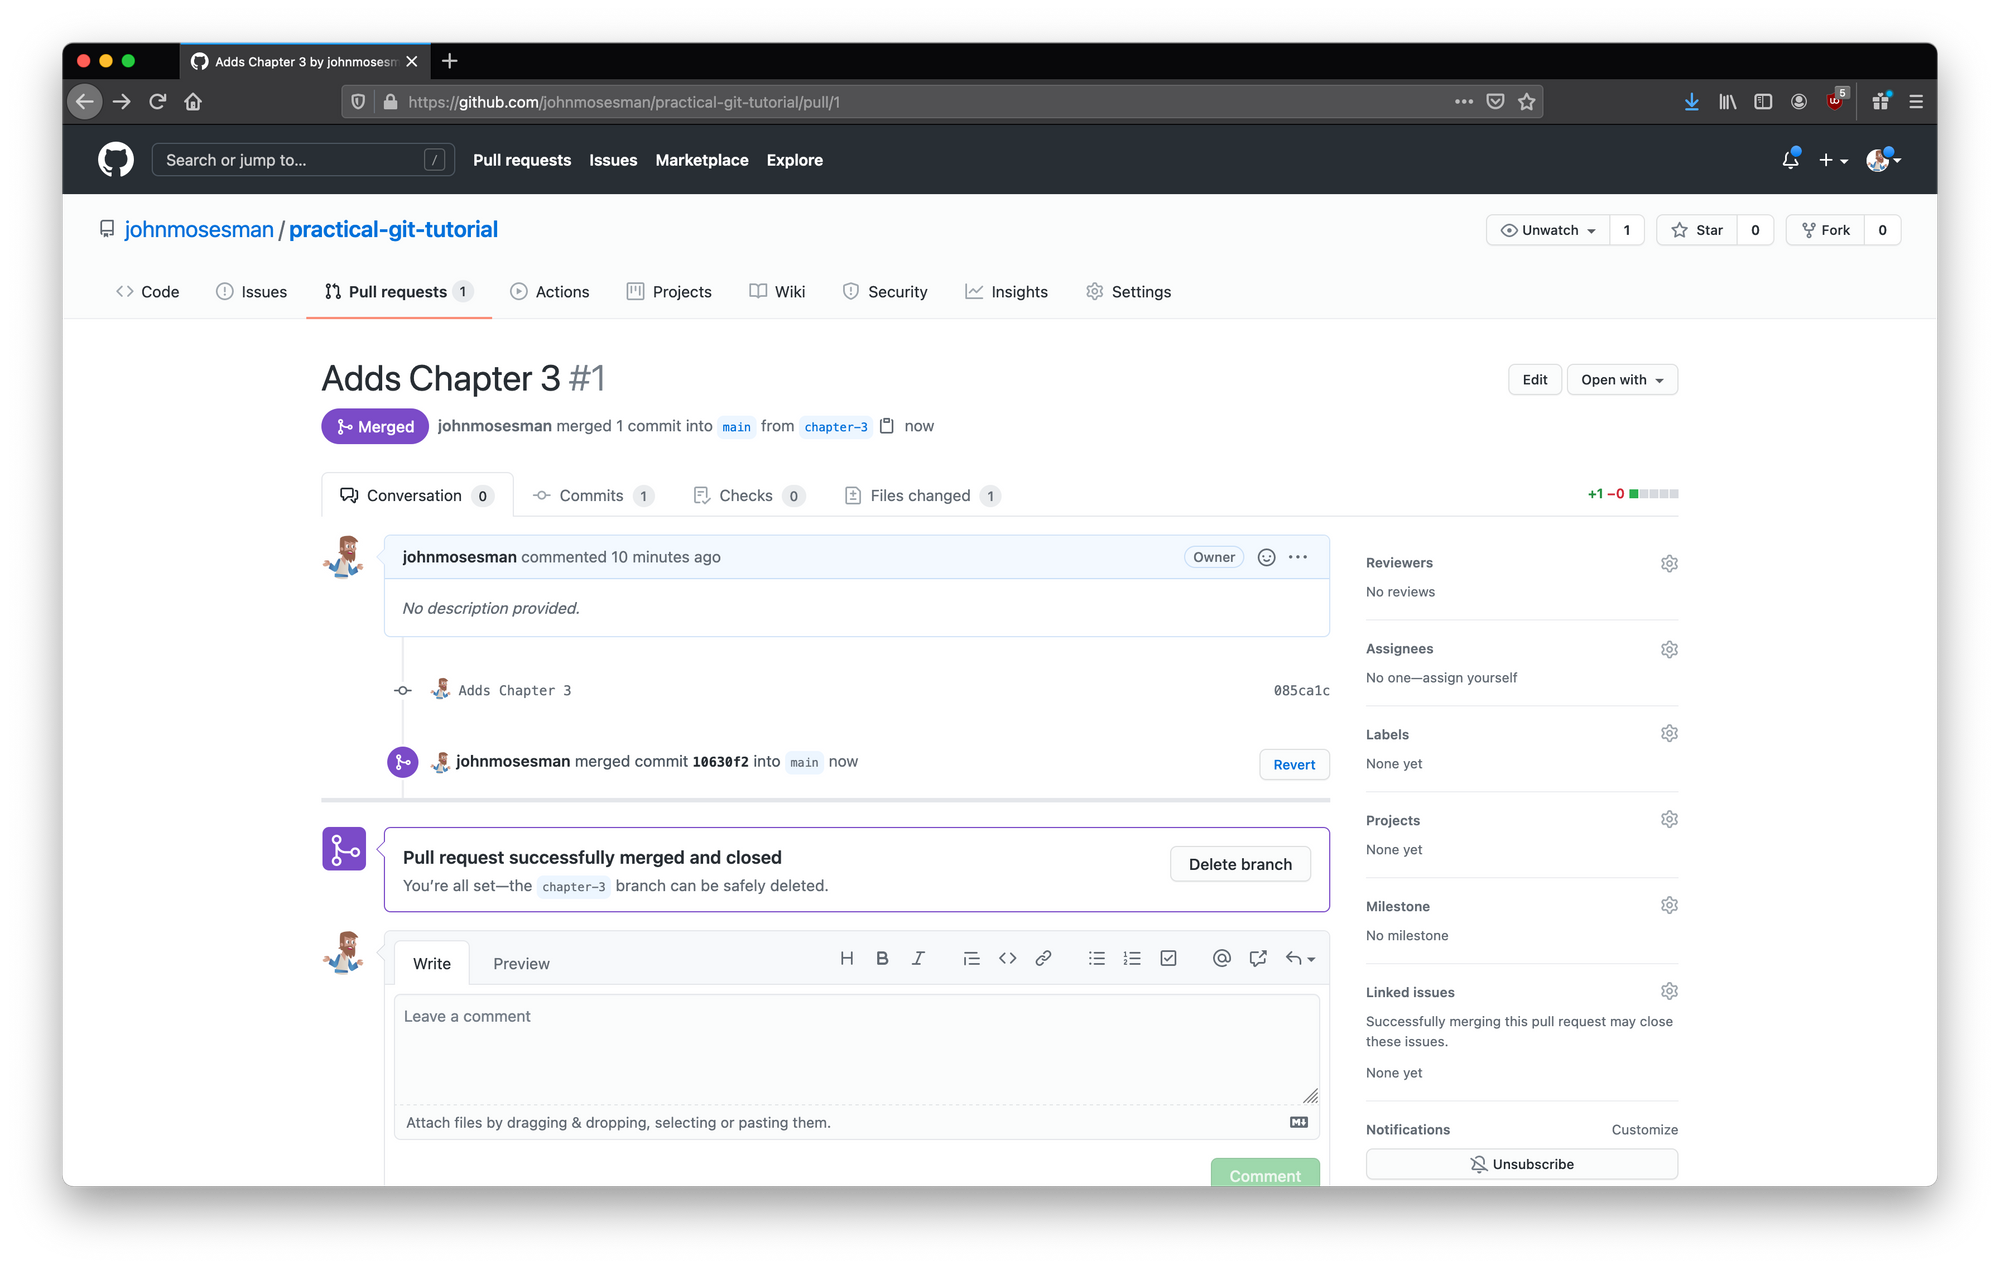 Merged pull request
And with that, our pull request has been merged into main!
How to bring our local up to date
We've now made a change to origin/main in a safe, controlled, and peer-reviewed way.
But, our local doesn't know anything about this change. Locally, Git still thinks we're on our chapter-3 branch which isn't merged into main:
(chapter-3)$ git log
commit 085ca1ce2d0010fdaa1c0ffc23ff880091ce1692 (HEAD -> chapter-3, origin/chapter-3)
Author: John Mosesman <johnmosesman@gmail.com>
Date:   Tue Mar 23 09:19:14 2021 -0500

    Adds Chapter 3

commit 741822a9fd7b15b6e3caf437dd0617fabf918449 (origin/main, origin/HEAD, main)
Author: John Mosesman <johnmosesman@gmail.com>
Date:   Mon Mar 22 10:33:26 2021 -0500

    Creates chapter 2 and adds the topic sentence

...
Our local shows origin/main on the previous commit starting with 741822. We need to pull in the new information from our origin to update our local repository.
How to retrieve remote data
As with many other things with Git, there are many different methods to accomplish the same task.
For our purposes, we'll look at a straightforward way that will work in the majority of cases.
To start, let's switch back to our main branch locally:
(chapter-3)$ git checkout main
Switched to branch 'main'
Your branch is up to date with 'origin/main'.
Our local thinks we're up to date with origin/main because we haven't asked the remote repository (origin) for new information since we pulled the project at the beginning using git clone.
Git repositories are not live-updating—they're just a snapshot of the history at a point in time. To receive any new information about the repository we have to ask for it again.
To retrieve any new information that has changed on the remote, we use git fetch:
(main)$ git fetch
From github.com:johnmosesman/practical-git-tutorial
   741822a..10630f2  main       -> origin/main
The output shows us that origin/main is now pointing to a commit starting with 10630f2. This commit prefix matches the SHA of the merge commit of our pull request.
There are a few ways to merge two branches into one another, and one of those ways is by creating a merge commit. That's what happened here.
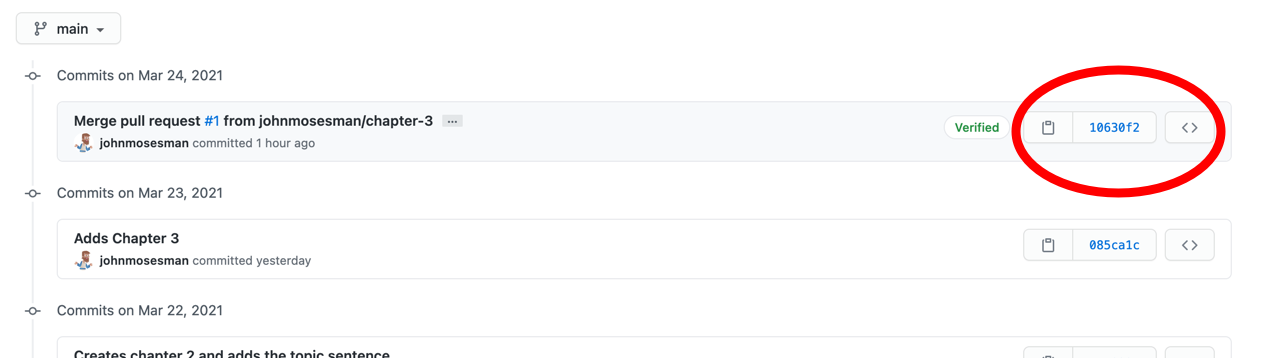 The merge commit of our PR
Our local repository now knows about the presence of these new commits, but we haven't done anything with them yet.
Running git fetch doesn't actually change any of our files—it just downloads new information from the remote about the status of the repo.
Now that our local repository is aware of the status of each branch (but hasn't changed or updated any of the branches), let's check our status again:
(main)$ git status
Your branch is behind 'origin/main' by 2 commits, and can be fast-forwarded.
  (use "git pull" to update your local branch)
Our local now knows that our local main is behind origin/main by 2 commits (the commit from the chapter-3 branch and the PR merge commit).
It also gives us the hint to use git pull to update our local branch:
john:~/code/practical-git-tutorial (main)$ git pull origin main
From github.com:johnmosesman/practical-git-tutorial
 * branch            main       -> FETCH_HEAD
Updating 741822a..10630f2
Fast-forward
 chapter-3.txt | 1 +
 1 file changed, 1 insertion(+)
 create mode 100644 chapter-3.txt
The git pull command is actually a shorthand for running two commands: git fetch followed by a git merge.
Since git fetch doesn't apply any changes locally, it can be useful to use git fetch to see if our branches are up to date with the remote (maybe we don't want to merge in the changes yet), or to pull down new branches that exist on the remote and not on our local machine.
Fetching a new branch from a remote will go ahead and download that branch as well to your local machine—since it's a new branch it won't conflict with anything in your local setup.
We could have just done a git pull initially instead of first doing a git fetch, but I wanted to explain git fetch as it is useful in its own right.
After running git pull, if we run git status once again we'll see that everything is up to date.
And with that, we've pulled in changes from our remote and got our local up to date!
How to fix merge conflicts in Git
The final topic we'll cover is how to deal with conflicts.
So far, Git has just magically handled all of the file updating, and most of the time Git can just handle it. But, there are times when Git doesn't know how to combine changes together, and that creates a conflict.
A conflict occurs when merging two changes that have changed the same line in a file. If two commits have changed the same line in a file, Git doesn't know which commit's changes to use, and it will require you to make the choice.
To setup this scenario, I've created another branch on Github called chapter-3-collaboration. Let's imagine that a teammate has already started working on this branch and they've asked you to collaborate with them in finishing out Chapter 3.
Since this is a new branch that we don't have locally, we can use git fetch to retrieve the new branch information from the remote, and then switch to that branch using git checkout:
(main)$ git fetch
From github.com:johnmosesman/practical-git-tutorial
 * [new branch]      chapter-3-collaboration -> origin/chapter-3-collaboration

(main)$ git checkout chapter-3-collaboration
Branch 'chapter-3-collaboration' set up to track remote branch 'chapter-3-collaboration' from 'origin'.
Switched to a new branch 'chapter-3-collaboration'
(chapter-3-collaboration)$
We've now pulled down the new branch to our local repository and switched to it. This is the contents of chapter-3.txt on this new branch currently:
(chapter-3-collaboration)$ cat chapter-3.txt
Chapter 3 - The End?

This is a sentence.
It's a title and one sentence. Let's change the title to something new like "Chapter 3 - The End Is Only The Beginning."
The contents of chapter-3.txt now look like this:
(chapter-3-collaboration)$ cat chapter-3.txt
Chapter 3 - The End Is Only The Beginning

This is a sentence.
After committing that change, if we try to push it up we get this message:
(chapter-3-collaboration)$ git push origin chapter-3-collaboration
To github.com:johnmosesman/practical-git-tutorial.git
 ! [rejected]        chapter-3-collaboration -> chapter-3-collaboration (non-fast-forward)
error: failed to push some refs to 'git@github.com:johnmosesman/practical-git-tutorial.git'
hint: Updates were rejected because the tip of your current branch is behind
hint: its remote counterpart. Integrate the remote changes (e.g.
hint: 'git pull ...') before pushing again.
hint: See the 'Note about fast-forwards' in 'git push --help' for details.
Our teammate has already made some commits before we did, and pushed it to the remote branch. Our local branch is now out of date with the remote, and GitHub is denying our push until we merge in the changes from our teammate:
... the tip of your current branch is behind its remote counterpart. Integrate the remote changes ... before pushing again.
It also gives us a hint about how to do that: git pull.
(chapter-3-collaboration)$ git pull origin chapter-3-collaboration
From github.com:johnmosesman/practical-git-tutorial
 * branch            chapter-3-collaboration -> FETCH_HEAD
Auto-merging chapter-3.txt
CONFLICT (content): Merge conflict in chapter-3.txt
Automatic merge failed; fix conflicts and then commit the result.
After pulling—and as we might have expected given the topic we're currently discussing—we have a merge conflict.
Git tried to automatically merge our teammate's changes into ours, but there was a place in the file that it couldn't automatically merge—we both changed the same line.
Git stopped "mid-merge" and is telling us we need to fix the merge conflicts before it can finish the merge. Let's look at our git status currently:
(chapter-3-collaboration)$ git status
On branch chapter-3-collaboration
Your branch and 'origin/chapter-3-collaboration' have diverged,
and have 1 and 1 different commits each, respectively.
  (use "git pull" to merge the remote branch into yours)

You have unmerged paths.
  (fix conflicts and run "git commit")
  (use "git merge --abort" to abort the merge)

Unmerged paths:
  (use "git add <file>..." to mark resolution)
        both modified:   chapter-3.txt

no changes added to commit (use "git add" and/or "git commit -a")
Git tells us our branch and the remote branch have 1 commit different from each other. It also tells us that we have some "unmerged paths"—that we're currently mid-merge and we need to fix the conflicts.
It shows us chapter-3.txt is currently modified, so let's look at the contents of chapter-3.txt:
(chapter-3-collaboration)$ cat chapter-3.txt
<<<<<<< HEAD
Chapter 3 - The End Is Only The Beginning
=======
Chapter 3 - The End But Not The Ending
>>>>>>> 2f6874f650a6a9d2b7ccefa7c9618deb1d45541e

This is a sentence.
Git has added some markers to the file to show us where the conflict happened. Both we and our teammate changed the title sentence, so it's surrounded by Git's markers of a conflict: <<< and >>> arrows separated by a line of ===.
The top line, signified by <<<<<<< HEAD and followed by "Chapter 3 - The End Is Only The Beginning", is the change that we just made. Git is telling us that this line is where our current HEAD is at—i.e., this is the change at our current commit.
The line below it, "Chapter 3 - The End But Not The Ending" followed by >>>>>>> 2f6874f650a6a9d2b7ccefa7c9618deb1d45541e, is the line and commit from our teammate.
Basically, Git is telling us, "Which one of these lines (or some combination of these lines) do you want to keep?"
Notice that the line at the bottom file isn't wrapped up in the conflicts—it wasn't changed by both commits.
We need to resolve the conflict by deleting one of the lines or combining the two lines into one (and remember to remove all of the extra markers that Git put in there as well).
I'm going to take a combination of these lines, so the final file looks like this:
(chapter-3-collaboration)$ cat chapter-3.txt
Chapter 3 - The End Is Not The Ending--But Only The Beginning

This is a sentence.
To finish the merge, we just need to commit our conflict resolution:
(chapter-3-collaboration)$ git add .
(chapter-3-collaboration)$ git commit -m "Merge new title from teammate"
[chapter-3-collaboration bd621aa] Merge new title from teammate

(chapter-3-collaboration)$ git status
On branch chapter-3-collaboration
Your branch is ahead of 'origin/chapter-3-collaboration' by 2 commits.
  (use "git push" to publish your local commits)

nothing to commit, working tree clean
The result of git status tells us that our local branch is is ahead of 'origin/chapter-3-collaboration' by 2 commits..
Looking at the git log confirms this:
commit bd621aa0e491a291af409283f5fd1f68407b94e0 (HEAD -> chapter-3-collaboration)
Merge: 74ed9b0 2f6874f
Author: John Mosesman <johnmosesman@gmail.com>
Date:   Thu Mar 25 09:20:42 2021 -0500

    Merge new title from teammate

commit 74ed9b0d0d9154c912e1f194f04dbd6abea602e6
Author: John Mosesman <johnmosesman@gmail.com>
Date:   Thu Mar 25 09:02:03 2021 -0500

    New title

commit 2f6874f650a6a9d2b7ccefa7c9618deb1d45541e (origin/chapter-3-collaboration)
Author: John Mosesman <johnmosesman@gmail.com>
Date:   Thu Mar 25 08:58:58 2021 -0500

    Update title

...
The resulting commit history has both of the commits on the branch and our merge commit at the top.
From here, we just need to push up our changes to the remote:
(chapter-3-collaboration)$ git push origin chapter-3-collaboration
Enumerating objects: 10, done.
Counting objects: 100% (10/10), done.
Delta compression using up to 16 threads
Compressing objects: 100% (6/6), done.
Writing objects: 100% (6/6), 647 bytes | 647.00 KiB/s, done.
Total 6 (delta 2), reused 0 (delta 0)
remote: Resolving deltas: 100% (2/2), completed with 1 local object.
To github.com:johnmosesman/practical-git-tutorial.git
   2f6874f..bd621aa  chapter-3-collaboration -> chapter-3-collaboration
Now that we've changed the remote branch, our teammate would need to do a git pull to merge in our new merged changes.
And, ideally we would tell our teammate that we pushed up a new change so they could pull it down before they continue editing—reducing the likelihood they'll have to fix a merge conflict in the future, too.
Branches off of branches
We could have also created our own branch off of the chapter-3-collaboration branch. This would let us work without having to worry about merge conflicts until the very end.
Once we had finished our work in our own separate branch, we could then merge our feature branch into our teammate's feature branch—and then into main.
chapter-3-collaboration-john->chapter-3-collaboration->main
As you can see the branch structure can get quite complicated as more and more branches branch off of each other and become ahead of and behind each other.
Because of this, it's generally a good idea to keep branches small and isolated and try to merge them quickly and often.
This can help avoid a lot of painful merge conflicts.
Review: how to start a new feature workflow
I'll end with a quick review of how to approach starting a new task and the commands and flows to do it.
Say you've been given your first ticket at a new job: a small bug to squash in your team's product.
The first thing you'd need to do is pull down the repo using git clone <URL>.
Next, you'd want to make a feature branch off of main using git checkout -b <BRANCH_NAME>. After that, you'd fix the bug and commit the change(s) using git add and git commit.
Maybe solving this problem takes multiple commits—or maybe you make a few commits in an attempt to solve it before you finally arrive at the solution. That's ok too.
After committing, you push your new branch to the origin (git push origin <BRANCH_NAME>) and create a pull request. After a code review your branch is merged in (yay!).
You've now completed your feature, and it's time to switch back to main (using git checkout main), use git pull to get your latest changes plus any other changes other people have made, and start off again with a new branch.
Conclusion
As mentioned in the beginning, there are many ways to approach working with Git and Git workflows.
There's also a lot of underlying Git "magic" (that is, code being run that you don't understand yet), but you will learn and pick up more of this with time.
I spent the first many years of my career just using memorized commands and workflows. It worked. As I ran into problems or collaborated with teammates I learned more and eventually my skill with Git expanded.
In the beginning, don't make it any harder than it has to be! You will learn over time.
If you liked this article, I write about technical topics like this as well as non-technical topics on my site.
I also write similar things on Twitter: @johnmosesman.
Either way, feel free to send me a message.
Thanks for reading!
John