
The print function is an important function in Python, as it is used to redirect output to the terminal. The output can also be redirected to a file.
The print function, by default, prints on a new line every time. This is due to the definition of print() in the Python documentation.
Why does Python's print function print on a new line by default?
In the snippet below, we can see that by default the value of end is \n. This means that every print statement would end with a \n. Note that \n represents a new-line character.
 Source: Python documentation.
Let's see an example of the print function.
Code Example:
# using Print with default settings

print("This will be printed")
print("in separate lines")
Output:
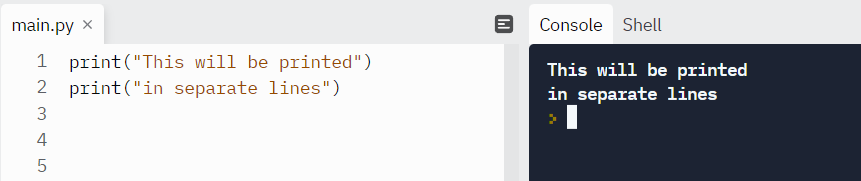
In the example above, lines would be printed separately due to the definition: end='\n'.
How to print on the same line in Python
Sometimes, we need to print strings on the same line. This is specially useful when we are reading files in Python. When we read files, we get a blank between lines by default.
Let's see an example. We have a file named rainbow.txt with contents shown below:
 Contents of file rainbow.txt
Code:
fhand = open('rainbow.txt')
for line in fhand:
  print(line)
In the code above, we have used a file handler fhand to access the file. Next, we iterate through the lines using a for loop.
Output:
When we print the contents, the results are like this:

The extra blank line is due to the presence of \n at the end of each line in the file which moves the cursor to the next line. Finally the blank line gets added due to print function's behavior as discussed in the last section.
Let's say we want to remove these. To do that, we can make some changes. For this, we need to change the default behavior of print. We'll see how to do that in detail in the coming sections.
Option #1 – How to modify the value of end in a print function
Let's customize the value of end in the print function. We'll set it to ' ' which is a space.
Code Example:
# Customizing the value of 'end'

print("This is string 1 same line", end=' ')
print("This is string 2 different line")
Output:

Now we can see that instead of a new line (\n) we are telling the print function to add a blank character at the end.
We can also provide another character instead of a blank like this:
# Customizing the value of 'end' with a custom separator

print("This is string 1 same line", end=';')
print("This is string 2 different line")
Output:

Usage: The above example is just a way to print on the same line with the separating character of your choice.
Let's see another example. We can iterate through a list of items and print them on the same line with end = ' ' .
# iterating lists

list_fruits = ['red','blue', 'green', 'orange']
for i in list_fruits:
    print(i, end = ' ')
Output:

Option #2 – Remove whitespace using rstrip() in files
We can remove certain characters around a string using strip(). By default, every line in a file has "\n" at the end. As we are concerned with only the character on the right, we will use rstrip() which stands for right-strip. We'll discuss an example of rstrip() next.
You can learn more about the strip() method in this blog post.
Back to our file printing example
Remember, we discussed a file printing example where extra lines were being printed:

Let's modify the code a bit using rstrip().
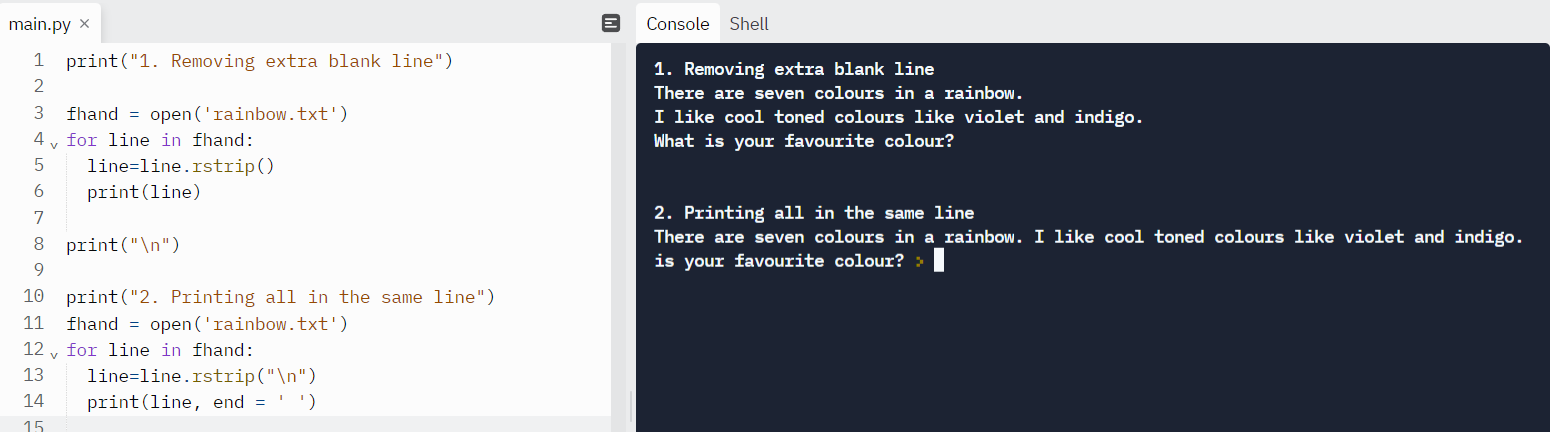
print("1. Removing extra blank line")

fhand = open('rainbow.txt')
for line in fhand:
  line=line.rstrip()
  print(line)

print("\n")

print("2. Printing all in the same line")
fhand = open('rainbow.txt')
for line in fhand:
  line=line.rstrip("\n")
  print(line, end = ' ')
Output
First, we have removed the extra whitespace with rstrip(). In the next step we have removed the trailing line again with rstrip("\n") and end=' ' to get the output in a single line.
Wrapping up
We have seen how we can print in Python without a new line. We have also seen how we can print lines in a file without extra trailing lines. I hope you found this tutorial helpful.
Share your thoughts with me on Twitter!
You can read my other posts here.