

In this tutorial, we will build a URL shortener using Flask. This tool takes any URL and generates a shorter, more readable version like bit.ly.
The application will allow users to enter a URL and an optional custom short id and generate a shorter version.
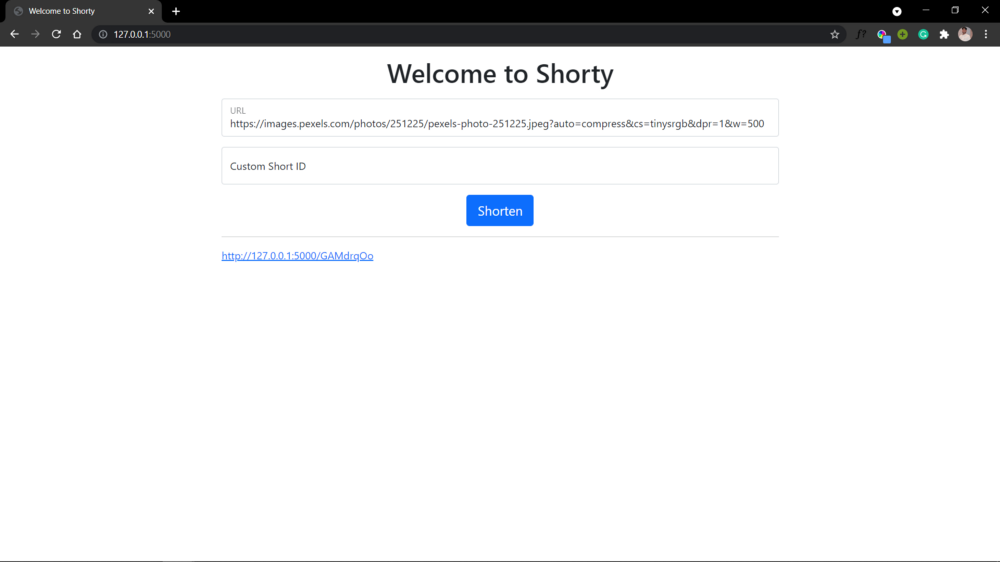
Here's what we're going to build:
The frontend of the application is not attractive, because the main focus of the project is building a backend project.
Some sample shortened URLs are https://shorty-flask.herokuapp.com/mzkpK8sw and https://shorty-flask.herokuapp.com/linkify.
Create the Virtual Environment and Install the Dependencies
In this tutorial, we're going to use Pipenv to manage our virtual environment.
Pipenv is a tool that automatically creates and manages a virtualenv for your projects, as well as adds/removes packages from your Pipfile as you install/uninstall packages. It also generates the ever-important Pipfile.lock, which is used to produce deterministic builds.
You can read this article to learn more about it.
Pipenv is an external library and we need to install it explicitly. To install the library, use the pip command:
pip install pipenv
Once it's installed, we can create a virtual environment and activate it using this command:
pipenv shell
To deactivate the virtual environment, we have a simple command:
exit
Once you have created and activated the virtual environment, you're ready to install the required libraries.
Flask is a simple, easy-to-use microframework for Python that can help build scalable and secure web applications. The module doesn't come pre-installed with Python, so we need to install it using the command:
pipenv install FlaskFlask-Migrate is an extension that handles SQLAlchemy database migrations for Flask applications using Alembic. The database operations are made available through the Flask command-line interface. To install the module, use the command:
pipenv install Flask-MigrateFlask-SQLAlchemy is an extension for Flask that adds support for SQLAlchemy to your application. It helps you simplify things using SQLAlchemy with Flask by giving you useful defaults and extra helpers that make it easier to perform common tasks. To install the module, use the command:
pipenv install Flask-SQLAlchemyPsycopg2 is the most popular PostgreSQL database adapter for the Python programming language. To install the module, use the command:
pipenv install psycopg2Gunicorn is a Python WSGI HTTP Server for UNIX. To install the module, use the command:
pipenv install gunicornPython Decouple: We'll also use environment variables in this project. So, we are going to install another module called python-decouple to handle this:
pipenv install python-decouple
How to Set Up the Flask Project
The first thing we're going to do is to create a Flask project. If you check the official documentation of Flask, you'll find a minimal application there.
But, we're not going to follow that. We are going to write an application that is more extensible and has a good base structure. If you wish, you can follow this guide to get started with Flask.
Our application will exist within a package called core. To convert a usual directory to a Python package, we just need to include an __init__.py file. So, let's create our core package first.
$ mkdir core
After that, let's create the __init__.py file inside the core directory:
$ cd core
$ touch __init__.py
$ cd ..
In the root directory of the project, create a file called config.py. We'll store the configurations for the project in this file. Within the file, add the following content:
from decouple import config


DATABASE_URI = config("DATABASE_URL")
if DATABASE_URI.startswith("postgres://"):
    DATABASE_URI = DATABASE_URI.replace("postgres://", "postgresql://", 1)


class Config(object):
    DEBUG = False
    TESTING = False
    CSRF_ENABLED = True
    SECRET_KEY = config('SECRET_KEY', default='guess-me')
    SQLALCHEMY_DATABASE_URI = DATABASE_URI
    SQLALCHEMY_TRACK_MODIFICATIONS = False


class ProductionConfig(Config):
    DEBUG = False


class StagingConfig(Config):
    DEVELOPMENT = True
    DEBUG = True


class DevelopmentConfig(Config):
    DEVELOPMENT = True
    DEBUG = True


class TestingConfig(Config):
    TESTING = True
In the above script, we have created a Config class and defined various attributes inside that. Also, we have created different child classes (as per different stages of development) that inherit the Config class.
Notice that we're using a few environment variables like SECRET_KEY and DATABASE_URL. Create a file named .env in the root directory and add the following content there:
SECRET_KEY=verysecretkey
DATABASE_URL=sqlite:///shorty.db
APP_SETTINGS=config.DevelopmentConfig
FLASK_APP=core
Apart from the SECRET_KEY and DATABASE_URL, we've also specified APP_SETTINGS and FLASK_APP.
The APP_SETTINGS refers to one of the classes we created in the config.py file. We set it to the current stage of the project. The value of FLASK_APP is the name of the package we have created.
Now, we can add the following content in the core/__init__.py file:
from flask import Flask
from flask_sqlalchemy import SQLAlchemy
from flask_migrate import Migrate
from decouple import config

app = Flask(__name__)
app.config.from_object(config("APP_SETTINGS"))

db = SQLAlchemy(app)
migrate = Migrate(app, db)

from core import routes
In the above Python script, we are first importing the Flask class from the Flask module that we have installed. Next, we're creating an object app of class Flask. We use the __name__ argument to indicate the app's module or package, so that Flask knows where to find other files such as templates.
Next we are setting the app configurations to the APP_SETTINGS according to the variable in the .env file. To use Flask-SQLAlchemy and Flask-Migrate in our application, we just need to create objects of the SQLAlchemy class and Migrate class from the flask_sqlalchemy and flask_migrate libraries respectively.
The application then imports the routes module, which doesn't exist yet.
To run the application, we'll use a main.py file with the following content:
from core import app

if __name__ == '__main__':
    app.run()
How to Create the Database Table
To define our database tables, we’ll create a models.py file within the core package. Inside that, we can write the following code :
from core import db
from datetime import datetime

class ShortUrls(db.Model):
    id = db.Column(db.Integer, primary_key=True)
    original_url = db.Column(db.String(500), nullable=False)
    short_id = db.Column(db.String(20), nullable=False, unique=True)
    created_at = db.Column(db.DateTime(), default=datetime.now(), nullable=False)
We first imported the db object that we had initialized in the __init__.py file. Then we created a ShortUrls class with a few fields such as id (primary key), original_url (provided by the user), short_id (generated by us or provided by the user), and created_at (timestamp).
We can then use Flask-Migrate commands to migrate the database with the new tables. The commands we'll use are:
flask db init— to initialize the database at the beginning (to be used only once)flask db migrate— to migrate the new changes to the database (to be used every time we make changes in the database tables)flask db upgrade— to upgrade our database with the new changes (to be used with the migrate command)
After we run the database initialization we will see a new folder called “migrations” in the project. This holds the setup necessary for Alembic to run migrations against the project.
Inside of “migrations”, we will see that it has a folder called “versions”, which will contain the migration scripts as they are created.
How to Create the Homepage for Shortening URLs
In this step, we will create a Flask route for the index page, which will allow users to enter a URL that we then save into the database. This route will use the custom short id provided by the user or generate one on its own, construct the short URL, and then render it as a result.
First, let’s create a routes.py file in the core package and create a Python function to generate short id.
from random import choice
import string

def generate_short_id(num_of_chars: int):
    """Function to generate short_id of specified number of characters"""
    return ''.join(choice(string.ascii_letters+string.digits) for _ in range(num_of_chars))
In order to generate a short id, we have used the choice method from Python’s random module. Also, we have used Python’s in-built string module for letters (lowercase + uppercase), and digits.
Now, we need to create a template for the index page that will be served by the index route. This template will have a simple form where a user can input the original URL and custom short id (optional) and submit it.
But we’ll not create index.html directly. We can use the Template Inheritance concept in Jinja2. So, let's create a templates directory within the core package and create a base.html file inside that. You can paste the HTML code into that file.
<!doctype html>
<html lang="en">
  <head>
    <!-- Required meta tags -->
    <meta charset="utf-8">
    <meta name="viewport" content="width=device-width, initial-scale=1, shrink-to-fit=no">

    <!-- Bootstrap CSS -->
    <link href="https://cdn.jsdelivr.net/npm/bootstrap@5.1.0/dist/css/bootstrap.min.css" rel="stylesheet" integrity="sha384-KyZXEAg3QhqLMpG8r+8fhAXLRk2vvoC2f3B09zVXn8CA5QIVfZOJ3BCsw2P0p/We" crossorigin="anonymous">

    <title>{% block title %} {% endblock %}</title>
  </head>
  <body>
    <div class="container mt-3">
        {% for message in get_flashed_messages() %}
            <div class="alert alert-danger">{{ message }}</div>
        {% endfor %}
        {% block content %} {% endblock %}
    </div>

    <!-- Optional JavaScript -->
    <!-- jQuery first, then Popper.js, then Bootstrap JS -->
    <script src="https://code.jquery.com/jquery-3.3.1.slim.min.js" integrity="sha384-q8i/X+965DzO0rT7abK41JStQIAqVgRVzpbzo5smXKp4YfRvH+8abtTE1Pi6jizo" crossorigin="anonymous"></script>
    <script src="https://cdn.jsdelivr.net/npm/@popperjs/core@2.9.3/dist/umd/popper.min.js" integrity="sha384-eMNCOe7tC1doHpGoWe/6oMVemdAVTMs2xqW4mwXrXsW0L84Iytr2wi5v2QjrP/xp" crossorigin="anonymous"></script>
    <script src="https://cdn.jsdelivr.net/npm/bootstrap@5.1.0/dist/js/bootstrap.min.js" integrity="sha384-cn7l7gDp0eyniUwwAZgrzD06kc/tftFf19TOAs2zVinnD/C7E91j9yyk5//jjpt/" crossorigin="anonymous"></script>
  </body>
</html>
Note that, for styling, we’re using Bootstrap here.
Most of the code in the preceding block is standard HTML code required for Bootstrap. The <meta> tags provide information for the web browser, the <link> tag links the Bootstrap CSS files, and the <script> tags are links to JavaScript code that allows some additional Bootstrap features.
You can check out the Bootstrap documentation for more information.
The <title>{% block title %} {% endblock %}</title> tag allows the inheriting templates to define a custom title.
We use the for message in get_flashed_messages() loop to display the flashed messages (warnings, alerts, and so on).
The {% block content %} {% endblock %} placeholder is where inheriting templates place the content so that all templates have access to this base template, which avoids repetition.
Next, create the index.html file that will extend this base.html file:
{% extends 'base.html' %}

{% block content %}
    <h1 class="text-center mb-3">{% block title %} Welcome to Shorty {% endblock %}</h1>
    <div class="row">
        <div class="col-md-2"></div>
        <div class="col-md-8">
            <form method="post" action="{{url_for('index')}}">
            <div class="form-floating mb-3">
                <input type="text" name="url" id="url"
                    placeholder="Enter looooooooooooong URL" class="form-control"
                    value="{{ request.form['url'] }}" autofocus></input>
                <label for="url">URL</label>
            </div>
            <div class="form-floating mb-3">
                <input type="text" name="custom_id" id="custom_id"
                    placeholder="Want to customise? (optional)" class="form-control"
                    value="{{ request.form['custom_id'] }}"></input>
                <label for="custom_id">Custom Short ID</label>
            </div>

            <div class="form-group text-center">
                <button type="submit" class="btn btn-lg btn-primary">Shorten</button>
            </div>
            </form>

            {% if short_url %}
            <hr>
            <span><a href="{{ short_url }}" target="_blank">{{ short_url }}</a></span>
            {% endif %}
        </div>
        <div class="col-md-2"></div>
    </div>
{% endblock %}
Here we extend base.html, define a title, and create a form with two inputs named url and custom_id.
The url input will allow users to enter URLs to shorten. It has a value of request.form['url'], which stores data in cases of submission failure (that is if the user provides no URL). Similarly, custom_id input will allow users to enter a custom short id. We then have a submit button.
Then we check if the short_url variable has any value—this is true if the form submits and the short URL generates successfully. If the condition is true, we display the short URL under the form.
Now we can rewrite our index view function in routes.py as:
from datetime import datetime
from core.models import ShortUrls
from core import app, db
from random import choice
import string
from flask import render_template, request, flash, redirect, url_for


def generate_short_id(num_of_chars: int):
    """Function to generate short_id of specified number of characters"""
    return ''.join(choice(string.ascii_letters+string.digits) for _ in range(num_of_chars))


@app.route('/', methods=['GET', 'POST'])
def index():
    if request.method == 'POST':
        url = request.form['url']
        short_id = request.form['custom_id']

        if short_id and ShortUrls.query.filter_by(short_id=short_id).first() is not None:
            flash('Please enter different custom id!')
            return redirect(url_for('index'))

        if not url:
            flash('The URL is required!')
            return redirect(url_for('index'))

        if not short_id:
            short_id = generate_short_id(8)

        new_link = ShortUrls(
            original_url=url, short_id=short_id, created_at=datetime.now())
        db.session.add(new_link)
        db.session.commit()
        short_url = request.host_url + short_id

        return render_template('index.html', short_url=short_url)

    return render_template('index.html')
The index() function is a Flask view function, which is a function decorated using the special @app.route decorator. Its return value gets converted into an HTTP response that an HTTP client, such as a web browser, displays.
Inside the index() view function, we accept both GET and POST requests by passing methods=['GET', 'POST'] to the app.route() decorator.
Then if the request is a GET request, it skips the if request.method == 'POST' condition until the last line. This is where we render a template called index.html, which will contain a form for users to enter a URL to shorten.
If the request is a POST request, the if request.method == 'POST' condition is true, which means a user has submitted a URL. We store the URL in the url variable. If the user has submitted an empty form, you flash the message The URL is required! and redirect to the index page.
If the user has entered custom_id, we store it in short_id, else we generate random short id using the function that we had created before.
If the user has submitted a URL, we create a new_link with all the data such as original_url short_id and created_at. Then we commit the transaction.
We then construct the short URL using request.host_url, which is an attribute that Flask’s request object provides to access the URL of the application’s host. This will be http://127.0.0.1:5000/ in a development environment and our_domain if we deploy our application.
For example, the short_url variable will have a value like http://127.0.0.1:5000/asdf1gHJ, which is the short URL that will redirect users to the original URL stored in the database with the ID that matches the asdf1gHJ.
Lastly, we render the index.html template passing the short_url variable to it.
We can now run the server and test our view function.
We have created a Flask application with a page that accepts URLs and generates shorter ones, but the URLs don’t do anything yet.
In the next step, we’ll add a route that extracts the short_id from the short URL, finds the original URL, and redirects users to it.
How to Add the Redirect Route
In this step, we will add a new route that takes the short id the application generates and fetches the original URL. Finally, we will redirect users to the original URL.
@app.route('/<short_id>')
def redirect_url(short_id):
    link = ShortUrls.query.filter_by(short_id=short_id).first()
    if link:
        return redirect(link.original_url)
    else:
        flash('Invalid URL')
        return redirect(url_for('index'))
This new route accepts a value short_id through the URL and passes it to the url_redirect() view function. For example, visiting [http://127.0.0.1:5000/asdf1gHJ](http://127.0.0.1:5000/asdf1gHJ) would pass the string 'asdf1gHJ' to the short_id parameter.
Inside the view function, we fetch the link from the database using the short_id. If it is not None, the view function will redirect the user to the original_url associated with this short_id using the redirect() Flask helper function. Otherwise, it will flash an error message to inform the user that the URL is invalid and redirect them to the index page.
Now we can again run the server and finally test the application.
How to Deploy the Application on Heroku
To deploy our app on Heroku, we need to make a few changes to our project. But first, you should create a free account on Heroku.
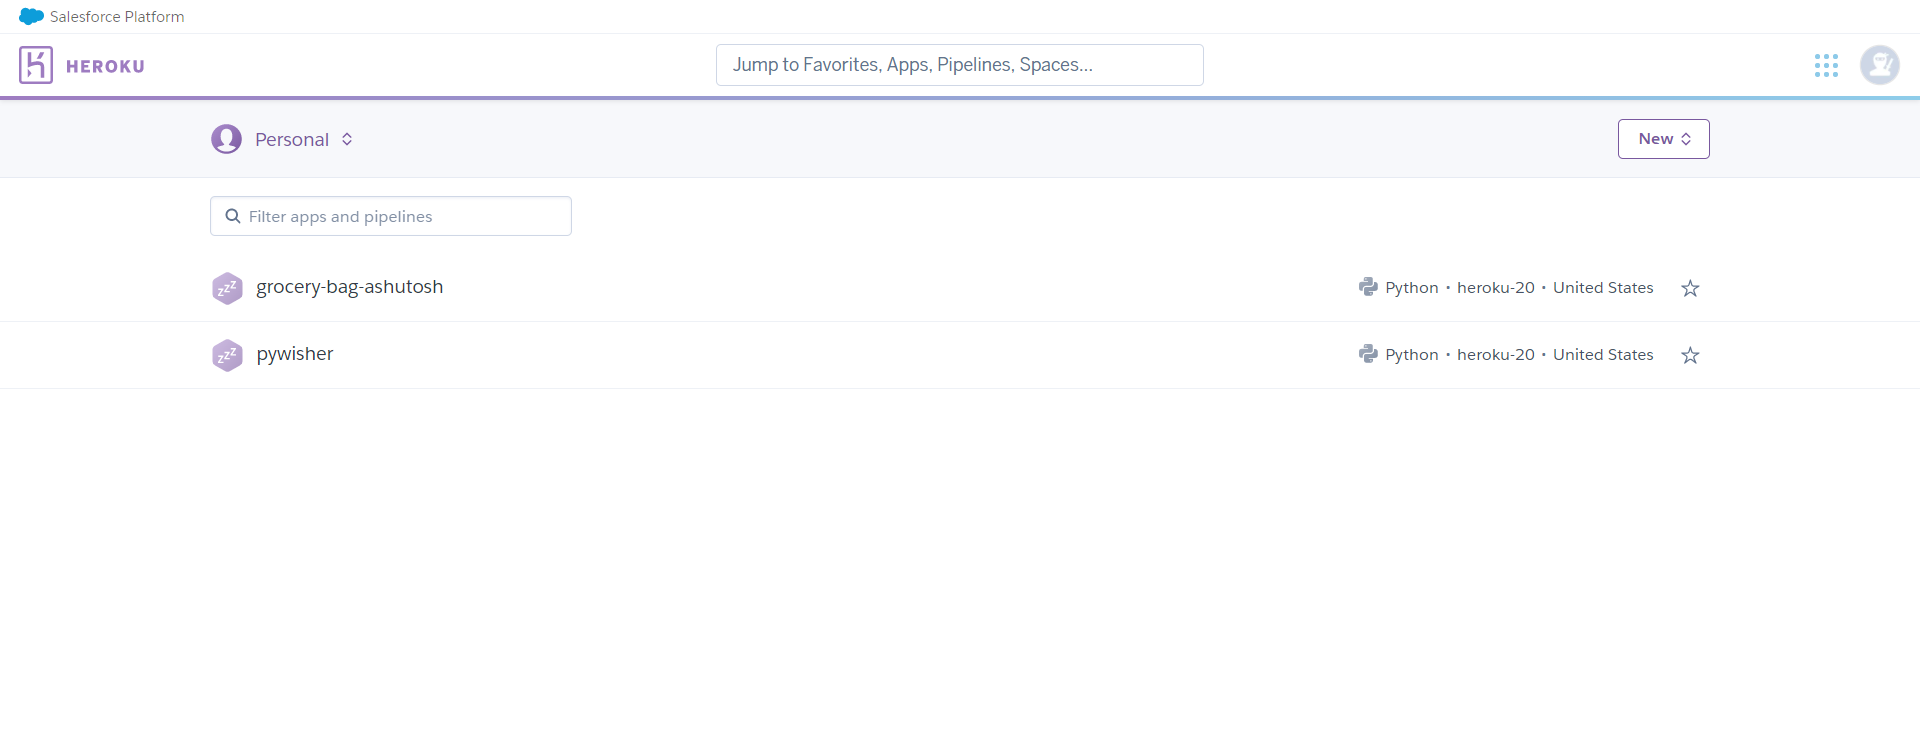
Head over to heroku.com and create an account. Once you have created the account, you're ready to proceed.
Login to your Heroku account, and you'll be welcomed with a similar screen to this:
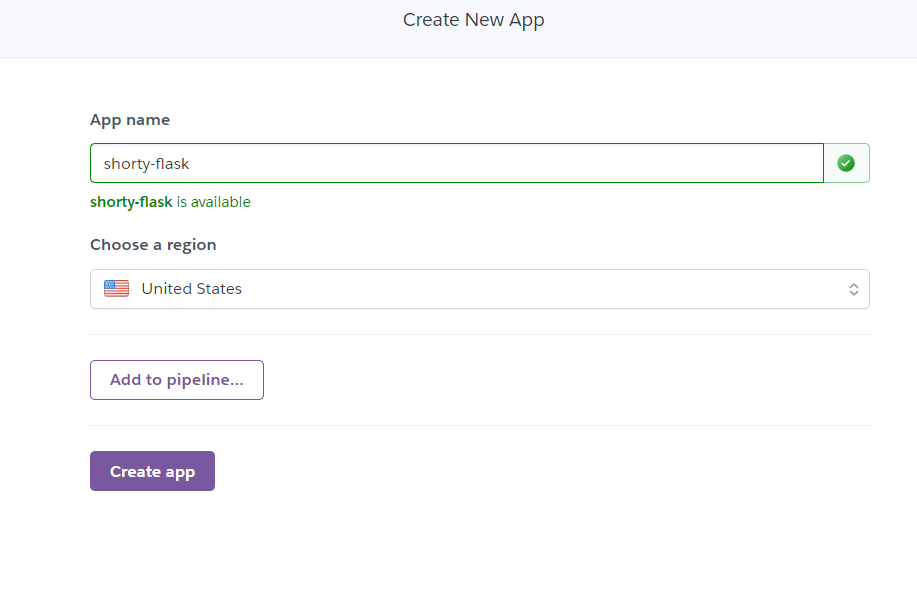
Click on the New button and then click on Create new app. Enter the app name and then click on the Create app button. Make sure the name is available.
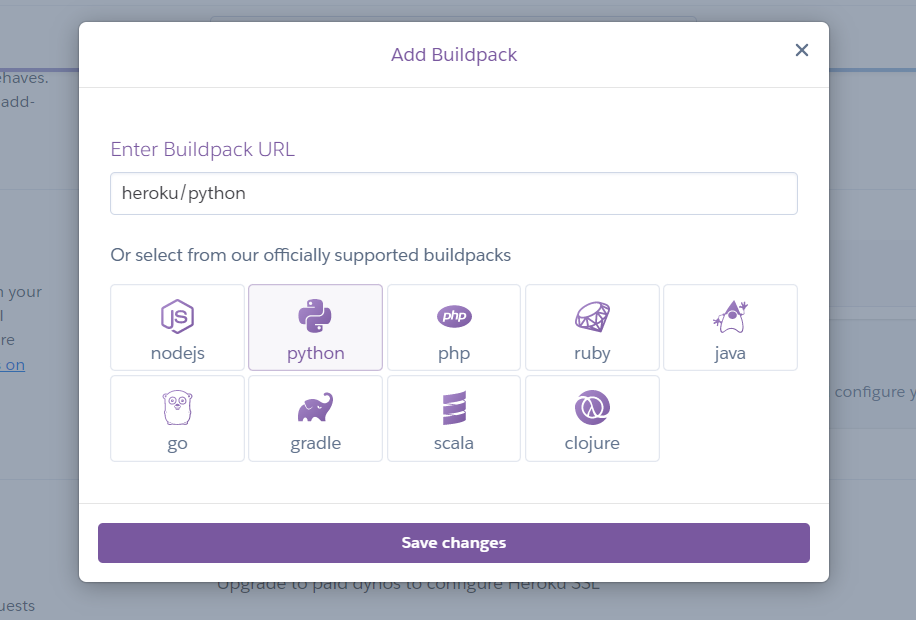
Click on the Settings tab, and scroll down to Buildpacks. Click on the Add buildpack button and add Python.
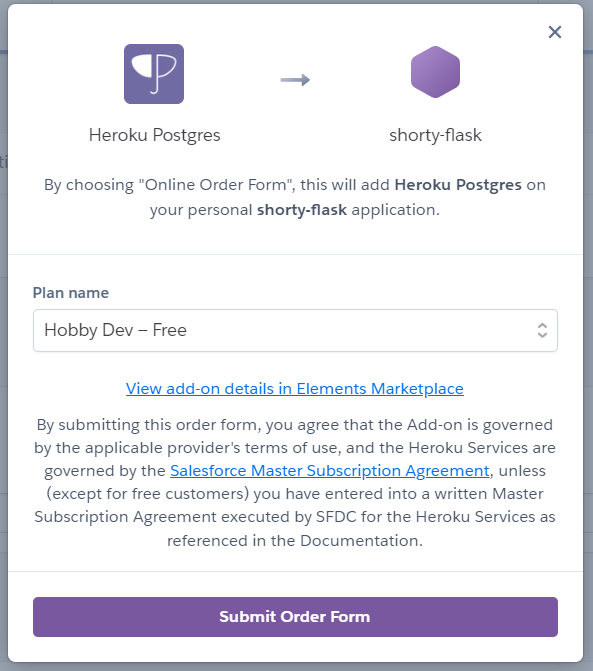
Since we'll require a database for this application, we are going to add a Postgres database (available for free on Heroku) in the resources.
Click on the Resources tab and search for Postgres in the search box. Select Heroku Postgres in the search results, and then click on Submit order form to add it to the resources.
As we've used environment variables in our project, we need to add them on Heroku.
Click on the Settings tab and scroll to Config Vars and click on Reveal Config Vars. Open your .env file in the project and copy and paste it into your Config Vars as below:
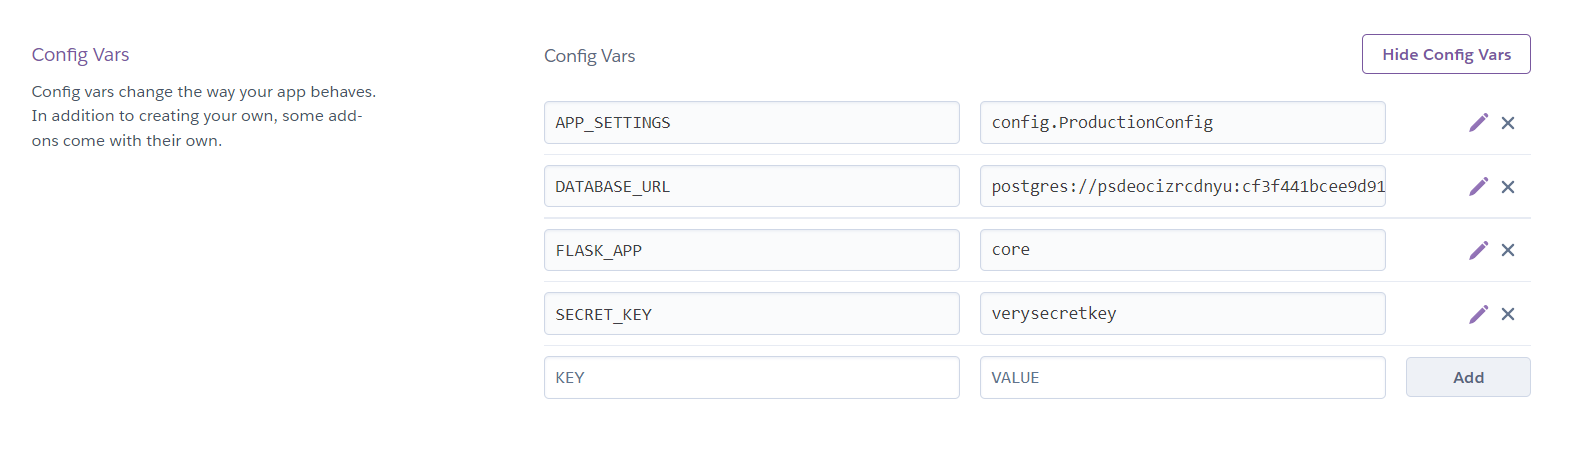
Notice that, we have set the APP_SETTINGS to config.ProductionConfig because we're deploying the application publicly.
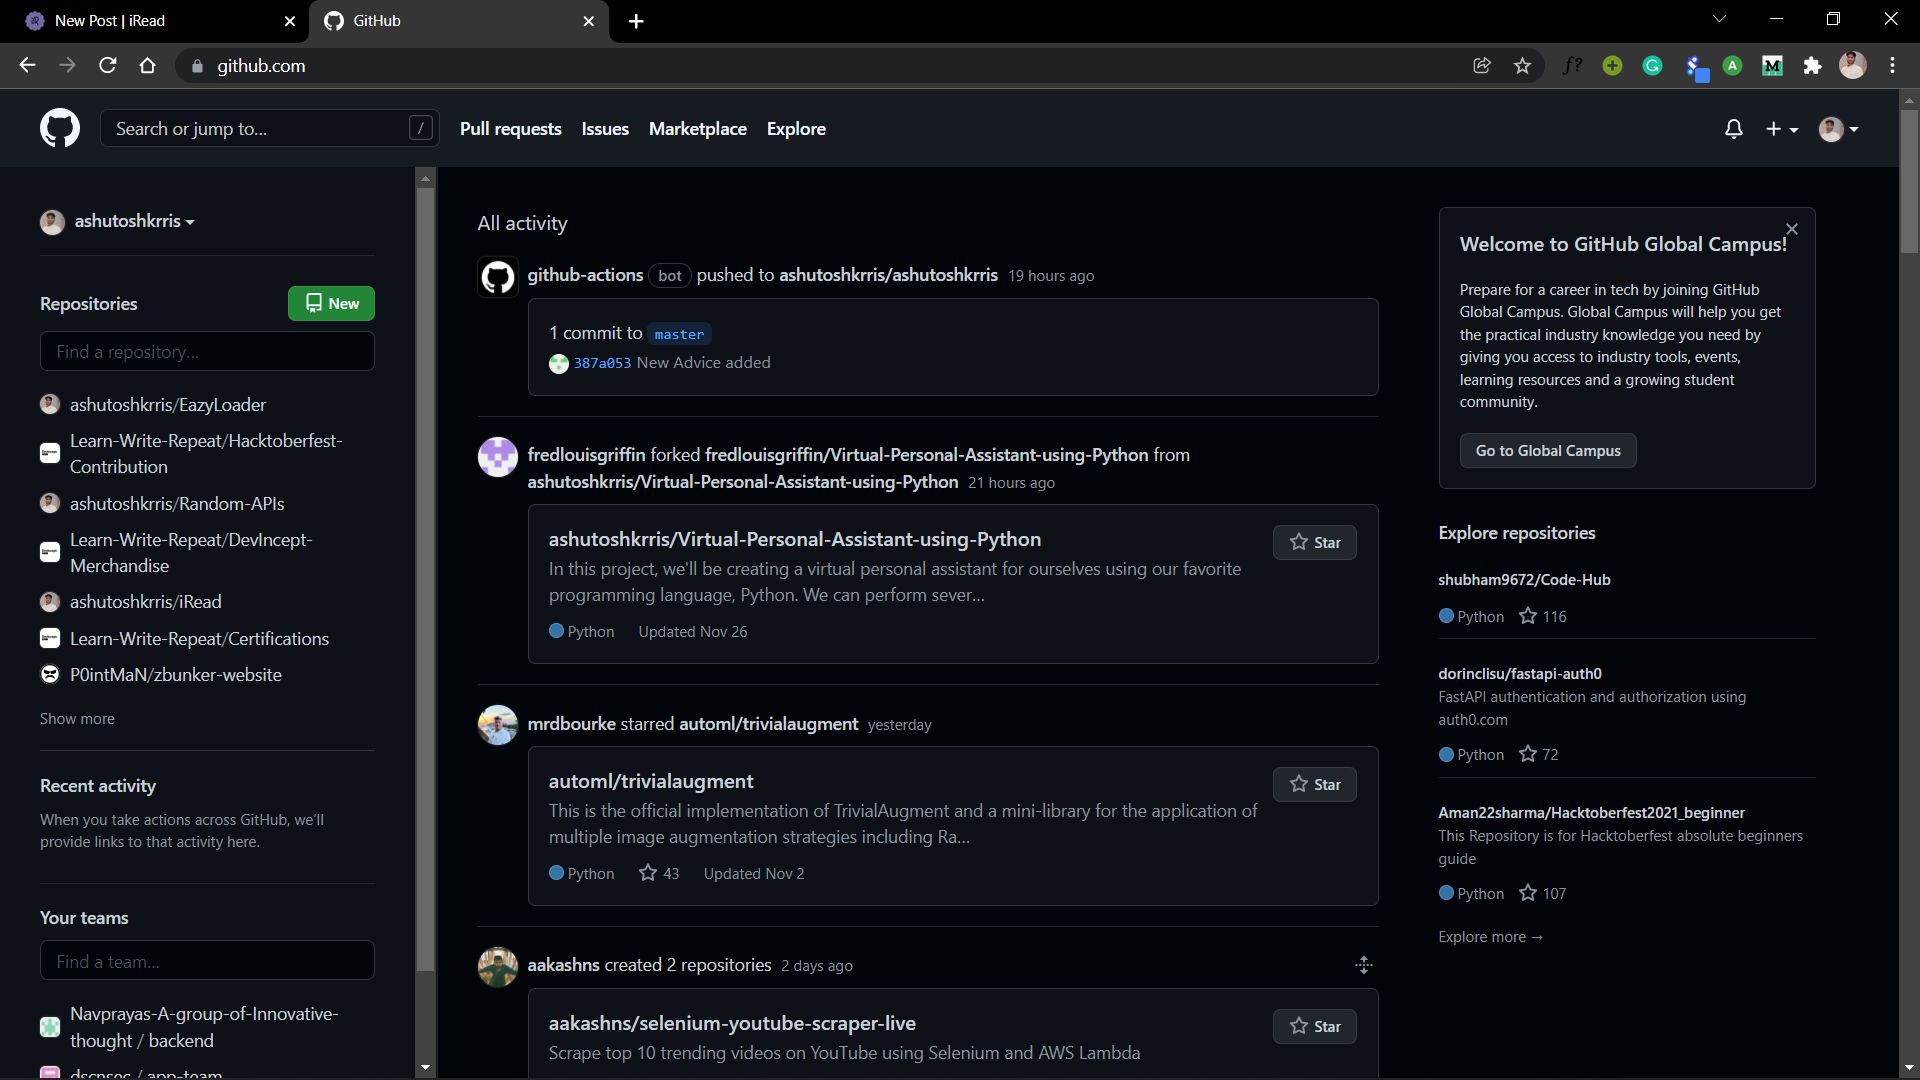
We'll be deploying our application using GitHub, which will make our task easier. If you don't have a GitHub account, create one for yourself here. If you have a GitHub account, log in to your account. Once you login, you'll see a similar screen:
Create a repository for your project using the green New button. Then go to your project on your system. Make sure you have Git installed in your system. If not, install it from here. Open a terminal in your project and write the below commands:
$ git init
$ git remote add origin <your-repository-url-here>
$ git add .
$ git commit -m "Initial commit"
$ git push origin main
Replace the <your-repository-url-here> with the URL provided by GitHub.
Now we need to add two new files required by Heroku – Procfile and runtime.txt:
web: gunicorn main:app
This declares a single process type, web, and the command needed to run it.
The name web is important here. It declares that this process type will be attached to the HTTP routing stack of Heroku, and will receive web traffic when deployed. Notice that the Procfile file doesn't have any extension.
Next, create a runtime.txt file and add your Python version there as:
python-3.9.7
Also, create a .gitignore file and add the following content:
# Django #
*.log
*.pot
*.pyc
__pycache__
media
db.sqlite3

# Backup files #
*.bak

# If you are using PyCharm #
.idea/**/workspace.xml
.idea/**/tasks.xml
.idea/dictionaries
.idea/**/dataSources/
.idea/**/dataSources.ids
.idea/**/dataSources.xml
.idea/**/dataSources.local.xml
.idea/**/sqlDataSources.xml
.idea/**/dynamic.xml
.idea/**/uiDesigner.xml
.idea/**/gradle.xml
.idea/**/libraries
*.iws /out/

# Python #
*.py[cod]
*$py.class

# Distribution / packaging
.Python build/
develop-eggs/
dist/
downloads/
eggs/
.eggs/
lib/
lib64/
parts/
sdist/
var/
wheels/
*.egg-info/
.installed.cfg
*.egg
*.manifest
*.spec

# Installer logs
pip-log.txt
pip-delete-this-directory.txt

# Unit test / coverage reports
htmlcov/
.tox/
.coverage
.coverage.*
.cache
.pytest_cache/
nosetests.xml
coverage.xml
*.cover
.hypothesis/

# Jupyter Notebook
.ipynb_checkpoints

# pyenv
.python-version

# celery
celerybeat-schedule.*

# SageMath parsed files
*.sage.py

# Environments
.env
.venv
env/
venv/
ENV/
env.bak/
venv.bak/

# mkdocs documentation
/site

# mypy
.mypy_cache/

# Sublime Text #
*.tmlanguage.cache
*.tmPreferences.cache
*.stTheme.cache
*.sublime-workspace
*.sublime-project

# sftp configuration file
sftp-config.json

# Package control specific files Package
Control.last-run
Control.ca-list
Control.ca-bundle
Control.system-ca-bundle
GitHub.sublime-settings

# Visual Studio Code #
.vscode/*
!.vscode/settings.json
!.vscode/tasks.json
!.vscode/launch.json
!.vscode/extensions.json
.history
This tells Git to ignore these files.
Now, we have made enough changes and we are ready to commit and push it to the GitHub repository using the commands:
$ git add .
$ git commit -m "Ready for deployment"
$ git push origin main
Now we're completely ready to deploy our app on Heroku.
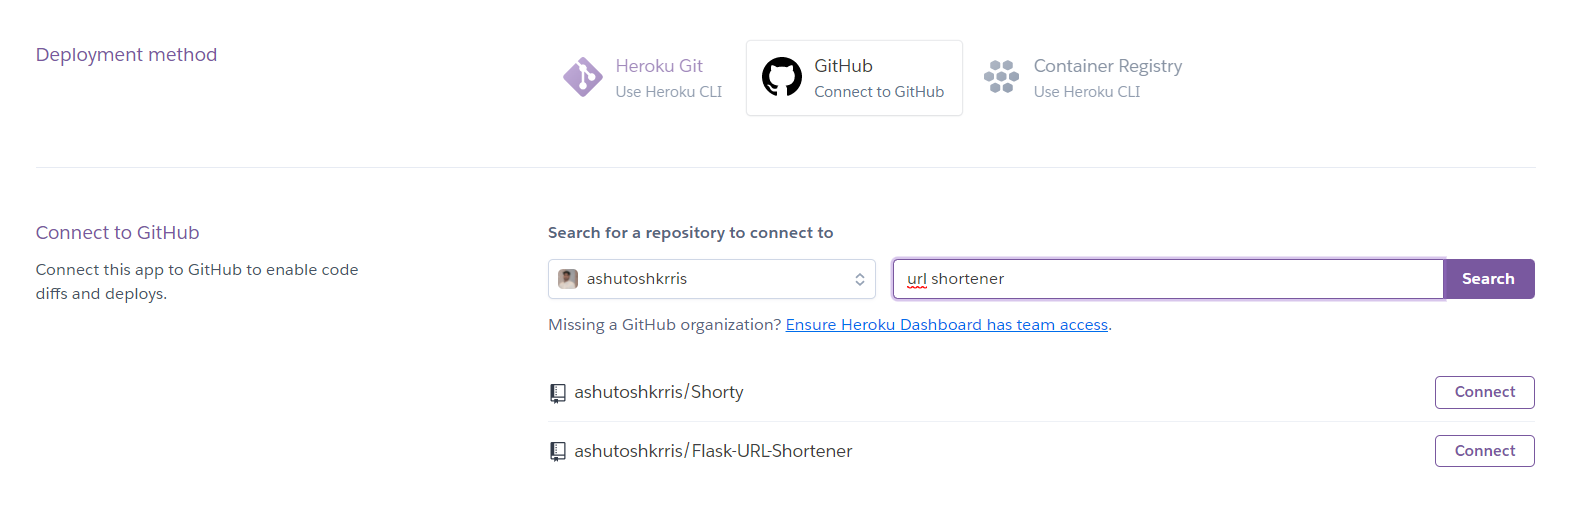
Open the Heroku app and click on the Deploy tab. In the Deployment method on the page, choose GitHub. Search for your repository and click on Connect to select it.
Once it is connected successfully, you'll see a button called Deploy Branch. Click on the button and the deployment process will start:

Heroku will install all the dependencies mentioned in the requirements.txt file and will use the Python version mentioned in the runtime.txt file. After the process is completed, you will see a success message like this:

Our app has been deployed successfully!
But there's one step still left. If you remember, whenever we made any changes to the database, we needed to migrate the database. Similarly here also, we need to migrate the database.
Click on More and then on Run Console to run bash. Once you click on that, you'll find a text box. Write the below command there:
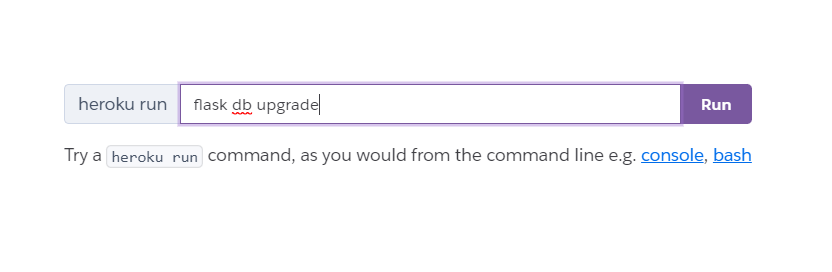
Once you run the command, you'll see the database migrations happening. With this, your app has been deployed successfully and you're ready to test it!
Now you can follow this tutorial to add a custom domain to your Heroku app as the Heroku URL is way too long.
Wrapping Up
We have created a Flask application that allows users to enter a long URL and generate a shorter version. If you want, you can add more features to this application such as User Authentication, Shortened URLs Statistics, and so on.
Thanks for reading!
Github repository: https://github.com/ashutoshkrris/Flask-URL-Shortener