

React 18 was released in March 2022. This release focuses on performance improvements and updating the rendering engine.
React 18 sets the foundation for concurrent rendering APIs that future React features will be built on top of.
In this tutorial, I will give a quick guide of the features released in React 18, and explain a few major concepts such as concurrent rendering, automatic batching and transitions.
React 18 Feature Quick Guide
| Category | Feature |
|---|---|
| Concept | Concurrent React |
| Features | Automatic Batching, Transitions, Suspense on the server |
| APIs | createRoot, hydrateRoot, renderToPipeableStream, renderToReadableStream |
| Hooks | useId, useTransition, useDeferredValue, useSyncExternalStore, useInsertionEffect |
| Updates | Strict mode |
| Deprecated/discouraged | ReactDOM.render, renderToString |
Now let's look at each of these updates in more detail. But first, if you haven't already, let's learn how to update React.
How to upgrade to React 18
Install React 18 and React DOM from npm or yarn, like this:
npm install react react-dom
Then, you'll want to use createRoot instead of render.
In your index.js, update ReactDOM.render to ReactDOM.createRoot to create a root, and render your app using root.
Here's what it would look like in React 17:
import ReactDOM from 'react-dom';
import App from 'App';

const container = document.getElementById('app');

ReactDOM.render(<App />, container);
And here's what it looks like in React 18:
import ReactDOM from 'react-dom';
import App from 'App';

const container = document.getElementById('app');

// create a root
const root = ReactDOM.createRoot(container);

//render app to root
root.render(<App />);
Concurrency in React 18
To understand concurrency, let’s consider this example by Dan Abramov from React 18 Working group discussions.
Let’s say that we need to call two people – Alice and Bob. In a non-concurrent setting, we can only have one call at a time. We would first call Alice, end the call, and then call Bob.
This is fine when calls are short, but if call with Alice has a long waiting period (such as on-hold), this can be a time sink.
 Image showing that in a typical non-concurrent phone conversation, you have to wait for a call to be over before starting a new call.
In a concurrent setting, we could call Alice and, once we were put on hold, we could then call Bob.
This doesn’t mean that we are talking to two people at the same time. It just means that we can have two or more concurrent calls at the same time and decide which call is more important.
 Image showing phone conversation between Alice and Bob can be concurrent, by placing a call on hold and answering a more urgent call with Bob first.
Similarly, in React 18 with concurrent rendering, React can interrupt, pause, resume, or abandon a render. This allows React to respond to the user interaction quickly even if it is in the middle of a heavy rendering task.
Before React 18, rendering was a single, uninterrupted, synchronous transaction and once rendering started, it couldn’t be interrupted.
Concurrency is a foundational update to React’s rendering mechanism. Concurrency allows React to interrupt rendering.
React 18 introduces the foundation of concurrent rendering and new features such as suspense, streaming server rendering, and transitions are powered by concurrent rendering.
New React 18 Features
Automatic Batching
React 18 features automatic batching. To understand batching, let’s consider the example of grocery shopping from the same React Working Group discussion.
Let’s say that you are making pasta for dinner. If you were to optimize your grocery trip, you would create a list of all the ingredients that you need to buy, make a trip to the grocery store, and get all your ingredients in one trip.
This is batching. Without batching, you would start cooking, find out you need an ingredient, go to the grocery store and buy the ingredient, come back and continue cooking, only to find out you need another ingredient, go to the grocery store...and drive yourself crazy.
In React, batching helps to reduce the number of re-renders that happen when a state changes, when you call setState. Previously, React batched state updates in event handlers, for example:
const handleClick = () => {
setCounter();
setActive();
setValue();
}

//re-rendered once at the end.
However, state updates that happened outside of event handlers were not batched. For example, if you had a promise or were making a network call, the state updates would not be batched. Like this:
fetch('/network').then( () => {
setCounter(); //re-rendered 1 times
setActive();  //re-rendered 2 times
setValue();   //re-rendered 3 times
});

//Total 3 re-renders
As you can tell, this is not performant. React 18 introduces automatic batching which allows all state updates – even within promises, setTimeouts, and event callbacks – to be batched. This significantly reduces the work that React has to do in the background. React will wait for a micro-task to finish before re-rendering.
Automatic batching is available out of the box in React, but if you want to opt-out you can use flushSync.
Transitions
Transitions can be used to mark UI updates that do not need urgent resources for updating.
For example, when typing in a typeahead field, there are two things happening: a blinking cursor that shows visual feedback of your content being typed, and a search functionality in the background that searches for the data that is typed.
Showing a visual feedback to the user is important and therefore urgent. Searching is not so urgent, and so can be marked as non-urgent.
These non-urgent updates are called transitions. By marking non-urgent UI updates as "transitions", React will know which updates to prioritize. This makes it easier to optimize rendering and get rid of stale rendering.
You can mark updates as non-urgent by using startTransition. Here is an example of what a typeahead component would like when marked with transitions:
import { startTransition } from 'react';

// Urgent: Show what was typed
setInputValue(input);

// Mark any non-urgent state updates inside as transitions
startTransition(() => {
  // Transition: Show the results
  setSearchQuery(input);
});
How are transitions different from debouncing or setTimeout?
- startTransition executes immediately, unlike setTimeout.
- setTimeout has a guaranteed delay, whereas startTransition's delay depends on the speed of the device, and other urgent renders.
- startTransition updates can be interrupted unlike setTimeout and won't freeze the page.
- React can track the pending state for you when marked with startTransition.
Suspense on the server
React 18 introduces:
- Code splitting on the server with suspense
- Streaming rendering on the server
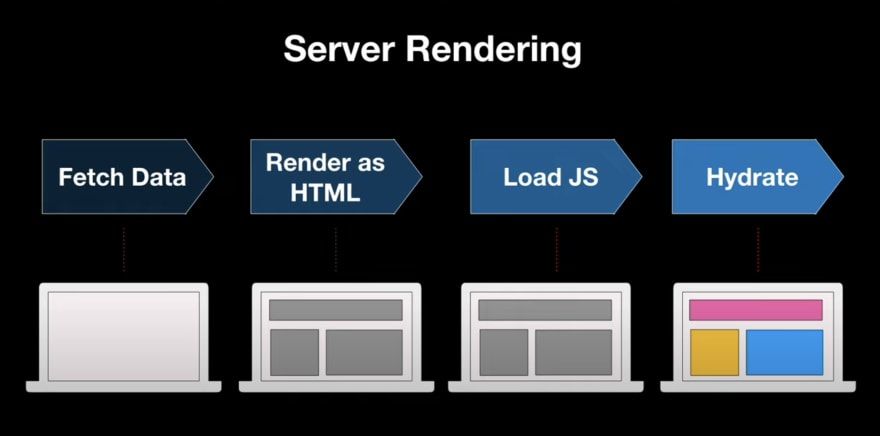
Client rendering vs server rendering
In a client-rendered app, you load the HTML of your page from the server along with all the JavaScript that is needed to run the page, and make it interactive.
If, however, your JavaScript bundle is huge, or you have a slow connection, this process can take a long time and the user will be waiting for the page to become interactive, or to see meaningful content.
 In a client rendering flow, a user has to wait a long time before the page becomes interactive. Source: React Conf 2021 Streaming Server Rendering with Suspense by Shaundai Person
For optimizing the user experience and avoiding the user having to sit on a blank screen, we can use server rendering.
Server rendering is a technique where you render the HTML output of your React components on the server and send HTML from the server. This lets the user view some UI while JS bundles are loading and before the app becomes interactive.
For a detailed overview of client vs server rendering, check out Shaundai Person’s React Conf 2021 talk.
 In a server rendering flow, we can display meaningful data to the user much faster by sending HTML from the server. Source: React Conf 2021 Streaming Server Rendering with Suspense by Shaundai Person
Server rendering further enhances the user experience of loading the page and reducing time to interactive.
Now what if most of your app is fast except for one part? Maybe this part loads data slowly, or maybe it needs to download a lot of JS before it gets interactive.
Before React 18, this part was often the bottleneck of the app, and would increase the time it took to render the component.
One slow component can slow down the entire page. This is because server rendering was all or nothing – you couldn’t tell React to defer loading of a slow component and couldn’t tell React to send HTML for other components.
React 18 adds support for Suspense on server. With the help of suspense, you can wrap a slow part of your app within the Suspense component, telling React to delay the loading of the slow component. This can also be used to specify a loading state that can be shown while it's loading.
In React 18, one slow component doesn’t have to slow the render of your entire app. With Suspense, you can tell React to send HTML for other components first along with the HTML for the placeholder, like a loading spinner. Then when the slow component is ready and has fetched its data, the server renderer will pop in its HTML in the same stream.
 Image showing that suspense on the server can allow a slow component to show a loading state while others are fully rendered.
This way the user can see the skeleton of the page as early as possible and see it gradually reveal more content as more pieces of HTML Arrive.
All of this happens before any JS or React loads on the page, which significantly improves the user experience and user-perceived latency.
Strict mode
Strict mode in React 18 will simulate mounting, unmounting, and re-mounting the component with a previous state. This sets the ground for reusable state in the future where React can immediately mount a previous screen by remounting trees using the same component state before unmounting.
Strict mode will ensure components are resilient to effects being mounted and unmounted multiple times.
Conclusion
In a summary, React 18 sets the foundation for future releases and focusses on improving the user experience.
Upgrading to React 18 should be straightforward and your existing code should not break after the update. The upgrade process should not take more than an afternoon.
Give it a go and let me know what you think!
Sources:
- React RFC
- My previous React 18 post
- React V18 blog
- React Conf 2021 - React for App developers
- React Conf 2021 - Streaming Server Rendering with Suspense
If you enjoyed this article, give it a ❤️ so others can find it too.
- For more frequent tips, stay in touch on Twitter
- Want articles like this directly in your inbox?