

Conditional rendering is a powerful tool for creating dynamic and engaging user interfaces in React applications.
You can use it to control what content is rendered and when, and it improves user experience, simplifies your code, and helps you create more flexible and adaptable components.
Code Sample
- The code in this article can be found here.
- The examples used in this article are inspired by The 100 Premier League Goals Quiz on the BBC.
Prerequisites
Before learning about React component rendering, it is important to have a basic understanding of HTML, CSS, and JavaScript.
- You should also have a basic understanding of React itself, including its fundamental concepts such as state, props, and lifecycle methods.
- Additionally, it is important to understand the concept of virtual DOM and how it works in React, as it is closely related to component rendering.
What You Will Learn In This Article
- How to return different JSX depending on a condition.
- How to conditionally include or exclude a piece of JSX.
- Common conditional syntax shortcuts you’ll encounter in React codebase.
About The Demos
In each demo that you'll see below:
- I show the demo video of what I'll show you how to create,
- then I show the code that achieves what is in the video,
- and finally, I explain the code.
Table of Contents
Define React conditional rendering and how it works
Why conditional rendering is necessary in React applications
The ternary operator and the
&&operatorCode examples for each method
How application state can be used to control when content is rendered.
- How to use the
useStatehook to manage state for conditional rendering. - Demo 1 - Login Logout
Demo 2 - How To Play Button
Advanced: How to Use Props to Cause React Conditional Rendering
Rendering components based on props
- Demo 3 - Component ABC
Demo 4 - Start Quiz
What Is React Conditional Rendering?
In React, conditional rendering is the process of displaying different content based on certain conditions or states. It allows you to create dynamic user interfaces that can adapt to changes in data and user interactions.
In this process, you can use conditional statements to decide what content should be rendered.
Why Conditional Rendering is Necessary in React Applications
There are several reasons why you might want to use conditional rendering in your React applications:
- Improved User Experience: Conditional rendering allows you to create dynamic user interfaces that adapt to changes in data and user interactions. By showing and hiding content based on the user's actions or the application state, you can create a more intuitive and engaging user experience.
- Improved Performance: By conditionally rendering content, you can avoid rendering unnecessary components and improve the performance of your application. This is particularly important in larger applications where unnecessary rendering can lead to performance issues.
- Simplified Code: Conditional rendering can help you simplify your code and make it more readable. By using conditional statements to decide what content should be rendered, you can avoid duplicating code and create more modular components.
- Flexibility: Conditional rendering allows you to create more flexible and customizable components. By rendering different content based on the application state, you can create components that can be used in different contexts and adapt to different user interactions.
How to Implement React Conditional Rendering
In React, there are different ways to conditionally render content based on the state of a component or other conditions. Two common ways are using the ternary operator and the && operator.
function Greeting(props) {
  const isLoggedIn = props.isLoggedIn;
  return (
    <div>
      {isLoggedIn ? (
        <h1>Welcome back!</h1>
      ) : (
        <h1>Please sign up.</h1>
      )}
    </div>
  );
}
In the above code, we used the ternary operator isLoggedIn ? ... : ... to conditionally render the message depending on whether the user is logged in or not.
function Greeting(props) {
  const isLoggedIn = props.isLoggedIn;
  return (
    <div>
      {isLoggedIn && <h1>Welcome back!</h1>}
    </div>
  );
}
In the above code, we used the && operator to conditionally render the message if isLoggedIn is true.
Both of these methods are effective for conditionally rendering content in React. Which one to use often comes down to personal preference or the specific use case.
The ternary operator may be more useful when there are multiple conditions to check, while the && operator can be simpler and more concise when there is only one condition.
How to Manage Application State For Conditional Rendering
In React, the application state can be used to control when and how content is rendered. The application state is a central repository of data that is used by the application to render the user interface. When the application state changes, React re-renders the components that depend on that state.
One way to use the application state to control rendering is to conditionally render components based on the state. For example, if you have a component that should only be displayed when a certain condition is met, you can use the application state to control when the component is rendered.
Another way to use the application state to control rendering is to pass state variables down to child components as props. This allows child components to render content based on the state of the parent component.
Here is an example of how you can use the application state to control rendering in React:
Demo 1 - Login Logout
import React, { useState } from "react";

const App = () => {
  const [isLoggedIn, setIsLoggedIn] = useState(false);

  const handleLogin = () => {
    setIsLoggedIn(true);
  };

  const handleLogout = () => {
    setIsLoggedIn(false);
  };

  return (
    <div>
      {isLoggedIn ? (
        <div>
          <h1>Welcome Back!</h1>
          <button onClick={handleLogout}>Logout</button>
        </div>
      ) : (
        <div>
          <h1>Please Login</h1>
          <button onClick={handleLogin}>Login</button>
        </div>
      )}
    </div>
  );
};

export default App;
In this example, we have a component App that renders different content based on the isLoggedIn state. Initially, isLoggedIn is set to false using the useState hook.
When the user clicks on the "Login" button, the handleLogin function is called, which sets the isLoggedIn state to true. Similarly, when the user clicks on the "Logout" button, the handleLogout function is called, which sets the isLoggedIn state to false.
The return statement of the App component uses a ternary operator to render different content based on the value of isLoggedIn. If isLoggedIn is true, it renders a welcome message and a "Logout" button. If isLoggedIn is false, it renders a message asking the user to login along with a "Login" button.
This example demonstrates how you can use conditional rendering to create dynamic user interfaces that can adapt to changes in the application state.
By using the useState hook to manage the isLoggedIn state and conditional statements to decide what content should be rendered, we can create a simple login/logout system that changes the content of the page based on the user's authentication status.
Demo 2 - Build a How to Play Button
 Folder Structure for How To Play Component
import React, { useState } from "react";

import "./style.css";

const HowToPlay = () => {
  const [showRules, setShowRules] = useState(false);

  const toggleRules = () => {
    setShowRules(!showRules);
  };

  return (
    <div>
      <button className="flat-black-button" onClick={toggleRules}>
        How to Play
      </button>
      {showRules ? (
        <div>
          <p className="flat-black-button-content">
            To get under way, click 'Start'. Once you have started the quiz,
            type an answer into the box and either hit enter or click the submit
            button. If you are right, it will fill in the correct slot in the
            table. Keep entering more answers until you've successfully
            completed the quiz - or the timer runs out. If you do not want to
            play any more, just hit the 'Give up!' button. You can then reveal
            the answers you missed - or have another go.
          </p>
        </div>
      ) : null}
    </div>
  );
};

export default HowToPlay;
This component displays a "How to Play" button and shows the game instructions when the button is clicked.
Let's break down the code:
- We use the
useStatehook to create a state variableshowRulesand its setter functionsetShowRules, initialized tofalse. This state toggles the display of the game instructions when the button is clicked. - The
toggleRulesfunction is called when the "How to Play" button is clicked, which toggles theshowRulesstate usingsetShowRules. - The
returnstatement displays the "How to Play" button using a button element, which has a class name of "flat-black-button". It also conditionally displays the game instructions ifshowRulesistrue. - We display the game instructions using a paragraph element, which has a class name of "flat-black-button-content".
- Finally, we export the
HowToPlaycomponent as the default export of the module.
You can use this component in other parts of the application where the "How to Play" button is needed. When the button is clicked, the game instructions will be displayed or hidden based on the current state of showRules.
Advanced: How to Use Props to Cause React Conditional Rendering
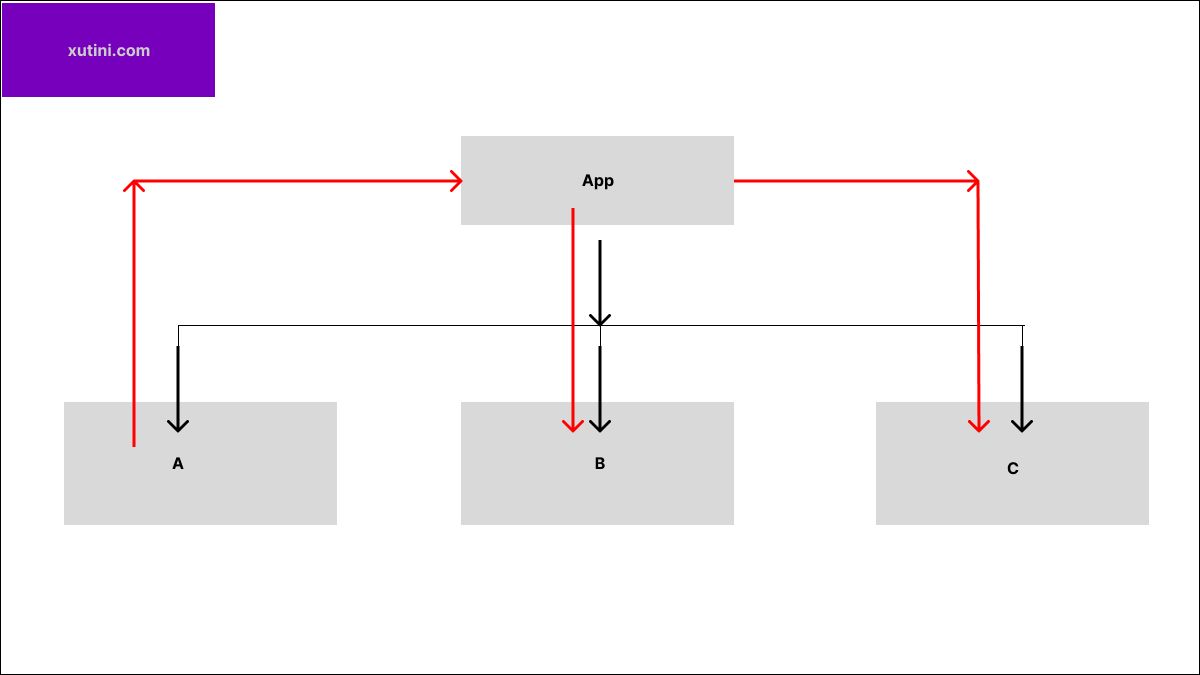 Component A,B, and C are children of App
The above diagram shows how a parent component named "App" communicates, indicated with a black line, with its child components, A, B, and C.
Component A needs to talk to components B and C, so it sends a message, indicated by the red line, to App using "props". App then passes that message down to B and C using their own "props".
Demo 3 - Component ABC
import "./App.css";

import React, { useState } from "react";

function App() {
  return (
    <div>
      <A />
    </div>
  );
}

function A() {
  const [showB, setShowB] = useState(false);
  const [showC, setShowC] = useState(false);
  const [text, setText] = useState("");

  const handleInputChange = (event) => {
    setText(event.target.value);
    setShowB(true);
    setShowC(true);
  };

  return (
    <div className="App">
      <input type="text" onChange={handleInputChange} />
      {showB && <B text={text} />}
      {showC && <C text={text} />}
    </div>
  );
}

function B(props) {
  const { text } = props;
  return <h1>Component B - {text.toUpperCase()}</h1>;
}

function C(props) {
  const { text } = props;
  return <h1>Component C - {text.toLowerCase()}</h1>;
}

export default App;
In this example, the A component has three state variables: showB, showC, and text. When the input field value changes, the handleInputChange function is called and based on the input field value, the text state variable is updated and showB and showC state variables are set to true.
The B and C components are functional components that receive the text prop as input and render the text in different ways – B component renders the text in uppercase, while C component renders the text in lowercase.
The && operator is used to conditionally render the components based on their respective state variables.
Let see how this concepts is used in a product app.
Demo 4 - Start Quiz
Demo 4 is another version of the last example.
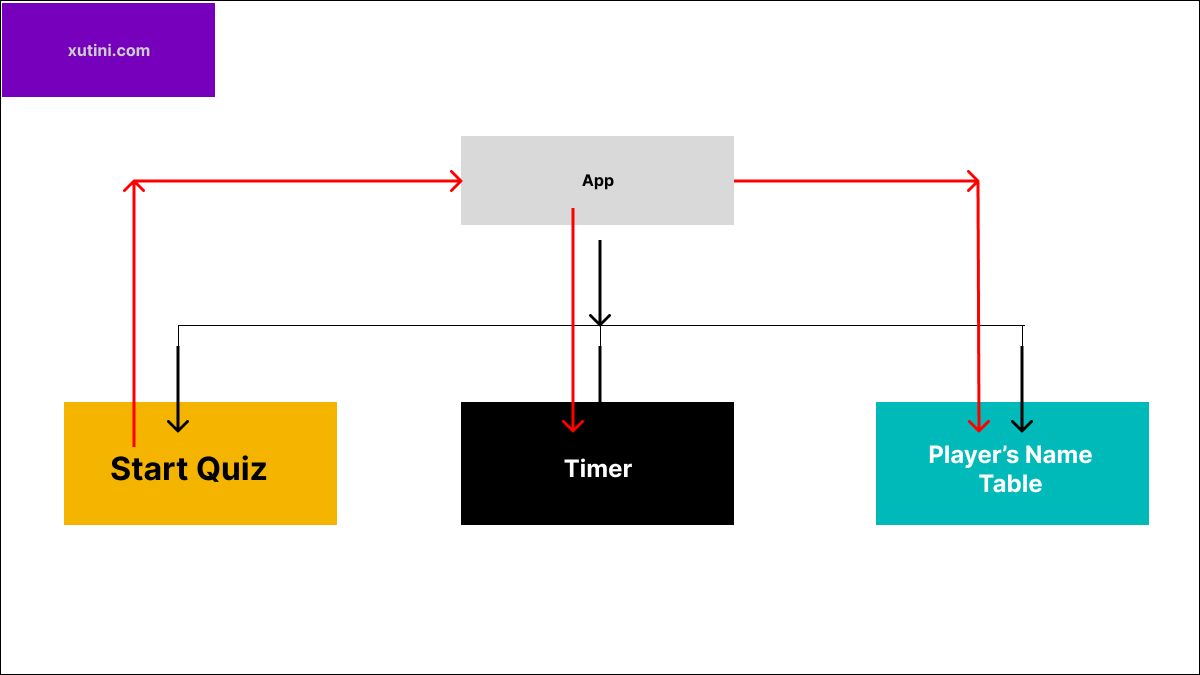 Clicking the StartQuiz's button will trigger the Timer and populate the PlayerNameTable
When the user clicks the "StartQuiz" button, a Timer begins counting down, and a signal is sent to populate the PlayerNameTable.
Timer Component
import React, { useEffect } from "react";
import { useTimer } from "react-timer-hook";

const Timer = ({ expiryTimestamp, shouldTimerStart }) => {
  const { seconds, minutes, start, reset } = useTimer({
    expiryTimestamp,
    autoStart: false,
  });
  useEffect(() => {
    if (shouldTimerStart) {
      start();
    }
  }, [shouldTimerStart]);

  return (
    <div>
      {minutes}:{seconds < 10 ? `0${seconds}` : seconds}
    </div>
  );
};

export default Timer;
This is a React component that uses the useTimer hook from the react-timer-hook library to create a countdown timer. Let's break it down:
- Import the necessary dependencies:
ReactanduseTimerfrom thereact-timer-hooklibrary. - Define the
Timercomponent, which takes two props:expiryTimestampandshouldTimerStart. - Destructure the
seconds,minutes,start, andresetproperties from theuseTimerhook. TheuseTimerhook takes an options object with anexpiryTimestampproperty that specifies the time at which the timer should expire, and anautoStartproperty that specifies whether the timer should start automatically when the component mounts. - Use the
useEffecthook to start the timer whenshouldTimerStartchanges. TheuseEffecthook takes a callback function that runs after every render, and an array of dependencies that determines when the callback should run. In this case, the callback runs whenevershouldTimerStartchanges. - Render the timer using the
minutesandsecondsproperties, with a conditional statement that adds a leading zero to the seconds when they are less than 1o. - Export the Timer component as the default export of the module.
PlayerNameTable
import React, { useState, useEffect } from "react";

import "./style.css";

const PlayerNameTable = ({ trigger }) => {
  const data = require("../data/League100.json");
  console.log(data);

  const [shouldShowData, updateShouldShowData] = useState(false);

  useEffect(() => {
    if (trigger) {
      updateShouldShowData(trigger);
    }
  }, [trigger]);

  return (
    <table>
      <thead>
        <tr>
          <th>Rank</th>
          <th>Goals</th>
          <th>Clubs</th>
          <th>Player</th>
        </tr>
      </thead>
      <tbody>
        {shouldShowData ? (
          data.sort().map((player, index) => (
            <tr key={index}>
              <td>{index + 1}</td>
              <td>{player.goals}</td>
              <td>{player.clubs}</td>
              {/* <td>{player.name || player.player}</td> */}
            </tr>
          ))
        ) : (
          <tr>
            <td></td>
            <td></td>
            <td></td>
            <td></td>
          </tr>
        )}
      </tbody>
    </table>
  );
};

export default PlayerNameTable;
This is a React component that renders a Premier League table. Let's break it down:
- Import the necessary dependencies:
React,useState, anduseEffect. - Import the
style.cssfile, which presumably contains CSS styles for the table. - Define the
PlayerNameTablecomponent, which takes one prop:trigger. - Load the data for the Premier League table from a JSON file using
require. The JSON data contains information about players, including their rank, number of goals, club, and name. - Use the
useStatehook to define a state variableshouldShowData, which determines whether the data should be shown in the table or not. By default, it is set tofalse. - Use the
useEffecthook to update theshouldShowDatastate variable whenever thetriggerprop changes. This allows the parent component to control when the data is shown in the table. - Render the table using the
table,thead,tbody, andtrHTML elements, along with thethandtdelements for the table headers and data cells. - Use a conditional statement to determine whether to show the data or an empty table. If
shouldShowDataistrue, sort thedataarray by rank and map over it to render each player's data as a table row. IfshouldShowDataisfalse, render an empty table row. - Export the
PlayerNameTablecomponent as the default export of the module.
StartQuiz
import React, { useState } from "react";
import "./style.css";

function Quiz({ trigger }) {
  const [isStarted, setIsStarted] = useState(false);
  const [answer, setAnswer] = useState("");

  const handleStartClick = () => {
    setIsStarted(true);
    trigger(true);
  };

  const handleResetClick = () => {
    setIsStarted(false);
    trigger(false);
  };

  const handleSubmitClick = () => {
    // Do something with the answer, e.g. validate it
  };

  return (
    <div>
      {isStarted ? (
        <div>
          <input
            type="text"
            value={answer}
            onChange={(e) => setAnswer(e.target.value)}
          />
          <button className="submit-button" onClick={handleSubmitClick}>
            Submit
          </button>
          <button className="reset-button" onClick={handleResetClick}>
            Reset
          </button>
        </div>
      ) : (
        <button className="start-button" onClick={handleStartClick}>
          Start Quiz
        </button>
      )}
    </div>
  );
}

export default Quiz;
This is a React component that represents a simple quiz. Here's what it does:
- Import the necessary dependencies:
ReactanduseState. - Import the
style.cssfile, which presumably contains CSS styles for the quiz. - Define the
Quizcomponent, which takes one prop:trigger. - Use the
useStatehook to define two state variables:isStarted, which determines whether the quiz has been started or not, andanswer, which stores the user's answer to the quiz question. - Define three functions to handle user events:
handleStartClick,handleResetClick, andhandleSubmitClick. - In the
handleStartClickfunction, set theisStartedstate variable totrueand trigger thetriggerprop to inform the parent component that the quiz has started. - In the
handleResetClickfunction, set theisStartedstate variable tofalseand trigger thetriggerprop to inform the parent component that the quiz has been reset. - In the
handleSubmitClickfunction, do something with the user's answer, such as validating it against the correct answer. - In the
returnstatement, render the quiz based on whether it has been started or not. IfisStartedistrue, render an input field for the user's answer, along with a "Submit" button and a "Reset" button. IfisStartedisfalse, render a "Start Quiz" button. - Export the
Quizcomponent as the default export of the module.
Parent App Component
import "./App.css";

import HowToPlay from "./HowToPlay";
import ScoreCounter from "./ScoreCounter";
import Timer from "./Timer";
import Table from "./Rank";
import PremierLeagueTable from "./Rank/index2";
import Quiz from "./Quiz";

import { useState, useEffect } from "react";

function App() {
  const [hasQuizStarted, updateHasQuizStarted] = useState(null);

  function startTimer(status) {
    updateHasQuizStarted(status);
  }

  const time = new Date();
  time.setSeconds(time.getSeconds() + 300);
  return (
    <div className="App">
      <h1>Can you name the players with 100 Premier League goals?</h1>
      <HowToPlay></HowToPlay>
      <div className="place_edges">
        <ScoreCounter></ScoreCounter>
        <Timer expiryTimestamp={time} shouldTimerStart={hasQuizStarted}></Timer>
      </div>
      <Quiz trigger={startTimer}></Quiz>
      <PremierLeagueTable trigger={hasQuizStarted}></PremierLeagueTable>
    </div>
  );
}

export default App;
React application that renders a quiz for Premier League players with 100 goals. The application includes components for displaying instructions, keeping track of the score and time, and rendering the quiz and the Premier League player table.
The startTimer function is passed as a prop to the Quiz component, which is called when the user starts the quiz. This updates the state of the hasQuizStarted variable, which is then passed to the Timer and PremierLeagueTable components to start the timer and render the player table.
Further Reading
Conditional rendering is an important concept in React that allows you to render different content based on a certain condition. Here are some resources that can help you further understand conditional rendering in React:
- Official React documentation on conditional rendering: https://react.dev/learn/conditional-rendering
- "Conditional Rendering in React" by Robin Wieruch: https://www.robinwieruch.de/conditional-rendering-react