
Forms allow you to collect user data on your websites and apps. And validation is essential to guarantee type safety and the proper format for collected data. You can perform validation on both the client and server side of the application.
This is where Zod and React-Hook-Form come in as a dynamic duo, ready to take your forms to the next level.
Zod is a validation library that provides a concise and expressive syntax for defining data schemas, making it an excellent choice for validating form data.
On the other hand, React-Hook-Form is a lightweight form library for React that embraces uncontrolled components and simplifies form-building with its intuitive hooks-based API.
In this tutorial, you will learn how to build a type-safe form using React-Hook-Form for form management and Zod for both client-side and server-side validation.
Here's what we'll cover:
- Getting Started
- How to Define Form Types
- How to Create a Form with react-hook-form
- How to Integrate Zod for Schema Validation
- How to Handle Server-Side Errors
- Conclusion
Getting Started
To get started, clone the starter boilerplate for the project. Open up your terminal and run this command:
git clone --branch starter https://github.com/Giftea/zod-rhf-fcc.git
You can find the final version on GitHub here.
Once you've got the boilerplate on your local machine, run the following commands to install dependencies and start the project:
npm install
npm run dev
Point your browser to http://localhost:3000, and you'll be greeted by the starting page of our project.
 localhost
How to Define Form Types
The /types.ts file will contain the types and schemas related to our form fields and their validation. Update the /types.ts file with the code below:
import { FieldError, UseFormRegister } from "react-hook-form";

export type FormData = {
    email: string;
    githubUrl: string;
    yearsOfExperience: number;
    password: string;
    confirmPassword: string;
  };

  export type FormFieldProps = {
    type: string;
    placeholder: string;
    name: ValidFieldNames;
    register: UseFormRegister<FormData>;
    error: FieldError | undefined;
    valueAsNumber?: boolean;
  };


  export type ValidFieldNames =
  | "email"
  | "githubUrl"
  | "yearsOfExperience"
  | "password"
  | "confirmPassword";
FormData represents the structure of the data expected in the form.
FormFieldProps defines the properties expected by the form field component (which we will build later on). It includes:
type: The type of the input field (for example, text, password).placeholder: Placeholder text for the input field.name: The name of the field, which corresponds to one of the valid field names defined in theValidFieldNamestype.register: A function fromreact-hook-form(UseFormRegister<FormData>) used to register the input field with the form.error: Represents any validation error associated with the field. It can beundefinedif there are no errors.valueAsNumber(optional): A boolean flag indicating whether the field value should be treated as a number. Defaults toundefined.
ValidFieldNames is a union type that enumerates the valid field names for the form. These correspond to the fields defined in the FormData type.
How to Create a Form with React-Hook-Form
Now that we have defined the types for the form, let's create a reusable form field component and the form component.
Create a Reusable Form Field Component
Let's create a reusable FormField component that handles rendering an input element, registering it with the form using react-hook-form, and displaying a validation error message when necessary.
Head on to the /app/components/FormField.tsx file and update the component:
import { FormFieldProps } from "@/types";

const FormField: React.FC<FormFieldProps> = ({
  type,
  placeholder,
  name,
  register,
  error,
  valueAsNumber,
}) => (
  <>
    <input
      type={type}
      placeholder={placeholder}
      {...register(name, { valueAsNumber })}
    />
    {error && <span className="error-message">{error.message}</span>}
  </>
);
export default FormField;
Imports:
- The component imports the
FormFieldPropstype from the@/typesmodule. This type contains the expected properties for a form field, such astype,placeholder,name,register,error, andvalueAsNumber.
Input Element:
- The component renders an
<input>element with attributes set based on the provided props (type,placeholder,name). - The
...register(name, { valueAsNumber })syntax is used to register the input field with the form, enabling form state management.
Error Handling:
- If there is a validation error, a
<span>element is rendered, displaying the error message.
Create the Form Component
The Form component will utilize the react-hook-form library to manage the form state. It modularizes form fields by using our reusable FormField component.
Navigate to app/components/Form.tsx and update it with the code below:
import { useForm } from "react-hook-form";
import { FormData } from "@/types";
import FormField from "./FormField";

function Form() {
  const {
    register,
    handleSubmit,
    formState: { errors },
    setError,
  } = useForm<FormData>();

  const onSubmit = async (data: FormData) => {
      console.log("SUCCESS", data);
  }

  return (
      <form onSubmit={handleSubmit(onSubmit)}>
        <div className="grid col-auto">
          <h1 className="text-3xl font-bold mb-4">
            Zod & React-Hook-Form
          </h1>
          <FormField
            type="email"
            placeholder="Email"
            name="email"
            register={register}
            error={errors.email}
          />

          <FormField
            type="text"
            placeholder="GitHub URL"
            name="githubUrl"
            register={register}
            error={errors.githubUrl}
          />

          <FormField
            type="number"
            placeholder="Years of Experience (1 - 10)"
            name="yearsOfExperience"
            register={register}
            error={errors.yearsOfExperience}
            valueAsNumber
          />

          <FormField
            type="password"
            placeholder="Password"
            name="password"
            register={register}
            error={errors.password}
          />

          <FormField
            type="password"
            placeholder="Confirm Password"
            name="confirmPassword"
            register={register}
            error={errors.confirmPassword}
          />
          <button type="submit" className="submit-button">
            Submit
          </button>
        </div>
      </form>
  );
}

export default Form;
Imports:
- The
useFormhook provides functionality for managing form state and validation. FormDatarepresents the structure of the form data.FormFieldis our reusable form field component.
Form Component:
- Form-related functions and state variables are destructured from the
useFormhook, which is explicitly typed withFormDatato define the shape of the form data. - Within the form, the
FormFieldcomponents are rendered for different input fields such as email, GitHub URL, years of experience, password, and confirm password.
Run Code:
Import the Form component into /app/page.tsx file:
"use client";
import Form from "./components/Form";

function Home() {

  return (
    <main className="flex min-h-screen flex-col items-center justify-between p-24">
     <Form />
    </main>
  );
}

export default Home;
Visit http://localhost:3000/ to view the form:
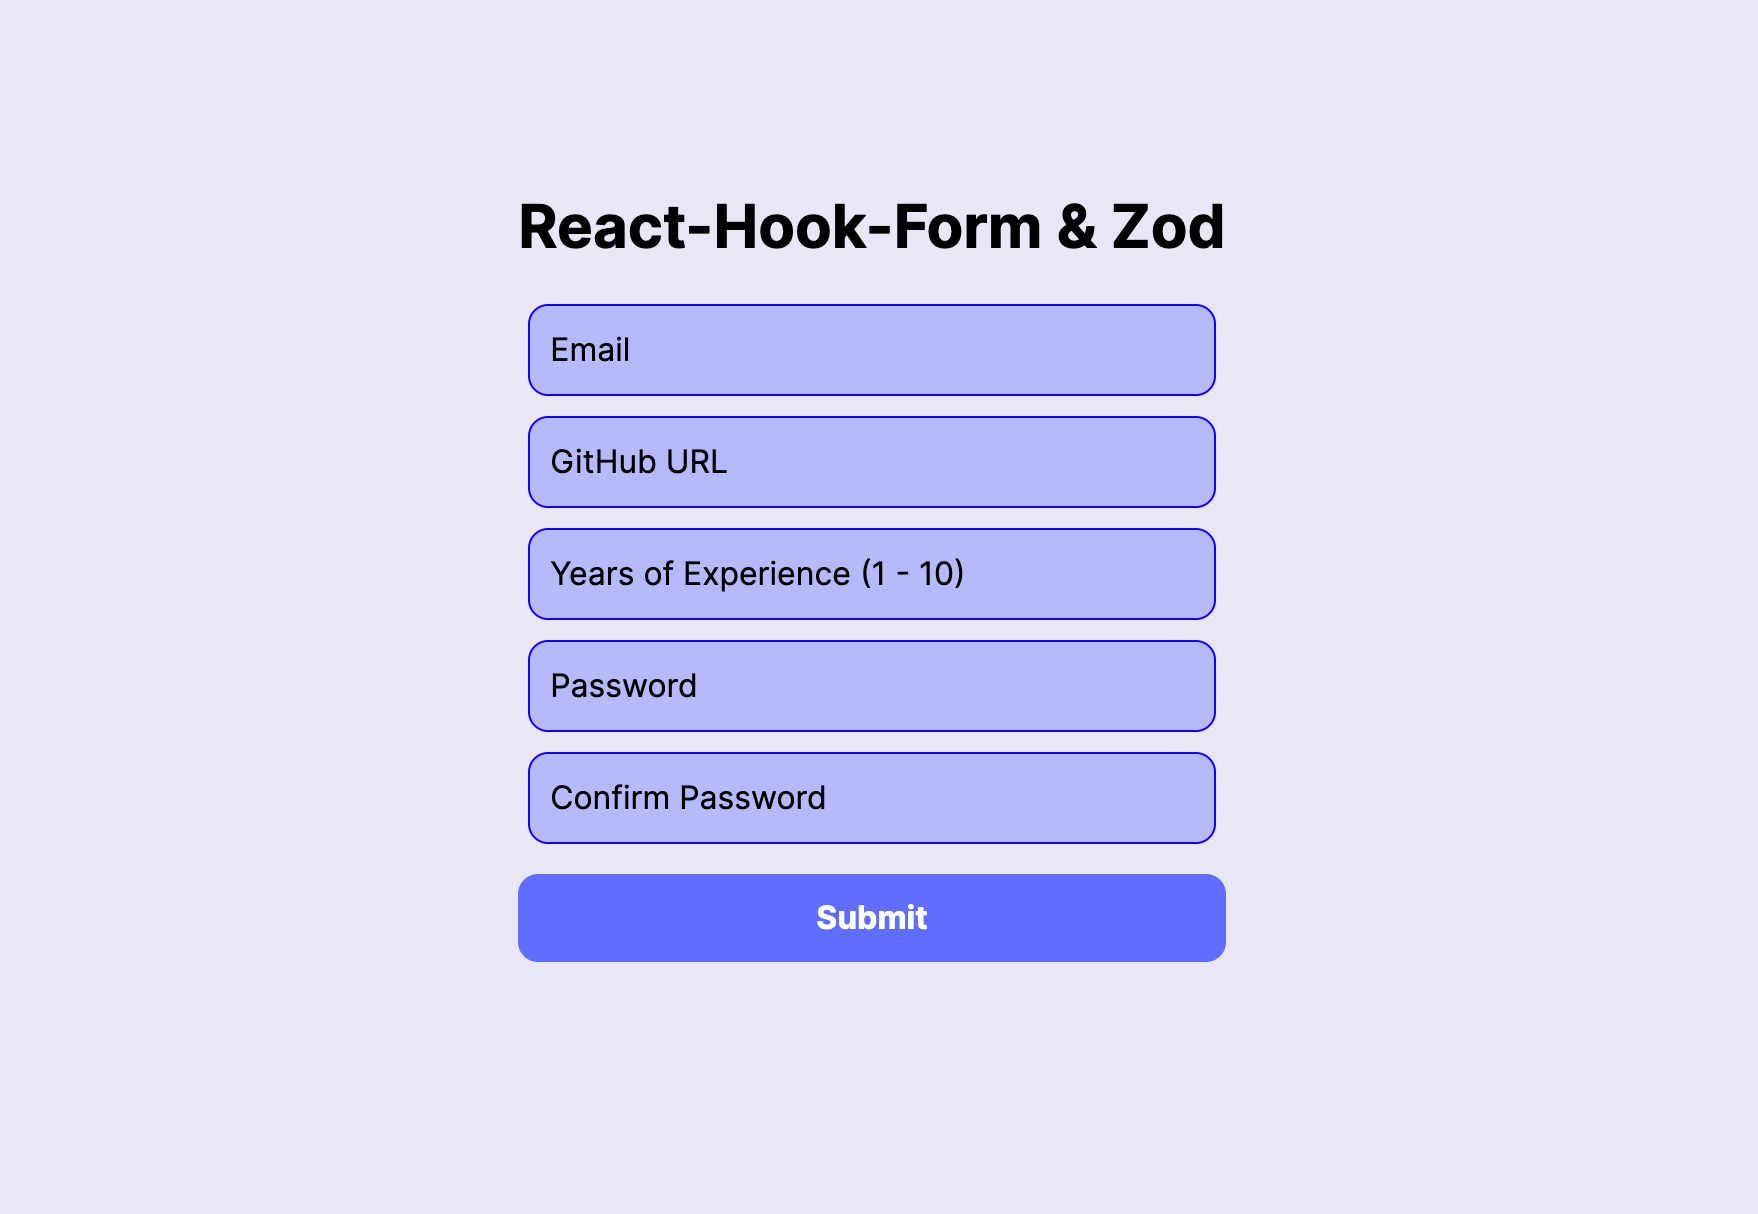
In summary, our Form component is a basic form structure that uses the react-hook-form library for state management and employs a reusable FormField component to handle the rendering and validation of individual form fields.
How to Integrate Zod for Schema Validation
Zod stands out as a schema declaration and validation library, with TypeScript as its primary focus. The term "schema" encompasses various data types, ranging from strings, numbers, and booleans to more complex objects.
Define a Form Schema with Zod
Let's create a TypeScript-backed form schema using Zod for our form structure.
Head to your /types.ts file, add the new imports, and create a user schema with the code below:
 import { z, ZodType } from "zod"; // Add new import

 export const UserSchema: ZodType<FormData> = z
  .object({
    email: z.string().email(),
    githubUrl: z
      .string()
      .url()
      .includes("github.com", { message: "Invalid GitHub URL" }),
    yearsOfExperience: z
      .number({
        required_error: "required field",
        invalid_type_error: "Years of Experience is required",
      })
      .min(1)
      .max(10),
    password: z
      .string()
      .min(8, { message: "Password is too short" })
      .max(20, { message: "Password is too long" }),
    confirmPassword: z.string(),
  })
  .refine((data) => data.password === data.confirmPassword, {
    message: "Passwords do not match",
    path: ["confirmPassword"], // path of error
  });
Imports:
zis an instance of the Zod object.ZodTypeis a generic type that represents a Zod schema type for a specific data structure.
User Schema:
export const UserSchema: ZodType<FormData> = ...: TheUserSchemarepresents a Zod type that corresponds to the structure defined by theFormDatatype.z.object({...}): This part defines an object schema using Zod. The object has several fields, each with its own validation rules.- Inside the object, each field is defined with its own validation rules using Zod methods like
z.string(),z.url(),z.number(), andz.min(). Optional custom error messages are provided for some of the fields. z.refine((data) => data.password === data.confirmPassword, { /* ... */ });: Adds a refinement to the schema to check if thepasswordandconfirmPasswordfields match. If not, a custom error message is provided, and the error is associated with theconfirmPasswordfield.
How to Integrate Zod with React-Hook-Form for validation
Now that we've set up the Zod schema for the form, let's integrate it with our existing Form component. To do this, we'll use zodResolver from the [@hookform](https://www.npmjs.com/package/@hookform/resolvers) library.
zodResolver is a resolver function that integrates the Zod schema validation with the form validation process.
Head over to the app/components/Form.tsx file and update it with the code below:
// Update imports
import { FormData, UserSchema } from "@/types";
import { zodResolver } from "@hookform/resolvers/zod";

function Form() {
  const {
    register,
    handleSubmit,
    formState: { errors },
    setError,
  } = useForm<FormData>({
    resolver: zodResolver(UserSchema), // Apply the zodResolver
  });

{/* Existing Code...*/}

}
If you try submitting the form with empty input fields, you will see error messages on the browser.
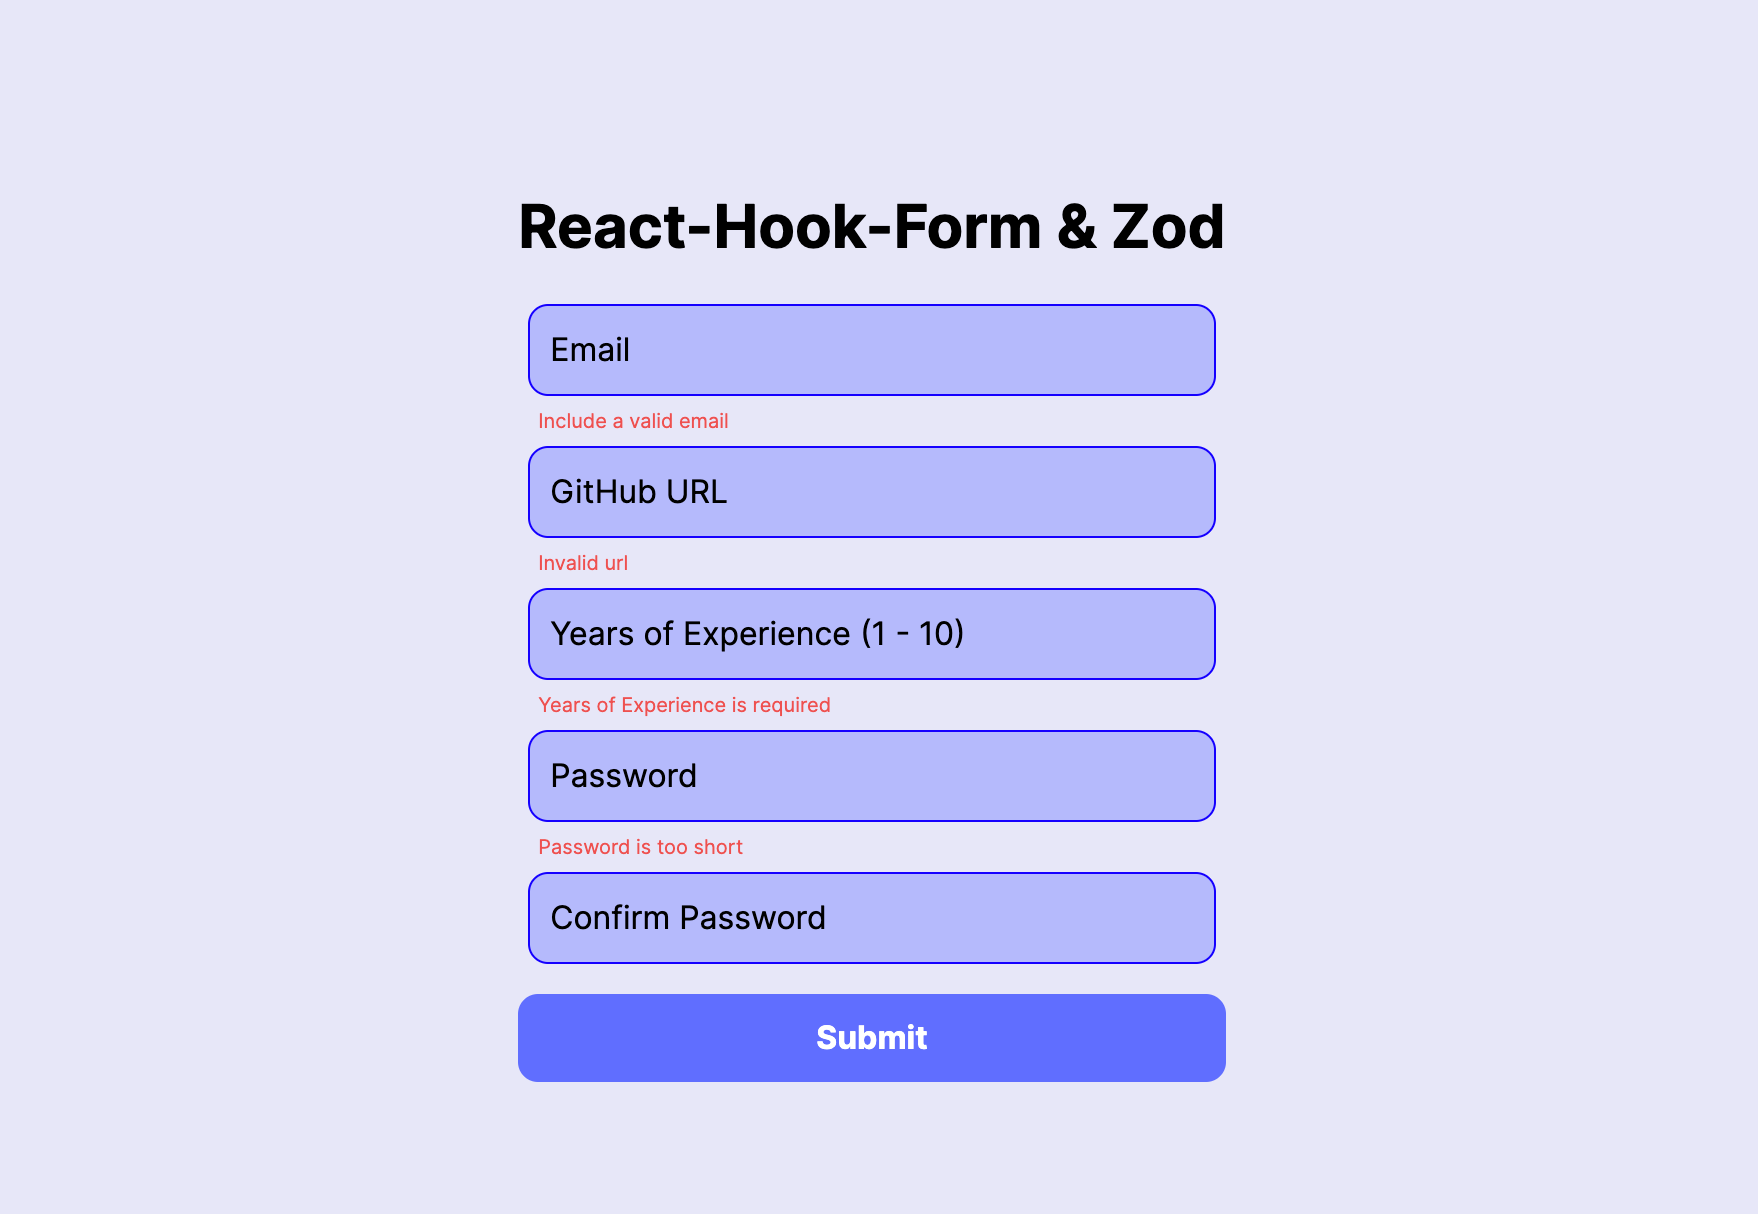 Error Messages - http://localhost:3000/
Additionally, our custom error messages, such as prompting users to provide a valid GitHub URL and checking if the passwords match, are demonstrated in the image below:
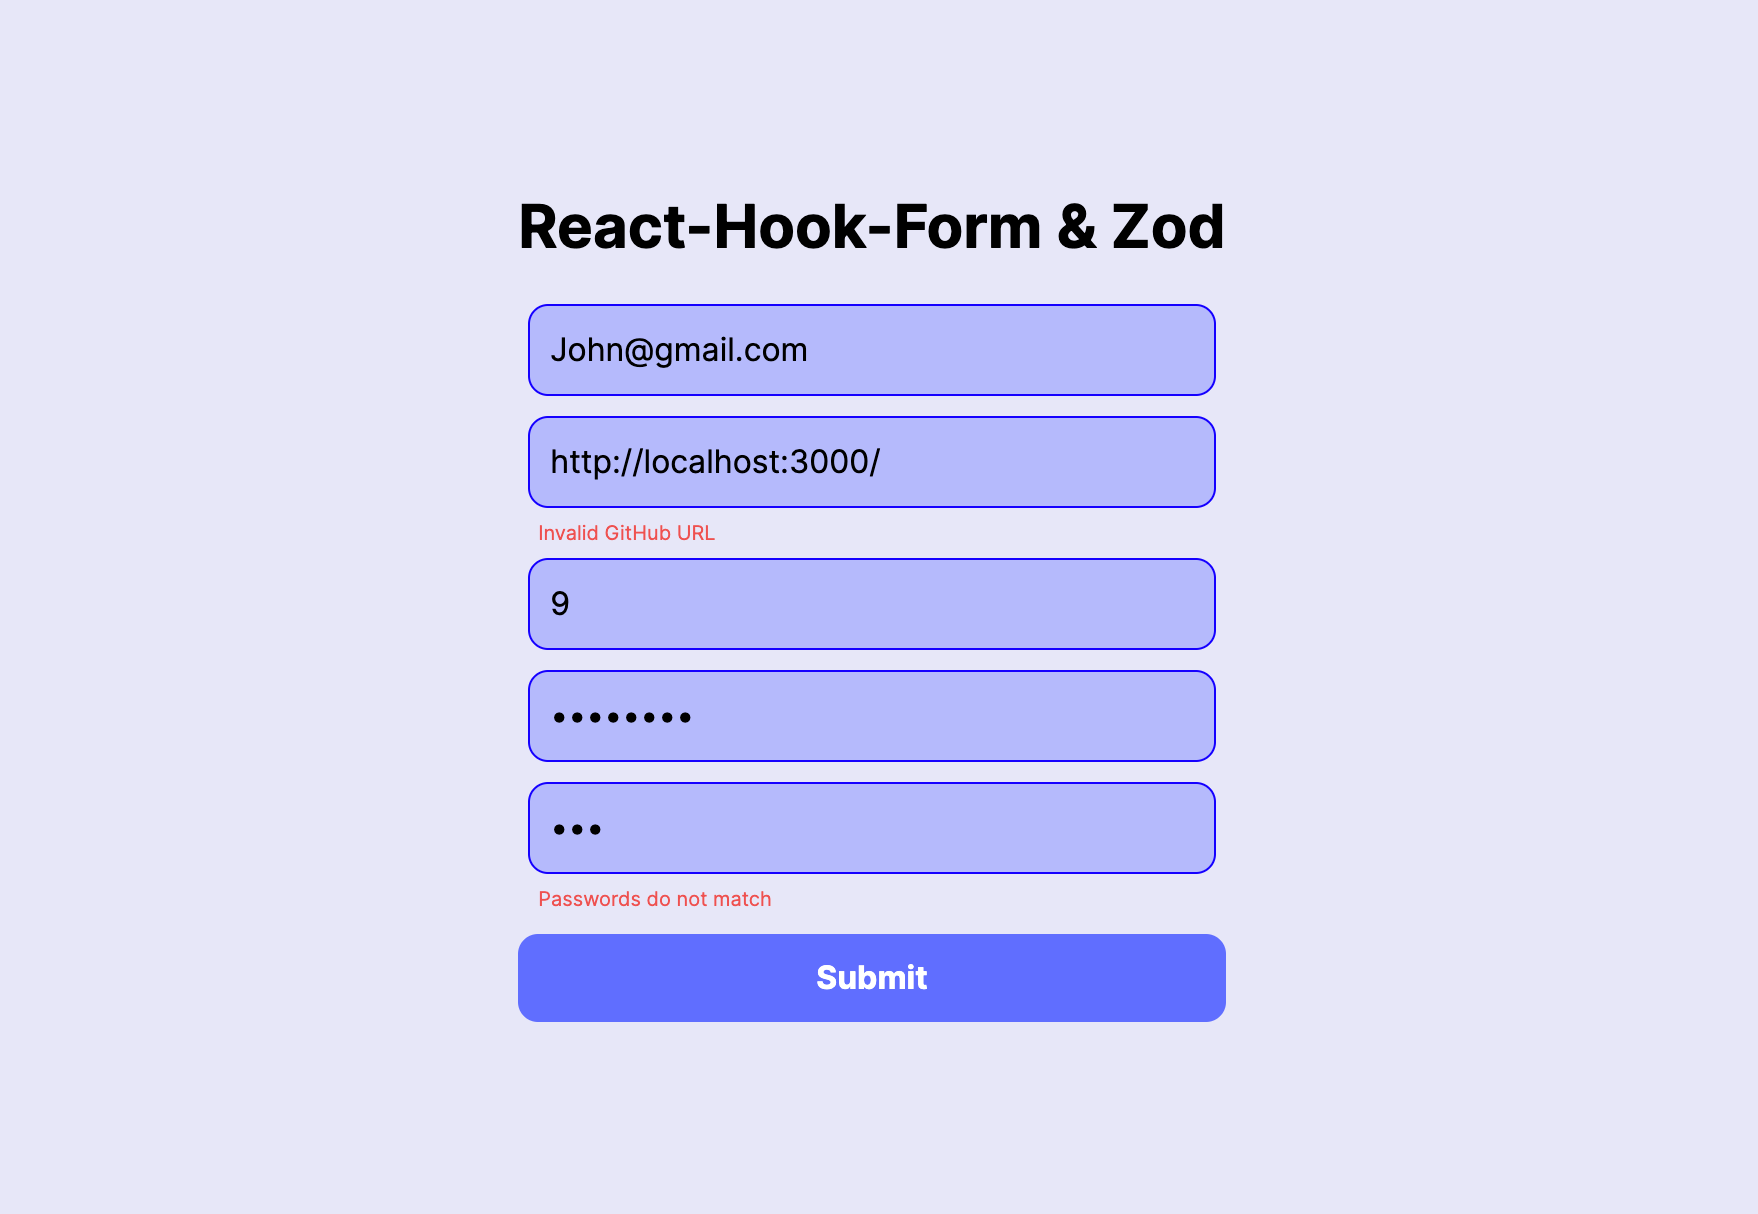 Custom Error Messages - http://localhost:3000/
How to Handle Server-Side Errors
When creating forms, data integrity and type safety are very important, given that submitted data goes to the website's server. This leads us to the significance of handling server-side errors — an extra security measure to make sure data from the client is accurate and non-malicious.
How to Implement Server-Side Validation
To implement server-side validation, we will leverage Next.js' backend capabilities to build a simple server. This server will receive and validate the data submitted through our form.
Navigate to app/api/form/route.ts and include the code below:
import { UserSchema } from "@/types";
import { NextResponse } from "next/server";

export async function POST(request: Request) {
  // Retrieve the JSON data from the request body
  const body = await request.json();

  // Use Zod to validate the received data against the UserSchema
  const result = UserSchema.safeParse(body);

  // Check if the validation is successful
  if (result.success) {
    return NextResponse.json({ success: true });
  }

  // If validation errors, map them into an object
  const serverErrors = Object.fromEntries(
    result.error?.issues?.map((issue) => [issue.path[0], issue.message]) || []
  );

  // Respond with a JSON object containing the validation errors
  return NextResponse.json({ errors: serverErrors });
}
Imports:
- The
UserSchemawe defined earlier is imported. NextResponsefrom thenext/servermodule, which allows us to craft server responses in a Next.js environment.
POST Function:
const body = await request.json(): Retrieves the JSON data from the request body and stores it in thebodyvariable.const result = UserSchema.safeParse(body): Utilizes thesafeParsemethod provided by Zod to validate the received data against theUserSchema. The result contains information about whether the validation was successful and, if not, details about the validation issues.if (result.success) { return NextResponse.json({ success: true }); }: If the validation is successful, a JSON response with{ success: true }is sent.const serverErrors = Object.fromEntries(/* ... */): If there are validation errors, the code maps them into an object with field names and corresponding error messages.return NextResponse.json({ errors: serverErrors }): Responds with a JSON object containing the validation errors.
In your terminal, stop running the project and run npm run dev again to restart the server.
How to Integrate Server-Side Validation
To integrate the server-side validation, we have to update the onSubmit function in the Form component.
Head over to the /app/components/Form.tsx file and update the imports and onSubmit function:
// Update import
import { FormData, UserSchema, ValidFieldNames } from "@/types";
import axios from "axios";

function Form() {
{/* Existing Code... */}

  const onSubmit = async (data: FormData) => {
    try {
      const response = await axios.post("/api/form", data); // Make a POST request
      const { errors = {} } = response.data; // Destructure the 'errors' property from the response data

      // Define a mapping between server-side field names and their corresponding client-side names
      const fieldErrorMapping: Record<string, ValidFieldNames> = {
        email: "email",
        githubUrl: "githubUrl",
        yearsOfExperience: "yearsOfExperience",
        password: "password",
        confirmPassword: "confirmPassword",
      };

      // Find the first field with an error in the response data
      const fieldWithError = Object.keys(fieldErrorMapping).find(
        (field) => errors[field]
      );

      // If a field with an error is found, update the form error state using setError
      if (fieldWithError) {
        // Use the ValidFieldNames type to ensure the correct field names
        setError(fieldErrorMapping[fieldWithError], {
          type: "server",
          message: errors[fieldWithError],
        });
      }
    } catch (error) {
      alert("Submitting form failed!");
    }
  };
{/* Existing Code... */}
}
axiosis used to make a POST request to the server endpoint/api/formwith the form data.- The
errorsobject is extracted from the response data. - A mapping (
fieldErrorMapping) between field names and their correspondingValidFieldNamesis defined. - It then checks if there are any errors related to form fields by iterating over the
fieldErrorMappingand finding the first field with an error. - If a field with an error is found, the
setErrorfunction fromreact-hook-formis used to set an error for the corresponding field. The error type is marked as "server," and the error message comes from the server response. - If there's an error in the entire try block, it catches the error and displays an alert: "Submitting form failed!"
Now, to test if we can receive errors from the server, we'll deliberately send improperly formatted data to the server. In your onSubmit function, replace the data object with the incorrect data in the code block below:
{/* Existing Code...*/}
  const onSubmit = async (data: FormData) => {

    try {
      // Update data sent in axios with incorrect data
      const response = await axios.post("/api/form", {
        email: "Not an email",
        githubUrl: "Not a URL",
        yearsOfExperience: "Hello",
        password: 1234,
        confirmPassword: 1234,
      }); // Make a POST request

{/* Existing Code...*/}
}
Fill the form in the browser normally and submit the form.
Inspect the "Network" tab within the browser's developer tools. You'll find error messages coming directly from the server, as demonstrated in the image below:
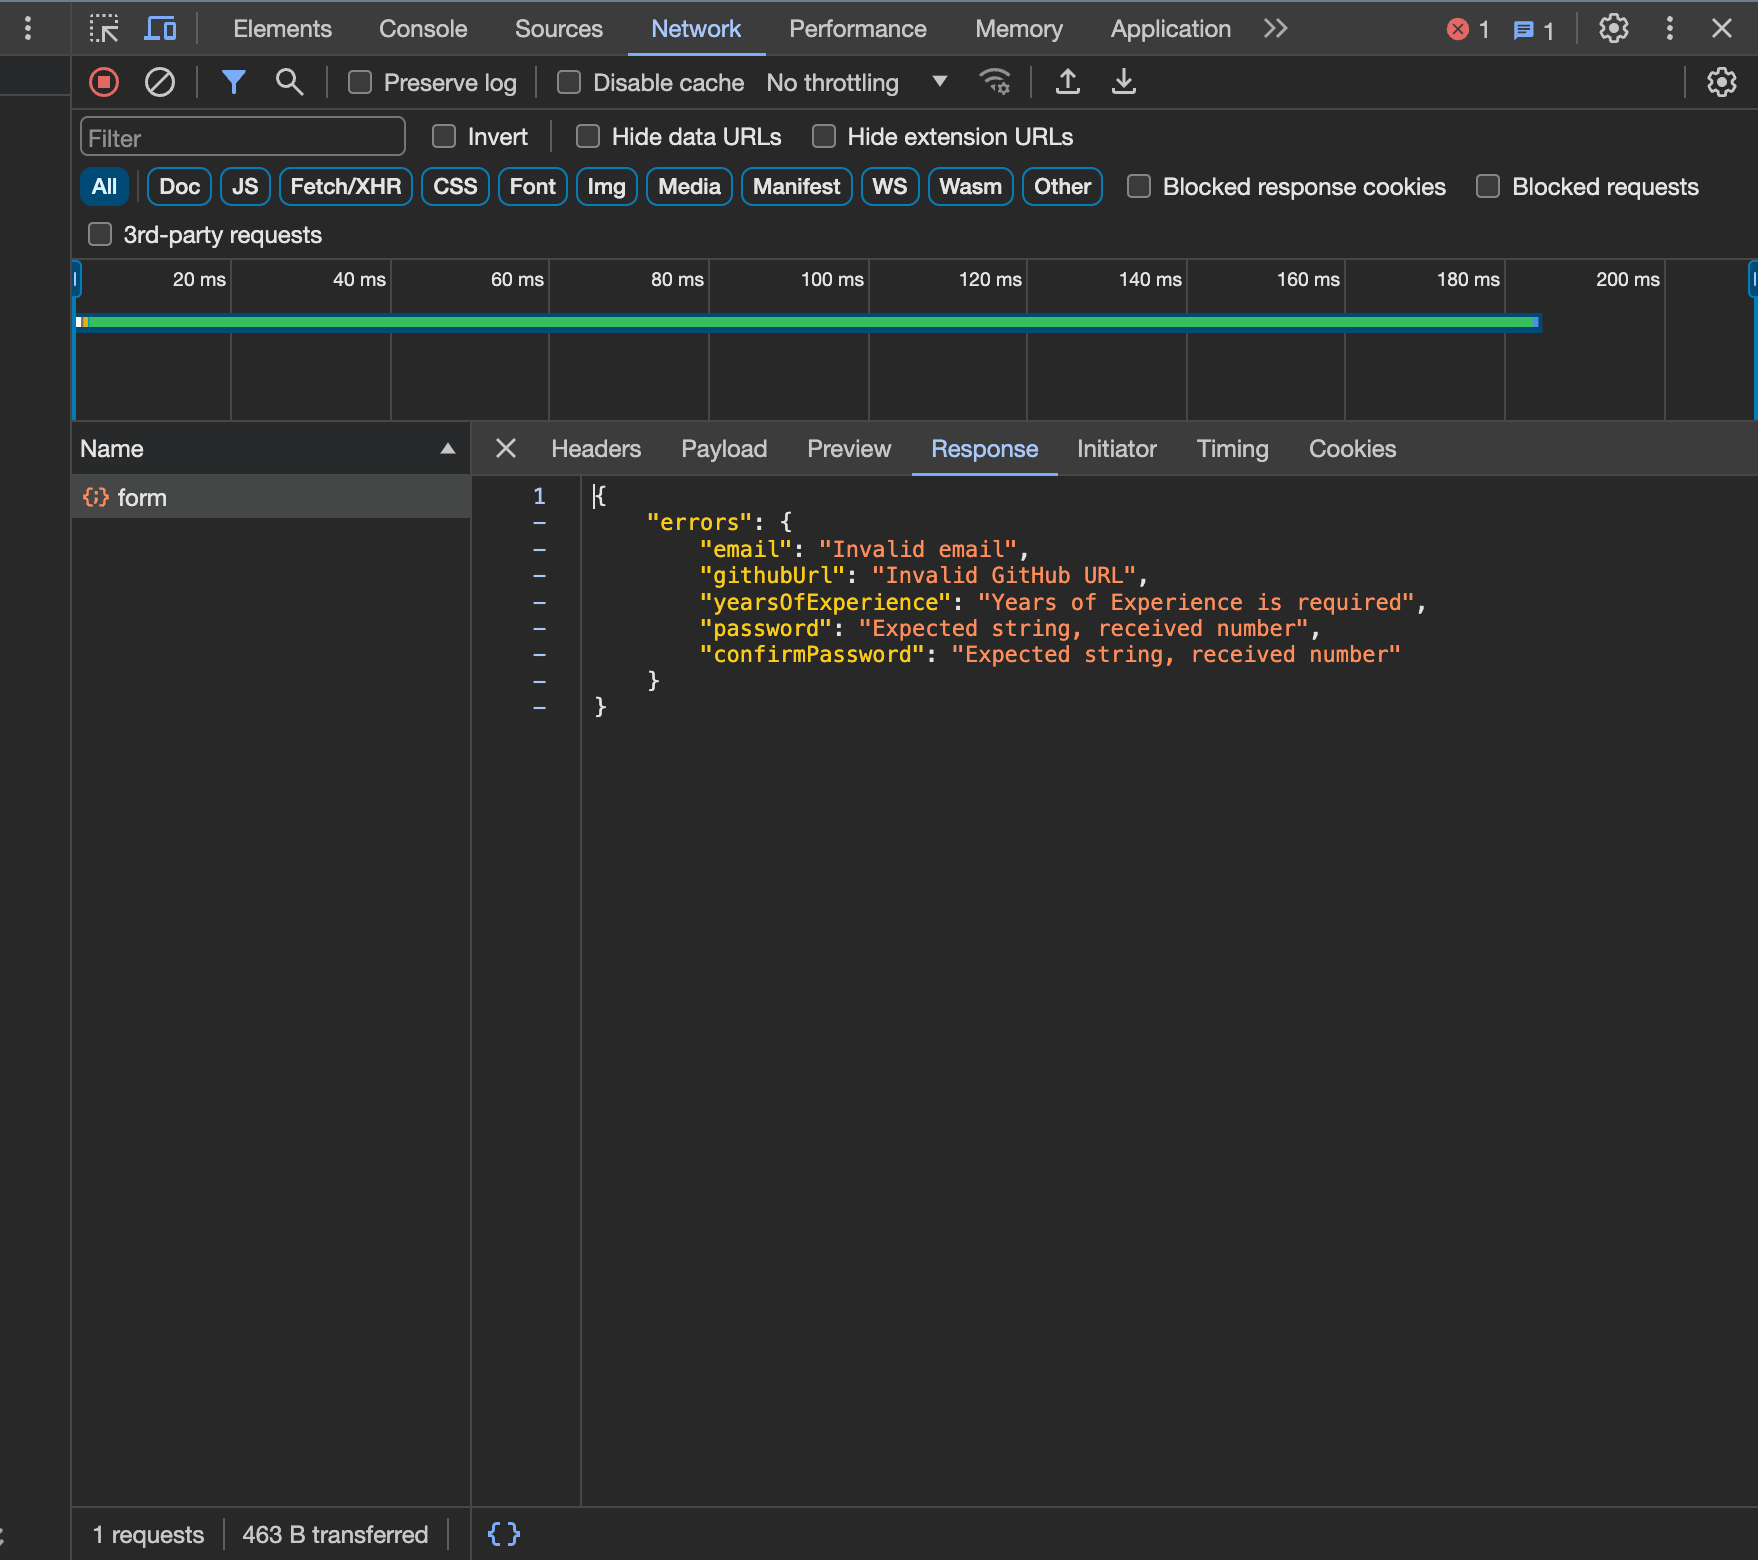 Server errors - http://localhost:3000/
If you're not getting any response from your server, remember to stop running your project in your terminal and run npm run dev again to re-start the server.
Conclusion
In this tutorial, we built a form with React-Hook-Form and validated it with Zod. With Zod, we explored schema validation, customized error messages, and server-side errors. The integration of React-Hook-Form and Zod presents a powerful, developer-friendly solution to creating resilient forms.
You can reach out to me on Twitter if you have any questions.
You can check out the source code and the deployed app.