

React is a popular JavaScript library for building user interfaces. And in order to create complex and efficient web applications, you'll need to understand its fundamental concepts.
In this tutorial, we will be covering three essential concepts of React – JSX, components, and props.
To get started, you should be familiar with:
JavaScript Basics
Destructuring of arrays and objects
ES6 modules
So, if you are new to React or want to brush up on the basics, read on.
Before getting started with React concepts, let's learn a bit about JSX - which is what you use to write React code.
What is JSX?
JSX stands for JavaScript XML. It's an extension of the JavaScript language based on ES6. It's translated into regular JavaScript at runtime.
JSX allows us to write HTML in React which makes the process of writing HTML in your React apps much easier.
Why use JSX?
JSX is not mandatory. It is totally up to you whether to use plain HTML or JSX. But the code blocks I'll share below will clarify the differnece between plain HTML and JSX and which one is preferable.
// Plain HTML
const myElement = React.createElement('h1', { style:{color:"green"} }, 'I do not use JSX!');

const root = ReactDOM.createRoot(document.getElementById('root'));
root.render(myElement);
// JSX
const myElement = <h1>I Love JSX!</h1>;

const root = ReactDOM.createRoot(document.getElementById('root'));
root.render(myElement);
As you can see in the first example, using plain HTML makes it a bit more difficult to create elements. We need to use a createElement method, then pass the element along with its style and its value.
On the other hand, JSX makes it much easier by simply using the element tag just as we write HTML and passing its value.
Because of these advantages, I'd strongly recommend using JSX.
JSX Rules
There are few rules to keep it mind while working with JSX:
A React component name must be capitalized. Component names that do not begin with a capital letter are treated like built-in components.
JSX allows you to return only one element from a given component. This is known as a parent element.
If you want to return multiple HTML elements, simply wrap all of them in a single <div></div>, <React.fragments><React.fragments/>, <></> or any semnatic tag.
const App = () => {
  return
    <div>
      <h1>Hello World!</h1>
      <p>Tanishka here!</p>
    </div>
}
But this won't work, because return would be interpreted as a plain return statement. To avoid that, you need to encapsulate everything inside ( ).
const App = () => {
  return (
    <div>
      <h1>Hello World!</h1>
      <p>Tanishka here!</p>
    </div>
  );
}
Now, this will work perfectly!
- In JSX, every tag, including self closing tags, must be closed. In case of self closing tags you have to add a slash at the end (for example
<img/>,<hr/>, and so on).
const App = () => {
  return (
    <>
      <img src="./assets/react.svg" alt="" />
    </>
  );
}
Since JSX is closer to JavaScript than to HTML, the React DOM uses the camelCase naming convention for HTML attribute names. For example:
tabIndex,onChnage, and so on."class" and "for" are reserved keywords in JavaScript, so use "className" and "forHTML" instead, respectively.
How to use CSS in JSX
While working with JavaScript we typically have a HTML file, a CSS file, and a JavaScript file, right? Simple. But while working with React, we use HTML (JSX) and JavaScript in the same file.
To add style to our components, we can either use inline CSS or external CSS.
Let's first see how inline CSS works in React.
JSX represents objects, that is key-value pairs – like a property name and its value. Always write the value in " " as we do in objects.
So when we're adding inline styles to JSX elements, we must add { } for object representation (outer { } is the convention).
const App = () => {
  return (
    <>
      <h1 style={ { color: "Red" } }>Hello World!</h1>
      <p style={ { fontSize: "20px" } }>Tanishka here!</p>
    </>
  );
}
Here, if you look at style in isolation, you'll see it does look like an object:
{
    color: "Red"
}
Basically, use { } to add styles, use key-value pairs, and always write the value in " ".
Now, let's see how to use an external CSS file.
We simply create a .css file and import it in our .jsx file like this:
import './style.css'

/*
    Your code here
*/
How to use JS in JSX
We might need to use plain JavaScript to add logic to program rendering components. And to add plain JavaScript code in JSX, we need to write it inside curly brackets.
However, whatever we write inside curly brackets must be an expression. Statements are not allowed.
const App = () => {
  return (
    <>
      <h1>My name is {const name = "Tanishka"}</h1>
    </>
  );
}
The above code is invalid.
Now, you might think {const name = "Tanishka"} is also JavaScript. How is this code block not valid? Because it is an initialization of name that is a statement and we cannot write statements inside curly brackets.
We can make a few changes in the above code block and it will be valid:
const App = () => {
  return (
  const name = "Tanishka";
    <>
      <h1>My name is {name}</h1>
    </>
  );
}
We initialized value of name outside the return block and just used the included varibale name inside curly brackets, where name has the assigned value of "Tanishka". So now it is an expression and is valid.
Now that we know how to write code in React, let's learn what to write – that is, React's basic concepts.
What are Components in React?
Components are independent and reusable blocks of code which work in isolation. The main advantage of components is that they help reduce redundancy.
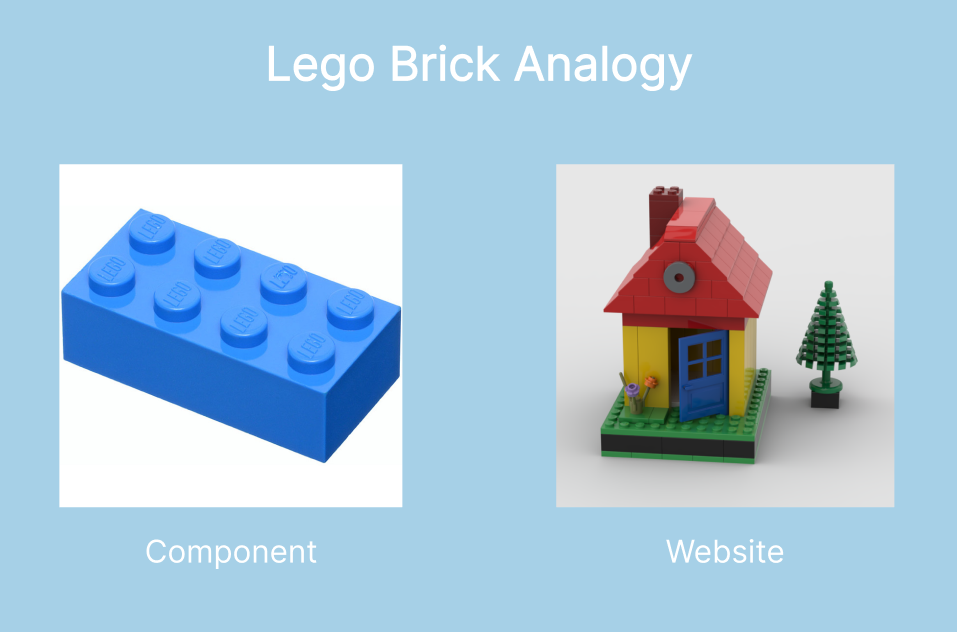
You can think of a component as a lego brick. When you're building a website, you put many of these bricks together to create the whole.
We can classify components into two types: class components and functional components. I won't go into the details here, as that's a topic for another tutorial.
Just know that the downsides of using class components are that they come with a bunch of preloaded stuff inside them whether you want it or not. This makes them a bit more difficult to deal with.
The React team recommends that new apps should be built with functional components and hooks. So, you should really consider the functional component approach when working with a new React project. So that's what we'll focus on here.
How to create a functional component in React
function Greet() {
  return <h1>Hello World!</h1>;
}
OR
const Greet = () => <h1>Hello World!</h1>
Wait, but aren't these just JavaScript functions? YES! Components are basically JavaScript functions which return a single HTML element. Conventionally, arrow functions are widely used.
And what are those funny looking tags? That's called JSX, which you'll learn more about in a minute.
How to nest components in React
In React, we can nest components inside one another. This helps in creating more complex User Interfaces. It also helps in getting rid of redundant code. The components that are nested inside parent components are called child components.
For example:
const Book = () => {
  return (
    <div>
      <h1>Book name : Cracking The Coding Interview</h1>
      <h2>Author : Gayle Laakmann McDowell</h2>
    </div>
  );
};
Here, we have created a Book component. What if we want to create more such instances of the book component? This is when we can use nested components.
const BookList = () => {
  return (
    <div>
      <Book />
      <Book />
    </div>
  );
};

const Book = () => {
  return (
    <div>
      <h1>Book name : Cracking The Coding Interview</h1>
      <h2>Author : Gayle Laakmann McDowell</h2>
    </div>
  );
};
In the above code block, we have created two components, Book and BookList. Book returns a div that has Book name and author name while BookList returns a div that contains two books.
In this way, nesting helps us create multiple instances of a component to create complex User Interfaces easily.
How Props Work in React
Props stand for properties. Props are like function arguments, and you send them into the component as attributes.
When we want to create multiple instances of a single component with various different values, we need to use props.
Let's go with our pevious example of Book and BookList:
For example:
const BookList = () => {
  return (
    <div>
      <Book />
      <Book />
    </div>
  );
};

const Book = () => {
  return (
    <div>
      <h1>Book name : Cracking The Coding Interview</h1>
      <h2>Author : Gayle Laakmann McDowell</h2>
    </div>
  );
};
In this code block, we have hard-coded values of book name and author but that's not really helpful for other books.
We can think of a component like a function and props like arguements of that function. We simply provide some specific values for each component and use those values in the component body.
Let's first see how to pass props:
const BookList = () => {
  return (
    <div>
      <Book bookName = "Cracking The Coding Interview"
      author = "Gayle Laakmann McDowell"/>
      <Book bookName = "The Road to Learn React"
      author = "Robert Wieruch"/>
    </div>
  );
};
Here, we simply created variable-like structures (bookName, author) and assigned their respective values to them. That's it! These are props.
Now, let's see how can we access them, that is use them in the component body:
const Book = (props) => {
  return (
    <div>
      <h1>Book name : {props.bookName}</h1>
      <h2>Author : {props.author}</h2>
    </div>
  );
};
Firstly, we need to use the keyword 'props' in the parameter of an arrow function which will act as an object. Now we can access the props values just like we access object values – object.property.
That's why we used 'props.bookName' and 'props.author'. Every book will get it's respective value by doing this, thus perfectly creating multiple instances of the book component.
You can use props like this, but there's another way of accessing props. For this method, you need to be familiar with the concept of destructuring, that is accessing each and every element of an object.
const Book = (props) => {
  const {bookName, author} = props;
  return (
    <div>
      <h1>Book name : {bookName}</h1>
      <h2>Author : {author}</h2>
    </div>
  );
};
We destructured the 'bookName' and 'author' and we used them as varibles instead of 'props.bookName' and 'prop.author'.
We could have directly detructured props in the parameter section. It would have looked like this:
const Book = ({bookName, author}) => {
  return (
    <div>
      <h1>Book name : {bookName}</h1>
      <h2>Author : {author}</h2>
    </div>
  );
};
It works just the same as the previous method but we just destructure the content of the props in the parameter section instead of doing it by declarations.
Children props
Sometimes, we might come across situations in which we need to add a specific element to a particular instance of a component only. We pass the specific element between opening and closing tags of the component. In those cases, we use children props.
const BookList = () => {
return (
<div>
<Book bookName = "Cracking The Coding Interview"
author = "Gayle Laakmann McDowell">
<button> Read Now! <button/>
< Book />
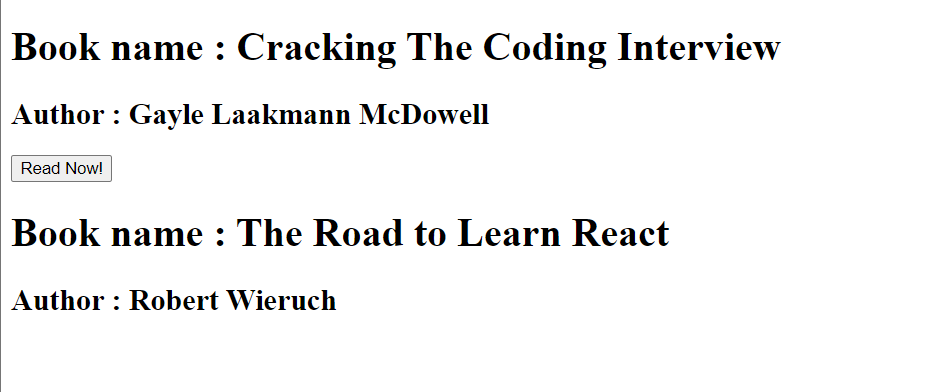
<Book bookName = "The Road to Learn React"
author = "Robert Wieruch"/>
</div>
);
};
In the above code block, we want to display a button only for the first book instance. That's why we used a child component by passing the button between opening and closing tags.
Let's see how to access them:
const Book = ({bookName, author, children}) => {
  return (
    <div>
      <h1>Book name : {bookName}</h1>
      <h2>Author : {author}</h2>
      {children}
    </div>
  );
};
We simply add 'children' in the paramters section and then used '{children}' in components wherever we want to place child props. In this case, I wanted to place that button below the information, so I used '{children}' after 'bookName' and 'author'.
This places a child prop between opening and closing tags only when it's specified. This serves our purpose.
When we want an element to be present only for a single instance of the component, we can use children props between component tags. Then again, we can either use props.children or destructure it and use it directly.
Let me show you how it will look:
As you can see, only the first instance has got the button below its information. So this is how children props come in handy.
Key Props
A key is a special attribute you need to include when creating lists of elements in React. We use keys to give an identity to elements in lists. We need to specify an id or any unique value to each instance of a component to keep track of their addition or removal.
When you're chosing a key for the items in lists, try to use a unique id for every instance. If an id is not provided or for some reason you can't use the id, we can go with the index of the list.
const App = () => {
  const numbers = [1, 2, 3, 4, 5];
  return (
    <>
      {numbers.map((number) => {
        return <li>{number}</li>;
      })}
    </>
  );
};
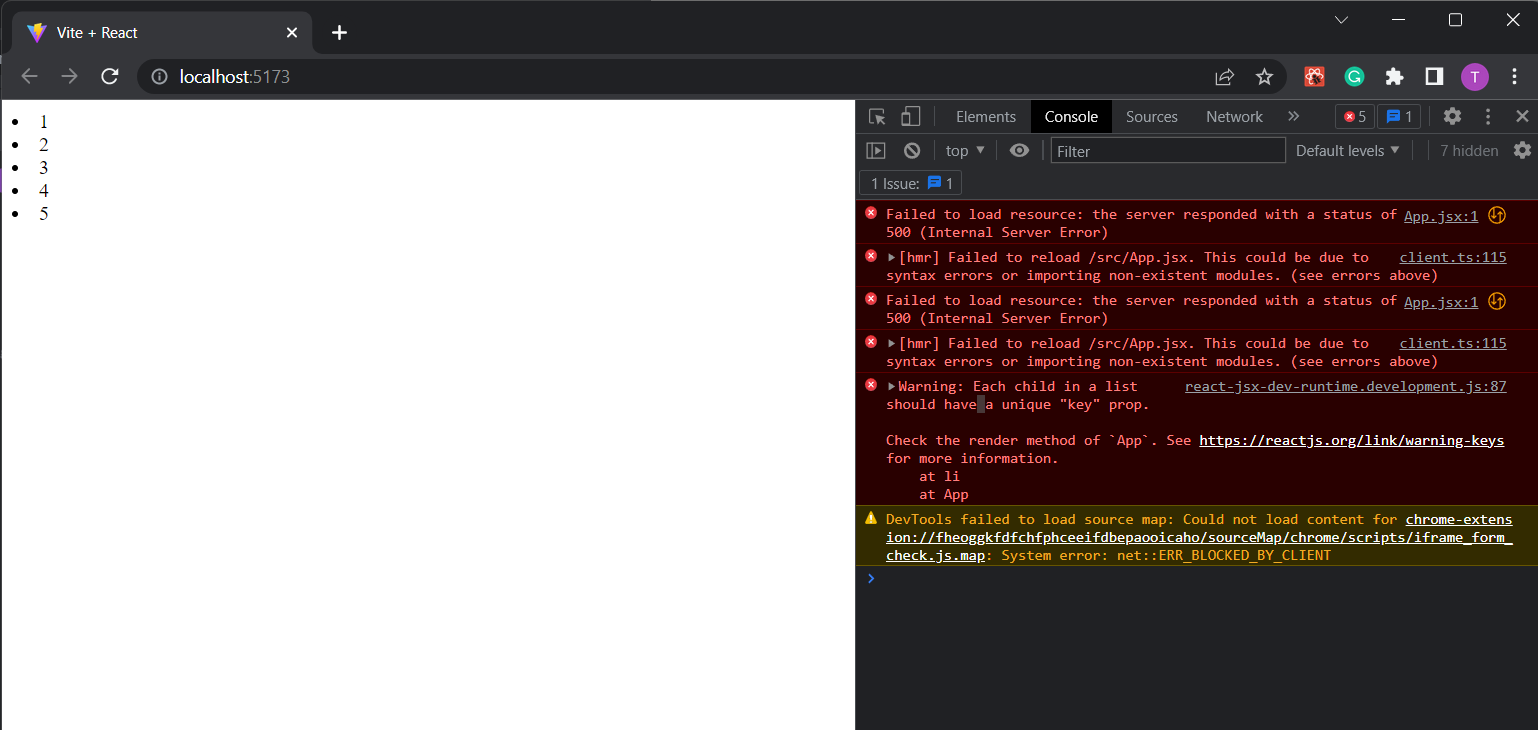
In the above code block, we are simply iterating over a list of numbers. Everything works fine until we open console. It is full of red text - a warning that says - 'Warning: Each child in a list should have a unique "key" prop.'
In this case, we don't have any specified id, so we can use the index of the list by accessing the second argument of the map function, that is index.
const App = () => {
  const numbers = [1, 2, 3, 4, 5];
  return (
    <>
      {numbers.map((number, index) => {
        return <li key={index}> {number} </li>;
      })}
    </>
  );
};
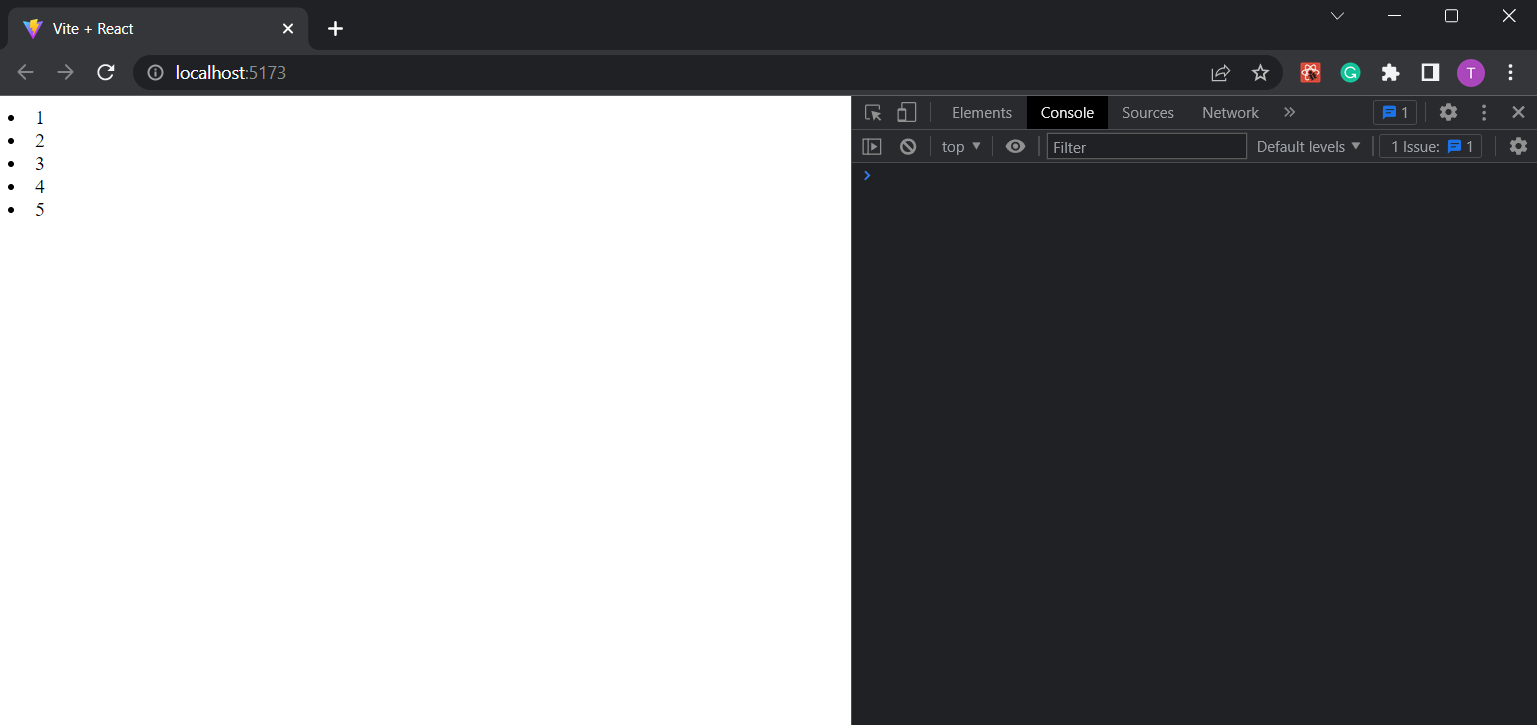
This code block works fine and all warnings are gone now.
Wrapping up
I hope this tutorial has been helpful in getting you started on your React journey. Happy coding !👩🏻💻✨