
Here are three custom hooks that will add essential functionality to your React projects in just a line of code.
React hooks are powerful for their ability to give us reusable stateful features that are separate from our components.
I’ve put together a short list of three custom React hooks worth using in almost every project you make.
1. useFetch Hook
In virtually every application you make, you will be fetching data from an external API.
The standard approach is to make the API call within useEffect and perform it using the fetch API, that is built into the browser.
function BlogPosts() {
  const [data, setData] = useState([]);

  useEffect(() => {
    fetch("http://jsonplaceholder.typicode.com/posts")
      .then((response) => response.json())
      .then((data) => setData(data));
  }, []);
}
Not only is this code quite a bit of boilerplate to perform the GET request, convert it JSON, and set it in state, but it is not reusable.
If you wanted to reuse it, you would need to declare useState and useEffect in that component as well.
Finally, our code does not handle any error or loading states, which are necessary when fetching data at runtime in our React client.
Fortunately, the useFetch hook is a far better abstraction that solves all of these considerations in a single line of code.
The only additional code we have to add is some conditionals that handle our loading and error states:
import useFetch from "react-fetch-hook";

function BlogPosts() {
  const { isLoading, error, data } = useFetch('http://jsonplaceholder.typicode.com/posts');

  if (isLoading) return <div>Loading...</div>;
  if (error) return <div>Error! {error.status}</div>;

  // return data here...
}
You get the same result, but with less code, added error handling and a better user experience (if you use a nice loading spinner).
You can install useFetch by running:
npm install react-fetch-hook
If you want an even more advanced third-party hook to do your data fetching (that can take care of refetching and caching your queries) look into SWR and React Query.
2. useForm Hook
Writing forms in React can be a pain, because it is repetitive and usually involves a lot of code to add common features like validation.
Here is what a very basic form in React looks like, where we have a single email input and handle the form submission with handleSubmit.
import isEmail from "validator/lib/isEmail";

function EmailForm() {
  function handleSubmit(event) {
    event.preventDefault();
    const email = event.target.elements.email.value;
    if (isEmail(email)) {
      console.log("form submitted: ", email);
    }
  }

  return (
    <form onSubmit={handleSubmit}>
      <label htmlFor="email">Email Address</label>
      <input id="email" type="email" required />
      <button type="submit">Submit</button>
    </form>
  );
}
But notice we have some more imperative code, where we have to use event.preventDefault() to tell the page not to reload, to get the email value from the elements object on our target element (the form itself), and then validate the email using the library validator.
Yes, we are validating the email value that is typed in, but if there’s a validation error, we need to tell the user.
Using the hook useForm from @mantine/hooks gives us a custom, reusable hook to manage all of our form state and easily show our user errors.
import { TextInput, Button } from "@mantine/core";
import { useForm } from "@mantine/hooks";
import isEmail from "validator/lib/isEmail";

export default function EmailForm() {
  const form = useForm({
    initialValues: { email: "" },
    errorMessages: { email: "Email is required" },
    validationRules: {
      email: (value) => isEmail(value),
    },
  });

  function handleSubmit(values) {
    console.log("form submitted: ", values);
  }

  return (
    <form onSubmit={form.onSubmit(handleSubmit)}>
      <TextInput
        required
        label="Email"
        placeholder="Email Address"
        {...form.getInputProps("email")}
      />
      <Button style={{ marginTop: 10 }} type="submit">
        Submit
      </Button>
    </form>
  );
}
Just by calling the useForm hook and specifying what the error message and validation should be for each field, the form value gives us all the functionality we need in our form through helper functions like getInputProps and onSubmit.
Now here’s what our form state looks like when our user doesn’t provide a valid email:
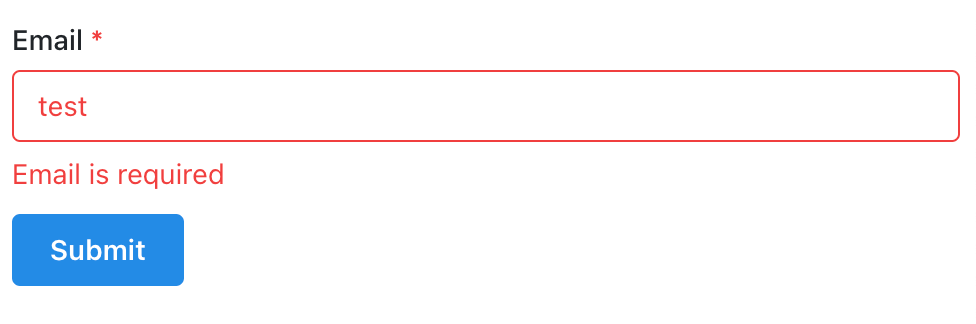
Note that in many cases, HTML inputs provide all the validation you need for common values like emails just by adding the
requiredattribute.
You can install useForm by running:
npm install @mantine/hooks
3. useLocalStorage Hook
It is helpful in React apps to be able to store user state locally in the browser.
If we had a video streaming app like YouTube, we could save the user’s video preferences (such as autoplay on or off) or their video progress in their browser’s local storage.
The difficulty of using local storage, however, is that all JavaScript data types must be converted into plain strings.
We often do this using JSON.stringify. But if we want to get the item out of local storage and use the data, it must be converted back into its original data type. We do that using JSON.parse.
This can be quite tricky, especially if we are building a server-rendered React app like Next.js that can’t always access the browser and therefore window APIs like local storage.
What can we do?
A very helpful hook to use is again from @mantine/hooks and is called useLocalStorageValue.
Let’s imagine that we are creating a toggle that stores an autoplay setting for our users’ videos, which can be set to “on” or “off”.
All we need to provide for useLocalStorageValue is the key that we want to assign our value to in local storage and its default value.
It works just like useState and gives us a state variable and a setter function to update.
import { useLocalStorageValue } from "@mantine/hooks";

export default function ToggleAutoplay() {
  const [autoplay, setAutoplay] = useLocalStorageValue({
    key: "autoplay",
    defaultValue: "on",
  });

  function toggleAutoplay() {
    setAutoplay((current) => (current === "on" ? "off" : "on"));
  }

  return (
    <button
      onClick={toggleAutoplay}
      style={{ backgroundColor: autoplay === "on" ? "green" : "red" }}
    >
      Autoplay {autoplay === "on" ? "On" : "Off"}
    </button>
  );
}
In our example here, clicking the button toggles autoplay to its opposite value and the background color changes to green if “on” and red if not.
But most importantly, the value is saved in our user’s browser, so when they refresh, their most recently saved choice is remembered.
You can install useLocalStorageValue by running:
npm install @mantine/hooks
Become a Professional React Developer
React is hard. You shouldn't have to figure it out yourself.
I've put everything I know about React into a single course, to help you reach your goals in record time:
Introducing: The React Bootcamp
It’s the one course I wish I had when I started learning React.
Click below to try the React Bootcamp for yourself:
 Click to get started