
By Amazing Enyichi Agu
React is a popular front-end JavaScript development library. It ranks #1 in awareness and usage according to the State Of JS 2021 survey.
This means that a majority of JavaScript developers likely are aware of or use React.
Even though React is popular for building web app user interfaces (UIs), you can also use the core React library for other things. In fact, the [react-dom](https://reactjs.org/docs/react-dom.html) library is what renders the UI on a web page – not React itself. React is more like an engine that can be ported to any environment.
One reason why developers love React is because of its approach to building user interfaces. You only have to describe what the interface should look like and the React engine takes care of the placement and any changes on the page.
There are some libraries that use React to help developers create other types of applications apart from web apps. They include:
- React 360: For building 3D Virtual Reality Applications
- React Desktop: For building Desktop Applications
- React Native: For building Mobile Applications
- Ink: For building Command-Line Applications
In this tutorial, we will explore command-line interfaces. We'll also build an app that displays the live prices of a few selected cryptocurrencies and tokens. To help get the prices of the tokens, we'll use the CoinGecko API.
A working version of the project can be found here on GitHub.
NOTE: This article assumes that you can use React to build basic front-end web apps. If not, here is a freeCodeCamp Course on React JS. The article also assumes that you can consume REST APIs and know the basic commands on the command line, as those are not covered in this article.
Alright, let's get started.
What is a Command-Line Interface? (CLI)
A command-line interface is a way that you can interact with a computer through text. It works by you typing in special commands in a command prompt.
 Command Line Interface in Windows Operating System
This was the way developers interacted with computers before Graphical User Interfaces (GUI) were created. Command-line interfaces are still useful for automating tasks and in software development generally.
What is Ink?
Ink is a JavaScript library that brings React to the command line. It helps develop CLI apps using the concept of component-based UI elements.
Ink allows you to use all the features of React including class-based components, lifecycle methods, functional components, hooks, and so on for building command-line tools.
The ink library also has plugins called Useful Components. These useful components are not built into the ink library, but are custom components built by other developers which you can import into an Ink project.
How to Install Ink
There are two ways of installing Ink. They are:
- Manually installing Ink with Babel
- Using the
create-ink-appcommand
In this article we'll use the create-ink-app method to quickly start an Ink project.
On the command line, navigate to the folder or directory where you would like to house your ink project, and then run the command below:
npx create-ink-app crypto-cli
 Installing Ink
This command installs the files necessary to build an Ink project inside the folder we ran the command in. In our case, the folder and the project's name are the same things ( crypto-cli).
create-ink-app also generates an executable command for our project so that we can run our application by calling its name on the CLI.
With that, Ink 3 (which is the latest version of Ink as of the time of this article) has been installed and we are ready to start building command-line apps.
When we run the crypto-cli command, we get this output.
 Output of running
 crypto-cli
Why do we have this output? Let's explore the files create-ink-app installed.
Examining the Files that Ink Installed
The file structure of the project looks like this:
 Files and folder create-ink-app provides
What do these files and the folder do?
node_modules: this folder holds all the packages needed for our app to function properly. The packages includereactandink, but also the dependencies ofreactandinkif any.node-modulesalso includes packages that the creators of theinkthought would provide a nice developer experience..editor-config: this file helps maintain consistency in code. A lot of developers might be working on this project with different IDEs. In order to make sure the coding style is the same, you can use.editor-config. You can find more information about it here..gitattributes: we'll use this to configure the attributes of our files that are going to be used by the version control program Git. You can find more information here. We don't have to add or remove anything in this file for this project.cli.js: in this file, we'll useinkto render our application.package-lock.json: we use this to lock the dependencies of our application to a particular version so that others can reproduce our project easily anywhere and anytime.package.json: contains metadata of our application including name, version, and dependencies.readme.md: a markdown readme file for our project.test.js: for writing tests in our application. We won't be editing this file in our project.ui.js: this is synonymous toApp.jsfor front-end web development with React. It imports and contains every component our project will have.
A look into the package.json shows us the dependencies we have installed:
...,
"dependencies": {
    "import-jsx": "^4.0.1",
    "ink": "^3.2.0",
    "meow": "^9.0.0",
    "react": "^17.0.2"
},
...
You might not be familiar with import-jsx and meow. Let's look at what they do.
import-jsx: you use this library to import and transpile JSX files inink.meow: CLI commands accept arguments.meowhelps us implement that inink.
Enough talk. Let's build.
How to Build the CLI Application
In this tutorial, as I mentioned earlier, we are going to build an application that displays prices of some cryptocurrencies and tokens using the CoinGecko API.
How to Create the Header
We'll import an npm package called ink-big-text . It is one of the "useful components" Ink provides. We'll use it to create a big header in the command line.
We'll also install ink-gradient for beautifying our header. It is another "useful component" Ink provides.
npm install ink-big-text ink-gradient
Then we'll edit our ui.js which again must contain all our components.
// ui.js

const React = require('react');
const Gradient = require('ink-gradient');
const BigText = require('ink-big-text');

const App = () => (
    <Gradient name="summer">
        <BigText text="crypto cli" align='center' font='chrome'/>
    </Gradient>
);

module.exports = App;
And the code translates to this wonderful header when we run crypto-cli.
 Output of the header
How to Display Our Data
To display our data, we need to create a Box element that arranges it in tabular form. Box works like a container of display: flex; on the web. You style it like a Flexbox element.
Before pulling the data from CoinGecko, we'll create mock data for now. A file data.json inside src will hold our mock data. You can find the mock data here.
Next, we'll create a folder called components inside the src folder. We'll also create a file called Table.js inside the components folder.
The following code then goes into Table.js:
// Table.js

const React = require('react');

const { useState, useEffect } = React;
// Destructuring useState and useEffect from React

const { Box, Text, Newline } = require('ink');
// Destructuring the components we need from ink

const cryptoData = require('../data.json');
// Fetching mock data

const Table = () => {

    const [data, setData] = useState([]);

    useEffect(()=>{
        setData(cryptoData);
    });

    return (
        <Box borderStyle='single' padding={2} flexDirection='column'>
            <Box>
                <Box width='25%'><Text>COIN</Text></Box>
                <Box width='25%'><Text>PRICE (USD)</Text></Box>
                <Box width='25%'><Text>24 HOUR CHANGE</Text></Box>
                <Box width='25%'><Text>ALL TIME HIGH</Text></Box>
            </Box>
            <Newline/>
            {
                data.map(({id, name, current_price, price_change_percentage_24h, ath}) => (
                    <Box key={id}>
                        <Box width='25%'><Text>{name}</Text></Box>
                        <Box width='25%'><Text>{current_price}</Text></Box>
                        <Box width='25%'><Text>{price_change_percentage_24h}</Text></Box>
                        <Box width='25%'><Text>{ath}</Text></Box>
                    </Box>
                ))
            }
        </Box>
    )
}

module.exports = Table;
Now we'll go ahead and import the Table component into our app.
// ui.js

const React = require('react');
const Gradient = require('ink-gradient');
const BigText = require('ink-big-text');
const importJsx = require('import-jsx');
const Table = importJsx('./components/Table')

const App = () => (
    <>
        <Gradient name="summer">
            <BigText
                text="crypto cli"
                align='center'
                font='chrome'
            />
        </Gradient>
        <Table/>
    </>
);

module.exports = App;
(perhaps, remove the 'use strict')
Running crypto-cli will give us this:
 Output using mock data
I like to have some decoration in my CLI app. So we'll go ahead and use the colors ink provides for us.
// Table.js

const React = require('react');

const { useState, useEffect } = React;

const { Box, Text, Newline } = require('ink');

const cryptoData = require('../data.json');

const Table = () => {

    const [data, setData] = useState([]);

    useEffect(()=>{
        setData(cryptoData);
    })

    return (
        <Box borderStyle='single' padding={2} flexDirection='column'>
            <Box>
                <Box width='25%'><Text>COIN</Text></Box>
                <Box width='25%'><Text>CURRENT PRICE (USD)</Text></Box>
                <Box width='25%'><Text>24 HOUR CHANGE</Text></Box>
                <Box width='25%'><Text>ALL TIME HIGH</Text></Box>
            </Box>
            <Newline/>
            {
                data.map(({id, name, current_price, price_change_percentage_24h, ath}) => (
                    <Box key={id}>
                        <Box width='25%'>
                            <Text>{name}</Text>
                        </Box>
                        <Box width='25%'>
                            <Text color='cyan'>{'$' + current_price.toLocaleString()}</Text>
                        </Box>
                        <Box width='25%'>
                            <Text backgroundColor={Math.sign(price_change_percentage_24h) < 0 ? 'red' : 'green'}>
                                {price_change_percentage_24h.toFixed(2) + '%'}
                            </Text>
                        </Box>
                        <Box width='25%'>
                            <Text color='green'>{'$' + ath.toLocaleString()}</Text>
                        </Box>
                    </Box>
                ))
            }
        </Box>
    )
}

module.exports = Table;
To be clear, in order to add color to text components in ink, we used the prop (attribute) color. In order to add background color, we used the attribute backgroundColor. Then we added logic that checks if the 24 hour change was negative or positive.
If the change was positive, we made sure the background-color was green, else the background-color will be red.
When we run crypto-cli, we have the following output:
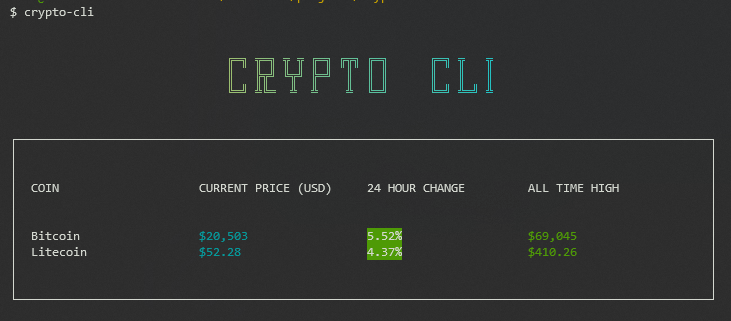 Output after adding styles
And manually negating the value for the second 24 HOUR CHANGE value in data.json produces the following output:
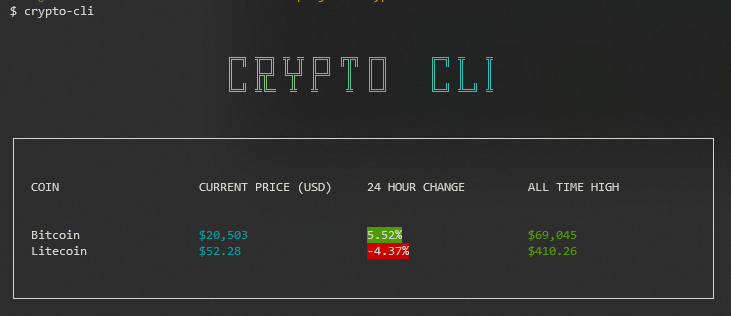 Output after negating a value
How to Fetch Data from the CoinGecko API
This stage is where we fetch actual data from CoinGecko API. Here are the steps we'll need to take:
 CoinGecko API page
- Navigate to the "coins" section and click on
/coins/markets
 navigating to /coins/markets
- Click the "Try it out" button.
- Input "usd" as the
vs_currency. Also type in theidof your favorite cryptocurrencies and tokens (I used bitcoin, litecoin, matic-network, ethereum, tether, binancecoin, solana, aave, cardano and tron). Remember to not add space when putting in the coin ids.
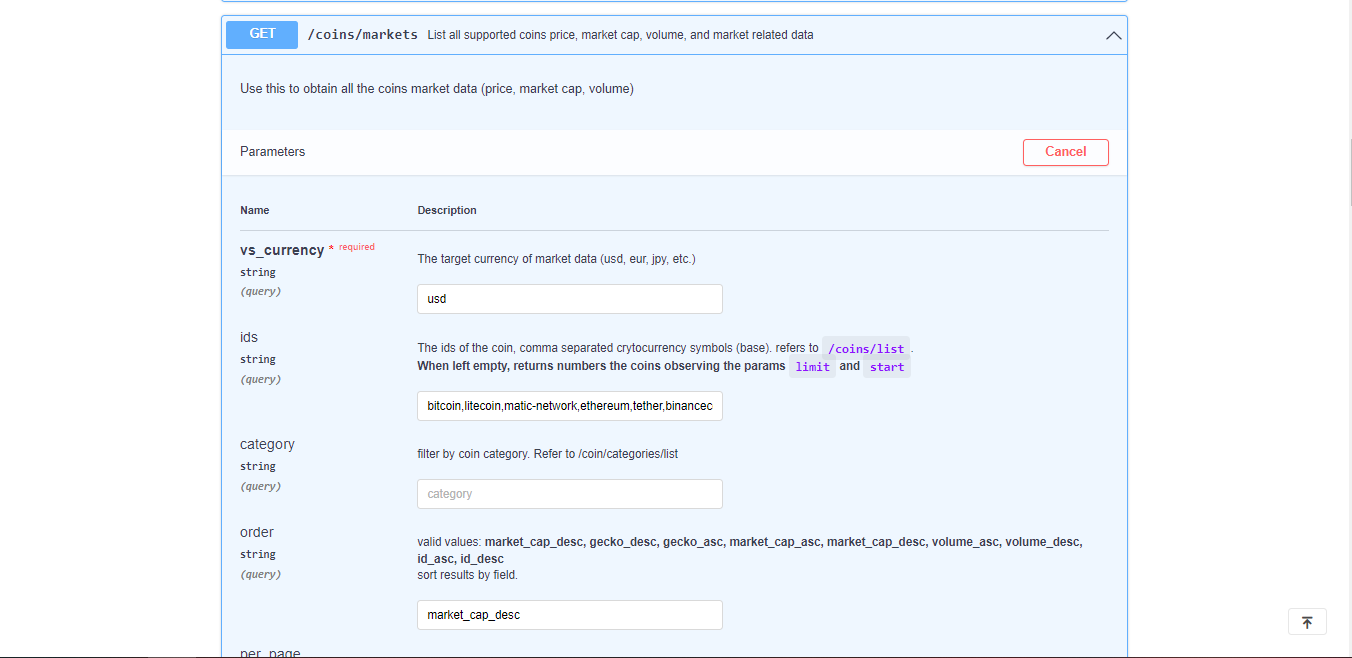 Input form values
- Click the execute button
- Copy out the link it generates. For me, this is the link I will use to make my API calls. The link depends on the cryptocurrencies or tokens you selected.
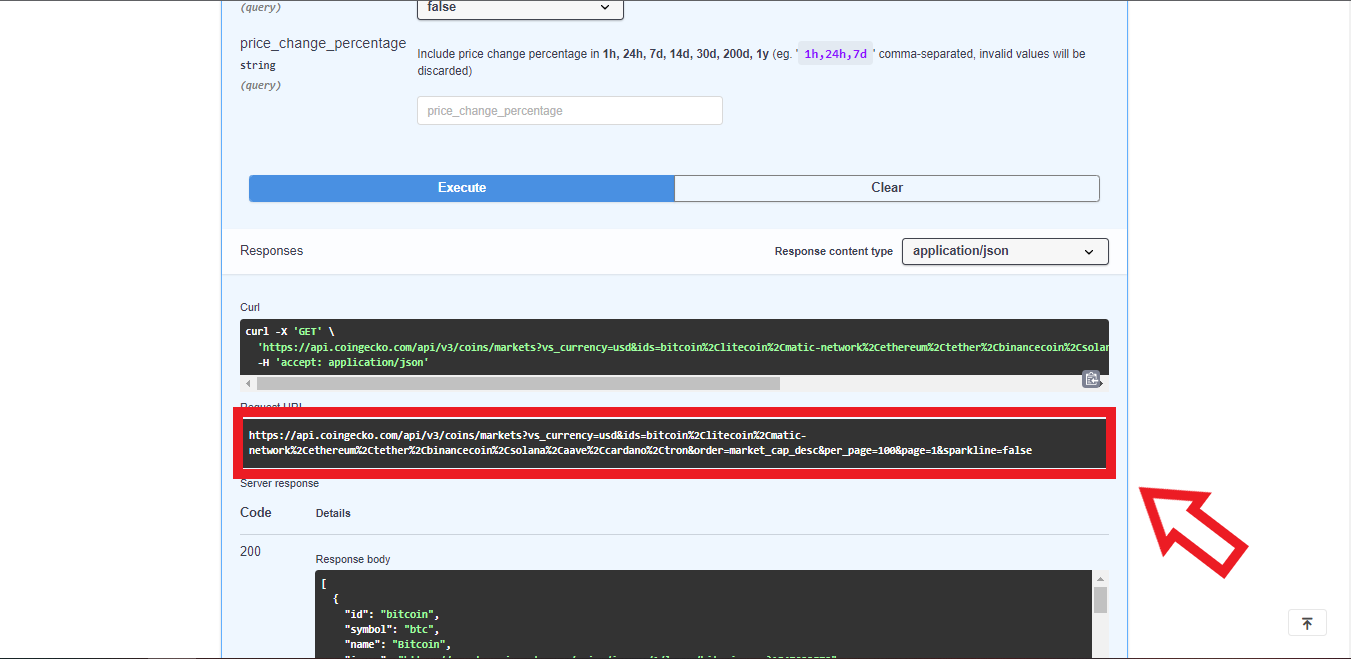 Copy the highlighted link
https://api.coingecko.com/api/v3/coins/markets?vs_currency=usd&ids=bitcoin%2Clitecoin%2Cmatic-network%2Cethereum%2Ctether%2Cbinancecoin%2Csolana%2Caave%2Ccardano%2Ctron&order=market_cap_desc&per_page=100&page=1&sparkline=false
We'll now move to our Table.js and make the API call.
Install [axios](https://github.com/axios/axios) which is an npm library useful for fetching the API data.
npm install axios
And then, using axios, we fetch our data.
const React = require('react')
const { useState, useEffect } = React;
const { Box, Text, Newline } = require('ink')
const axios = require('axios')

const url = 'https://api.coingecko.com/api/v3/coins/markets?vs_currency=usd&ids=bitcoin%2Clitecoin%2Cmatic-network%2Cethereum%2Ctether%2Cbinancecoin%2Csolana%2Caave%2Ccardano%2Ctron&order=market_cap_desc&per_page=100&page=1&sparkline=false'

const Table = () => {

    const [data, setData] = useState([])

    useEffect(()=>{
        axios.get(url)
        .then(response => setData(response.data))
        .catch(e => console.log(e))
    },[])
    // Fetching data and catching possible errors

    return (
        <Box borderStyle='single' padding={2}>
            {
                data.length === 0 ?
                <Box>
                    <Text>Loading ...</Text>
                </Box> :
                <Box flexDirection='column'>
                    <Box>
                        <Box width='25%'><Text>COIN</Text></Box>
                        <Box width='25%'><Text>CURRENT PRICE (USD)</Text></Box>
                        <Box width='25%'><Text>24 HOUR CHANGE</Text></Box>
                        <Box width='25%'><Text>ALL TIME HIGH</Text></Box>
                    </Box>
                    <Newline/>
                    {
                        data.map(({id, name, current_price, price_change_percentage_24h, ath}) => (
                            <Box key={id}>
                                <Box width='25%'>
                                    <Text>{name}</Text>
                                </Box>
                                <Box width='25%'>
                                    <Text color='cyan'>{'$' + current_price.toLocaleString()}</Text>
                                </Box>
                                <Box width='25%'>
                                    <Text backgroundColor={Math.sign(price_change_percentage_24h) < 0 ? 'red' : 'green'}>
                                        {price_change_percentage_24h.toFixed(2) + '%'}
                                    </Text>
                                </Box>
                                <Box width='25%'>
                                    <Text color='green'>{'$' + ath.toLocaleString()}</Text>
                                </Box>
                            </Box>
                        ))
                    }
                </Box>
            }
        </Box>
    )
}

module.exports = Table;
And with the coins we selected, we should see the following output (with most possibly different values because the crypto market is volatile):
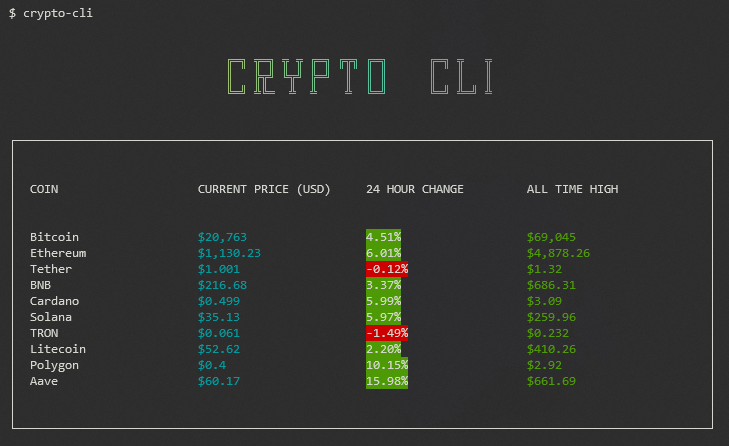 Final Output
Conclusion
In this tutorial, we learned how to build a command line application with React and Ink.
We also used the CoinGecko API and Axios to fetch our data.
Ink offers more components and you can combine it in a number of ways to create really useful command line programs.
Thank you for reading and I will see you soon.