
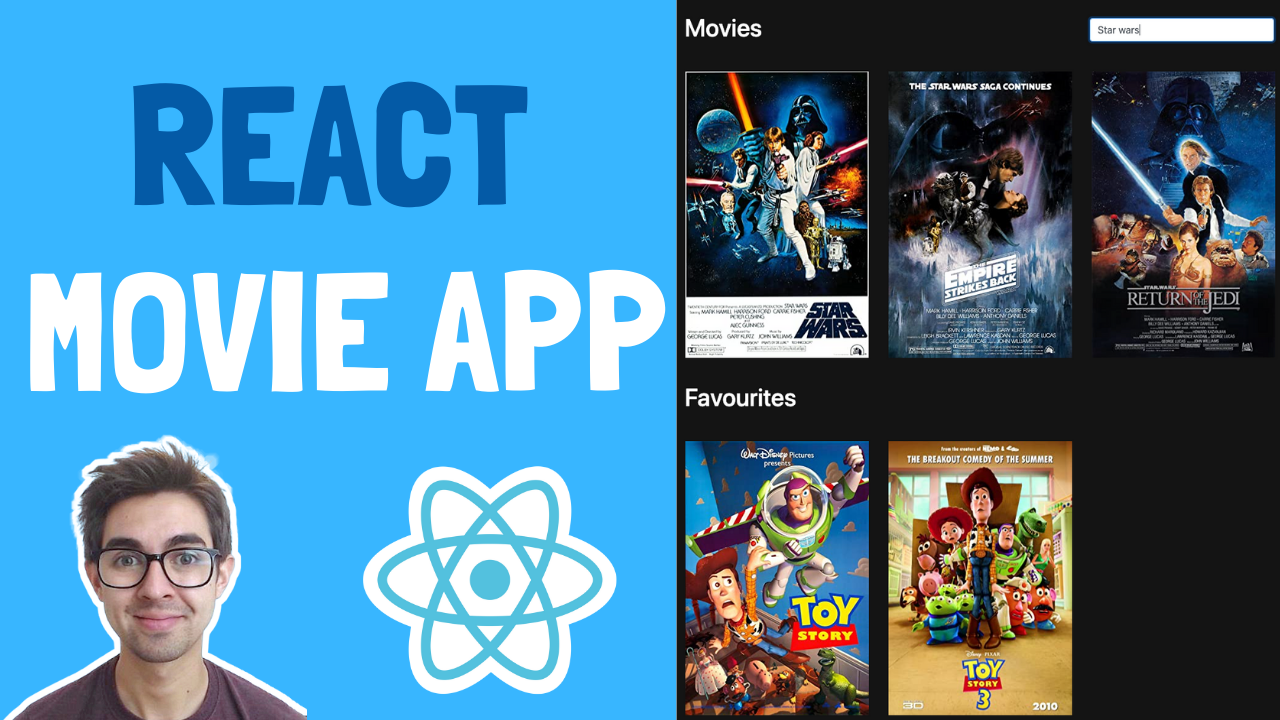
In this React movie app tutorial, we're going to:
- Use a real API to search for movies as we type
- Create a "Netflix style" horizontal scroll effect
- Add movies to and remove them from our favourites
- Save our favourites to local storage to they appear when the app refreshes
This is what we'll build:
And here's a video walkthrough if you want to supplement your reading.
Finally, in case you get lost while following along, you can grab the finished code here (on GitHub).
Let's Go!
Our movie app wouldn't be any good if we didn't have any movies to display.
We're going to use the OMDB API as our source for movies. This API is free to use, and all we have to do is sign up and get an API key.
How to Get an API Key
Go to http://www.omdbapi.com/apikey.aspx and fill out the form. You should receive an email like this:
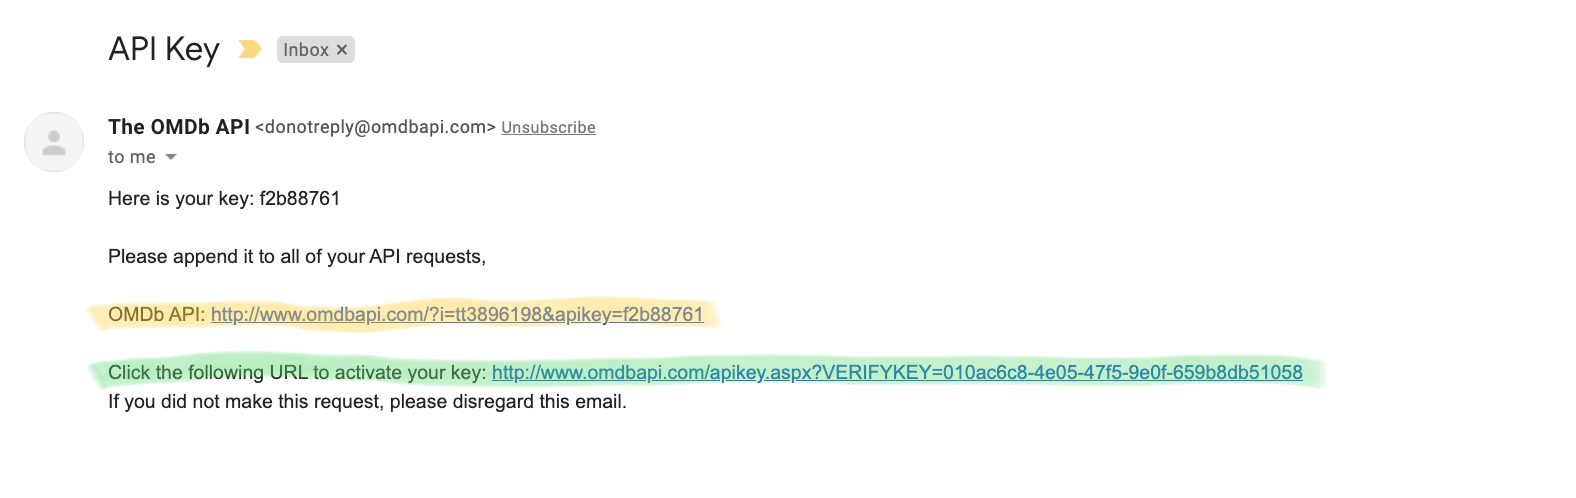
Click the activation link (highlighted in green) and you're good to go. Woohoo!
Exploring the API with PostMan
This is an optional step, so if you'd rather get into the React-y goodness feel free to jump to the next section.
We're going to use Postman (download if here if you haven't got it) to play with the API.
Fire up Postman and paste in the "OMBb API" URL you received in your email (highlighted in yellow in the image above). Click "send" and you should get some JSON back in the "body" section like so:
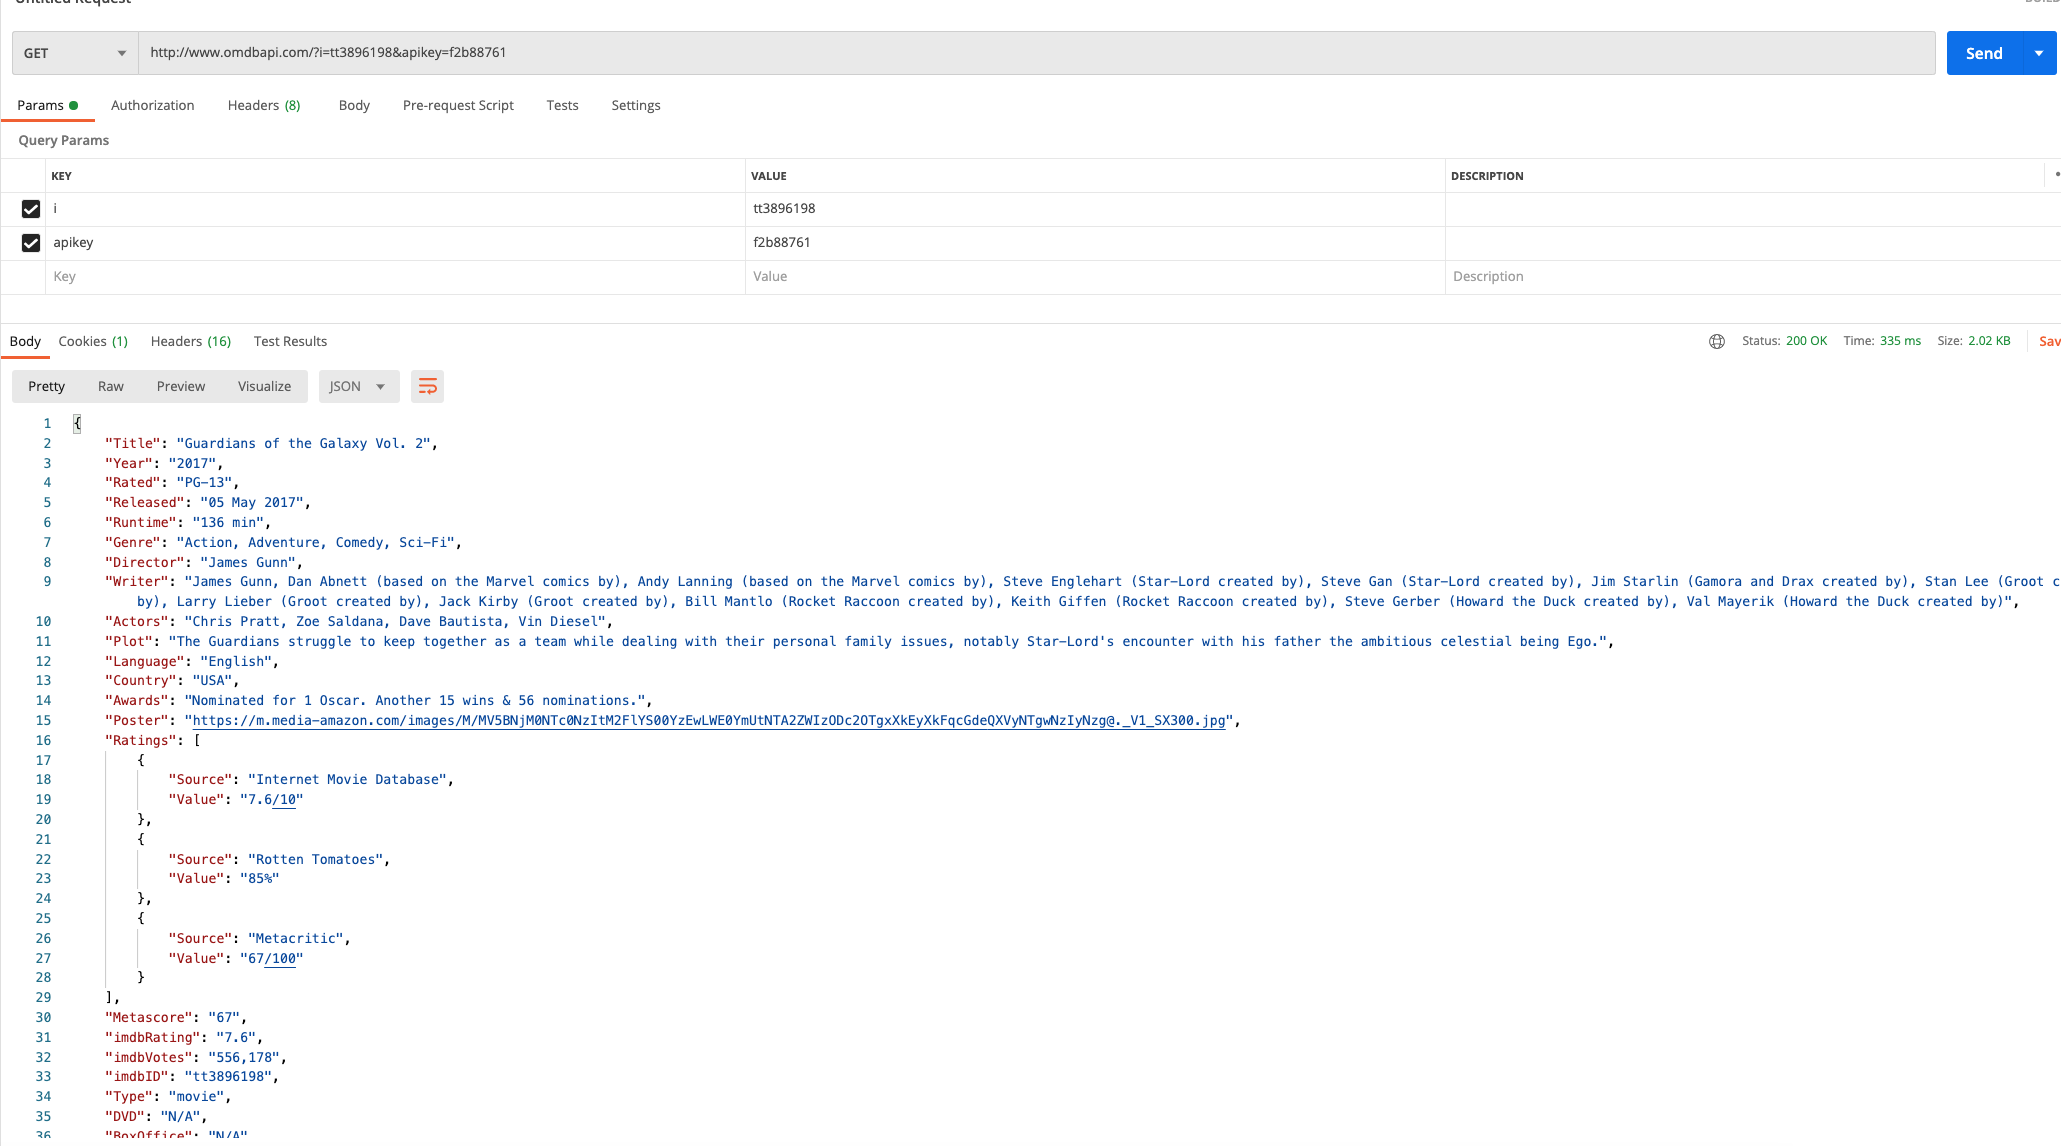
Mission success! Well, part of the mission is a success – we're only getting started here after all. But this means our URL from the email is working fine and our React App will be able to retrieve movies.
How to Search for Movies by Title
So far we've used the API to retrieve one movie, but what we want to do is search for "Titles containing a search term". To do this, we change the i query parameter to s like so:
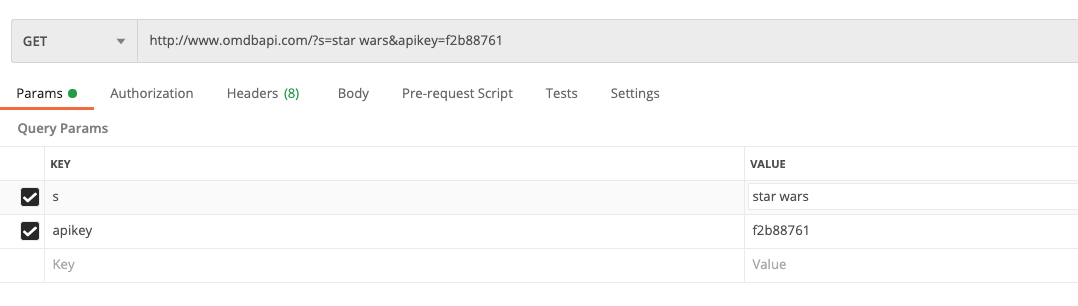
This will query the API for all movies containing "star wars" in the title. Click "send" again, and this time you'll see the response is different:
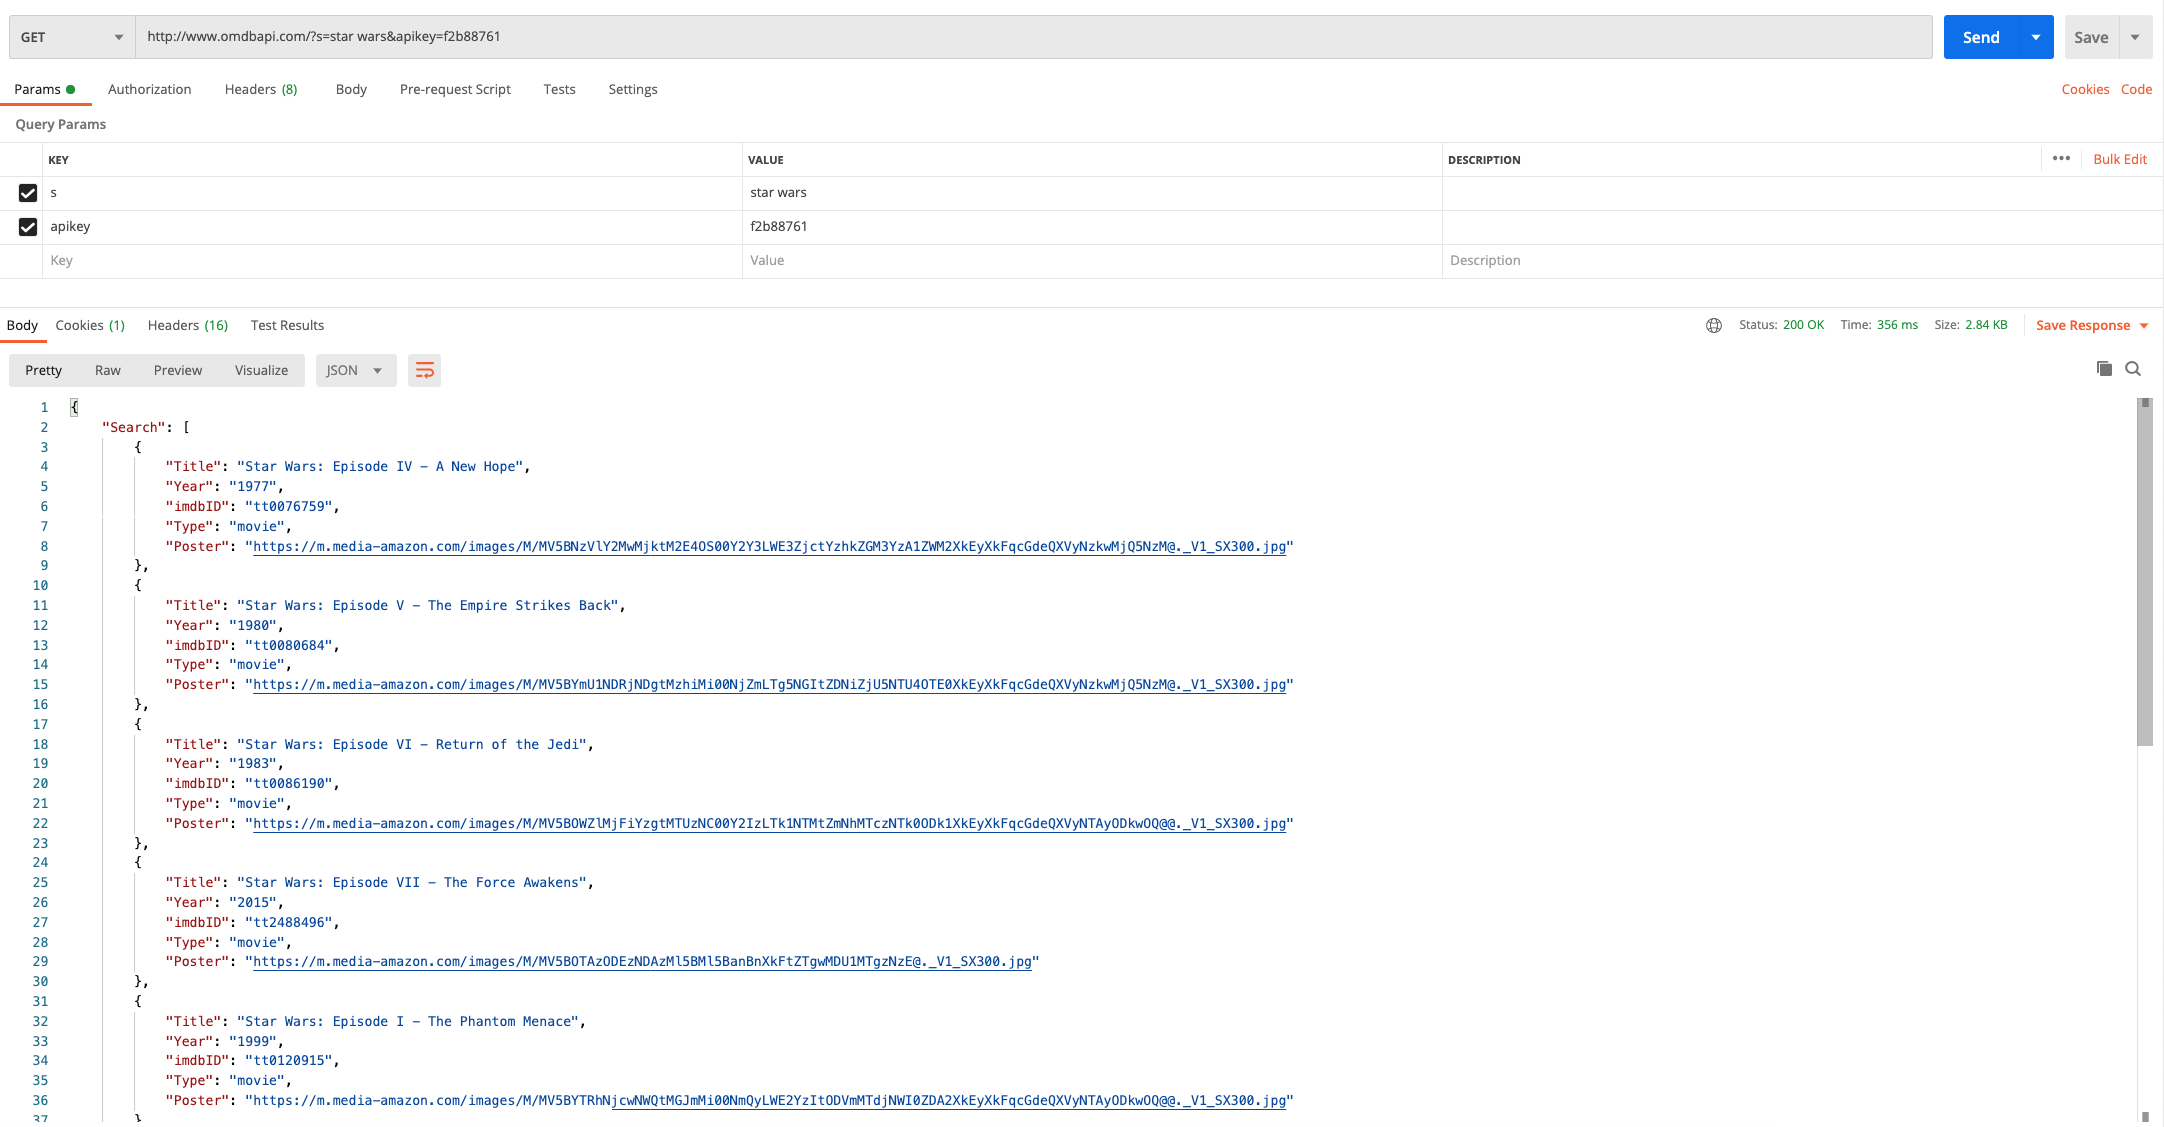
Notice how we receive an array of items. Each item in the array contains some details about a movie (title, year and so on). We're going to take the Poster image for each object and display it in our app
How to Set Up a React Project
Ok with that out of the way, we can get into the good stuff – creating a React project. We're going to use create-react-app to get us off the ground quickly.
Fire up a terminal and type:
npx create-create-app movie-app
When thats finished doing its thing, we're going to add Bootstrap to help us position things nicely without needing much of our own CSS.
Run the following commands:
cd movie-app
npm install boostrap
Thats all we need, so go ahead and fire up the app:
npm start
How to Add Movies to State
The App component will hold the state for the app. That way we can keep everything organised in one place and pass different pieces of state to different components.
Open App.js, delete everything, and replace it with the following:
import React, { useState, useEffect } from 'react';
import 'bootstrap/dist/css/bootstrap.min.css';
import './App.css';

const App = () => {
    const [movies, setMovies] = useState([        {
            "Title": "Star Wars: Episode IV - A New Hope",
            "Year": "1977",
            "imdbID": "tt0076759",
            "Type": "movie",
            "Poster": "https://m.media-amazon.com/images/M/MV5BNzVlY2MwMjktM2E4OS00Y2Y3LWE3ZjctYzhkZGM3YzA1ZWM2XkEyXkFqcGdeQXVyNzkwMjQ5NzM@._V1_SX300.jpg"
        },
        {
            "Title": "Star Wars: Episode V - The Empire Strikes Back",
            "Year": "1980",
            "imdbID": "tt0080684",
            "Type": "movie",
            "Poster": "https://m.media-amazon.com/images/M/MV5BYmU1NDRjNDgtMzhiMi00NjZmLTg5NGItZDNiZjU5NTU4OTE0XkEyXkFqcGdeQXVyNzkwMjQ5NzM@._V1_SX300.jpg"
        },
        {
            "Title": "Star Wars: Episode VI - Return of the Jedi",
            "Year": "1983",
            "imdbID": "tt0086190",
            "Type": "movie",
            "Poster": "https://m.media-amazon.com/images/M/MV5BOWZlMjFiYzgtMTUzNC00Y2IzLTk1NTMtZmNhMTczNTk0ODk1XkEyXkFqcGdeQXVyNTAyODkwOQ@@._V1_SX300.jpg"
        }]);

    return (
        <div className='container-fluid movie-app'>
            <div className='row'>

            </div>
        </div>
    );
};

export default App;
- We're creating a state object to hold our list of movies. This will come from the API eventually, but for now we're just going to hard code some data – which is taken from the response in Postman.
- We're adding the CSS from Bootstrap and adding some basic markup
If you save/run the app, you'll see that even though we've set up some state, we aren't rendering anything yet – so the screen will be blank.
How to Create a MovieList Component
Ah our first component! We're going to create a MovieList component to display the list of movies that comes back in the search request.
Create a new folder call components under the src folder. Create a new file in the components folder called MovieList.js:
Open up MovieList.js and add the following:
import React from 'react';

const MovieList = (props) => {
    return (
        <>
            {props.movies.map((movie, index) => (
                <div className='image-container d-flex justify-content-start m-3'>
                    <img src={movie.Poster} alt='movie'></img>
                </div>
            ))}
        </>
    );
};

export default MovieList;
- We'll pass in a list of movies as props
- We'll use the map function to loop over these movies
- For each movie we'll display an image using the Poster URL as the image source
How to Render our MovieList
Just one more step before we see stuff working in the browser - are you excited?!
Jump back into App.js and update it with the following:
import React, { useState, useEffect } from 'react';
import 'bootstrap/dist/css/bootstrap.min.css';
import './App.css';
import MovieList from './components/MovieList';

const App = () => {
    const [movies, setMovies] = useState([
        {
            Title: 'Star Wars: Episode IV - A New Hope',
            Year: '1977',
            imdbID: 'tt0076759',
            Type: 'movie',
            Poster:
                'https://m.media-amazon.com/images/M/MV5BNzVlY2MwMjktM2E4OS00Y2Y3LWE3ZjctYzhkZGM3YzA1ZWM2XkEyXkFqcGdeQXVyNzkwMjQ5NzM@._V1_SX300.jpg',
        },
        {
            Title: 'Star Wars: Episode V - The Empire Strikes Back',
            Year: '1980',
            imdbID: 'tt0080684',
            Type: 'movie',
            Poster:
                'https://m.media-amazon.com/images/M/MV5BYmU1NDRjNDgtMzhiMi00NjZmLTg5NGItZDNiZjU5NTU4OTE0XkEyXkFqcGdeQXVyNzkwMjQ5NzM@._V1_SX300.jpg',
        },
        {
            Title: 'Star Wars: Episode VI - Return of the Jedi',
            Year: '1983',
            imdbID: 'tt0086190',
            Type: 'movie',
            Poster:
                'https://m.media-amazon.com/images/M/MV5BOWZlMjFiYzgtMTUzNC00Y2IzLTk1NTMtZmNhMTczNTk0ODk1XkEyXkFqcGdeQXVyNTAyODkwOQ@@._V1_SX300.jpg',
        },
    ]);

    return (
        <div className='container-fluid movie-app'>
            <div className='row'>
                <MovieList movies={movies} />
            </div>
        </div>
    );
};

export default App;
- We're importing the MovieList component (line 4 in your IDE)
- We're rendering the MovieList and passing the movies we stored in state as props (line 37 in your IDE)
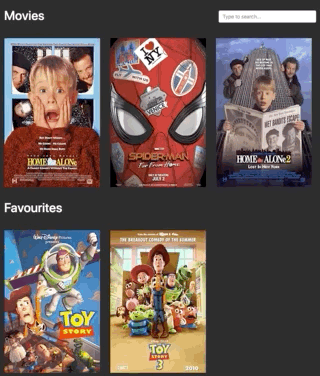
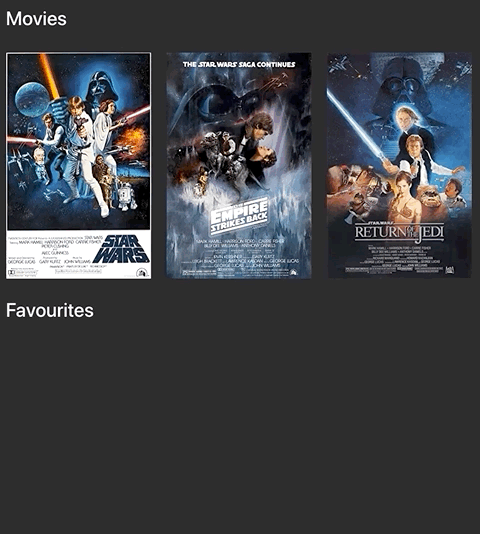
Save and run the app, and then if you go to the browser you should see the following:
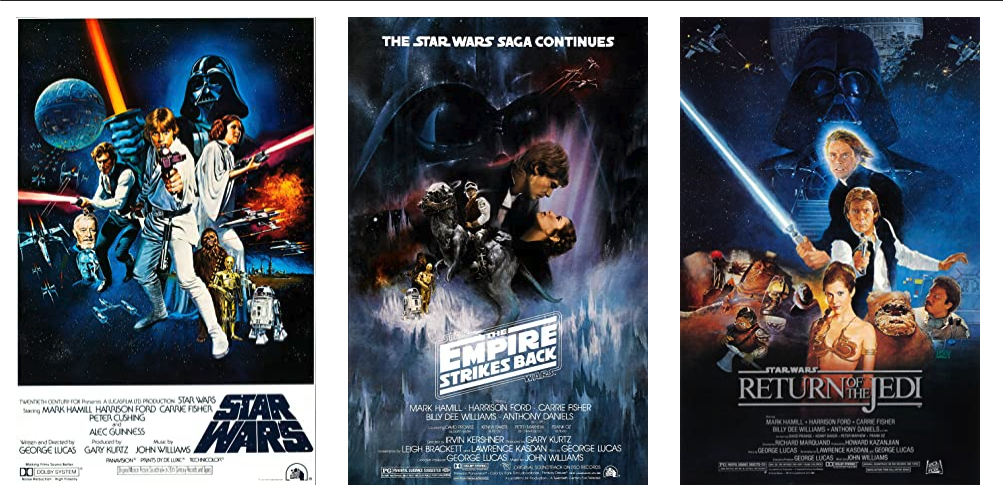 These movies are taking from our movies state object in App.js
We have some movie posters. Marvelous!
How to Add a Call to the API
Now that we know our app is capable of rendering the movies we receive from the API, we can add logic to make a request to get Movies and render these on the screen.
Update App.js with the following:
import React, { useState, useEffect } from 'react';
import 'bootstrap/dist/css/bootstrap.min.css';
import './App.css';
import MovieList from './components/MovieList';

const App = () => {
    const [movies, setMovies] = useState([]);

    const getMovieRequest = async () => {
        const url = `http://www.omdbapi.com/?s=star wars&apikey=263d22d8`;

        const response = await fetch(url);
        const responseJson = await response.json();

        if (responseJson.Search) {
            setMovies(responseJson.Search);
        }
    };

    useEffect(() => {
        getMovieRequest();
    }, []);

    return (
        <div className='container-fluid movie-app'>
            <div className='row'>
                <MovieList movies={movies} />
            </div>
        </div>
    );
};

export default App;
- We're removing the hardcoded movies from our movie state value (line 7 in your IDE)
- We've added a function that calls the API. This uses the Fetch API (line 9 in your IDE)
- We are hardcoding a search value for now – later we'll add an input that the user can type a search value into (line 10 in your IDE)
- If we get any movies back in the search, we're going to set this to our movie state
- We're using a useEffect to make sure the API call only happens when the app loads for the first time (line 20 in your IDE)
Since we already pass the movie state value to the MovieList as props, this works automatically without us having to change our JSX. How nice!
How to Add Horizontal Scroll
While we're here we're going to add the fancy horizontal scroll effect and a dark background – Netflix style.
Go to App.css and delete everything that's there. Then add the following:
body {
    background: #141414;
    color: #ffffff;
}

.movie-app > .row {
    overflow-x: auto;
    flex-wrap: nowrap;
}
Thats it! Try scrolling horizontally through the movies in the browser.
How to Add a Heading and Search input
So far we've been using hardcoded search values, but this might not please the non Star Wars fans.
Next we'll add a heading and a search input that lets the user search for whatever they want.
How to add the Heading
Add a new component to the components folder called MovieListHeading.js. Open it up and add the following:
import React from 'react';

const MovieListHeading = (props) => {
    return (
        <div className='col'>
            <h1>{props.heading}</h1>
        </div>
    );
};

export default MovieListHeading;
- This accepts a heading prop which gets rendered within a Bootstrap column
- This allows us to reuse this later
How to add the Search Input
Add a new component to the components folder called SearchBox.js. Open it up and add the following:
import React from 'react';

const SearchBox = (props) => {
    return (
        <div className='col col-sm-4'>
            <input
                className='form-control'
                value={props.value}
                onChange={(event) => props.setSearchValue(event.target.value)}
                placeholder='Type to search...'
            ></input>
        </div>
    );
};

export default SearchBox;
- This renders an input
- Takes a value from props, and when the user types, calls a function which updates the value. This is also taken from props.
How to save the Search Input to state
Now that we have some new components, we need to know what the user has typed so that we can send it to the API. Update App.js with the following:
import React, { useState, useEffect } from 'react';
import 'bootstrap/dist/css/bootstrap.min.css';
import './App.css';
import MovieList from './components/MovieList';
import MovieListHeading from './components/MovieListHeading';
import SearchBox from './components/SearchBox';

const App = () => {
    const [movies, setMovies] = useState([]);
    const [searchValue, setSearchValue] = useState('');

    const getMovieRequest = async () => {
        const url = `http://www.omdbapi.com/?s=star wars&apikey=263d22d8`;

        const response = await fetch(url);
        const responseJson = await response.json();

        if (responseJson.Search) {
            setMovies(responseJson.Search);
        }
    };

    useEffect(() => {
        getMovieRequest();
    }, []);

    return (
        <div className='container-fluid movie-app'>
            <div className='row d-flex align-items-center mt-4 mb-4'>
                <MovieListHeading heading='Movies' />
                <SearchBox searchValue={searchValue} setSearchValue={setSearchValue} />
            </div>
            <div className='row'>
                <MovieList movies={movies} />
            </div>
        </div>
    );
};

export default App;
- We're adding a new state value to store what the user types (line 10 in your IDE)
- We're importing our components (lines 5/6 in your IDE)
- We're adding a new "row" that holds our MovieListHeading and Searchbox components (line 29 in your IDE)
- And we're passing the searchValue value and the setSearchValue function to the SearchBox component (line 31)
By saving the state of the input in App.js, it makes it easy for us to pass the search value to the getMovieRequest function.
How to call the API when the Search Value changes
Now that we know what the user has typed, we need to call the API with this value. Update App.js with the following:
import React, { useState, useEffect } from 'react';
import 'bootstrap/dist/css/bootstrap.min.css';
import './App.css';
import MovieList from './components/MovieList';
import MovieListHeading from './components/MovieListHeading';
import SearchBox from './components/SearchBox';

const App = () => {
    const [movies, setMovies] = useState([]);
    const [searchValue, setSearchValue] = useState('');

    const getMovieRequest = async (searchValue) => {
        const url = `http://www.omdbapi.com/?s=${searchValue}&apikey=263d22d8`;

        const response = await fetch(url);
        const responseJson = await response.json();

        if (responseJson.Search) {
            setMovies(responseJson.Search);
        }
    };

    useEffect(() => {
        getMovieRequest(searchValue);
    }, [searchValue]);

    return (
        <div className='container-fluid movie-app'>
            <div className='row d-flex align-items-center mt-4 mb-4'>
                <MovieListHeading heading='Movies' />
                <SearchBox searchValue={searchValue} setSearchValue={setSearchValue} />
            </div>
            <div className='row'>
                <MovieList movies={movies} />
            </div>
        </div>
    );
};

export default App;
- We're updating our getMovieRequest function to accept a parameter: searchValue (line 12 in your IDE)
- We're passing this value to the request using a template string (line 13 in your IDE)
- We're updating the useEffect hook to run whenever the searchValue changes (line 25 in your IDE)
- When the useEffect hooks runs, it passes the new searchValue to our getMovieRequest function (line 24 in your IDE)
- This does a call to the API and updates the state if we get results as usual
Try this in the browser – and you'll see the results update in real time.
How to Add Favourites
Being able to search for movies is nice and all, but how are we supposed to remember to watch all these fantastic films? By adding them to favourites, of course!
We'll add a nice "zooming" effect that shows an "Add to Favourites" button when the user hovers over the poster, like you see below.
We'll also add logic to add/display any favourite movies the user selects:
How to add the Overlay
We'll start by adding the overlay and zooming effect. Go to MovieList.js and update it with the following:
import React from 'react';

const MovieList = (props) => {
    return (
        <>
            {props.movies.map((movie, index) => (
                <div className='image-container d-flex justify-content-start m-3'>
                    <img src={movie.Poster} alt='movie'></img>
                    <div className='overlay d-flex align-items-center justify-content-center'>
                        Add to Favourites
                    </div>
                </div>
            ))}
        </>
    );
};

export default MovieList;
- We're adding a new class to the parent div: image-container. This will allow us to add the zoom effect (line 7 in your IDE)
- We're adding a new div which will be the overlay. We'll hide this div initially and show it when the user hovers over (line 9 in your IDE)
- We're adding some text (line 10 in your IDE)
Now if you save and run this, nothing will happen. We need to add some CSS for the magic to happen. Go to App.css and add the following to the file:
.image-container {
    position: relative;
    transition: transform 0.2s;
}

.image-container:hover {
    cursor: pointer;
    transform: scale(1.1);
}

.image-container:hover .overlay {
    opacity: 1;
}

.overlay {
    position: absolute;
    background: rgba(0, 0, 0, 0.8);
    width: 100%;
    transition: 0.5s ease;
    opacity: 0;
    bottom: 0;
    font-size: 20px;
    padding: 20px;
    text-align: center;
}
- We're adding a transition effect to the image container to "scale" it when the user hovers over (giving us the zoom effect)
- We're adding some styling to the overlay which is hidden initially
- We're increasing the opacity (that is, showing the overlay) when the user hovers over
If you run this in the browser, you can see the image "zooms" and the overlay appears when you hover over. Neat!
How to create the "Add to Favourites" component
Next we're going to create an "Add to Favourites" component that we pass to the MovieList which we'll then render in the overlay.
Create a new file in the components folder called AddToFavourites.js. Add the following:
import React from 'react';

const AddFavourite = () => {
    return (
        <>
            <span className='mr-2'>Add to Favourites</span>
            <svg
                width='1em'
                height='1em'
                viewBox='0 0 16 16'
                class='bi bi-heart-fill'
                fill='red'
                xmlns='http://www.w3.org/2000/svg'
            >
                <path
                    fill-rule='evenodd'
                    d='M8 1.314C12.438-3.248 23.534 4.735 8 15-7.534 4.736 3.562-3.248 8 1.314z'
                />
            </svg>
        </>
    );
};

export default AddFavourite;
This will return the text "Add to Favourites" and a "Heart" icon (taken from www.icons.getboostrap.com).
Next we're going to import this component into App.js and pass it to our MovieList component. Update App.js with the following:
import React, { useState, useEffect } from 'react';
import 'bootstrap/dist/css/bootstrap.min.css';
import './App.css';
import MovieList from './components/MovieList';
import MovieListHeading from './components/MovieListHeading';
import SearchBox from './components/SearchBox';
import AddFavourites from './components/AddFavourites';

const App = () => {
    const [movies, setMovies] = useState([]);
    const [searchValue, setSearchValue] = useState('');

    const getMovieRequest = async (searchValue) => {
        const url = `http://www.omdbapi.com/?s=${searchValue}&apikey=263d22d8`;

        const response = await fetch(url);
        const responseJson = await response.json();

        if (responseJson.Search) {
            setMovies(responseJson.Search);
        }
    };

    useEffect(() => {
        getMovieRequest(searchValue);
    }, [searchValue]);

    return (
        <div className='container-fluid movie-app'>
            <div className='row d-flex align-items-center mt-4 mb-4'>
                <MovieListHeading heading='Movies' />
                <SearchBox searchValue={searchValue} setSearchValue={setSearchValue} />
            </div>
            <div className='row'>
                <MovieList movies={movies} favouriteComponent={AddFavourites} />
            </div>
        </div>
    );
};

export default App;
- We're importing our new AddFavourites component (line 7 in your IDE)
- We're passing this as a prop (favouriteComponent) to our MovieList component (line 35)
Now that our MovieList component accepts this component as a prop, we can render it in our overlay
Remember that React components are just functions - so we can pass them around like we do normal functions!
Open up MovieList.js and update it with the following:
import React from 'react';

const MovieList = (props) => {
    const FavouriteComponent = props.favouriteComponent;
    return (
        <>
            {props.movies.map((movie, index) => (
                <div className='image-container d-flex justify-content-start m-3'>
                    <img src={movie.Poster} alt='movie'></img>
                    <div className='overlay d-flex align-items-center justify-content-center'>
                        <FavouriteComponent />
                    </div>
                </div>
            ))}
        </>
    );
};

export default MovieList;
- We're taking our favouriteComponent from props and assigning it to a variable. This lets us use it as a react component (line 4 in your IDE)
- We're rendering our favouriteComponent in the overlay (line 15 in your IDE)
This approach lets us customize what gets rendered in the overlay. We can pass any react component and the MovieList component will render it. This makes our MovieList component reusable.
How to save favourites to state
So we have our favourites component in place, and although it looks nice, it doesn't do anything yet.
When the user clicks the "Add to Favourites" component, we want to take the movie they clicked and save it into a new state object called favourites. We'll then render this list in the UI.
Open up App.js and update it with the following:
import React, { useState, useEffect } from 'react';
import 'bootstrap/dist/css/bootstrap.min.css';
import './App.css';
import MovieList from './components/MovieList';
import MovieListHeading from './components/MovieListHeading';
import SearchBox from './components/SearchBox';
import AddFavourites from './components/AddFavourites';

const App = () => {
    const [movies, setMovies] = useState([]);
    const [searchValue, setSearchValue] = useState('');
    const [favourites, setFavourites] = useState([]);

    const getMovieRequest = async (searchValue) => {
        const url = `http://www.omdbapi.com/?s=${searchValue}&apikey=263d22d8`;

        const response = await fetch(url);
        const responseJson = await response.json();

        if (responseJson.Search) {
            setMovies(responseJson.Search);
        }
    };

    const addFavouriteMovie = (movie) => {
        const newFavouriteList = [...favourites, movie];
        setFavourites(newFavouriteList);
    };

    useEffect(() => {
        getMovieRequest(searchValue);
    }, [searchValue]);

    return (
        <div className='container-fluid movie-app'>
            <div className='row d-flex align-items-center mt-4 mb-4'>
                <MovieListHeading heading='Movies' />
                <SearchBox searchValue={searchValue} setSearchValue={setSearchValue} />
            </div>
            <div className='row'>
                <MovieList
                    movies={movies}
                    favouriteComponent={AddFavourites}
                    handleFavouritesClick={addFavouriteMovie}
                />
            </div>
        </div>
    );
};

export default App;
- We're adding a new state object to hold our favourites. We'll add whatever movie the user clicked to this array (line 12 in your IDE)
- We're creating a function called addFavouriteMovie, which accepts a movie. This takes the current favourites array, copies it, adds the new movie to it, and saves everything back into state (line 25 in your IDE)
- We're passing this function as a prop (handleFavouritesClick) to our MovieList component (line 44 in your IDE)
Now that we have our state object, and a way to update that state object, we need to call this from our favouritesComponent in MovieList.
Open up MovieList.js and update it with the following:
import React from 'react';

const MovieList = (props) => {
    const FavouriteComponent = props.favouriteComponent;

    return (
        <>
            {props.movies.map((movie, index) => (
                <div className='image-container d-flex justify-content-start m-3'>
                    <img src={movie.Poster} alt='movie'></img>
                    <div
                        onClick={() => props.handleFavouritesClick(movie)}
                        className='overlay d-flex align-items-center justify-content-center'
                    >
                        <FavouriteComponent />
                    </div>
                </div>
            ))}
        </>
    );
};

export default MovieList;
- All we're doing here is taking the handleFavouritesClick function from props and adding it to an onClick property in the overlay
- We're passing the current movie the map function is currently on to the handleFavouritesClick function
Now if you run the app, click "Add to Favourites" for any movie, and open up the React dev tools (in Chrome) you'll see it updates in state.
Unfortunately the hooks aren't named the same as what we called them, but we can guess which one it is:

How to render Favourite movies
Things are looking good so far. we have the ability to save things to favourites, but haven't actually displayed them yet.
We're going to reuse the MovieList component to display our favourites. How fancy!
Open up App.js and update it with the following:
import React, { useState, useEffect } from 'react';
import 'bootstrap/dist/css/bootstrap.min.css';
import './App.css';
import MovieList from './components/MovieList';
import MovieListHeading from './components/MovieListHeading';
import SearchBox from './components/SearchBox';
import AddFavourites from './components/AddFavourites';

const App = () => {
    const [movies, setMovies] = useState([]);
    const [searchValue, setSearchValue] = useState('');
    const [favourites, setFavourites] = useState([]);

    const getMovieRequest = async (searchValue) => {
        const url = `http://www.omdbapi.com/?s=${searchValue}&apikey=263d22d8`;

        const response = await fetch(url);
        const responseJson = await response.json();

        if (responseJson.Search) {
            setMovies(responseJson.Search);
        }
    };

    const addFavouriteMovie = (movie) => {
        const newFavouriteList = [...favourites, movie];
        setFavourites(newFavouriteList);
    };

    useEffect(() => {
        getMovieRequest(searchValue);
    }, [searchValue]);

    return (
        <div className='container-fluid movie-app'>
            <div className='row d-flex align-items-center mt-4 mb-4'>
                <MovieListHeading heading='Movies' />
                <SearchBox searchValue={searchValue} setSearchValue={setSearchValue} />
            </div>
            <div className='row'>
                <MovieList
                    movies={movies}
                    favouriteComponent={AddFavourites}
                    handleFavouritesClick={addFavouriteMovie}
                />
            </div>
            <div className='row d-flex align-items-center mt-4 mb-4'>
                <MovieListHeading heading='Favourites' />
            </div>
            <div className='row'>
                <MovieList movies={favourites} favouriteComponent={AddFavourites} />
            </div>
        </div>
    );
};

export default App;
- We're adding a new row and within it, adding a new heading using the MovieListHeading component (line 47 in your IDE)
- We're adding a new row below that, and rending our favourites using the MovieList component (line 51)
This is an example of how to create a reusable component. If a component uses the similar logic but displays different data for different situations, you can probably reuse it.
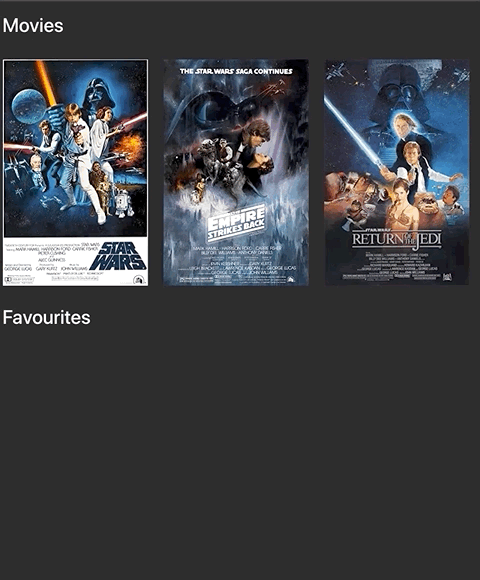
Fire this up in the browser and everything should work:
How to Remove Favourites
Next we want to add the ability to remove movies from favourites. We'll take a similar approach we did to adding favourites:
- Create a remove component that we pass to our MovieList, which gets rendered in the overlay
- Create a function called clicked to remove the clicked movie from state.
- Pass a function to handle the onClick event when the user clicks the remove component
How to create the RemoveFavourites component
Create a new file in the components folder called RemoveFavourites.js and add the following:
import React from 'react';

const RemoveFavourites = () => {
    return (
        <>
            <span className='mr-2'>Remove from favourites</span>
            <svg
                width='1em'
                height='1em'
                viewBox='0 0 16 16'
                class='bi bi-x-square'
                fill='currentColor'
                xmlns='http://www.w3.org/2000/svg'
            >
                <path
                    fill-rule='evenodd'
                    d='M14 1H2a1 1 0 0 0-1 1v12a1 1 0 0 0 1 1h12a1 1 0 0 0 1-1V2a1 1 0 0 0-1-1zM2 0a2 2 0 0 0-2 2v12a2 2 0 0 0 2 2h12a2 2 0 0 0 2-2V2a2 2 0 0 0-2-2H2z'
                />
                <path
                    fill-rule='evenodd'
                    d='M4.646 4.646a.5.5 0 0 1 .708 0L8 7.293l2.646-2.647a.5.5 0 0 1 .708.708L8.707 8l2.647 2.646a.5.5 0 0 1-.708.708L8 8.707l-2.646 2.647a.5.5 0 0 1-.708-.708L7.293 8 4.646 5.354a.5.5 0 0 1 0-.708z'
                />
            </svg>
        </>
    );
};

export default RemoveFavourites;
- We're adding the text "remove from favourites" (line 6 in your IDE)
- We're adding a "remove" icon which we get from icons.getbootrap.com (line 7 in your IDE)
How to remove favourites from state
Similar to what we did before, we need to write a function that removes a selected movie from our favourites state.
Open App.js and update it with the following:
import React, { useState, useEffect } from 'react';
import 'bootstrap/dist/css/bootstrap.min.css';
import './App.css';
import MovieList from './components/MovieList';
import MovieListHeading from './components/MovieListHeading';
import SearchBox from './components/SearchBox';
import AddFavourites from './components/AddFavourites';
import RemoveFavourites from './components/RemoveFavourites';

const App = () => {
    const [movies, setMovies] = useState([]);
    const [searchValue, setSearchValue] = useState('');
    const [favourites, setFavourites] = useState([]);

    const getMovieRequest = async (searchValue) => {
        const url = `http://www.omdbapi.com/?s=${searchValue}&apikey=263d22d8`;

        const response = await fetch(url);
        const responseJson = await response.json();

        if (responseJson.Search) {
            setMovies(responseJson.Search);
        }
    };

    const addFavouriteMovie = (movie) => {
        const newFavouriteList = [...favourites, movie];
        setFavourites(newFavouriteList);
    };

    const removeFavouriteMovie = (movie) => {
        const newFavouriteList = favourites.filter(
            (favourite) => favourite.imdbID !== movie.imdbID
        );

        setFavourites(newFavouriteList);
    };

    useEffect(() => {
        getMovieRequest(searchValue);
    }, [searchValue]);

    return (
        <div className='container-fluid movie-app'>
            <div className='row d-flex align-items-center mt-4 mb-4'>
                <MovieListHeading heading='Movies' />
                <SearchBox searchValue={searchValue} setSearchValue={setSearchValue} />
            </div>
            <div className='row'>
                <MovieList
                    movies={movies}
                    favouriteComponent={AddFavourites}
                    handleFavouritesClick={addFavouriteMovie}
                />
            </div>
            <div className='row d-flex align-items-center mt-4 mb-4'>
                <MovieListHeading heading='Favourites' />
            </div>
            <div className='row'>
                <MovieList
                    movies={favourites}
                    handleFavouritesClick={removeFavouriteMovie}
                    favouriteComponent={RemoveFavourites}
                />
            </div>
        </div>
    );
};

export default App;
- We're importing our RemoveFavourites component (line 8 in your IDE)
- We're creating a function called removeFavouriteMovie to remove a given movie from our favourites state (line 31 in your IDE)
- To remove we're using the filter function. This returns a new version of the favourites array that does not include the movie we wish to remove
- We're passing our RemoveFavourites component and our removeFavouriteMovie function to our MovieList component (line 60 in your IDE)
Because we already coded our MovieList component to accept a component to render and a function to call, everything just works!
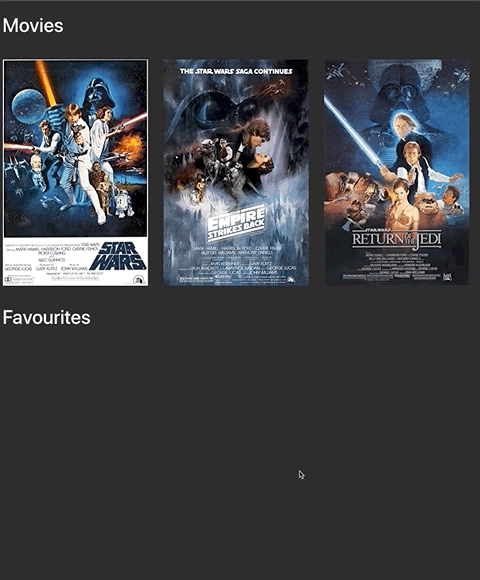
Now if you run this in your browser you should be able to remove favourites:
How to Save or Remove Movies from Local Storage
The last thing we're going to do is save to local storage. This lets us persist our favourite movies when the page reloads or if we open the app in a different window.
We'll save our favourites to local storage when something changes, and we'll retrieve our favourites from local storage when the app loads, saving this to or favourites state.
Open App.js for the final time and update it with the following:
import React, { useState, useEffect } from 'react';
import 'bootstrap/dist/css/bootstrap.min.css';
import './App.css';
import MovieList from './components/MovieList';
import MovieListHeading from './components/MovieListHeading';
import SearchBox from './components/SearchBox';
import AddFavourites from './components/AddFavourites';
import RemoveFavourites from './components/RemoveFavourites';

const App = () => {
    const [movies, setMovies] = useState([]);
    const [favourites, setFavourites] = useState([]);
    const [searchValue, setSearchValue] = useState('');

    const getMovieRequest = async (searchValue) => {
        const url = `http://www.omdbapi.com/?s=${searchValue}&apikey=263d22d8`;

        const response = await fetch(url);
        const responseJson = await response.json();

        if (responseJson.Search) {
            setMovies(responseJson.Search);
        }
    };

    useEffect(() => {
        getMovieRequest(searchValue);
    }, [searchValue]);

    useEffect(() => {
        const movieFavourites = JSON.parse(
            localStorage.getItem('react-movie-app-favourites')
        );

        setFavourites(movieFavourites);
    }, []);

    const saveToLocalStorage = (items) => {
        localStorage.setItem('react-movie-app-favourites', JSON.stringify(items));
    };

    const addFavouriteMovie = (movie) => {
        const newFavouriteList = [...favourites, movie];
        setFavourites(newFavouriteList);
        saveToLocalStorage(newFavouriteList);
    };

    const removeFavouriteMovie = (movie) => {
        const newFavouriteList = favourites.filter(
            (favourite) => favourite.imdbID !== movie.imdbID
        );

        setFavourites(newFavouriteList);
        saveToLocalStorage(newFavouriteList);
    };

    return (
        <div className='container-fluid movie-app'>
            <div className='row d-flex align-items-center mt-4 mb-4'>
                <MovieListHeading heading='Movies' />
                <SearchBox searchValue={searchValue} setSearchValue={setSearchValue} />
            </div>
            <div className='row'>
                <MovieList
                    movies={movies}
                    handleFavouritesClick={addFavouriteMovie}
                    favouriteComponent={AddFavourites}
                />
            </div>
            <div className='row d-flex align-items-center mt-4 mb-4'>
                <MovieListHeading heading='Favourites' />
            </div>
            <div className='row'>
                <MovieList
                    movies={favourites}
                    handleFavouritesClick={removeFavouriteMovie}
                    favouriteComponent={RemoveFavourites}
                />
            </div>
        </div>
    );
};

export default App;
- We're adding a function called saveToLocalStorage. This function takes a list of items, and saves them to local storage against a key. In this case the key is react-movie-app-favourites. (line 38 in your IDE)
- We're saving to local storage when we add a favourite movie (line 45 in your IDE)
- We're saving to local storage when we remove a favourite movie (line 54 in your IDE)
- We're using the useEffect hook to retrieve favourites from local storage when the app loads, and we're setting this to state (line 30 in your IDE)
Fire this up in your browser and you should be able to save favourite movies - even if you close the browser!
The End - What Next?
Thanks for reading, and more importantly - congrats on making it to the end!
If you enjoyed this article, make sure to check out reactbeginnerprojects.com. You'll find a bunch of free projects you can try out to learn the key skills you'll need to land a job as a React developer and boost your portfolio.