By Deborah Kurata
When a user clicks a button on a webpage, the user expects the page to respond to their action and do something: play the game, buy the product, display a message, and so on.
In this tutorial, we walk through how to use JavaScript to react to user or browser actions, called events, and run code to do something. You can use the techniques shown here to make your webpages more interactive.
You can also watch this associated video which walks through how to react to events with JavaScript.
Basic Steps
For our JavaScript code to respond to an action on our page, we follow three steps:
- First, we find the HTML element that can notify us of the action. This might be a button that the user clicks or a textbox the user types into or an element the user mouses over.
- Once we find the element, we listen for events on that element. The
clickorkeypressormouseoverevent, for example. - Lastly, we react to the event, running code when the event happens.
As an example, say we are building a guess a number game as shown in Figure 1. The game generates a random number and the user tries to guess that number. We want to listen for the click event on the Guess button, and run code to react by checking the user's guess against the generated random number.
Following the three steps we identified above:
- We write code to find the "Guess" button HTML element.
- We use the reference to the found element to listen for the button's
clickevent, which occurs when the user clicks the button. - And when the code is notified of the event, the code reacts and runs a defined function. In this example, that function reads the user's guess from the "Enter your guess" input element and compares it to the randomly generated number.
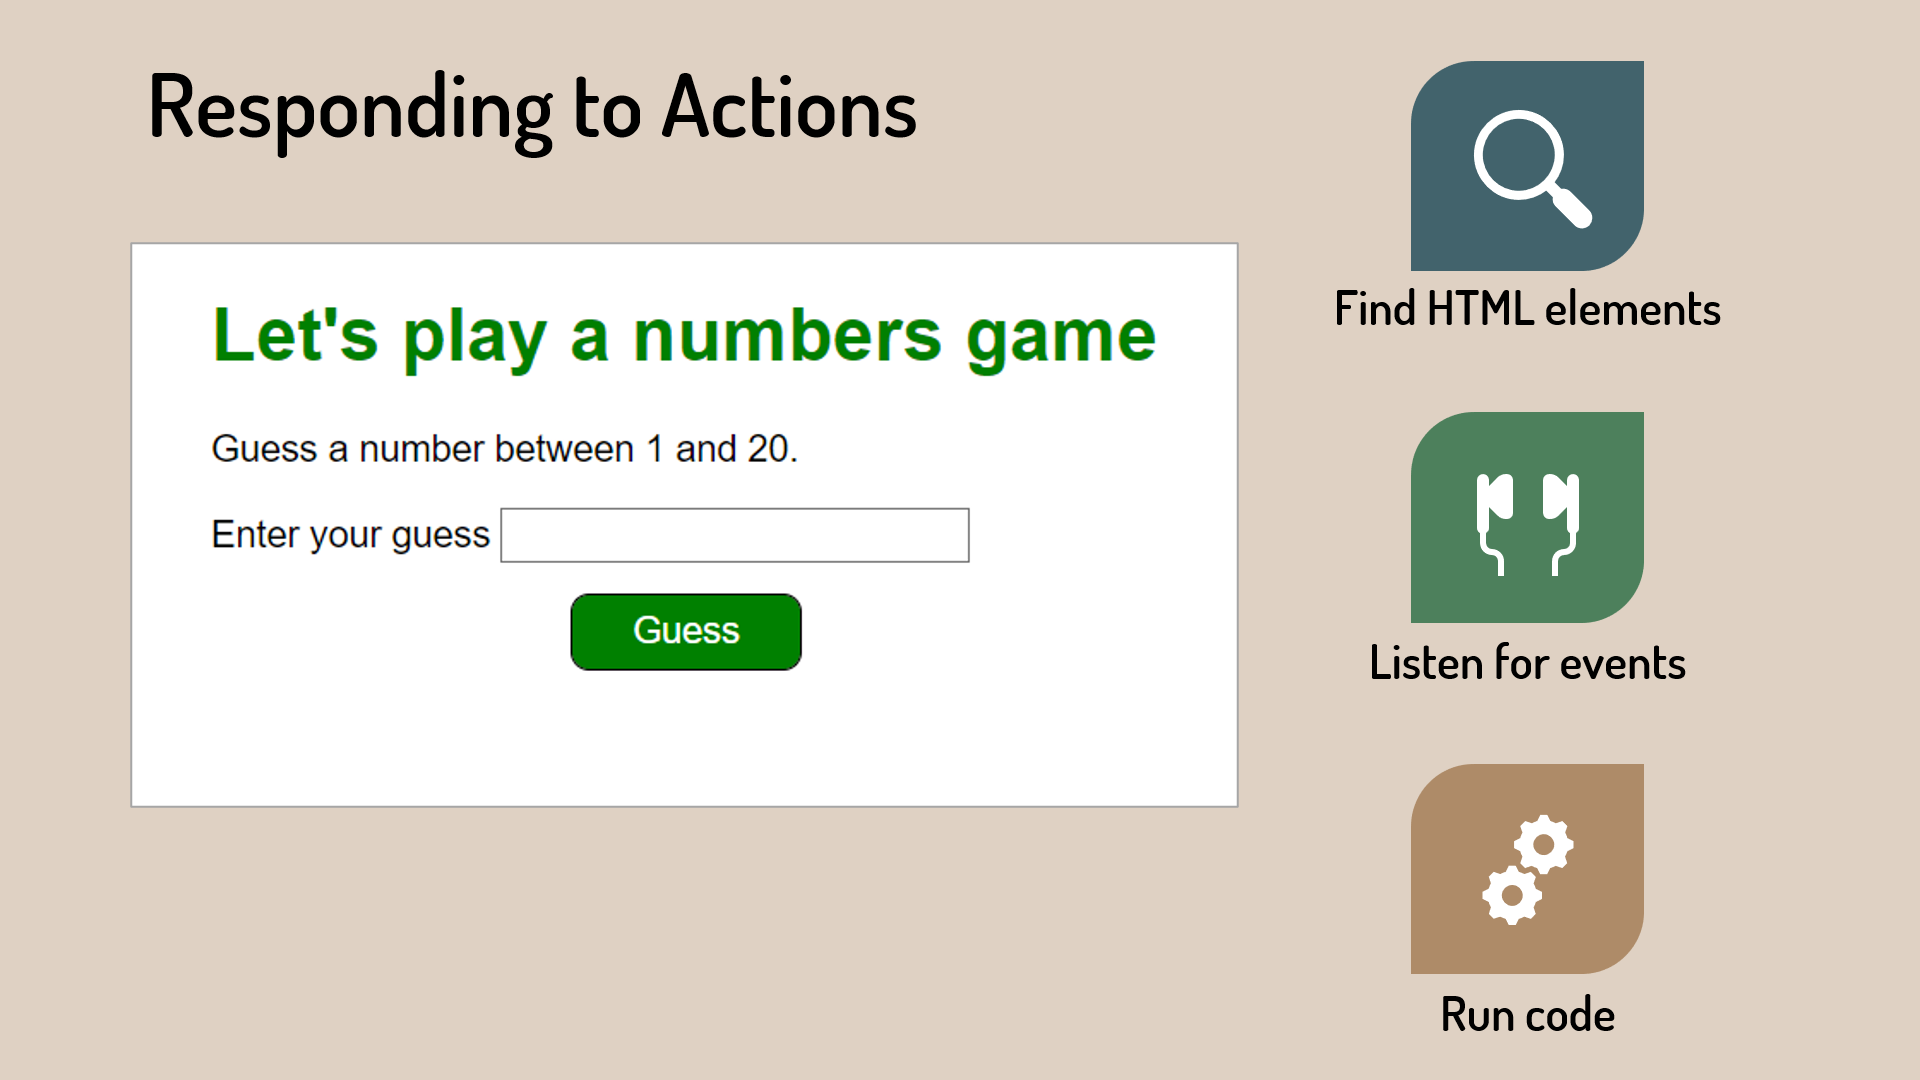 Figure 1. Number guessing game with steps for responding to actions
Let's walk through these steps, one at a time.
How to Find an HTML Element
When streaming a video, we can't watch the video until we find it in our streaming service. So too with our HTML elements.
For our JavaScript code to work with an element on an HTML page, our code must first find that element.
We hold the reference to the found element in a variable. Once we have a variable reference to the element, we can read its content, write new content to it, or react to that element's events.
There are several ways to find an element on an HTML page using JavaScript.
Use getElementById()
If we want to find one element by its unique id attribute, we use the getElementById() method. This method is available using the HTML document object.
The getElementById() method returns the one element with the defined id attribute.
The HTML for our guess a number game includes a button with a unique identifier assigned to the id attribute:
<button id="guess-button">Guess</button>
Since the button element has an id attribute, we use getElementById() to find that button element and hold a reference to it.
const guessButton = document.getElementById('guess-button');
In the above code, we use the Document Object Model (DOM) document object and call the getElementById() method. We pass in the value of the id attribute, which in our example is guess-button.
When the JavaScript code is executed, the reference to the found element is assigned to the specified variable, guessButton in this example. We use a constant because the element reference shouldn't change while the user is on the webpage.
In many cases, we want just one particular element, so getElementById() is often the best choice.
Use getElementsByClassName()
If we instead want to find a set of elements by their class attribute, we use the getElementsByClassName() method. This method is also available using the HTML document object.
The getElementsByClassName() returns a collection of elements that all have a class attribute set to the passed-in class name.
Let's say our guess a number game has two buttons, both with the same style class:
<button class="btn">Guess</button>
<button class="btn">Play again</button>
Use getElementsByClassName() to find both button elements and hold a reference to them.
const buttons = document.getElementsByClassName('btn');
In the above code, we use the DOM document object and call the getElementsByClassName() method. We pass in the value of the class attribute, which in our example is btn.
When the JavaScript code is executed, the reference to the found elements are stored in a collection. Navigate that collection by looping through the elements.
for (const ele of buttons) {
  console.log("Found button:", ele.textContent);
}
This for loop iterates through each button element in the provided collection. Each time through the loop, the ele variable is set to the next button in the collection. The above code displays the textContent of each found button.
Use getElementsByClassName() if you need to set up events for multiple similar elements.
Use querySelector()
If finding an element requires more complex selection criteria, we can use a CSS selector to find an element using the querySelector() method. Any syntax you use as a CSS selector you can use with the querySelector() method.
The querySelector() method returns the first element that matches the defined CSS selector.
For more information on CSS selectors, check out this video.
Let's say our guess a number game button is within a div element and we want to find that div element.
Here is the HTML:
<div class="button-container">
   <button class="btn">Guess</button>
</div>
Maybe we can't change the HTML to add an id to the div element, so we'll find the div using a query selector.
const buttonContainer = document.querySelector("div.button-container");
In the above code, we use the DOM document object and call the querySelector() method. We pass in the query selector, which in our example is a div element class selector.
When the JavaScript code is executed, the reference to the first element found that matches the selector is assigned to the specified variable, buttonContainer in this example.
Once we have a variable that references our found element or elements, we can use that variable to listen for events on that element.
How to Listen for Events
An event is a notification that an action occurred. Events can come from the user as they click a button, scroll, select an element, press a key, resize the browser, and so on. Or events can come from the browser itself as it finishes loading the page, for example.
To listen for an element's event, use the reference to that element and call its addEventListener() method.
guessButton.addEventListener('click', displayEvent);
We pass to that method the name of the event, enclosed in quotes. In this example, we listen for the click event. The event name is case-sensitive, meaning it must have the exact spelling and casing of the element's event.
How do we know the name of that event? Or even what events we can listen for?
One great option is the JavaScript documentation at developer.mozilla.org. Search for "event" and pick "Event reference". The Event reference first identifies the types of events we can listen for. Then it provides an event listing. Check it out here.
But what about that second addEventListener() argument?
How to React to the Event
As we saw above, when we call addEventListener(), we pass in the event we want to listen for. We also pass a function containing the code to react to that event. In other words, the code we want to run when the event happens. We call this an event handler because it's handling the event when it occurs.
Here again is the code for addEventListener():
guessButton.addEventListener('click', displayEvent);
Notice the function name. We don't include the parentheses after the function name because we aren't executing the function. Rather we are passing the function to the event listener. The function won't run until the event occurs.
When the code is notified of the event, the passed-in function is run. In our example, the displayEvent() function executes. The event details are optionally passed in to that function.
In this code example, the event information is logged to the browser console.
function displayEvent(event) {
   console.log(event);
}
If we have a simple event handler, like the above example, instead of passing in the name of the function, we can pass in the function itself using an arrow function.
guessButton.addEventListener('click', event => console.log(event));
An arrow function is shorthand syntax for a function. We define the event parameter ( event in this example), an arrow, and the one-line function body.
For more information on functions, including arrow functions, check out this video.
Now let's walk through an example.
Number Guessing Game Example
For our number guessing game, when the user clicks the guess button, we want to read the user's guess from the textbox and determine if the guess matches the randomly generated number.
First we find the guess button:
const guessButton = document.getElementById('guess-button');
Then we listen for the click event and react by processing the user's guess.
guessButton.addEventListener('click', processGuess);
Note that we don't put the function name in quotes because it's a variable referencing our function. And we don't put parentheses after the function name because we aren't calling the function. Rather we are passing the function's reference. We want the browser to call this function when the click event happens.
Here is the processGuess() function:
function processGuess() {
  let feedbackText;
  if (guessInput){
    const guess = guessInput.valueAsNumber;

    if (guess === randomNumber) {
      feedbackText = `${guess} is correct ... You win!`;
      displayPlayAgain(true);
    } else if (guess > randomNumber) {
      feedbackText = `${guess} is too high`;
    } else {
      feedbackText = `${guess} is too low`;
    }
  }
  if (feedbackContainer) {
    feedbackContainer.innerHTML += '<br>' + feedbackText;
  }
}
When the user clicks the "Guess" button, the browser executes this code. The guessInput variable is a reference to the "Enter your guess" textbox. If that textbox was found, the value of the textbox is read using valueAsNumber. This property provides the string value from the text box as a number.
The code then compares the guess to the generated random number and the appropriate message is prepared. The feedbackContainer is a reference to a div element to display the message.
The result is shown in Figure 2.
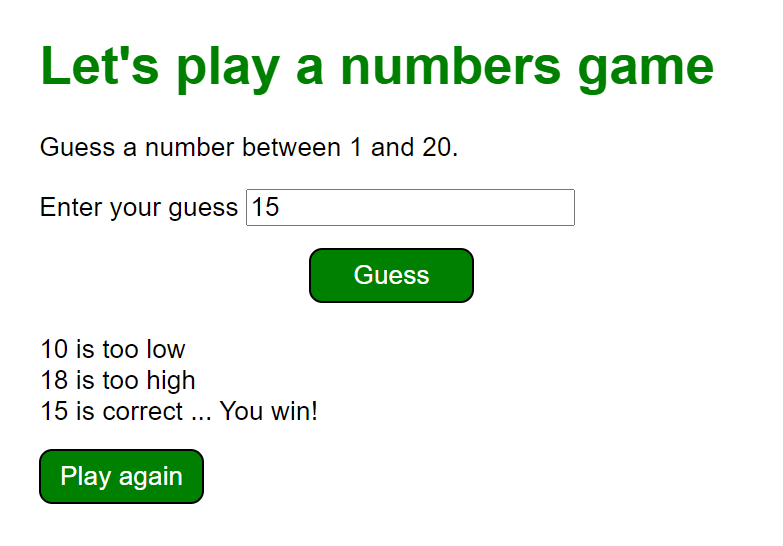 Figure 2. Game play with messages
You can find the complete code for this game here: https://github.com/DeborahK/Gentle-Introduction-to-JavaScript
Wrapping Up
To react to events with JavaScript, we first find an HTML element we want to react to. We then listen for events from that element using the addEventListener() method.
The first argument passed into addEventListener() is the name of the event. Be sure to spell and case it correctly. Use the Event reference at developer.mozilla.org for the list of events.
The second argument is the event handler. It is the function to run when the event occurs. Pass a named function or an arrow function.
For more information on programming with JavaScript and to build our guess a number game step by step, check out this course:
Now that you know how to listen for and react to events, what will you do with that power?