
By Nabil Tharwat
Releasing modern software might seem daunting and complicated. In this article, I'll expand on the concepts involved in the process, from managing dependencies to building in the cloud.
Articles and tutorials usually cover a specific tool and dive right into it before laying down the foundational knowledge. In this article, I'll provide that foundation by introducing the concepts that go into these tools.
The topics I'll cover include dependency management (and what dependencies really are!), build systems, and continuous integration systems with a little bit of icing on the cake. Having this background will help set you up for what's to come.
What are Libraries?
Say you're chipping away dutifully at your tasks. You create a collection of utilities that make your job easier. You're then assigned to a different project in which you need the same utilities, and copy them over. Congratulations, you just created a library and used it across two projects! 😁
Libraries are collections of pre-written code that developers use to optimise tasks. They boost our productivity by abstracting away the boring and repetitive stuff. Numpy, Matplotlib, Lodash, jQuery, and React are all examples of popular, open-source libraries.
You've probably noticed that each of these libraries (or any other library) has a version number. It's usually constructed as a few numeric fields separated by periods: v1.0.0 or just 1.0.0. These numbers are not random! There are many schemes for defining a version of a product.
Some products use the build number generated by a compiler or CI/CD tool (we'll look into these in a minute). Other products use the date of the build instead of the build number. Others use a build hash.
The most prominent versioning scheme is called Semantic Versioning. It's what most (if not all) code libraries use.
What is Semantic Versioning (Semver)?
Semantic versioning is a versioning scheme in which you have 3 fields, each separated by a dot. For now, we'll call the first field (on the left side) Major, the one in the middle Minor, and the last one Patch. It looks exactly like this, with some derivations: Major.Minor.Patch.
Per the Semver standard, all fields must increment only. You can't decrement any of them. When a parent version is incremented, all children are reset. So incrementing Major resets Minor and Patch to 0.
The patch version
The Patch version is the most frequently changing number. When this number is incremented, it indicates a change that doesn't add new features or break existing functionality. These may be security fixes, performance optimisations, bug fixes, and so on.
Changes to the Patch version are always two-way compatible, as long as parent versions are the same. Code written on v1.0.1 will work on v1.0.0 and v1.0.2.
The minor version
The Minor version is the second most frequently changing number. A change to this number indicates a feature update that doesn't break existing functionality.
Changes to the Minor version are always forward compatible, as long as the Major version is the same.
Code written with v1.1.0 will work with v1.2.0 but may not work with v1.0.0, as you may be using features added in the more recent version.
The major version
The Major version is the highest priority and the most "dangerous" field of the three. When this number is incremented, it indicates breaking changes. These are usually API/interface changes and/or entity renaming and removal.
A new Major version is not meant to be compatible with any other Major version, so don't expect v1.0.0 to work with v2.0.0 or vice versa. Your code may compile after an upgrade, but that's just pure luck.
There are cases in which library authors break underlying logic without affecting the public API you use, so it doesn't break your code. But these are exceptions.
Python 2 and Python 3 are examples of breaking changes. Python 2 print statements don't work on the Python 3 interpreter, and vice versa. Some of it may work, like for loops and other basic structs, but that's about it.
It's recommended that you stay up to date as much as possible with the Patch version. If you need the new features, upgrade your Minor version. A change in Major indicates enormous changes. So be careful when you're upgrading.
There's usually a migration guide with each major release that you should follow. You can read more about Semver in the official documentation.
So... how do we install and use external libraries written by other people in the first place?
How to Manage Your Project's Dependencies
In the past, the best that we could do was to actually copy the source code of the libraries we were using into our projects. We applied changes to the library's code, fixed bugs before they were released, and had control over the code.
But this practice, commonly referred to as vendoring, has fallen out of favour for multiple reasons.
If you had applied changes and a new version was released, you had to re-apply all those changes again. It's a manual process that needs to happen every time you update or download a library. It's cumbersome, takes a lot of time, and may break extra functionality that you added.
This quickly gets out of hand when increasing the project's complexity and scale, which leaves us with the better option: Dependency Managers.
What is a Dependency Manager?
A dependency is a library or utility that your project needs to work. Simply put, if Program A requires Program B to compile and/or run, Program A is dependent on Program B. A program can depend on multiple other programs.
A dependency manager is a tool that automatically keeps track of a project's dependencies. It allows you to run simple commands in the terminal to install, update, and remove dependencies. NPM, Yarn, Composer, Gradle, and Bundler are all examples of dependency managers.
Don't confuse these with Package Managers, as those are tools that manage system-wide packages. apt-get, yum, Homebrew, and Chocolatey are package managers.
Some package managers can manage system-wide packages and project dependencies. NPM and Yarn are examples of this.
How does a dependency manager work?
A dependency manager uses two main files: a manifest and a lock file.
The manifest is a list of your project's direct dependencies. It lists the dependencies that you directly specified when installing something. So when you run npm install jsdom, it adds the jsdom package to the list of dependencies in the project's manifest.
But the manifest is not enough. A dependency may have dependencies, and those may have dependencies as well, and so on, forming a dependency graph. A manifest includes only direct dependencies.
Therefore, when you run npm install jsdom, the manifest will only list jsdom despite jsdom having other dependencies of its own. So, how do dependency managers keep track of the whole dependency graph?
What are Lock Files?
A lock file is a log that lists all the project's dependencies. This includes direct dependencies (listed in the manifest) and the whole dependency graph. It lists every dependency with a specific version, the repository it was fetched from, and other details.
This image shows a comparison between the dependency graph (listed in the lock file) and the direct dependency list (listed in the manifest) of jsdom, a JavaScript implementation of many web standards for testing.
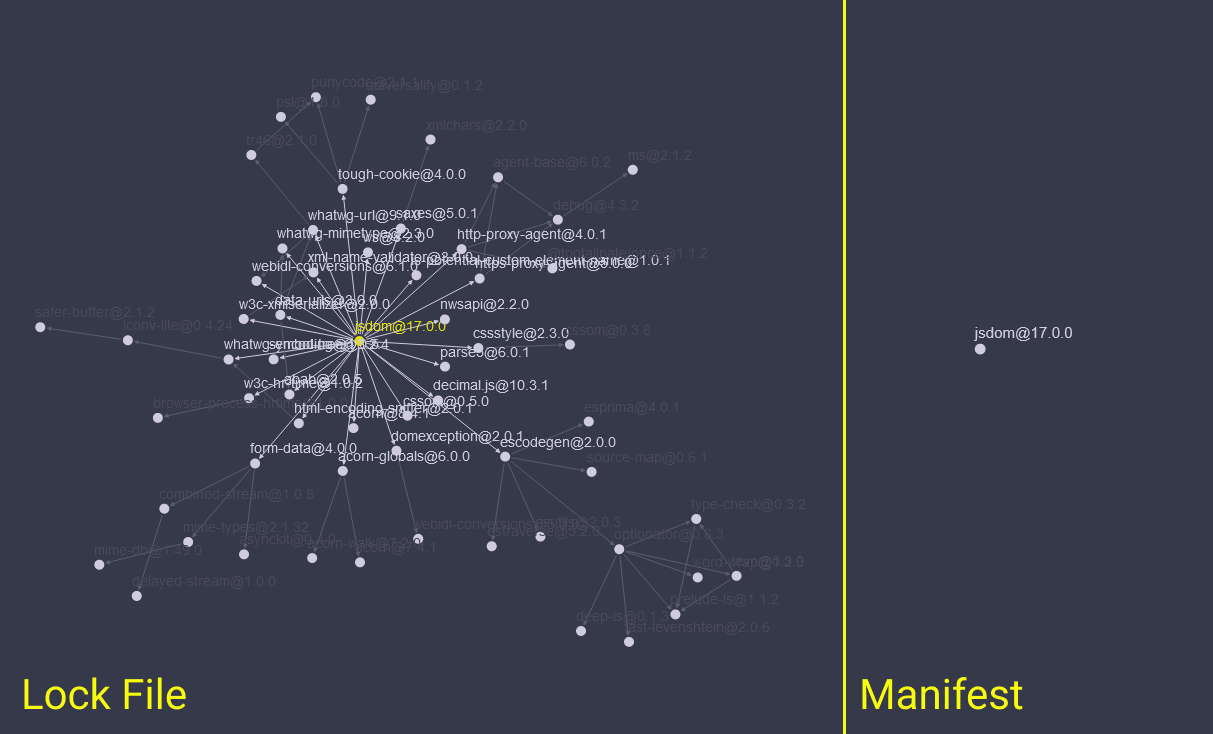
Okay, we know the exact dependency graph, but so what? So everything! We often have multiple developers working on the same project. A dependency manager may install different versions of a library if multiple developers install the project's dependencies using only the manifest.
A lock file locks each dependency in the graph to a specific version, allowing us to have reproducible builds on different machines. This means that every time someone runs npm install, the code is guaranteed to work. This also makes it easier to report bugs by including a lock file in the report.
Lock files also allow dependency managers to reuse cached packages instead of downloading the latest version every time you build your project.
So we've learned what libraries, semantic versioning, and dependency managers are. Now it's time to build our project.
What are Build Systems?
Every build process is a build system in one way or another. A build system is a set of transformations that transform a source into an artifact. It may be a simple command that starts up a compiler, a script to generate pdf from text files, or even a GUI solution that builds your project and generates a binary.
A build system generally consists of 3 components:
- Targets
- Dependencies
- Rules
A target is the desired output. If you want a binary called "test.exe", then your target is just that. Dependencies are project dependencies and may include environment utilities like having the C++ compiler installed, npm available, and so on. Rules define how you go from source to target. They may also be the commands used.
A build system may be configured to test your app, generate coverage reports, and lint sources before building as part of its rules. But a build system is manual and local by default. You have to start it up yourself, and it only produces an output on your local machine.
So... what if you want multiple developers to be able to release versions of your app incrementally? This is where CI/CD comes in!
Continuous Integration Systems
In short, Continuous Integration (CI) is a paradigm in which you continuously validate changes to a product. A CI system automatically builds and tests every change to avoid problems that may arise when waiting for a release.
Continuous Delivery (CD) is the practice of automating the release process. Major releases are automatically deployed to staging and production, providing an automated release process.
Continuous Deployment (CD) is a step-up from Continuous Delivery. It's the practice of automatically deploying every change if it passes all stages of your production pipeline, without waiting for any explicit approval. This practice emphasizes test automation and user feedback, often leading to multiple software updates a month, week, or even a day!
It's a broad concept that you can read more about in this article. For now, we'll refer to the systems that host these practices collectively as Continuous Integration Systems.
A continuous integration system (CI for short) is a build system in the cloud that activates a project's build system on demand and automatically. It's a keystone in the success of agile teams.
CIs consist of three main components:
- Triggers
- Actions
- Recipes
Triggers are events that the CI listens for to start the build system. These events may be a commit on main branch, a pull request for feature previews, or one of many others. Each platform supports several events.
Actions are commands and scripts that are started upon triggers. You may say: "Build project upon commit on main branch" in the system's language.
Recipes are configurations that specify triggers and actions, environment setup, environment variables, build systems, and system dependencies. They're the system's language.
Note that you can have multiple build systems on the same CI, each with different targets and rules.
TravisCI, Jenkins, CircleCI, GitHub Actions, and GitLab CI/CD are examples of CIs we come across every day. The following is an example GitHub Actions recipe to release new versions of a program and send them to GitHub Releases:
on:
  push:
    branches:
      - main // will start the CI when a push to branch main is made

jobs:
  release_linux:
    runs-on: ubuntu-latest // must be run on ubuntu@latest

    steps:
      - name: check out git repository
        uses: actions/checkout@v1

      - name: install Node.js, npm and yarn // required env tools
        uses: actions/setup-node@v1

      - name: install deb packages // required env dependencies
        run: sudo apt-get install fakeroot dpkg rpm

      - name: build and release app
        uses: kl13nt/action-electron-forge@master
        with:
          // release to github releases after successful build
          release: ${{ startsWith(github.ref, 'refs/tags/v') }}
I've omitted a ton of config stuff in there, but you get the idea. I specified the trigger as a commit on "main" branch and the actions to clone the project's repository, install NodeJS, npm, yarn, and other environment dependencies.
The build stage will run an npm-scripts build system which will lint and test the code before building. The CI will then send the output binaries to the project's GitHub Releases page.
A lock file also comes into play when pushing to a CI as well! If the CI installs different versions of dependencies than the ones you have locally, it may fail. This is why a lock file is as necessary for CIs as it's for developers, so you can rest assured that the code that worked on your machine will work the same way on the CI.
Conclusion
If you've made it this far, I really hope this was an inspiring (and gentle!) learning experience. You can find more of my content on my website. Thanks for reading!