By Samer Buna
Update: This article is now part of my book “Node.js Beyond The Basics”.
Read the updated version of this content and more about Node at jscomplete.com/node-beyond-basics.
Node uses two core modules for managing module dependencies:
- The
requiremodule, which appears to be available on the global scope — no need torequire('require'). - The
modulemodule, which also appears to be available on the global scope — no need torequire('module').
You can think of the require module as the command and the module module as the organizer of all required modules.
Requiring a module in Node isn’t that complicated of a concept.
const config = require('/path/to/file');
The main object exported by the require module is a function (as used in the above example). When Node invokes that require() function with a local file path as the function’s only argument, Node goes through the following sequence of steps:
- Resolving: To find the absolute path of the file.
- Loading: To determine the type of the file content.
- Wrapping: To give the file its private scope. This is what makes both the
requireandmoduleobjects local to every file we require. - Evaluating: This is what the VM eventually does with the loaded code.
- Caching: So that when we require this file again, we don’t go over all the steps another time.
In this article, I’ll attempt to explain with examples these different stages and how they affect the way we write modules in Node.
Let me first create a directory to host all the examples using my terminal:
mkdir ~/learn-node && cd ~/learn-node
All the commands in the rest of this article will be run from within ~/learn-node.
Resolving a local path
Let me introduce you to the module object. You can check it out in a simple REPL session:
~/learn-node $ node
> module
Module {
  id: '<repl>',
  exports: {},
  parent: undefined,
  filename: null,
  loaded: false,
  children: [],
  paths: [ ... ] }
Every module object gets an id property to identify it. This id is usually the full path to the file, but in a REPL session it’s simply <repl>.
Node modules have a one-to-one relation with files on the file-system. We require a module by loading the content of a file into memory.
However, since Node allows many ways to require a file (for example, with a relative path or a pre-configured path), before we can load the content of a file into the memory we need to find the absolute location of that file.
When we require a 'find-me' module, without specifying a path:
require('find-me');
Node will look for find-me.js in all the paths specified by module.paths — in order.
~/learn-node $ node
> module.paths
[ '/Users/samer/learn-node/repl/node_modules',
  '/Users/samer/learn-node/node_modules',
  '/Users/samer/node_modules',
  '/Users/node_modules',
  '/node_modules',
  '/Users/samer/.node_modules',
  '/Users/samer/.node_libraries',
  '/usr/local/Cellar/node/7.7.1/lib/node' ]
The paths list is basically a list of node_modules directories under every directory from the current directory to the root directory. It also includes a few legacy directories whose use is not recommended.
If Node can’t find find-me.js in any of these paths, it will throw a “cannot find module error.”
~/learn-node $ node
> require('find-me')
Error: Cannot find module 'find-me'
    at Function.Module._resolveFilename (module.js:470:15)
    at Function.Module._load (module.js:418:25)
    at Module.require (module.js:498:17)
    at require (internal/module.js:20:19)
    at repl:1:1
    at ContextifyScript.Script.runInThisContext (vm.js:23:33)
    at REPLServer.defaultEval (repl.js:336:29)
    at bound (domain.js:280:14)
    at REPLServer.runBound [as eval] (domain.js:293:12)
    at REPLServer.onLine (repl.js:533:10)
If you now create a local node_modules directory and put a find-me.js in there, the require('find-me') line will find it.
~/learn-node $ mkdir node_modules

~/learn-node $ echo "console.log('I am not lost');" > node_modules/find-me.js

~/learn-node $ node
> require('find-me');
I am not lost
{}
>
If another find-me.js file existed in any of the other paths, for example, if we have a node_modules directory under the home directory and we have a different find-me.js file in there:
$ mkdir ~/node_modules
$ echo "console.log('I am the root of all problems');" > ~/node_modules/find-me.js
When we require('find-me') from within the learn-node directory — which has its own node_modules/find-me.js, the find-me.js file under the home directory will not be loaded at all:
~/learn-node $ node
> require('find-me')
I am not lost
{}
>
If we remove the local node_modules directory under ~/learn-node and try to require find-me one more time, the file under the home’s node_modules directory would be used:
~/learn-node $ rm -r node_modules/
~/learn-node $ node
> require('find-me')
I am the root of all problems
{}
>
Requiring a folder
Modules don’t have to be files. We can also create a find-me folder under node_modules and place an index.js file in there. The same require('find-me') line will use that folder’s index.js file:
~/learn-node $ mkdir -p node_modules/find-me

~/learn-node $ echo "console.log('Found again.');" > node_modules/find-me/index.js

~/learn-node $ node
> require('find-me');
Found again.
{}
>
Note how it ignored the home directory’s node_modules path again since we have a local one now.
An index.js file will be used by default when we require a folder, but we can control what file name to start with under the folder using the main property in package.json. For example, to make the require('find-me') line resolve to a different file under the find-me folder, all we need to do is add a package.json file in there and specify which file should be used to resolve this folder:
~/learn-node $ echo "console.log('I rule');" > node_modules/find-me/start.js

~/learn-node $ echo '{ "name": "find-me-folder", "main": "start.js" }' > node_modules/find-me/package.json

~/learn-node $ node
> require('find-me');
I rule
{}
>
require.resolve
If you want to only resolve the module and not execute it, you can use the require.resolve function. This behaves exactly the same as the main require function, but does not load the file. It will still throw an error if the file does not exist and it will return the full path to the file when found.
> require.resolve('find-me');
'/Users/samer/learn-node/node_modules/find-me/start.js'
> require.resolve('not-there');
Error: Cannot find module 'not-there'
    at Function.Module._resolveFilename (module.js:470:15)
    at Function.resolve (internal/module.js:27:19)
    at repl:1:9
    at ContextifyScript.Script.runInThisContext (vm.js:23:33)
    at REPLServer.defaultEval (repl.js:336:29)
    at bound (domain.js:280:14)
    at REPLServer.runBound [as eval] (domain.js:293:12)
    at REPLServer.onLine (repl.js:533:10)
    at emitOne (events.js:101:20)
    at REPLServer.emit (events.js:191:7)
>
This can be used, for example, to check whether an optional package is installed or not and only use it when it’s available.
Relative and absolute paths
Besides resolving modules from within the node_modules directories, we can also place the module anywhere we want and require it with either relative paths (./ and ../) or with absolute paths starting with /.
If, for example, the find-me.js file was under a lib folder instead of the node_modules folder, we can require it with:
require('./lib/find-me');
Parent-child relation between files
Create a lib/util.js file and add a console.log line there to identify it. Also, console.log the module object itself:
~/learn-node $ mkdir lib
~/learn-node $ echo "console.log('In util', module);" > lib/util.js
Do the same for an index.js file, which is what we’ll be executing with the node command. Make this index.js file require lib/util.js:
~/learn-node $ echo "console.log('In index', module); require('./lib/util');" > index.js
Now execute the index.js file with node:
~/learn-node $ node index.js
In index Module {
  id: '.',
  exports: {},
  parent: null,
  filename: '/Users/samer/learn-node/index.js',
  loaded: false,
  children: [],
  paths: [ ... ] }
In util Module {
  id: '/Users/samer/learn-node/lib/util.js',
  exports: {},
  parent:
   Module {
     id: '.',
     exports: {},
     parent: null,
     filename: '/Users/samer/learn-node/index.js',
     loaded: false,
     children: [ [Circular] ],
     paths: [...] },
  filename: '/Users/samer/learn-node/lib/util.js',
  loaded: false,
  children: [],
  paths: [...] }
Note how the main index module (id: '.') is now listed as the parent for the lib/util module. However, the lib/util module was not listed as a child of the index module. Instead, we have the [Circular] value there because this is a circular reference. If Node prints the lib/util module object, it will go into an infinite loop. That’s why it simply replaces the lib/util reference with [Circular].
More importantly now, what happens if the lib/util module required the main index module? This is where we get into what’s known as the circular modular dependency, which is allowed in Node.
To understand it better, let’s first understand a few other concepts on the module object.
exports, module.exports, and synchronous loading of modules
In any module, exports is a special object. If you’ve noticed above, every time we’ve printed a module object, it had an exports property which has been an empty object so far. We can add any attribute to this special exports object. For example, let’s export an id attribute for index.js and lib/util.js:
// Add the following line at the top of lib/util.js
exports.id = 'lib/util';

// Add the following line at the top of index.js
exports.id = 'index';
When we now execute index.js, we’ll see these attributes as managed on each file’s module object:
~/learn-node $ node index.js
In index Module {
  id: '.',
  exports: { id: 'index' },
  loaded: false,
  ... }
In util Module {
  id: '/Users/samer/learn-node/lib/util.js',
  exports: { id: 'lib/util' },
  parent:
   Module {
     id: '.',
     exports: { id: 'index' },
     loaded: false,
     ... },
  loaded: false,
  ... }
I’ve removed some attributes in the above output to keep it brief, but note how the exports object now has the attributes we defined in each module. You can put as many attributes as you want on that exports object, and you can actually change the whole object to be something else. For example, to change the exports object to be a function instead of an object, we do the following:
// Add the following line in index.js before the console.log

module.exports = function() {};
When you run index.js now, you’ll see how the exports object is a function:
~/learn-node $ node index.js
In index Module {
  id: '.',
  exports: [Function],
  loaded: false,
  ... }
Note how we did not do exports = function() {} to make the exports object into a function. We can’t actually do that because the exports variable inside each module is just a reference to module.exports which manages the exported properties. When we reassign the exports variable, that reference is lost and we would be introducing a new variable instead of changing the module.exports object.
The module.exports object in every module is what the require function returns when we require that module. For example, change the require('./lib/util') line in index.js into:
const UTIL = require('./lib/util');

console.log('UTIL:', UTIL);
The above will capture the properties exported in lib/util into the UTIL constant. When we run index.js now, the very last line will output:
UTIL: { id: 'lib/util' }
Let’s also talk about the loaded attribute on every module. So far, every time we printed a module object, we saw a loaded attribute on that object with a value of false.
The module module uses the loaded attribute to track which modules have been loaded (true value) and which modules are still being loaded (false value). We can, for example, see the index.js module fully loaded if we print its module object on the next cycle of the event loop using a setImmediate call:
// In index.js
setImmediate(() => {
  console.log('The index.js module object is now loaded!', module)
});
The output of that would be:
The index.js module object is now loaded! Module {
  id: '.',
  exports: [Function],
  parent: null,
  filename: '/Users/samer/learn-node/index.js',
  loaded: true,
  children:
   [ Module {
       id: '/Users/samer/learn-node/lib/util.js',
       exports: [Object],
       parent: [Circular],
       filename: '/Users/samer/learn-node/lib/util.js',
       loaded: true,
       children: [],
       paths: [Object] } ],
  paths:
   [ '/Users/samer/learn-node/node_modules',
     '/Users/samer/node_modules',
     '/Users/node_modules',
     '/node_modules' ] }
Note how in this delayed console.log output both lib/util.js and index.js are fully loaded.
The exports object becomes complete when Node finishes loading the module (and labels it so). The whole process of requiring/loading a module is synchronous. That’s why we were able to see the modules fully loaded after one cycle of the event loop.
This also means that we cannot change the exports object asynchronously. We can’t, for example, do the following in any module:
fs.readFile('/etc/passwd', (err, data) => {
  if (err) throw err;

  exports.data = data; // Will not work.
});
Circular module dependency
Let’s now try to answer the important question about circular dependency in Node: What happens when module 1 requires module 2, and module 2 requires module 1?
To find out, let’s create the following two files under lib/, module1.js and module2.js and have them require each other:
// lib/module1.js

exports.a = 1;

require('./module2');

exports.b = 2;
exports.c = 3;

// lib/module2.js

const Module1 = require('./module1');
console.log('Module1 is partially loaded here', Module1);
When we run module1.js we see the following:
~/learn-node $ node lib/module1.js
Module1 is partially loaded here { a: 1 }
We required module2 before module1 was fully loaded, and since module2 required module1 while it wasn’t fully loaded, what we get from the exports object at that point are all the properties exported prior to the circular dependency. Only the a property was reported because both b and c were exported after module2 required and printed module1.
Node keeps this really simple. During the loading of a module, it builds the exports object. You can require the module before it’s done loading and you’ll just get a partial exports object with whatever was defined so far.
JSON and C/C++ addons
We can natively require JSON files and C++ addon files with the require function. You don’t even need to specify a file extension to do so.
If a file extension was not specified, the first thing Node will try to resolve is a .js file. If it can’t find a .js file, it will try a .json file and it will parse the .json file if found as a JSON text file. After that, it will try to find a binary .node file. However, to remove ambiguity, you should probably specify a file extension when requiring anything other than .js files.
Requiring JSON files is useful if, for example, everything you need to manage in that file is some static configuration values, or some values that you periodically read from an external source. For example, if we had the following config.json file:
{
  "host": "localhost",
  "port": 8080
}
We can require it directly like this:
const { host, port } = require('./config');

console.log(`Server will run at http://${host}:${port}`);
Running the above code will have this output:
Server will run at http://localhost:8080
If Node can’t find a .js or a .json file, it will look for a .node file and it would interpret the file as a compiled addon module.
The Node documentation site has a sample addon file which is written in C++. It’s a simple module that exposes a hello() function and the hello function outputs “world.”
You can use the node-gyp package to compile and build the .cc file into a .node file. You just need to configure a binding.gyp file to tell node-gyp what to do.
Once you have the addon.node file (or whatever name you specify in binding.gyp) then you can natively require it just like any other module:
const addon = require('./addon');

console.log(addon.hello());
We can actually see the support of the three extensions by looking at require.extensions.
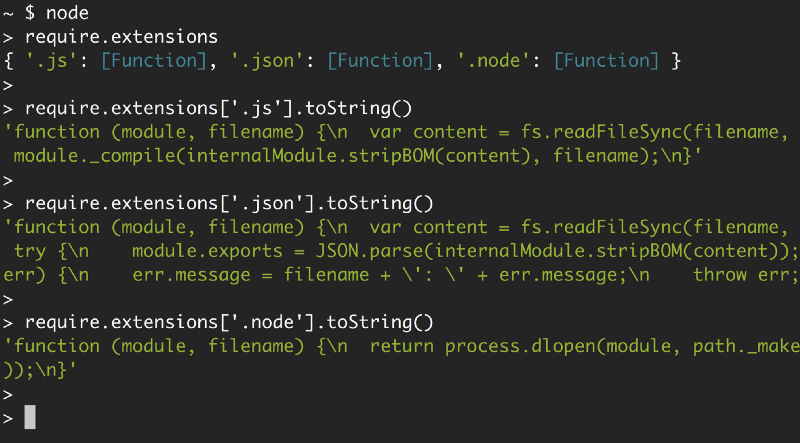
Looking at the functions for each extension, you can clearly see what Node will do with each. It uses module._compile for .js files, JSON.parse for .json files, and process.dlopen for .node files.
All code you write in Node will be wrapped in functions
Node’s wrapping of modules is often misunderstood. To understand it, let me remind you about the exports/module.exports relation.
We can use the exports object to export properties, but we cannot replace the exports object directly because it’s just a reference to module.exports
exports.id = 42; // This is ok.

exports = { id: 42 }; // This will not work.

module.exports = { id: 42 }; // This is ok.
How exactly does this exports object, which appears to be global for every module, get defined as a reference on the module object?
Let me ask one more question before explaining Node’s wrapping process.
In a browser, when we declare a variable in a script like this:
var answer = 42;
That answer variable will be globally available in all scripts after the script that defined it.
This is not the case in Node. When we define a variable in one module, the other modules in the program will not have access to that variable. So how come variables in Node are magically scoped?
The answer is simple. Before compiling a module, Node wraps the module code in a function, which we can inspect using the wrapper property of the module module.
~ $ node
> require('module').wrapper
[ '(function (exports, require, module, __filename, __dirname) { ',
  '\n});' ]
>
Node does not execute any code you write in a file directly. It executes this wrapper function which will have your code in its body. This is what keeps the top-level variables that are defined in any module scoped to that module.
This wrapper function has 5 arguments: exports, require, module, __filename, and __dirname. This is what makes them appear to look global when in fact they are specific to each module.
All of these arguments get their values when Node executes the wrapper function. exports is defined as a reference to module.exports prior to that. require and module are both specific to the function to be executed, and __filename/__dirname variables will contain the wrapped module’s absolute filename and directory path.
You can see this wrapping in action if you run a script with a problem on its first line:
~/learn-node $ echo "euaohseu" > bad.js

~/learn-node $ node bad.js
~/bad.js:1
(function (exports, require, module, __filename, __dirname) { euaohseu
                                                              ^
ReferenceError: euaohseu is not defined
Note how the first line of the script as reported above was the wrapper function, not the bad reference.
Moreover, since every module gets wrapped in a function, we can actually access that function’s arguments with the arguments keyword:
~/learn-node $ echo "console.log(arguments)" > index.js

~/learn-node $ node index.js
{ '0': {},
  '1':
   { [Function: require]
     resolve: [Function: resolve],
     main:
      Module {
        id: '.',
        exports: {},
        parent: null,
        filename: '/Users/samer/index.js',
        loaded: false,
        children: [],
        paths: [Object] },
     extensions: { ... },
     cache: { '/Users/samer/index.js': [Object] } },
  '2':
   Module {
     id: '.',
     exports: {},
     parent: null,
     filename: '/Users/samer/index.js',
     loaded: false,
     children: [],
     paths: [ ... ] },
  '3': '/Users/samer/index.js',
  '4': '/Users/samer' }
The first argument is the exports object, which starts empty. Then we have the require/module objects, both of which are instances that are associated with the index.js file that we’re executing. They are not global variables. The last 2 arguments are the file’s path and its directory path.
The wrapping function’s return value is module.exports. Inside the wrapped function, we can use the exports object to change the properties of module.exports, but we can’t reassign exports itself because it’s just a reference.
What happens is roughly equivalent to:
function (require, module, __filename, __dirname) {
  let exports = module.exports;

  // Your Code...

  return module.exports;
}
If we change the whole exports object, it would no longer be a reference to module.exports. This is the way JavaScript reference objects work everywhere, not just in this context.
The require object
There is nothing special about require. It’s an object that acts mainly as a function that takes a module name or path and returns the module.exports object. We can simply override the require object with our own logic if we want to.
For example, maybe for testing purposes, we want every require call to be mocked by default and just return a fake object instead of the required module exports object. This simple reassignment of require will do the trick:
require = function() {

  return { mocked: true };

}
After doing the above reassignment of require, every require('something') call in the script will just return the mocked object.
The require object also has properties of its own. We’ve seen the resolve property, which is a function that performs only the resolving step of the require process. We’ve also seen require.extensions above.
There is also require.main which can be helpful to determine if the script is being required or run directly.
Say, for example, that we have this simple printInFrame function in print-in-frame.js:
// In print-in-frame.js

const printInFrame = (size, header) => {
  console.log('*'.repeat(size));
  console.log(header);
  console.log('*'.repeat(size));
};
The function takes a numeric argument size and a string argument header and it prints that header in a frame of stars controlled by the size we specify.
We want to use this file in two ways:
- From the command line directly like this:
~/learn-node $ node print-in-frame 8 Hello
Passing 8 and Hello as command line arguments to print “Hello” in a frame of 8 stars.
- With
require. Assuming the required module will export theprintInFramefunction and we can just call it:
const print = require('./print-in-frame');

print(5, 'Hey');
To print the header “Hey” in a frame of 5 stars.
Those are two different usages. We need a way to determine if the file is being run as a stand-alone script or if it is being required by other scripts.
This is where we can use this simple if statement:
if (require.main === module) {
  // The file is being executed directly (not with require)
}
So we can use this condition to satisfy the usage requirements above by invoking the printInFrame function differently:
// In print-in-frame.js

const printInFrame = (size, header) => {
  console.log('*'.repeat(size));
  console.log(header);
  console.log('*'.repeat(size));
};

if (require.main === module) {
  printInFrame(process.argv[2], process.argv[3]);
} else {
  module.exports = printInFrame;
}
When the file is not being required, we just call the printInFrame function with process.argv elements. Otherwise, we just change the module.exports object to be the printInFrame function itself.
All modules will be cached
Caching is important to understand. Let me use a simple example to demonstrate it.
Say that you have the following ascii-art.js file that prints a cool looking header:
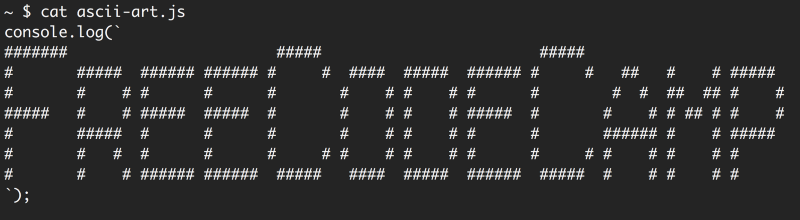
We want to display this header every time we require the file. So when we require the file twice, we want the header to show up twice.
require('./ascii-art') // will show the header.
require('./ascii-art') // will not show the header.
The second require will not show the header because of modules’ caching. Node caches the first call and does not load the file on the second call.
We can see this cache by printing require.cache after the first require. The cache registry is simply an object that has a property for every required module. Those properties values are the module objects used for each module. We can simply delete a property from that require.cache object to invalidate that cache. If we do that, Node will re-load the module to re-cache it.
However, this is not the most efficient solution for this case. The simple solution is to wrap the log line in ascii-art.js with a function and export that function. This way, when we require the ascii-art.js file, we get a function that we can execute to invoke the log line every time:
require('./ascii-art')() // will show the header.
require('./ascii-art')() // will also show the header.
That’s all I have for this topic. Thanks for reading. Until next time!
Learning React or Node? Checkout my books: