
By Jason Arnold
My current love affair with Sass continues and we’ve taken it to the next level. What started out as a faster, less-syntaxy way to write my CSS, has now grown into a much more committed relationship.
We are ready to experiment a little bit. I’ve recently tried my hand at two of Sass’s most helpful features, Mixins and Loops.
Mixins and Loops
With Mixins and Loops, the lines get blurred a bit between CSS and another coding language like JavaScript. When you think about your code in terms of functions that you define in one place and call in another, or loops that iterate over a piece a code a certain number of times, you probably don’t think of CSS. I know I never did.
CSS is for styling. Why would I ever need to loop over a style or call a style defined somewhere else? That doesn’t even make sense in terms of CSS. It’s totally foreign. Plus, isn’t there something about ‘separation of concerns’ (SoC)?
But thinking more about SoC, maybe this way does make more sense.
CSS should handle the styling of the site, right? So, why have I been using JavaScript’s .style() method or jQuery’s .css() method to handle this? Why can’t I dynamically change styling inside of CSS?
Well, Sass gets you a few steps closer to that. Whatever side of the SoC fence you fall on, Mixins and Loops in Sass can save some serious time and effort when styling your sites.
Mixins
I’ll start with Mixins. In the simplest terms, you can think of a Mixin like a JavaScript function for CSS. You define a Mixin somewhere in your Sass code and pass it parameters that you reference inside of the Mixin. Then, somewhere else in the Sass code, you call that Mixin and pass in arguments that correspond to the parameters and the whole thing gets run. Confusing? Yeah, a little, so lets go through an example.
First you define a Mixin in Sass. This is done with =. The syntax of a Mixin definition looks like this (remember that the $ is used in Sass to define variables):
=mixinName($param1, $param2, $etc)
  Sass code goes here...
This Mixin can then be called anywhere else in your code that you need it. And you pass along the arguments that the Mixin needs and Sass converts all of that to CSS.
Here is an example of a Mixin I wrote to define a basic box.
=box($height, $width, $backgroundColor)
  height: $height
  width: $width
  background-color: $backgroundColor
  margin-bottom: 5px
  border: 1px solid black
I’ve defined my three parameters after the name of the Mixin, in this case it is box. Then I have Sass code, some of which calls on the parameters. I can now use this Mixin elsewhere in my Sass code whenever I want to define a box with these characteristics. I can call the Mixin as many times as I want, passing in different arguments each time. You call a Mixin with the + character.
.box-1
  +box(100px, 200px, tomato)

.box-2
  +box(50px, 100px, rbga(100, 255, 255, 0.5)
The page will now render these CSS properties onto the parts of the page with the .box-1 and .box-2 classes. Here is the result.
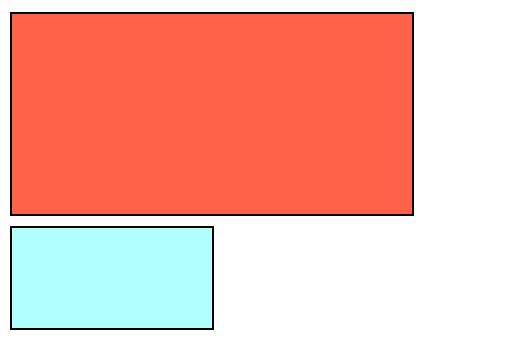 Exciting!
It may be a little underwhelming with only 2 boxes. But if you have a site where you need to define several similar items, Mixins can save you a ton of time. And if you need to change or add a property to all these, you have only one place to go.
If I wanted to make these boxes into ovals by adding a border-radius property, I just do it once in the Mixin rather than for each box in my CSS.
Loops
The second Sass feature covered here is Loops and they are exactly what you think they are. The concept is the same as in most other programming languages. You have a piece of code that needs to be iterated over a certain number of times.
Sass has these as options too and they are called control directives. They start with the @ symbol and the syntax is pretty easy to understand. These include an @if, @for, @each, and @while. I’ll cover the @for here today but you can read more about all of these here.
The @for control directive comes in two different options , the to and through options. This is in reference to the <end> of the loop. to is exclusive and through is inclusive.
The syntax for the through version of an @for loop is as follows:
@for <$variable> from <start> through <end>
  Sass code goes here...
The to version is the same. Just replace through with to.
The $variable can be whatever name you want it to be. The <start>; and values should be integers.
Here is an example I wrote that creates 10 divs on the page, each wider than the last and a slightly different color. I also included them in a Mixin so I could pass in parameters and call it wherever I needed to.
=graph($height, $baseColor)
  @for $i from 1 through 10
    .line-#{$i}
      height: $height
      width: 2em * $i
      background-color: rgba($i * ($baseColor + 20), $i *  ($baseColor + 10), $i * ($baseColor + 5), 1)
This is creating 10 different CSS selectors of .line-1, .line-2, and so forth. Each selector has the height specified by $height, a width of 2em * the value of i and a background color based on the $baseColor number passed in.
I then call this Mixin just like any other
+graph(10px, 10)
And here is the result:
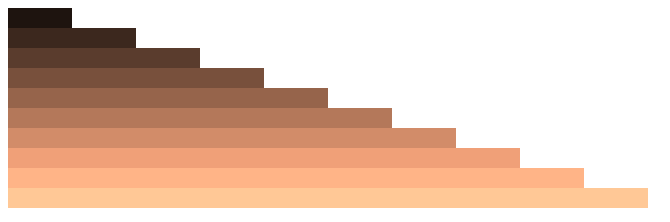 So beige!
You can also add things like CSS pseudo classes to these loops. Here is another example with the :hover pseudo class.
=stack
  @for $i from 1 through 30
    .stack-#{$i}
    position: absolute
    height: 100px
    width: 100px
    top $i + 10px
    left $i + 10px
    background-color: rgba($i * 1, $i * 2, $i * 3, 1)

    &:hover
      background-color: rgba($i * 2, $i * 4, $i * 8, 1)
Call this Mixin like so (no arguments needed):
+stack
The loop will run once when the page renders and then again on each individual .stack element when the mouse hovers over it. This changes the background color.
It was much easier and faster to write this Mixin with an @for loop rather than writing out 299 lines of CSS. And again, if I want to change something for all of them I do it once instead of 299 times.
The result is underwhelming since you can’t hover on the screenshot. Here is a CodePen with all the above examples.
These are only two of the great tools that Sass offers. They can help you create some great looking and functional CSS in a fraction of the time.
I hope you enjoyed this post. Please let me know if you have any questions. Thanks!