

Does this sound familiar? “Help! I committed to the wrong branch!” “It happened again… Where is my commit?”
Well, I’ve been there so many times. Someone calls my name for help when something goes wrong with git. And it has happened not only when I was teaching students, but also while working with experienced developers.
Over time, I kind-of became “the Git guy”.
We use git all the time, and usually it helps us get the work done. But sometimes, and way more often than we might want, things go wrong.
Perhaps we have committed to the wrong branch. Perhaps we lost some code that we wrote. Perhaps we committed something that we didn’t mean to.
 Source: xkcd.com
There are many online resources about git, and some of them (like this one) actually focus on what happens in these undesired scenarios.
But I always felt these resources were lacking the “why” . When provided with a set of commands , what does each command do? And how did you get to these commands in the first place? ?
In a previous post, I provided a visual intro to Git internals. While understanding the internals of git is useful, getting the theory is almost never enough. How do we apply our knowledge of git’s internals and use it to fix problems we’ve gotten ourselves into?
In this post, I would like to bridge this gap and elaborate on the git reset command. We will get to understand what git reset does behind the scenes, and then apply this knowledge to solve various scenarios. ?
Common grounds— working dir, index and repository
In order to understand the inner mechanisms of git reset, it is important to understand the process of recording changes within git . Specifically, I mean the working dir, the index, and the repository.
If you are confident about these terms, feel free to skip to the next section. If you would like an even deeper explanation, see this previous post.
When we work on our source code we work from a working dir — any directory on our file system which has a repository associated with it. It contains the folders and files of our project, and also a directory called .git.
After we make some changes, we want to record them in our repository. A repository (repo for short) is a collection of commits, each of which is an archive of what the project’s working tree looked like at a past date, whether on our machine or someone else’s.

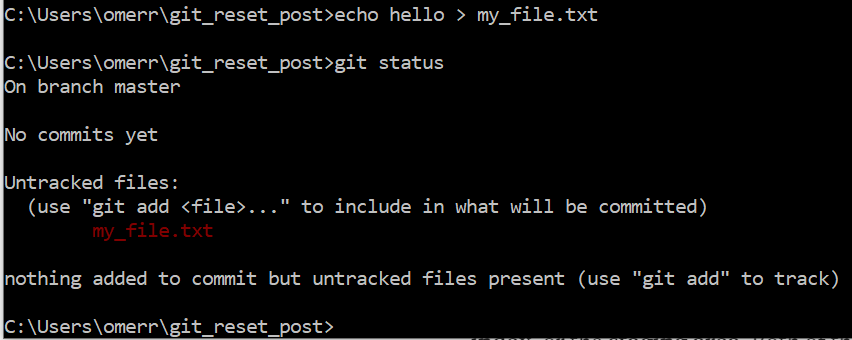
Let’s create a file in the working dir and run git status:
Yet, git does not commit changes from the working tree directly into the repository.
Instead, changes are first registered in something called the index, or the staging area. Both of these terms refer to the same thing, and they are used often in git’s documentation. We will use these terms interchangeably throughout this post.
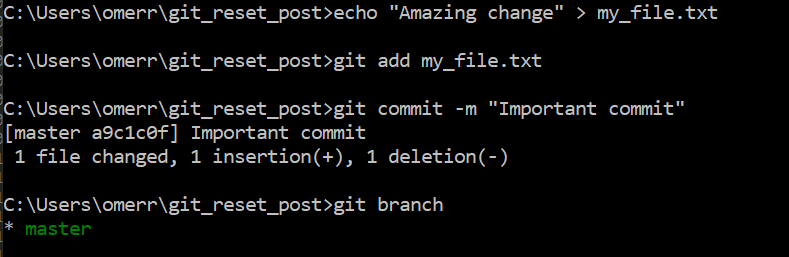
When we use git add, we add files (or changes within files) to the staging area. Let’s use this command on the file we created earlier:

As git status reveals, our file is staged (and ready “to be committed”). Yet, it is not a part of any commit. In other words, it is now in the working dir, as well as the index, but not in the repository.

Next, when we use git commit, we create a commit based on the state of the index. So the new commit (commit 3 in the example below) will include the file added to the index beforehand.

In other words, the working dir has exactly the same state as the index and the repository.
The command git commit also makes the current branch master point to the newly created commit object.

The inner workings of git reset
I like to think of git reset as a command that reverses the process described above (introducing a change to the working dir, adding it to the index, and then commiting it to the repository).
Git reset has three operating modes — --soft, --mixed, or --hard. I see them as three stages:
- Stage 1 — update
HEAD—git reset --soft - Stage 2 — update index —
git reset --mixed - Stage 3 — update working dir —
git reset --hard
Stage 1–update HEAD (git reset --soft)
First, git reset updates whatever HEAD points to. For git reset --hard HEAD~1 it will move what HEAD points to (in the example above, master) to HEAD~1. If the — -soft flag is used, git reset stops there.
Continuing with our example above, HEAD will point to commit 2, and thus new_file.txt will not be a part of the tree of the current commit. It will, however, be part of the index and the working dir.

Looking at git status, we can see that the file is indeed staged but not committed:

In other words, we reverted the process to the stage where we used git add, but haven’t yet used git commit.
Stage 2–update index to HEAD (git reset --mixed)
If we use git reset --mixed HEAD~1, then git won’t stop after updating whatever HEAD points to ( master )to HEAD~1. It will also update the index to (the already updated) HEAD.
In our example, that means that the index will have the same state as commit 2:

So we reverted the process to the stage before using git add — the newly created file is now part of the working dir, but the index and the repository are not.

Stage 3–update the working dir to index (git reset --hard)
By using git reset — hard HEAD~1, after updating whatever HEAD points to (master )to HEAD~1, as well as updating the index to (the already updated) HEAD, git will move on and update the working dir to look like the index.
In our example, that means that the working dir will have the same state as the index, which already has the same state as commit 2:

Actually, we reverted the entire process to even before creating my_file.txt.
Applying our knowledge to real-world scenarios
Now that we understand how git reset works, let's apply this knowledge to save our day! ?
1. OOPS! I committed something by mistake.
Let's consider the following scenario. We created a file with the string This is very importnt, staged and committed it.

And then… Oops! We realized we had a typing error. ?
Well, now we know we can easily solve that. We can revert our last commit, and get the file back to the working dir using git reset --mixed HEAD~1. Now, we can edit the content of our file, stage and commit it again.
Tip: in this specific case, we could also use git commit --amend, as described here.
2. OOPS! I committed something to the wrong branch — and I need it on a new branch
We’ve all been there. We did some work, and then committed it…
Oh no, we committed to master branch, though we should have created a new branch and then issued a pull request. ?
At this stage I find it helpful to visualze the state we’re in, and where we would like to get to:

Actually, there are three changes between the current state and the desired one.
First, new branch points to our recently added commit. Second, master points to the previous commit. Third, HEAD points to new.
We can get to the desired state by three simple steps:
First, make new branch point to the recently added commit — this can be simply achieved by using git branch new. We therefore reach the following state:

Second, make master point to the previous commit (in other words, to HEAD~1). We can do that by using git reset --hard HEAD~1. We therefore reached the following state:

Lastly, we would like to be on branch new, that is, make HEAD point to new. This is easily achieved by performing git checkout new.
All in all:
git branch newgit reset --hard HEAD~1git checkout new
3. OOPS! I committed something to the wrong branch — and I need it on another, already-existing branch
In this case, we went through the same steps as in the previous scenario — we did some work, and then committed it…

Oh no, we committed to master branch, though we should have committed to another branch that already exists. ?
Let’s get back to our drawing board:

Again, we can see there are a few differences here.
First, we need the most recent commit to be on existing branch. Since master currently points to it, we can simply ask git to take the recent commit from master branch and apply it to existing branch like so:
git checkout existing— switching toexistingbranchgit cherry-pick master— applying the last commit onmasterbranch to the current (existing) branch
Now, we reached the following state:

Now we just need to make master point to the previous commit, rather than the latest one. For that we can:
git checkout master— change the active branch tomasteragain.git reset --hard HEAD~1— now we are back at the original branch.
And we have reached our desired state:

Summary
In this post, we learned how git reset operates, and clarified its three modes of operation — --soft, --mixed, and --hard.
We then applied our knowledge about git reset to solve some real-life issues with git.
By understanding the way git operates, we can confidently tackle all kinds of scenarios, and also appreciate the beauty of this tool ?
In future posts, we will cover additional git commands and how they can help us solve all kinds of undesired situations.
Omer Rosenbaum, Swimm’s Chief Technology Officer. Cyber training expert and Founder of Checkpoint Security Academy. Author of Computer Networks (in Hebrew). Visit My YouTube Channel.