
By Bert Carremans
In this article, I will show how to scrape the internet for top-rated films with the Scrapy framework. The goal of this web scraper is to find films that have a high user rating on The Movie Database. The list with these films will be stored in an SQLite database and emailed. This way you know you’ll never miss a blockbuster on TV again.
Finding a good web page to scrape
I start with an online TV guide to find films on Belgian TV channels. But you could easily adapt my code to use it for any other website. To make your life easier when scraping for films, make sure the website you want to scrape:
- has HTML tags with a comprehensible class or id
- uses classes and ids in a consistent way
- has well-structured URLs
- contains all relevant TV channels on one page
- has a separate page per weekday
- lists only films and no other program types like live shows, news, reportage, and so on. Unless you can easily distinguish the films from the other program types.
With the results found we will scrape The Movie Database (TMDB) for the film rating and some other information.
Deciding on what information to store
I will scrape the following information about the films:
- film title
- TV channel
- the time that the film starts
- the date the film is on TV
- genre
- plot
- release date
- link to the details page on TMDB
- TMDB rating
You could complement this list with all actors, the director, interesting film facts, and so on – all the information you’d like to know more about.
In Scrapy this information will be stored in the fields of an Item.
Create the Scrapy project
I am going to assume that you have Scrapy installed. If not, you can follow the excellent Scrapy installation guide.
When Scrapy is installed, open the command line and go to the directory where you want to store the Scrapy project. Then run:
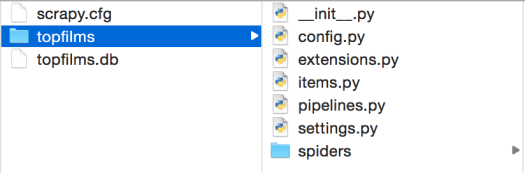
scrapy startproject topfilms
This will create a folder structure for the top films project as shown below. You can ignore the topfilms.db file for now. This is the SQLite database that we will create in the next blog post on Pipelines.
Defining Scrapy Items
We’ll be working with the file items.py. Items.py is created by default when creating your Scrapy project.
An scrapy.Item is a container that will be filled during the web scraping. It will hold all the fields that we want to extract from the web page(s). The contents of the Item can be accessed in the same way as a Python dict.
Open items.py and add a Scrapy.Item class with the following fields:
import scrapy
class TVGuideItem(scrapy.Item):
    title = scrapy.Field()
    channel = scrapy.Field()
    start_ts = scrapy.Field()
    film_date_long = scrapy.Field()
    film_date_short = scrapy.Field()
    genre = scrapy.Field()
    plot = scrapy.Field()
    rating = scrapy.Field()
    tmdb_link = scrapy.Field()
    release_date = scrapy.Field()
    nb_votes = scrapy.Field()
Processing Items with Pipelines
After starting a new Scrapy project, you’ll have a file called pipelines.py. Open this file and copy-paste the code shown below. Afterward, I’ll show you step-by-step what each part of the code does.
import sqlite3 as lite
con = None  # db connection
class StoreInDBPipeline(object):
    def __init__(self):
        self.setupDBCon()
        self.dropTopFilmsTable()
        self.createTopFilmsTable()
def process_item(self, item, spider):
        self.storeInDb(item)
        return item
def storeInDb(self, item):
        self.cur.execute("INSERT INTO topfilms(\
        title, \
        channel, \
        start_ts, \
        film_date_long, \
        film_date_short, \
        rating, \
        genre, \
        plot, \
        tmdb_link, \
        release_date, \
        nb_votes \
        ) \
        VALUES( ?, ?, ?, ?, ?, ?, ?, ?, ?, ?, ? )",
        (
        item['title'],
        item['channel'],
        item['start_ts'],
        item['film_date_long'],
        item['film_date_short'],
        float(item['rating']),
        item['genre'],
        item['plot'],
        item['tmdb_link'],
        item['release_date'],
        item['nb_votes']
        ))
        self.con.commit()
def setupDBCon(self):
        self.con = lite.connect('topfilms.db')
        self.cur = self.con.cursor()
def __del__(self):
        self.closeDB()
def createTopFilmsTable(self):
        self.cur.execute("CREATE TABLE IF NOT EXISTS topfilms(id INTEGER PRIMARY KEY AUTOINCREMENT NOT NULL, \
        title TEXT, \
        channel TEXT, \
        start_ts TEXT, \
        film_date_long TEXT, \
        film_date_short TEXT, \
        rating TEXT, \
        genre TEXT, \
        plot TEXT, \
        tmdb_link TEXT, \
        release_date TEXT, \
        nb_votes \
        )")
def dropTopFilmsTable(self):
        self.cur.execute("DROP TABLE IF EXISTS topfilms")

    def closeDB(self):
        self.con.close()
First, we start by importing the SQLite package and give it the alias lite. We also initialize a variable con which is used for the database connection.
Creating a class to store Items in the database
Next, you create a class with a logical name. After enabling the pipeline in the settings file (more on that later), this class will be called.
class StoreInDBPipeline(object):
Defining the constructor method
The constructor method is the method with the name __init__. This method is automatically run when creating an instance of the StoreInDBPipeline class.
def __init__(self):
    self.setupDBCon()
    self.dropTopFilmsTable()
    self.createTopFilmsTable()
In the constructor method, we launch three other methods which are defined below the constructor method.
SetupDBCon Method
With the method setupDBCon, we create the topfilms database (if it didn’t exist yet) and make a connection to it with the connect function.
def setupDBCon(self):
    self.con = lite.connect('topfilms.db')
    self.cur = self.con.cursor()
Here we use the alias lite for the SQLite package. Secondly, we create a Cursor object with the cursor function. With this Cursor object, we can execute SQL statements in the database.
DropTopFilmsTable Method
The second method that is called in the constructor is dropTopFilmsTable. As the name says, it drops the table in the SQLite database.
Each time the web scraper is run the database will be completely removed. It is up to you if you want to do that as well. If you want to do some querying or analysis of the films’ data, you could keep the scraping results of each run.
I just want to see the top rated films of the coming days and nothing more. Therefore I decided to delete the database in each run.
def dropTopFilmsTable(self):
    self.cur.execute("DROP TABLE IF EXISTS topfilms")
With the Cursor object cur we execute the DROP statement.
CreateTopFilmsTable Method
After dropping the top films table, we need to create it. This is done by the last method call in the constructor method.
def createTopFilmsTable(self):
    self.cur.execute("CREATE TABLE IF NOT EXISTS topfilms(id INTEGER PRIMARY KEY AUTOINCREMENT NOT NULL, \
    title TEXT, \
    channel TEXT, \
    start_ts TEXT, \
    film_date_long TEXT, \
    film_date_short TEXT, \
    rating TEXT, \
    genre TEXT, \
    plot TEXT, \
    tmdb_link TEXT, \
    release_date TEXT, \
    nb_votes \
    )")
Again we use the Cursor object cur to execute the CREATE TABLE statement. The fields that are added to the table top films are the same as in the Scrapy Item we created before. To keep things easy, I use exactly the same names in the SQLite table as in the Item. Only the id field is extra.
Sidenote: a good application to look at your SQLite databases is the SQLite Manager plugin in Firefox. You can watch this SQLite Manager tutorial on Youtube to learn how to use this plugin.
Process_item Method
This method must be implemented in the Pipeline class and it must return a dict, an Item or DropItem exception. In our web scraper, we will return the item.
def process_item(self, item, spider):
    self.storeInDb(item)
    return item
In contrast with the other methods explained, it has two extra arguments. The item that was scraped and the spider that scraped the item. From this method, we launch the storeInDb method and afterward return the item.
StoreInDb Method
This method executes an INSERT statement to insert the scraped item into the SQLite database.
def storeInDb(self, item):
    self.cur.execute("INSERT INTO topfilms(\
    title, \
    channel, \
    start_ts, \
    film_date_long, \
    film_date_short, \
    rating, \
    genre, \
    plot, \
    tmdb_link, \
    release_date, \
    nb_votes \
    ) \
    VALUES( ?, ?, ?, ?, ?, ?, ?, ?, ?, ?, ? )",
                     (
                         item['title'],
                         item['channel'],
                         item['start_ts'],
                         item['film_date_long'],
                         item['film_date_short'],
                         float(item['rating']),
                         item['genre'],
                         item['plot'],
                         item['tmdb_link'],
                         item['release_date'],
                         item['nb_votes']
                     ))
    self.con.commit()
The values for the table fields come from the item, which is an argument for this method. These values are simply called as a dict value (remember that an Item is nothing more than a dict?).
Every constructor has a... destructor
The counterpart of the constructor method is the destructor method with the name __del__. In the destructor method for this pipelines class, we close the connection to the database.
def __del__(self):
    self.closeDB()
CloseDB Method
def closeDB(self):
    self.con.close()
In this last method, we close the database connection with the close function. So now we have written a fully functional pipeline. There is still one last step left to enable the pipeline.
Enabling the pipeline in settings.py
Open the settings.py file and add the following code:
ITEM_PIPELINES = {
    'topfilms.pipelines.StoreInDBPipeline':1
}
The integer value indicates the order in which the pipelines are run. As we have only one pipeline, we assign it the value 1.
Creating a Spider in Scrapy
Now we’ll be looking at the core of Scrapy, the Spider. This is where the heavy lifting of your web scraper will be done. I’ll show you step-by-step how to create one.
Importing the necessary packages
First of all, we’ll import the necessary packages and modules. We use the CrawlSpider module to follow links throughout the online TV guide.
Rule and LinkExtractor are used to determine which links we want to follow.
The config module contains some constants like DOM_1, DOM_2 and START_URL that are used in the Spider. The config module is found one directory up to the current directory. That’s why you see two dots before the config module.
And lastly, we import the TVGuideItem. This TVGuideItem will be used to contain the information during the scraping.
import scrapy
from scrapy.spiders import CrawlSpider, Rule
from scrapy.linkextractors import LinkExtractor
from fuzzywuzzy import fuzz
from ..config import *
from topfilms.items import TVGuideItem
Telling the Spider where to go
Secondly we subclass the CrawlSpider class. This is done by inserting CrawlSpider as an argument for the TVGuideSpider class.
We give the Spider a name, provide the allowed_domains (e.g. themoviedb.org) and the start_urls. The start_urls is in my case the web page of the TV guide, so you should change this by your own preferred website.
With rules and the deny argument we tell the Spider which URLs (not) to follow on the start URL. The URL not to follow is specified with a regular expression.

I am not interested in the films that were shown yesterday, don't allow the Spider to follow URLs ending with “gisteren“.
OK, but which URLs should the Spider follow? For that, I use the restrict_xpaths argument. It says to follow all URLs with the class=”button button–beta”. These are in fact URLs with films for the coming week.
Finally, with the callback argument we let the Spider know what to do when it is following one of the URLs. It will execute the function parse_by_day. I’ll explain that in the next part.
class TVGuideSpider(CrawlSpider):
    name = "tvguide"
    allowed_domains = [DOM_1, DOM_2]
    start_urls = [START_URL]
# Extract the links from the navigation per day
    # We will not crawl the films for yesterday
    rules = (
        Rule(LinkExtractor(allow=(), deny=(r'\/gisteren'), restrict_xpaths=('//a[@class="button button--beta"]',)), callback="parse_by_day", follow= True),
    )
Parsing the followed urls
The parse_by_day function, part of the TVGuideScraper, scrapes the web pages with the overview of all films per channel per day. The response argument comes from the Request that has been launched when running the web scraping program.
On the web page being scraped you need to find the HTML elements that are used to show the information we are interested in. Two good tools for this are the Chrome Developer Tools and the Firebug plugin in Firefox.
One thing we want to store is the date for the films we are scraping. This date can be found in the paragraph (p) in the div with class="grid__col__inner". Clearly, this is something you should modify for the page you are scraping.

With the xpath method of the Response object, we extract the text in the paragraph. I learned a lot of this in the tutorial on how to use the xpath function.
By using extract_first, we make sure that we do not store this date as a list. Otherwise, this will give us issues when storing the date in the SQLite database.
Afterwards, I perform some data cleaning on film_date_long and create film_date_short with the format YYYYMMDD. I created this YYYYMMDD format to sort the films chronologically later on.
Next, the TV channel is scraped. If it is in the list of ALLOWED_CHANNELS (defined in the config module), we continue to scrape the title and starting time. This information is stored in the item, which is initiated by TVGuideItem().
After this, we want to continue scraping on The Movie Database. We will use the URL https://www.themoviedb.org/search?query= to show search results for the film being scraped. To this URL, we want to add the film title (url_part in the code). We simply re-use the URL part that is found in the link on the TV guide web page.
With that URL, we create a new request and continue on TMDB. With request.meta['item'] = item we add the already scraped data to the request. This way we can continue to fill up our current TVGuideItem.
Yield request actually launches the request.
def parse_by_day(self, response):
    film_date_long = response.xpath('//div[@class="grid__col__inner"]/p/text()').extract_first()
    film_date_long = film_date_long.rsplit(',',1)[-1].strip()  # Remove day name and white spaces
    # Create a film date with a short format like YYYYMMDD to sort the results chronologically
    film_day_parts = film_date_long.split()
    months_list = ['januari', 'februari', 'maart',
                  'april', 'mei', 'juni', 'juli',
                  'augustus', 'september', 'oktober',
                  'november', 'december' ]
    year = str(film_day_parts[2])
    month = str(months_list.index(film_day_parts[1]) + 1).zfill(2)
    day = str(film_day_parts[0]).zfill(2)
    film_date_short = year + month + day
    for col_inner in response.xpath('//div[@class="grid__col__inner"]'):
        chnl = col_inner.xpath('.//div[@class="tv-guide__channel"]/h6/a/text()').extract_first()
        if chnl in ALLOWED_CHANNELS:
            for program in col_inner.xpath('.//div[@class="program"]'):
                item = TVGuideItem()
                item['channel'] = chnl
                item['title'] = program.xpath('.//div[@class="title"]/a/text()').extract_first()
                item['start_ts'] = program.xpath('.//div[@class="time"]/text()').extract_first()
                item['film_date_long'] = film_date_long
                item['film_date_short'] = film_date_short
                detail_link = program.xpath('.//div[@class="title"]/a/@href').extract_first()
                url_part = detail_link.rsplit('/',1)[-1]
                # Extract information from the Movie Database www.themoviedb.org
                request = scrapy.Request("https://www.themoviedb.org/search?query="+url_part,callback=self.parse_tmdb)
                request.meta['item'] = item  # Pass the item with the request to the detail page
    yield request
Scraping additional information on The Movie DataBase
As you can see in the request created in the function parse_by_day, we use the callback function parse_tmdb. This function is used during the request to scrape the TMDB website.
In the first step, we get the item information that was passed by the parse_by_day function.
The page with search results on TMDB can possibly list multiple search results for the same film title (url_part passed in the query). We also check whether there are results with if tmddb_titles.

We use the fuzzywuzzy package to perform fuzzy matching on the film titles. In order to use the fuzzywuzzy package we need to add the import statement together with the previous import statements.
from fuzzywuzzy import fuzz
If we find a 90% match we use that search result to do the rest of the scraping. We do not look at the other search results anymore. To do that we use the break statement.
Next, we gather genre, rating and release_date from the search results page in a similar way we used the xpath function before. To get a YYYYMMDD format for the release date, we execute some data processing with the split and join functions.
Again we want to launch a new request to the details page on TMDB. This request will call the parse_tmdb_detail function to extract the film plot and number of votes on TMDB. This is explained in the next section.
def parse_tmdb(self, response):
    item = response.meta['item']  # Use the passed item


    tmdb_titles = response.xpath('//a[@class="title result"]/text()').extract()
    if tmdb_titles:  # Check if there are results on TMDB
        for tmdb_title in tmdb_titles:
            match_ratio = fuzz.ratio(item['title'], tmdb_title)
            if match_ratio > 90:
                item['genre'] = response.xpath('.//span[@class="genres"]/text()').extract_first()
                item['rating'] = response.xpath('//span[@class="vote_average"]/text()').extract_first()
                release_date = response.xpath('.//span[@class="release_date"]/text()').extract_first()
                release_date_parts = release_date.split('/')
                item['release_date'] = "/".join(
                    [release_date_parts[1].strip(), release_date_parts[0].strip(), release_date_parts[2].strip()])
                tmdb_link = "https://www.themoviedb.org" + response.xpath(
                    '//a[@class="title result"]/@href').extract_first()
                item['tmdb_link'] = tmdb_link
                # Extract more info from the detail page
                request = scrapy.Request(tmdb_link, callback=self.parse_tmdb_detail)
                request.meta['item'] = item  # Pass the item with the request to the detail page
    yield request
    break  # We only consider the first match
    else:
        return
Scraping the film plot from the details page
The last function we’ll discuss is a short one. As before we get the item passed by the parse_tmdb function and scrape the details page for the plot and number of votes.

At this stage, we are finished scraping the information for the film. In other words, the item for the film is completely filled up. Scrapy will then use the code written in the pipelines to process these data and put it in the database.
def parse_tmdb_detail(self, response):
    item = response.meta['item']  # Use the passed item
    item['nb_votes'] = response.xpath('//span[@itemprop="ratingCount"]/text()').extract_first()
    item['plot'] = response.xpath('.//p[@id="overview"]/text()').extract_first()
    yield item
Using Extensions in Scrapy
In the section about Pipelines, we already saw how we store the scraping results in an SQLite database. Now I will show you how you can send the scraping results via email. This way you get a nice overview of the top rated films for the coming week in your mailbox.
Importing the necessary packages
We will be working with the file extensions.py. This file is automatically created in the root directory when you created the Scrapy project. We start by importing the packages which we’ll use later in this file.
import logging
from scrapy import signals
from scrapy.exceptions import NotConfigured
import smtplib
import sqlite3 as lite
from config import *
The logging package is not really required. But this package can be useful for debugging your program or just to write some information to the log.
The signals module will help us to know when the spider has been opened and closed. We will send the email with the films after the spider has done its job.
From the scrapy.exceptions module we import the method NotConfigured. This will be raised when the extension is not configured in the settings.py file. Concretely the parameter MYEXT_ENABLED must be set to True. We’ll see this later in the code.
The smtplib package is imported to be able to send the email. I use my Gmail address to send the email, but you could adapt the code in config.py to use another email service.
Lastly, we import the sqlite3 package to extract the top-rated films from the database and import config to get our constants.
Creating the SendEmail class in the extensions
First, we define the logger object. With this object we can write messages to the log at certain events. Then we create the SendEmail class with the constructor method. In the constructor, we assign FROMADDR and TOADDR to the corresponding attributes of the class. These constants are set in the config.py file. I used my Gmail address for both attributes.
logger = logging.getLogger(__name__)
class SendEmail(object):
    def __init__(self):
        self.fromaddr = FROMADDR
        self.toaddr  = TOADDR
Instantiating the extension object
The first method of the SendEmail object is from_crawler. The first check we do is whether MYEXT_ENABLED is enabled in the settings.py file. If this is not the case, we raise a NotConfigured exception. When this happens, the rest of the code in the extension is not executed.
In the settings.py file we need to add the following code to enable this extension.
MYEXT_ENABLED = True
EXTENSIONS = {
    'topfilms.extensions.SendEmail': 500,
    'scrapy.telnet.TelnetConsole': None
}
So we set the Boolean flag MYEXT_ENABLED to True. Then we add our own extension SendEmail to the EXTENSIONS dictionary. The integer value of 500 specifies the order in which the extension must be executed. I also had to disable the TelnetConsole. Otherwise sending the email did not work. This extension is disabled by putting Noneinstead of an integer order value.
Next, we instantiate the extension object with the cls() function. To this extension object we connect some signals. We are interested in the spider_opened and spider_closedsignals. And lastly we return the ext object.
@classmethod
def from_crawler(cls, crawler):
    # first check if the extension should be enabled and raise
    # NotConfigured otherwise
    if not crawler.settings.getbool('MYEXT_ENABLED'):
        raise NotConfigured
    # instantiate the extension object
    ext = cls()
    # connect the extension object to signals
    crawler.signals.connect(ext.spider_opened, signal=signals.spider_opened)
    crawler.signals.connect(ext.spider_closed, signal=signals.spider_closed)
    # return the extension object
    return ext
Define the actions in the spider_opened event
When the spider has been opened we simply want to write this to the log. Therefore we use the logger object which we created at the top of the code. With the info method we write a message to the log. Spider.name is replaced by the name we defined in the TVGuideSpider.py file.
def spider_opened(self, spider):
    logger.info("opened spider %s", spider.name)
Sending the email after the spider_closed event
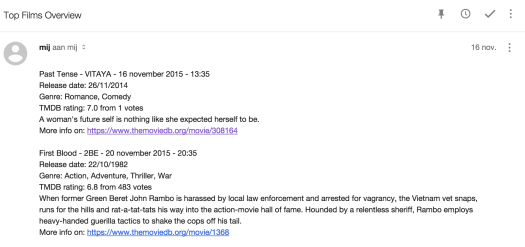
In the last method of the SendEmail class we send the email containing the overview with top rated films.
Again we send a notification to the log that the spider has been closed. Secondly, we create a connection to the SQLite database containing all the films of the coming week for the _ALLOWEDCHANNELS. We select the films with a rating >= 6.5. You can change the rating to a higher or lower threshold as you wish. The resulting films are then sorted by film_date_short, which has the YYYYMMDD format and by the starting time start_ts.
We fetch all rows in the cursor cur and check whether we have some results with the len function. It is possible to have no results when you set the threshold rating too high, for example.
With for row in data we go through each resulting film. We extract all the interesting information from the row. For some data we apply some encoding with encode('ascii','ignore'). This is to ignore some of the special characters like é, à, è, and so on. Otherwise we get errors when sending the email.
When all data about the film is gathered, we compose a string variable topfilm. Each topfilm is then concatenated to the variable topfilms_overview, which will be the message of the email we send. If we have no film in our query result, we mention this in a short message.
At the end, we send the message with the Gmail address, thanks to the smtplib package.
def spider_closed(self, spider):
    logger.info("closed spider %s", spider.name)
    # Getting films with a rating above a threshold
    topfilms_overview = ""
    con = lite.connect('topfilms.db')
    cur = con.execute(
        "SELECT title, channel, start_ts, film_date_long, plot, genre, release_date, rating, tmdb_link, nb_votes "
        "FROM topfilms "
        "WHERE rating >= 6.5 "
        "ORDER BY film_date_short, start_ts")


    data = cur.fetchall()
    if len(data) > 0:  # Check if we have records in the query result
        for row in data:
            title = row[0].encode('ascii', 'ignore')
            channel = row[1]
            start_ts = row[2]
            film_date_long = row[3]
            plot = row[4].encode('ascii', 'ignore')
            genre = row[5]
            release_date = row[6].rstrip()
            rating = row[7]
            tmdb_link = row[8]
            nb_votes = row[9]
            topfilm = ' - '.join([title, channel, film_date_long, start_ts])
            topfilm = topfilm + "\r\n" + "Release date: " + release_date
            topfilm = topfilm + "\r\n" + "Genre: " + str(genre)
            topfilm = topfilm + "\r\n" + "TMDB rating: " + rating + " from " + nb_votes + " votes"
            topfilm = topfilm + "\r\n" + plot
            topfilm = topfilm + "\r\n" + "More info on: " + tmdb_link
            topfilms_overview = "\r\n\r\n".join([topfilms_overview, topfilm])
    con.close()
    if len(topfilms_overview) > 0:
        message = topfilms_overview
    else:
        message = "There are no top rated films for the coming week."
    msg = "\r\n".join([
        "From: " + self.fromaddr,
        "To: " + self.toaddr,
        "Subject: Top Films Overview",
        message
    ])
    username = UNAME
    password = PW
    server = smtplib.SMTP(GMAIL)
    server.ehlo()
    server.starttls()
    server.login(username, password)
    server.sendmail(self.fromaddr, self.toaddr, msg)
    server.quit()
Result of sending emails via Extensions
The final result of this piece of code is an overview with top rated films in your mailbox. Great! Now you don’t have to look this up anymore on the online TV guide.
Tricks to avoid IP banning
When you make many requests in a short period of time, you risk being banned by the server. In this final section, I’ll show you some tricks to avoid IP banning.
Delaying your requests
One simple way to avoid IP banning is to pause between each request. In Scrapy this can be done by simply setting a parameter in the settings.py file. As you probably noticed, the settings.py file has a lot of parameters commented out.
Search for the parameter DOWNLOAD_DELAY and uncomment it. I set the pause length to 2 seconds. Depending on how many requests you have to make, you can change this. But I would set it to at least 1 second.
DOWNLOAD_DELAY=2
More advanced way for avoiding IP banning
By default, each time you make a request, you do this with the same user agent. Thanks to the package fake_useragent we can easily change the user agent for each request.
All credits for this piece of code go to Alecxe who wrote a nice Python script to make use of the fake_useragent package.
First, we create a folder _scrapy_fakeuseragent in the root directory of our web scraper project. In this folder we add two files:
- _init.py_ which is an empty file
- middleware.py
To use this middleware we need to enable it in the settings.py file. This is done with the code:
DOWNLOADER_MIDDLEWARES = {
    'scrapy.downloadermiddleware.useragent.UserAgentMiddleware': None,
    'scrapy_fake_useragent.middleware.RandomUserAgentMiddleware': 400,
}
First, we disable the default UserAgentMiddleware of Scrapy by specifying None instead of an integer value. Then we enable our own middleware RandomUserAgentMiddleware. Intuitively, middleware is a piece of code that is executed during a request.
In the file middleware.py we add the code to randomize the user agent for each request. Make sure you have the fake_useragent package installed. From the fake_usergent package we import the UserAgent module. This contains a list of different user agents. In the constructor of the RandomUserAgentMiddleware class, we instantiate the UserAgent object. In the method _processrequest we set the user agent to a random user agent from the ua object in the header of the request.
from fake_useragent import UserAgent
class RandomUserAgentMiddleware(object):
    def __init__(self):
        super(RandomUserAgentMiddleware, self).__init__()
        self.ua = UserAgent()
    def process_request(self, request, spider):
        request.headers.setdefault('User-Agent', self.ua.random)
Conclusion
That was it! I hope you now have a clear view on how to use Scrapy for your web scraping projects.