

For years, Quincy Larson sent a weekly email newsletter through freeCodeCamp's Mail for Good platform, which is powered by Amazon SES.
He recently migrated this process to SendGrid. In this article, I will show you how I built a tool to accomplish this.
How to Set Up a SendGrid Account
The first step is to register for SendGrid and set up your account. For the purposes of this tutorial, the free tier should be sufficient.
As you scale up your application, you may need to increase your available email limits through the platform.
How to Set Up a Dedicated IP Address on SendGrid
By default, SendGrid uses shared IP addresses for sending emails. This might be acceptable for smaller-scale email applications, but as you increase your send rates you will need to set up a dedicated IP address.
This is a good idea, because your "sender reputation" (the metric SendGrid uses to assess your standing with email service providers) will not be negatively impacted by the actions of other users who share the same IP.
To set up your own dedicated IP, select the "Settings" option from the side navigation menu, then select "IP Addresses". Just a quick note, however: this option is unavailable on the free tier.
Depending on your paid plan, you may already have one dedicated IP address set up. If you do not have one, or if you choose to add more, you can select the "Add an IP address" button to configure a new IP.
 Setting menu for IP addresses
How to Authorize an Email Sender in SendGrid
NOTE: you can skip this section if you are using a custom domain for your emails.
To send emails from your personal email address, you will need to verify that the email address belongs to you.
In the left menu, select "Settings", then "Sender Authentication". Choose "Verify a Single Sender" to walk through the flow of adding your one email address.
 Single Sender option
How to Authenticate Your Custom Domain in SendGrid
NOTE: you can skip this section if you are NOT using a custom domain for your emails.
In order to send emails from your custom mail domain, you will need to authenticate that domain with SendGrid. To get to this screen, select the Settings menu again, then select "Sender Authentication".
 Setting menu for Sender Authentication
You should then see a screen with an option for "Domain Authentication". Select the "Authenticate Your Domain" option and SendGrid will walk you through the process for configuring your DNS records (with specific instructions based on your DNS provider).
 Sender Authenication settings page
How to Set Up Reverse DNS in SendGrid
NOTE: you can skip this section if you are not using a custom domain for your emails.
Reverse DNS (Domain Name System) is used by email providers to look up the owner of a given IP address. Setting this up will allow email providers to verify that the IP address you send an email from is connected to your custom domain.
In the same Sender Authentication screen as above, you will see a "Reverse DNS" section. There will be an option to configure reverse DNS for each dedicated IP you have on your account - like Domain Authentication, SendGrid's platform will walk you through setting this up.
How to Set Up Email Authentication in SendGrid
NOTE: you can skip this section if you are not using a custom domain for your emails.
Major email providers (such as Gmail, Yahoo, and Outlook) use several methods for authenticating the sender of an email: SPF, DKIM, and DMARC.
- SPF (Sender Policy Framework) validates that the IP address sending mail from your domain is authorized to do so.
- DKIM (DomainKeys Identified Mail) uses public key strings to authenticate that an email
fromaddress is accurate and not spoofed/falsified. - DMARC (Domain-based Message Authentication, Reporting, and Conformance) is a set of instructions that tell email providers how to react when an email fails the SPF or DKIM validations.
SendGrid's authentication flow will walk you through setting up SPF and DKIM as part of the domain authentication process, but you will need to configure your DMARC manually.
Visit your DNS hosting provider and access the DNS management settings. From there, add a new TXT record with a name of _dmarc.yourdomain.com (replacing yourdomain.com with your custom domain).
Note that some providers, such as GoDaddy, will automatically append your domain to the record - in this case, the name should be _dmarc.
The value of this record should take a similar structure to:
"v=DMARC1; p=none; pct=100; rua=mailto:dmarc@yourdomain.com"
v=DMARCindicates the version of DMARC rules to use (currently only Version 1 is available).p=noneindicates the action an email provider should take when an email fails DKIM or SPF. This setting should start asnone, to avoid impacting deliverability of your emails. Once you have confirmed that your DKIM and SPF are configured correctly, you can update this value toquarantineto have providers automatically route failing emails to the spam folder, orrejectto have providers reject/bounce failing emails.pct=100indicates the percentage of failing emails to which the action should be applied.rua=mailto:dmarc@yourdomain.comis the email address to send aggregate reports to. These reports contain information on all emails from your IPs that were received by a given provider. Replace thedmarc@yourdomain.comwith the email address you want to receive those reports.
How to Create a Dynamic Template in SendGrid
The tool we will be building today uses SendGrid's dynamic template feature to set the subject and body text of an email. To set this up, select the "Email API" option in the side navigation menu, then choose "Dynamic Templates".
 Setting menu for Dynamic Templates
You will see a screen with a prompt to create your first dynamic template. Select the "Create a Dynamic Template" option.
Give your new template a name: "freeCodeCamp SendGrid Tutorial". SendGrid will add this template to a list of available templates. Select the template to see the Template ID (make a note of this, as we will need it for the tool later on) and click the "Add Version" button.
 Preview of the newly-added template
Select "Blank Template" on the screen that appears, then choose "Code Editor". You should now see the editor view. SendGrid's editor uses HTML to build the email body - however, when we build our tool we will be sending the plain text version.
For now, replace the contents of the editor with the following code:
<p>This is a test email used with the freeCodeCamp SendGrid tutorial</p>
<p>Unsubscribe: {{{unsubscribeId}}}</p>
You will notice that we have added {{{unsubscribeId}}}. SendGrid's template uses Handlebars to dynamically replace values - we will be leveraging this feature when we build the tool.
Now select the settings option from the top left - you may optionally give your template version a name, but the "Subject" field is what we want to modify. Set this value to {{{subject}}} to dynamically load the subject value from our tool.
To test the dynamic template, select the "Test Data" option from the top menu. Insert this JSON data into the editor there:
{
    "unsubscribeId": "1",
    "subject": "Testing emails!"
}
You should now see the preview on the right side of the screen reflect these values in the template. Remember to hit the Save button to save your changes!
 Editor and Preview screen showing the dynamic loading of template values
How to Generate a API Key in SendGrid
The final step in configuring your SendGrid account is to generate an API key for our tool to use.
Click the back arrow at the top left to return to the main SendGrid page. Then select "Settings" and "API keys". Choose "Create API Key" to generate a new key. You may optionally grant "Full Access" to your key, but for the purpose of this tutorial you will only need "Mail Send" access.
Be sure to give your key a descriptive name so you will remember its purpose if you access this screen again. Once you have your permissions configured, select "Create and View" to generate the key - save this somewhere safe as you will not be able to view it again.
 Create API screen with the Mail Send permission enabled
How to Build the Email Tool
Now it is time to write the code to actually send some emails. You can view the code for our live application, but for the purposes of this tutorial we will be building a slightly reduced version to focus primarily on using the SendGrid API.
Required Software for a Custom Email Campaign Script
You will need to have the following tools installed to work with this project:
You may also optionally want git for version control.
Our live tool uses a MongoDB Atlas cluster, but our tutorial example will not. If you are not familiar with MongoDB, freeCodeCamp's curriculum includes an excellent section on setting up and using MongoDB.
How to Initialize the Project
Create a directory (folder) in which to work on this project. Then open that folder with your editor and terminal of choice.
To get started, we will need to set this up as a Node project. The quickest way to do so is with npm init in your terminal. This will walk you through creating a package.json which is the core file of a Node application.
The default values will work fine for our application, but we will want to modify the scripts section:
  "scripts": {
    "build": "tsc",
    "send": "node ./prod/send.js"
  },
The build script will be used to compile our TypeScript into JavaScript, and the send script will run our application.
Next we will install and set up TypeScript. If you are not familiar with TypeScript, it is essentially a superset of JavaScript with stronger type definitions and compile-time error checking.
To install TypeScript on your project, run npm install --save-dev typescript in your terminal. (The --save-dev flag saves it as a development dependency - TypeScript is not required at runtime so can be cleaned up in a production environment).
TypeScript requires its own configuration file to set the rules it should follow when generating the JavaScript files. Create a file in your project's root directory called tsconfig.json and insert the following:
{
    "compilerOptions": {
      "target": "es5",
      "module": "commonjs",
      "strict": true,
      "esModuleInterop": true,
      "skipLibCheck": true,
      "forceConsistentCasingInFileNames": true,
      "outDir": "./prod",
      "rootDir": "./src"
    }
  }
For the sake of brevity, we will not dive in to these configuration settings. If you would like additional information, TypeScript has very in-depth documentation.
If you are using git for version control and uploading this to a repository (such as GitHub), you will want to create a .gitignore file in your project's root directory. This file should contain:
/node_modules/
.env
/prod/
/node_modules/will ignore the installed packages. This is considered a best practise when working with version control..envwill ignore our environment variables file. This is very important as you never want to commit your secrets to a repository./prod/will ignore our compiled JavaScript files. We will also use this folder for our email lists, so it is important to avoid accidentally committing that private identifiable information.
Create a .env file in your root project directory. We will be loading the following environment variables through this file:
SENDGRID_API_KEY=
SENDGRID_FROM=
SENDGRID_TEMPLATE_ID=

MAIL_SUBJECT=
SENDGRID_API_KEYshould be the API key you generated in the previous steps.SENDGRID_FROMshould be your email address (this is the address used for thefromfield).SENDGRID_TEMPLATE_IDshould be theidstring for the dynamic template you created earlier.MAIL_SUBJECTwill be the subject line for the emails you send. For now, set this as "fCC Tutorial Email".
Finally, create a src folder in your root project directory, and create a send.ts file in that folder.
How to Install Your Dependencies
First we need to install the sendgrid Node.js package. This package serves as a wrapper for the SendGrid API and will streamline our process for making API calls to send emails. Run npm install @sendgrid/mail to install this package.
Then we need a couple of development dependencies. Run npm install --save-dev dotenv @types/node.
dotenvwill allow us to load environment variables from the.envfile locally.@types/nodeprovides type definitions for Node.js - TypeScript relies on these definitions to understand the structure of the built-in methods and functions.
How to Write the Logic
Now we will be working in our /src/send.ts file - this is where we are building the bulk of our app logic. We will start by importing the required values from our packages.
First we want to load the dotenv package and parse our environment variables.
import dotenv from "dotenv";
dotenv.config();
The dotenv.config() call reads our .env file and loads the values into the process.env Node object.
Next we import the required modules from the SendGrid package:
import sgMail, { MailDataRequired } from "@sendgrid/mail";
sgMail is the primary API wrapper, and MailDataRequired is a type definition we will need.
Finally, we import some built-in Node features for handling our files:
import path from "path";
import { createWriteStream, readFile } from "fs";
pathwill be used to locate our email list files with relative pathsfswill be used to read and write to those files
Time to start building the logic! Our application relies on some essential values to be set in the .env file, so we need to start by validating that those variables are set correctly. If any are missing, we want our application to exit early to avoid throwing errors when we send the emails.
// Here we check for a valid API key
const apiKey = process.env.SENDGRID_API_KEY;
if (!apiKey) {
  console.error("Missing SendGrid Key");
  process.exit(1);
}

// Here we check for a valid from address
const fromAddress = process.env.SENDGRID_FROM;
if (!fromAddress) {
  console.error("Missing sender email address!");
  process.exit(1);
}

// Here we check for a dynamic template ID
const sgTemplate = process.env.SENDGRID_TEMPLATE_ID;
if (!sgTemplate) {
  console.error("Missing SendGrid Template ID");
  process.exit(1);
}

// Here we check for the mail subject, but if it is missing
// we do not need to exit. Instead we use a fallback value.
const subjectValue = process.env.MAIL_SUBJECT || "Fallback value - check your env!";
The process.exit(1) call you see in each condition check tells Node to terminate the process (our application) with an exit code of 1. This indicates that our application crashed due to one of these checks failing.
SendGrid requires us to set the API key. Below your environment variable logic, add the function call to set the key.
// Here we set the SendGrid API key
sgMail.setApiKey(apiKey);
Before moving forward, go ahead and run npm run build in your terminal - this will create a prod folder containing our compiled JavaScript. You should now see the following file structure:
 File Tree for this point in the tutorial
At this point, if you are using git you want to be very sure that the prod folder will not be committed to your repository.
Within the prod folder, create a validEmails.csv file. Our app will use this file to read the email list. Initialise the file with the following contents (replace your@email.com with your actual email address):
email,unsubscribeId
your@email.com,1
iama@fake.email,2
Now we can write the code to parse this into an email list! In your src/send.ts file, add this code:
// Here we concatenate our file path for the valid email file
const filePath = path.join(__dirname + "/../validEmails.csv");

// This is where we start reading the file!
readFile(filePath, "utf8", (err, data) => {
    if (err) {
        console.error(err);
        return;
    }
    console.log(data)
});
Now if you run npm run build and npm run send you should see the contents of our validEmail.csv file in the terminal. If you would like, you can view our current progress up to this point.
Great! Now we need to parse that string into an array of objects so we can iterate through it and build our email messages. Update our callback function:
// This is where we start reading the file!
readFile(filePath, "utf8", (err, data) => {
    if (err) {
        console.error(err);
        return;
    }

  // Here we parse the data into an object array
  const emailList = data
    .split("\n")
    .slice(1)
    .map((el) => {
      const [email, unsubscribeId] = el.split(",");
      return { email, unsubscribeId };
    });
});
.split("\n")splits the string by line breaks. NOTE: If you are on Windows, you may need to change the end-of-line setting for yourvalidEmails.csvfromCRLFtoLF(Windows inserts extra linebreak characters that will impact our data handling).slice(1)removes the first element of that array (ouremail,unsubscribeIdline).- Our
mapfunction will convert eachemail,unsubscribeIdstring into an{email, unsubscribeId}object.
The end result of this parsing function will be an array of objects with email and unsubscribeId properties - much smoother to work with than a string.
 Example output from parsing function
It is now time to send some emails. Below your parsing function (but still within the readFile callback) add the structure for our iteration method. Because we want to access each value in the array, we will use the .forEach approach.
  // Here we iterate through the emailList array
  emailList.forEach((user) => {});
Within the callback for the .forEach, we can construct the message object the SendGrid API expects.
  // Here we iterate through the emailList array
  emailList.forEach((user) => {

    // This is the message object SendGrid needs
    const message: MailDataRequired = {
        to: user.email,
        from: fromAddress,
        subject: subjectValue,
        text: "This goes away!",
        templateId: sgTemplate,
        dynamicTemplateData: {
            subject: subjectValue,
            unsubscribeId: user.unsubscribeId
        }
    }

  });
Before moving on, let's look more closely at this message object. The MailDataRequired we imported earlier is used as the type definition here, so TypeScript can alert us if we happen to miss a required property. Thankfully, we have all of the required properties. But what do they mean?
to:The email address to send the message to. This will be theemailfrom each line of ourvalidEmails.csvfilefrom:The email address to send the message from. This is set in our.envearlier (it should be your email address).subject:This field is not required, but gives us a fallback value in case the dynamic template doesn't parse our subject correctly.text:This text value is overwritten by the template. However, it is still important to use. SendGrid can send emails asplaintextorhtml- by using thetextproperty instead of thehtmlproperty, we ensure our template is sent asplaintext. Email providers are more likely to flag HTML messages as spam, so this helps increase our deliverability rate.templateId:This is the ID for the dynamic template SendGrid should use in the email.dynamicTemplateData:These are the values that correspond with our Handlebars strings we set in the dynamic template earlier.
Great! Our next step is to take this constructed message and send it. Below the message object (but still within the .forEach callback), let's add our send call:
    // Here we send the message we just constructed!
    sgMail.send(message);
This will send the message to each of the emails in our validEmails.csv. Unfortunately, our code will run silently and we will not know if each send was successful or not. Let's add some error handling.
The .send() call returns a Promise, so we can use .then().catch() to handle the return.
    // Here we send the message we just constructed!
    sgMail.send(message)
        .then(() => {
            // Here we log successful send requests
            console.info(`Message send success: ${user.email}`)
        }).catch((err) => {
            // Here we log errored send requests
            console.error(err);
            console.error(`Message send failed: ${user.email}`)
        });
Now if you run npm run build and npm run send you should see a beautiful email in your inbox!
At this point, you now have a functional email sending application. Congratulations! You can view our progress to this point if you'd like.
Read on to see how to handle bounced emails and additional logic for send failures, which is what we'll discuss next.
How to Handle Bounced Emails in SendGrid
You may have noticed that iama@fake.email is very much not a real email address. SendGrid will generate bounced reports daily for your activity the previous day.
Every bounced email hurts your SendGrid reputation and can lead to email providers marking your mail as spam. So, we need to add logic to prevent sending to known bouncing addresses.
Start by creating a bouncedEmails.csv file in your prod folder (it should be next to your validEmails.csv). We do not need unsubscribeId values here, so initialise it with:
email
iama@fake.email
Now back to our send.ts file. On line 38, just below our existing filePath declaration, configure the path for the new bouncedEmails.csv file.
// Here we concatenate our file paths for the CSV files
const filePath = path.join(__dirname + "/validEmails.csv");
const bouncePath = path.join(__dirname + "/bouncedEmails.csv");
Great! Now we need to read that file. Immediately below these file path declarations (before our existing readFile call), add the logic for reading the bounced files.
// Read through the bounce list, parse into array
readFile(bouncePath, "utf8", (err, data) => {
  if (err) {
    console.error(err);
    process.exit(1);
  }
  bounceList = data.split("\n").slice(1);
readFile is asynchronous - so we need to wrap the callback function around all of our existing send logic. Make sure that your closing }) for this callback is moved to the very end of our file.
We read the bouncedEmails.csv file, split it on the new line (remember that you will need to ensure your line endings are LF), and remove the email line. Finally, we continue with our existing send logic.
Back to our send logic. Within our .forEach function, add logic to skip blocked emails (we will add this before constructing the message object to avoid creating unnecessary variables).
  // Here we iterate through the emailList array
  emailList.forEach((user) => {
    // Here we check if the email has been bounced
    if (bounceList.length && bounceList.includes(user.email)) {
        console.info(`Message send skipped: ${user.email}`);
        return;
    }
By leveraging an early return statement, we end that particular .forEach iteration when the bounceList includes that email. This prevents us from attempting to send to email addresses that have previously bounced. Now if you run npm run build and npm run start, you should see this output in your terminal:
 Example console output for a skipped email and successful email
View our progress up to this point.
How to Capture Failed Emails in SendGrid
Currently our application will log an error if an email fails to send. This can work for small use cases, but as you scale your application up you will find it increasingly difficult to identify those failures and attempt to send again.
But instead, we can make our application save those emails in a new file.
Create a failedEmails.csv file in your prod folder. This file can be empty. We will write the code to add the header row.
Back to our send.ts file, head to our path declarations on line 38. Let's add one more for our new failedEmails.csv:
// Here we concatenate our file paths for the CSV files
const filePath = path.join(__dirname + "/validEmails.csv");
const bouncePath = path.join(__dirname + "/bouncedEmails.csv");
const failedPath = path.join(__dirname + "/failedEmails.csv");
Unlike our other paths, this path will be used for a write operation. Because we want to write continuously as emails are processed, we need to create a stream to do so. Just below these path declarations, let's create that stream and add our initial header row.
// Here we create our write stream for failed emails
const failedStream = createWriteStream(failedPath);

// Here we add the header row
failedStream.write("email,unsubscribeId\n")
Time to improve our error handling logic to incorporate this new stream. We need to add another write operation to our error handling in the send call.
    // Here we send the message we just constructed!
    sgMail
      .send(message)
      .then(() => {
        // Here we log successful send requests
        console.info(`Message send success: ${user.email}`);
      })
      .catch((err) => {
        // Here we log errored send requests
        console.error(err);
        console.error(`Message send failed: ${user.email}`);
        // And here we add that email to the failedEmails.csv
        failedStream.write(`${user.email},${user.unsubscribeId}\n`)
      });
This will write the email and unsubscribeId to our new failedEmails.csv in the proper format - allowing us to copy that data into the validEmails.csv to make another send attempt.
Congratulations! You've now built a successful and fully functional tool to send out email blasts. You can see the completed code if you want to confirm your work. But keep reading for a couple of optional, "nice to have" features.
Optional Features for Your Email Tool
Because our tool is CLI-based (meaning it is used in the command-line interface, or terminal), there is not much user feedback. We can leverage some additional console functions to provide more information about the progress of the script.
Let's start by adding some "checkpoints". Before our environment variable validation, let's print a message that the script has started and is checking the variables:
console.info('Script started. Validating environment variables...')
Then, after our validation, we can print a success message.
// Here we set the SendGrid API key
sgMail.setApiKey(apiKey);

console.info('Variables confirmed!')
Within our function to read the bounced file, we can add some messages for start, failure, and success.
console.info('Reading bounced email list...')

// Read through the bounce list, parse into array
readFile(bouncePath, "utf8", (err, data) => {
  if (err) {
    console.error(err);
    console.error('Failed to read bounced emails!')
    process.exit(1);
  }
  bounceList = data.split("\n").slice(1);

console.info('Bounced emails read!')
And the same for our valid email list:
console.info('Reading send list...')
// This is where we start reading the file!
readFile(filePath, "utf8", (err, data) => {
  if (err) {
    console.error(err);
    console.error('Failed to read send list!')
    return;
  }
Now, it would be very nice to have a message print when the operation completes. However, if we add a console.info after our .forEach loop, it will actually print before the emails have finished sending!
This is because the .send method creates a network call and returns a Promise, and that Promise might not have resolved/rejected before our iteration has finished.
So instead we can build a counter to track the number of emails we have sent versus the total number of emails. Just before our .forEach loop, add these variables:
    // Here we create variables for counting
    const emailTotal = emailList.length;
    let emailCount = 0;
We want to count bounced emails as processed, even though we are skipping them.
  // Here we iterate through the emailList array
  emailList.forEach((user) => {
    // Here we check if the email has been bounced
    if (bounceList.includes(user.email)) {
      console.info(`Message send skipped: ${user.email}`);
      emailCount++;
      if (emailCount === emailTotal) {
        console.info(
          `Sending complete! Sent ${emailTotal} emails. Have a nice day!`
        );
        return;
      }
    }
Finally we need to add logic to see if the email we have sent is the last email. This logic goes in our success and error handlers for the send call:
    // Here we send the message we just constructed!
    sgMail
      .send(message)
      .then(() => {
        // Here we log successful send requests
        console.info(`Message send success: ${user.email}`);
        // Here we handle the email counts
        emailCount++;
        if (emailCount === emailTotal) {
          console.info(
            `Sending complete! Sent ${emailTotal} emails. Have a nice day!`
          );
        }
      })
      .catch((err) => {
        // Here we log errored send requests
        console.error(err);
        console.error(`Message send failed: ${user.email}`);
        // And here we add that email to the failedEmails.csv
        failedStream.write(`${user.email},${user.unsubscribeId}\n`);
        // Here we handle the email counts
        emailCount++;
        if (emailCount === emailTotal) {
          console.info(
            `Sending complete! Sent ${emailTotal} emails. Have a nice day!`
          );
        }
      });
And with that, our app is fully complete! If you run the npm run build and npm run send scripts, you should see this output in your terminal:
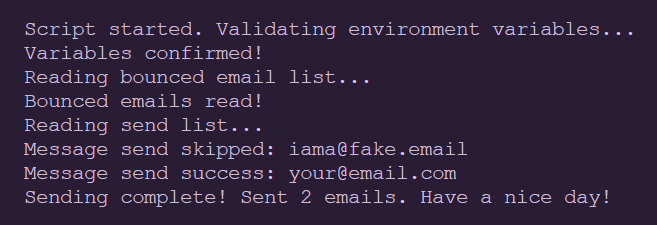 Example console output for completed application.
And you should have received a few emails that look similar to this:
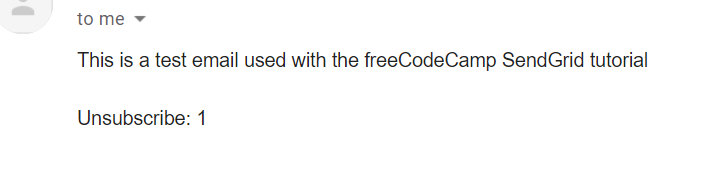 Sample image of test email result
You can view our final code here, or you can view the extended version built for freeCodeCamp.