
By Kangze Huang
The Complete AWS Web Boilerplate — Tutorial 3

Table of Contents
Part 0: Introduction to the Complete AWS Web Boilerplate
Part 1: User Authentication with AWS Cognito (3 parts)
Part 2: Saving File Storage Costs with Amazon S3 (1 part)
Part 3: Sending Emails with Amazon SES (1 part)
Part 4: Manage Users and Permissions with AWS IAM [Coming Soon]
Part 5: Cloud Server Hosting with AWS EC2 and ELB[Coming Soon]
Part 6: The MongoDB Killer: AWS DynamoDB [Coming Soon]
Part 7: Painless SQL Scaling using AWS RDS [Coming Soon]
Part 8: Serverless Architecture with Amazon Lambda [Coming Soon]
Download the Github here.
Setup
Sending emails with Amazon SES is really straightforward. Let’s start at the set-up. Go to Amazon SES and click Email Addresses in the sidebar. Then click Verify a New Email Address and enter an email you want to use for messaging in the app.
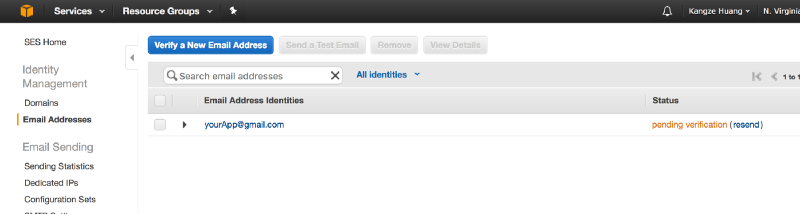
Now go to your email provider and click the verification link. After verifying, go back to Amazon SES Email Addresses tab. You should now see your email verified.

This was necessary for 2 reasons. First is that we need an email for sending a message, and the second is because we are in a sandbox environment. A sandbox environment means you can only send and receive emails from verified addresses, and prevents you from spamming people. This is all the set-up we need for this boilerplate.

If you want be able to send emails to any email address, you need to make a written request to Amazon to graduate from the sandbox environment. To do this, navigate to the top-right hand corner at Support > Support Center.

At this next screen, click Create case.
This is a straightforward form, but we’ll briefly explain. Select Service Limit Increase and set the Limit Type to SES Sending Limits. Now create 2 requests, one where Limit is Desired Daily Sending Quota (how many emails can be sent in one day), and the other where Limit is Desired Maximum Send Rate. Set the New limit value to the amount that you need. Finally, optionally set the Mail Type as it increases you odds of approval. Use transactional if your emails are generated as a request of a user’s activity. There are others available for other use cases.
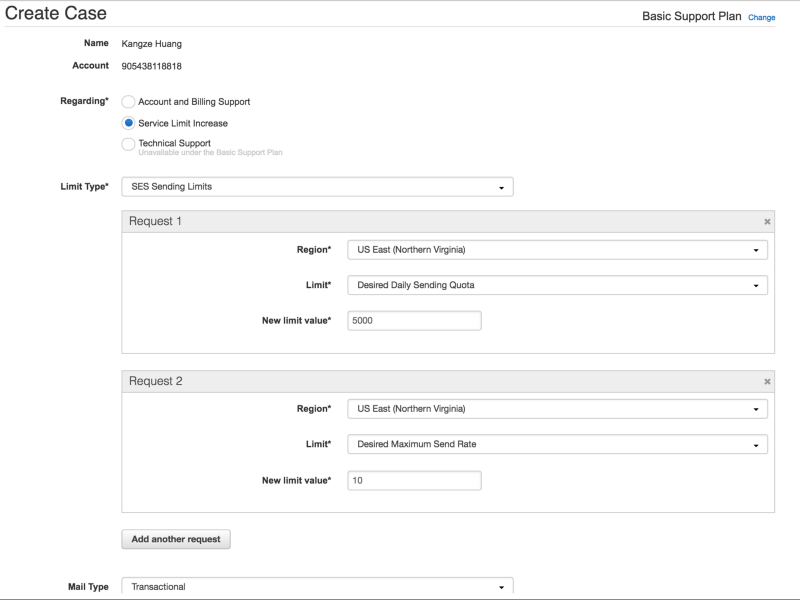
The rest of the request is easy. Make sure you agree to comply with the Terms of Service, and you have a process to handle bounces and complaints (for when users mark your email as spam). Finally, give a brief explanation of your use case.

Submit your code and you should get an email from Amazon with the results of your service increase request. Once approved, your app can send messages to any email.
The Code
We’re ready to dig into the code! Go to App/src/api/aws/aws_ses.js where the bulk of the code resides. Let’s take a look at the main function sendAWSEmail():
export function sendAWSEmail(email, message){ const ses = new AWS.SES({ region: 'us-east-1' }) const p = new Promise((res, rej)=>{ if(!email|| message){ rej('Missing user email or message content') }else{ const params = createInquiryParamsConfig(email, message) // console.log('Sending email with attached params!') AWS.config.credentials.refresh(function(){ // console.log(AWS.config.credentials) ses.sendEmail(params, function(err, data) { if(err){ // console.log(err, err.stack); // an error occurred rej(err) }else{ // console.log(data); // successful response res('Success! Email sent') } }) }) } }) return p}
This is extremely straightforward. We receive two arguments, an email to send to, and a message to be sent. The first thing we do in this function is instantiate the AWS SES object for interacting with AWS by simply passing in the region. Next we check if there is a recipient email and a message. If both are provided, then we can actually send the email.
Assuming we have both a recipient email and message, we will create a params object for AWS SES to read for all the info & options necessary. This params object is created with createInquiryParamsConfig(). Before we dive into that rabbit hole, let’s just quickly finish up explaining the rest of sendAWSEmail(). We refresh AWS Cognito user’s credentials (that we set with AWS Cognito, explained in my other tutorial) and call ses.sendEmail with params and a response callback passed in. Reject the promise if there is an error, and resolve with a success message if there is no error. ses.sendEmail is the only AWS function we will use, and everything else is we need is determined in params.
Now let’s see how to make params with createInquiryParamsConfig().
function createInquiryParamsConfig(email, message){ const params = { Destination: { BccAddresses: [], CcAddresses: [], ToAddresses: [ email ] }, Message: { Body: { Html: { Data: generateHTMLInquiryEmail(landlordEmail, message), Charset: 'UTF-8' } }, Subject: { Data: 'Kangzeroos Boilerplate says hi ' + email, Charset: 'UTF-8' } }, Source: 'yourApp@gmail.com', ReplyToAddresses: [ 'yourApp@gmail.com' ], ReturnPath: 'yourApp@gmail.com' } return params}
Pretty straightforward, we pass in email and message, and return a big javascript object. All the values you see here are necessary, but you can add a ton of other optional configurations too. The function we must pay attention to is generateHTMLInquiryEmail(). Let’s look at that.
function generateHTMLInquiryEmail(email, message){ return ` <!DOCTYPE html> <html> <head> <meta charset='UTF-8' /> <title>title</title> </head> <body> <table border='0' cellpadding='0' cellspacing='0' height='100%' width='100%' id='bodyTable'> <tr> <td align='center' valign='top'> <table border='0' cellpadding='20' cellspacing='0' width='600' id='emailContainer'> <tr style='background-color:#99ccff;'> <td align='center' valign='top'> <table border='0' cellpadding='20' cellspacing='0' width='100%' id='emailBody'> <tr> <td align='center' valign='top' style='color:#337ab7;'> <h3>${message}</h3> </td> </tr> </table> </td> </tr> <tr style='background-color:#74a9d8;'> <td align='center' valign='top'> <table border='0' cellpadding='20' cellspacing='0' width='100%' id='emailReply'> <tr style='font-size: 1.2rem'> <td align='center' valign='top'> <span style='color:#286090; font-weight:bold;'>Send From:</span> <br/> ${email} </td> </tr> </table> </td> </tr> </table> </td> </tr> </table> </body> </html> `}
All we are doing here is creating an HTML file and passing in the email and message to create a custom email. We use ES6 string literals to add in string variables with ${ } like so: <h3>${message}.
And that’s it! You can use whatever front end code you want, simply pass in an email and message to sendAWSEmail(). Just remember sendAWSEmail() returns a promise, so you will have to handle that accordingly. If you don’t know how to handle promises, check out my other tutorial here.
See you next time!
Table of Contents
Part 0: Introduction to the Complete AWS Web Boilerplate
Part 1: User Authentication with AWS Cognito (3 parts)
Part 2: Saving File Storage Costs with Amazon S3 (1 part)
Part 3: Sending Emails with Amazon SES (1 part)
Part 4: Manage Users and Permissions with AWS IAM [Coming Soon]
Part 5: Cloud Server Hosting with AWS EC2 and ELB[Coming Soon]
Part 6: The MongoDB Killer: AWS DynamoDB [Coming Soon]
Part 7: Painless SQL Scaling using AWS RDS [Coming Soon]
Part 8: Serverless Architecture with Amazon Lambda [Coming Soon]
This method was partially used in the deployment of renthero.ca