

Serialization is the process of transforming data that's in one format into another format that can be stored.
If you have ever worked with a database or fetching data from a server, this should all be familiar to you. If not, you have come to the right place.
In this tutorial, we will go over:
- How to setup serialization in a Jetpack Compose project
- How to serialize a data class
- How to de-serialize a data class
You might be asking yourself, what’s so special about serialization in Jetpack Compose? In essence, there isn’t a lot of difference than with a regular Kotlin Android project. The only difference is in the setup.
How to Set Everything Up
Each version of Jetpack Compose corresponds with a version of Kotiln that it is compatible with. Each version of the kotlin-serialization library is also compatible with a specific version of Kotlin. So you need to make sure that each of the three parts in this tripod are compatible with one another.
How can you that?
Your first resource you'll want to consult is the Compose to Kotlin Compatibility Map.
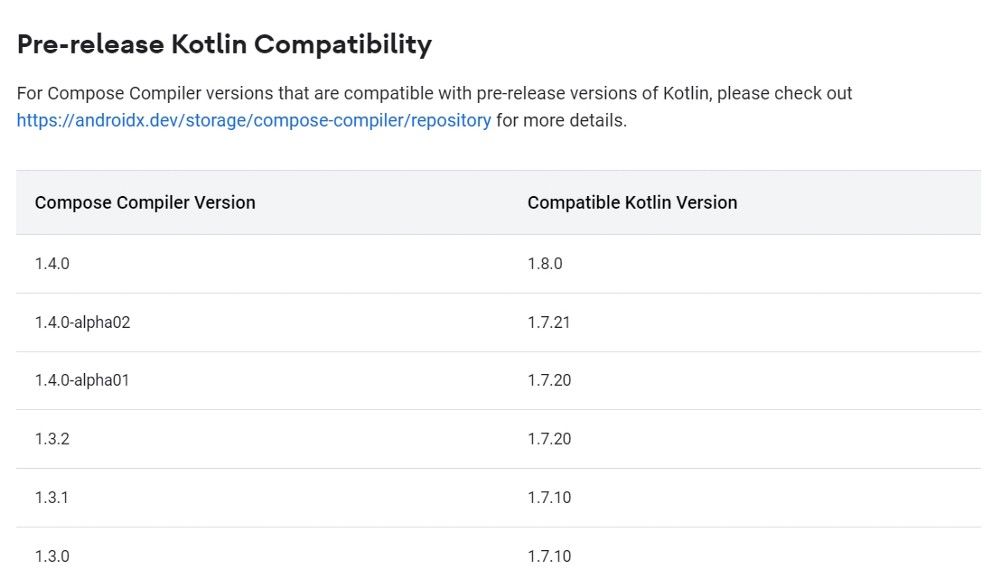
Here you can see which version of Jetpack Compose corresponds to which Kotlin version.
The second resource you will need is the releases page for the kotlin-serialization library. There you will find which library version is compatible with which Kotlin version.

Confused? 😕
Let’s illustrate this with an example:
- Your Jetpack Compose version is 1.1.0.
- Looking over the compatibility map, you see it is compatible with Kotlin version 1.6.10.
- Heading to the releases page of kotlin-serialization library, you see that the version of the kotlin-serialization library that you need to use is 1.3.2.
Head into your project level build.gradle file, and inside the buildscript object, in the dependencies section, put in classpath for the kotlin-serialization library with the version you need.
dependencies {
        ...
        classpath "org.jetbrains.kotlin:kotlin-serialization:X.Y.Z"
 }
Then, head over to your application build.gradle file and do these two things:
- Add the id ‘org.jetbrains.kotlin.plugin.serialization’ inside of the plugins at the top of the file:
plugins {
   ...
   id 'org.jetbrains.kotlin.plugin.serialization'
}
- At the bottom of the file, inside the dependencies section add implementation ‘org.jetbrains.kotlinx:kotlinx-serialization-json:X.Y.Z’:
dependencies {
   ...
   implementation 'org.jetbrains.kotlinx:kotlinx-serialization-json:X.Y.Z'
}
Sync your project and you should be good to go.
Note that we are using the json format of the library, but there are other formats that are supported as well:
- Protocol Buffers
- CBOR (Concise Binary Object Representation)
- Properties
- HOCON (Human Optimized Config Object Notation)
⚠️ If you encounter any errors, make sure the versions you put are correct
How to Build Your Data Class
In order to have something we can serialize and later de-serialize, we need to work with data classes.
Creating a data class is simple. If you are using Android Studio, just right click inside your project’s module and choose New Kotlin file. Enter your class name and then append the data keyword before it.
For the sake of this article, let's say we are working with an API that returns a list of users. Each user object has a range of attributes it can have (just to name a few):
- First name
- Last name
- Age
- Birthdate
- Id
To make our data class serializable, all you need to do is add the @Serializable annotation above the class declaration.
@Serializable
data class UserModel(
   val firstName: String,
   val lastName: String,
   val age: Int,
   val birthdate: Date,
   val id: Long
)
Pretty nifty, right?
Well, there’s more.
The variable that will hold the user’s first name is written as firstName. That means that in the response from our server, it needs to return in a field with the same name.
Sometimes, in API responses, the keys are not written in camelCase, but rather in kebab_case. That would mean that the key for first name, might be first_name. In that case, we would have to write it out like this:
@Serializable
data class UserModel(
   val first_name: String,
   val lastName: String,
   val age: Int,
   val birthdate: Date,
   val id: Long
)
But that is not the convention for property names in Kotlin.
So what can we do?
We can use the @SerialName annotation. This allows us to mark what the name of the field will be from the response and then write anything as the property for it.
@Serializable
data class UserModel(
   @SerialName("first_name")
   val firstName: String,
   val lastName: String,
   val age: Int,
   val birthdate: Date,
   val id: Long
)
How to Serialize and De-Serialize
Now that our data class is set up, let’s enjoy the fruits of our labor. Whenever we need to serialize our data class, we will use the Json.encodeToString method:
val dataAsString: String = Json.encodeToString(user)
When we run the above line of code, we will get our data class in string form.
De-serializing our data is as simple as serializing it. We will use the Json.decodeFromString method:
val user: UserModel = Json.decodeFromString<UserModel>(dataAsString)
✋ Notice that we specified which type of data we want to de-serialize to with the type parameter ().
Time for some extra credit.
Let’s say that in your data class you have a field that you don’t want to serialize. If we take our UserModel class, imagine that we want to have a user’s actual picture (bitmap).
@Serializable
data class UserModel(
   @SerialName("first-name")
   val firstName: String,
   val lastName: String,
   val age: Int,
   val birthdate: Date,
   val id: Long,
   var photo: Bitmap?
)
This is not something we will get from our API call, so how can we exclude it? Because if we don’t, our serialization will fail.
Here to our rescue is the @Transient annotation.
@Serializable
data class UserModel(
   @SerialName("first-name")
   val firstName: String,
   val lastName: String,
   val age: Int,
   val birthdate: Date,
   val id: Long,
   @Transient
   var photo: Bitmap?
)
This will exclude the marked field from being serialized and de-serialized.
- If you want to see a real life example of using serialization inside a project, you can check out a project I made here
- And if you would like to read other articles I have written, you can go here
- For more information about the kotlin-serialization library, you can go here
Thank you for reading! Happy serializing.