
By Rick Mak
In a company that makes mobile and web products, developers shouldn’t be the only ones who can launch the latest version of an app. You need proper testing beyond getting colleagues to give ad hoc feedback by clicking through the app.
At Oursky, our QA built an automatic testing pipeline. But testing needs to be coordinated and the report needs to go to the relevant people. The QA team needs to know when to test the latest version of the app. The PM needs to check the latest progress. And the designer needs to support and fine-tune the details. While building command line tools is the obvious go-to for developers, we wanted to find a tool that everyone in the company uses.
We created our deployment ChatOp on Slack. Read on to see how you can do it with your chat service. You can automate your deployment, which saves everyone time and reduces coordination errors (Campfire, Hipchat, and Flowdock are also supported). We’ve been using ChatOps in 15+ simultaneous projects within our team.
ChatOps is a great way to make the deployment procedure less complex, less black-boxed, and less scary.
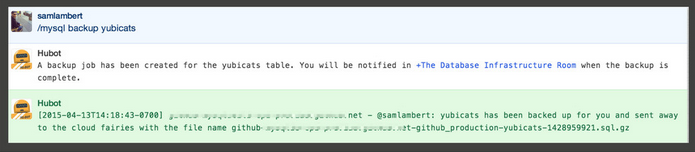
I adapted GitHub’s use of ChatOps for our deployment with Slack. GitHub’s open source chatbot (Hubot) does automating deployment, graphing, monitoring, provisioning, tweeting, and many other things. GitHub even created MySQL database back-up jobs so they can do important operations without leaving the chatroom with a set of instructions.
The big picture of ChatOps deployment
ChatOps simplifies deployment with automation: it removes manual coordination errors, and allows everyone in a project to jump in. It also encourages open communication so team members don’t have to interrupt each other for updates or documentation. They can access information whenever they need it.
So how does it work and how do you set it up?
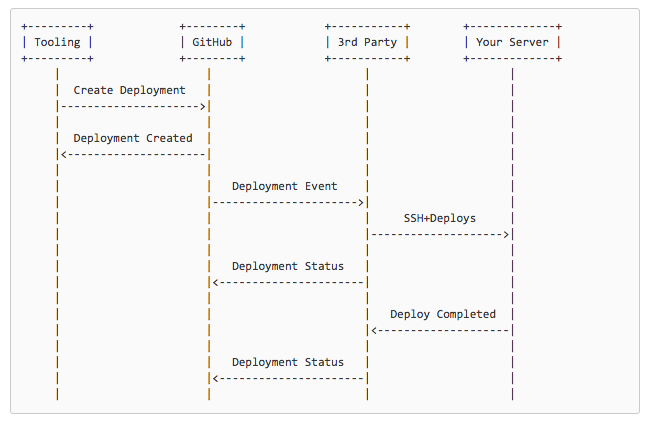
This graph shows how deployment interactions would work via Github.
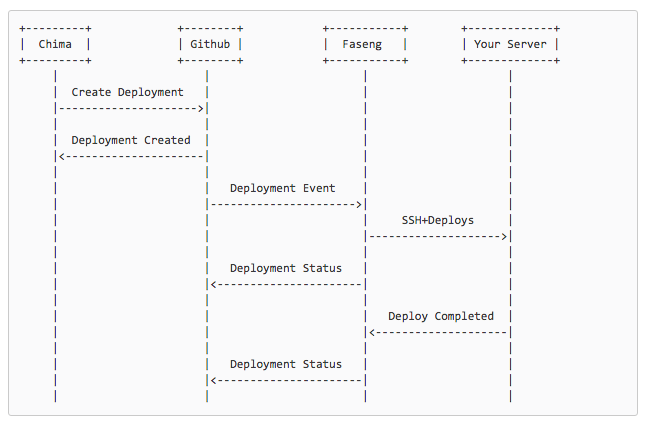
Our company implemented a similar version using open Slack channels for all our operations. Each project has its own channel. We introduced two Slack botsk, Chima and Faseng, to assist the deployment process. (Chima and Faseng are the names of our resident office cats.)
The core idea is summarized in this sentence:
_Tell **Chima**(CEO), to make **Faseng**(CTO) deploy._
Roles of the bots: Creating & executing
For each project, we set up respective deployment jobs with Faseng. It’s not only easily to deploy, but deployment notifications make the progress and status of the project clear.
Creating the deployment job (chat command bot)
Chima is a github/hubot which helps to understand our commands from Slack. For example chima deploy is a deployment command.
We have to configure these settings for each project:
- Specify a deployment
providersuch as Fabric, Capistrano, Heroku, or any Ruby Rescue task - Whether to support
auto_mergefor the target branch for deployment - The
repositoryname of the project - Available environments of the deployment
- Only channel members in the
allowed_roomslist can create the deployment
We put this configuration in the app.json file. Below is an example of how you can configure for project-x:
{ "project-x": { "provider": "fabric", "auto_merge": false, "repository": "oursky/project-x", "environments": ["live", "edge"], "allowed_rooms": ["deployment"] }}
Executing the deployment job (deployment bot)
Faseng is an atmos/heaven program. When it receives GitHub webhooks, it will run deployment jobs as background tasks with Resque. There are several supported ways to create deployment jobs, such as:
- Fabric
- Capistrano
- Heroku
- Any Ruby rescue task
- Lita: Written in Ruby
- Err: Written in Python
Deployment task creation and completion will send out notifications into the integrated chat services. Campfire, Hipchat, SlackHQ, and Flowdock can receive deployment status event notifications.
Use cases in our company
1. Developers use it to deploy to the staging environment
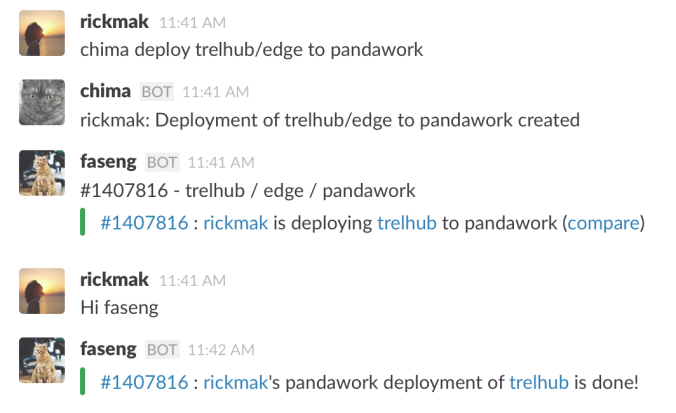
Although we planned to use ChatOps to ease the difficulties for non-developers, it also benefits me as a developer.
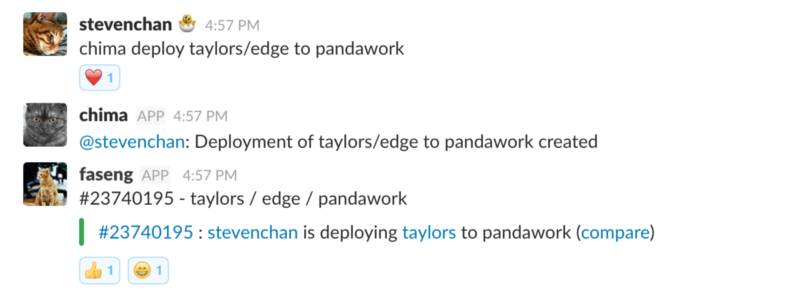
For example, when I want to deploy trellhub/edge to pandawork, I can just type chima deploy trelhub/edge to pandawork and then brew some coffee while I wait.
To deploy using a chat command, I have to set up the environment settings at Chima. To make sure the deployment is authorized, I have also provided Faseng the access to the pandawork server.
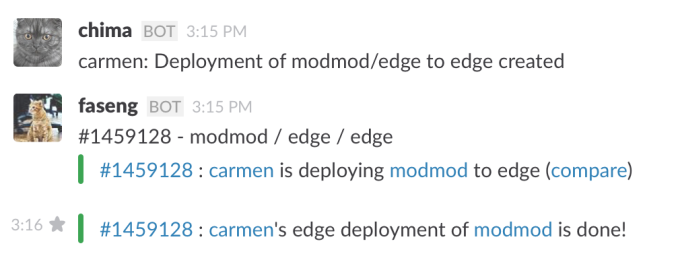
2. QA can also deploy the latest version to the edge
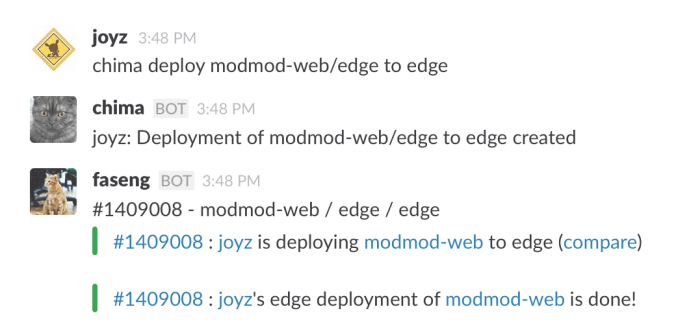
After each milestone, the QA team is responsible for performing functional tests, usability tests, and performance tests for the pre-deliverable software.
In this example, our QA engineer, Joyz, wants to ensure that the latest version of modmod-web is ready on the edge environment before she runs the tests. She can trigger the deployment and receive notifications as well.
3. Checking up the current jobs
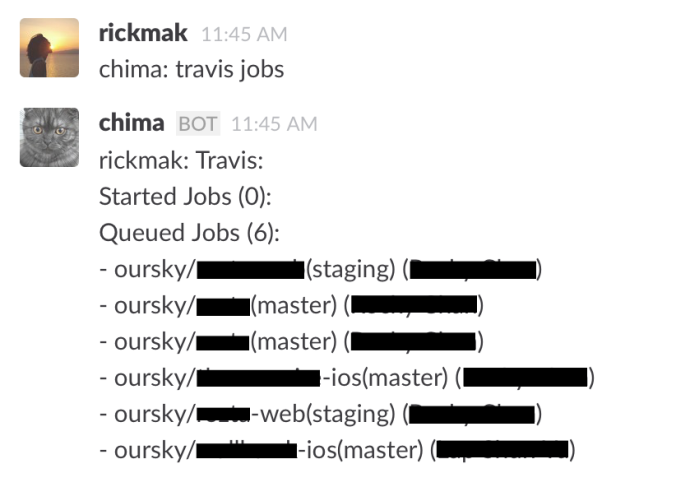
To see the current building jobs, everyone who is relevant to the project can talk to Chima and check on the Travis building progress.
This one-time initial ChatOps setup has helped our team manage our projects in the following ways:
- Enables less technical members on the team to contribute to the development process.
- Notifications are pushed to the relevant project channel, which means that every relevant team member receives and can access status updates.
We are working towards doing more via ChatOps , such as backing up servers and performing automated tests. Look out for future updates or share your tips with us! We’d love to hear from you.
Further reading
About continuous integration
About deployment
- Github Developer — Deployments
- Remote multi-server automation tool — Capistrano
- Python tool for streamlining deployment- Fabric
Footnote: Now, we’ve moved to GitHub trigger deploy.
Building an app? Our free developer tools and open source backend will make your job easier.
Liked what you read? Give me some claps so more people see this article! Thanks!