By Hrittik Roy
Modern software development workflows are complicated, involving many tools and dependencies.
When working in a team, it's not uncommon to use several different software programs, each with its own dependencies. This can quickly become confusing, with each software requiring different configurations and management.
One solution is to use virtual environments to isolate the dependencies. This can still require you to install and manage the installation and configuration.
But there's another better option: packaging everything – including the database and coding language version – into one container that you can use whenever you need it. In fact, most companies deploy their logic and applications into production containers.
For development, you can use a Docker container as a fully-featured development environment. It's similar to your production environment, but with all the compilers, debuggers, build tools, SDKs, productivity tools, and others. That would be your development container or dev container.
Here devcontainer.json comes as the standard that streamlines and standardizes your development environment. It lets you focus on shipping changes rather than worrying about dependencies and installations.
In this tutorial, you will learn about the devcontainer.json standard, its purpose, how to configure it, and how to adopt it for your personal or business use. It'll help you boost your productivity as an engineer.
What's a Dev Container?
Dev containers, also known as development containers, provide a complete development environment packed within a container that can be easily accessed through your preferred IDE via Secured Shell (SSH). This setup eliminates any obstacles that impede your workflow, ranging from low performance to less bandwidth.
Your container can operate on various infrastructures, including private and public clouds, clusters, or local machines, and you can leverage the hardware that would be challenging to replicate on your own.
The isolation aspect also ensures that your dependencies do not overlap and disrupt your local environment. All container configuration is stored in a standard .devcontainer.json file, from Microsoft, which serves as the packaging instructions for your environment.
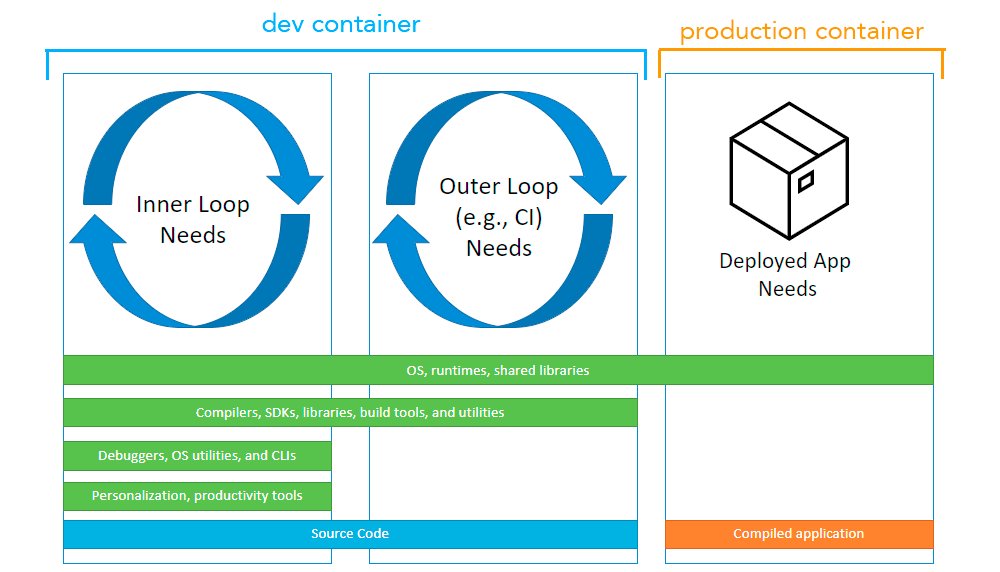 Dev Container Structure. From: containers.dev
The file uses a structured JSON with Comments (jsonc) metadata format which you can tailor to your specific needs. For example, you can add developer tools like git, a debugger, and other configurations like various extensions.
Where can you use it?
The simplest setup can be to create a basic container environment with a language to experiment with different features. For instance, if you wish to test a new edition of a programming language, you can utilize the base image of that particular language and generate a new development environment with ease.
There are a few use cases for complicated setups as well. For example, one of the most difficult tasks is often creating and configuring a database to work seamlessly with your project while setting up your dev environment.
By creating a Docker compose file, you can easily configure the creation of the database and expose environment variables to create a self-contained environment. These orchestrated multi-container setups (with both the database and programming language) are installed as a parent-child relationship and can serve complex use cases.
Look at the below configuration as an example which uses Compose to connect the build space:
{
"name": "Python 3 & PostgreSQL",
"dockerComposeFile": "docker-compose.yml",
"service": "app",
"workspaceFolder": "/workspaces/${localWorkspaceFolderBasename}"
}
In this example, your Dev Container uses a Docker Compose file and references the instructions to build a Python and PostgreSQL integrated workspace. The structure can help develop CRUD applications without trying to configure your database and system configuration to support it across every developer.
The Problems Dev Containers Solve
Now with features like these, dev containers are gaining popularity in personal and business settings because they offer reproducibility and isolation. Let's take a look at all the advantages:
Addressing setup configuration issues
Maintaining and managing local environments can be a lot of work. It often involves using various tools and configurations, making the process cumbersome. Having something that standardizes this process can save a lot of time.
Standardizing build instructions of the project
Writing documentation for dependency upgrades and changes can be challenging. A better approach would be to use code to simplify the process, allowing anyone to ship without being bogged down by documentation or "it works on my machine".
Ensuring isolation of development environments
A software developer can simultaneously work on different projects with many moving parts. What if you can isolate environments, preventing conflicts with other software on the host system and providing a clean, controlled environment for development? It’s now possible :)
Enabling consistency across development teams
Achieving portability across multiple teams and individuals is complicated with varied technology and configurations. A standardized development environment may ensure that all team members have a uniform configuration while decreasing inconsistencies caused by individual machine variances.
Simplifying onboarding and training processes
Learning new things is important, but can be challenging. So what better way to learn than by practicing a new language or framework? Launching environments quickly in isolation can help keep machines clean.
This is especially true when presenting talks or running workshops. Starting with a clean slate, everyone can follow along without getting bogged down by missing tools or mid-step confusion.
How to Create Your First Devcontainer
Now that you know all the benefits, I'll help you create your first development container. As this is an introductory tutorial, you'll learn how to do it for a basic Go environment.
Once you have a grasp of the fundamentals, you can expand your setup to include more complex configurations that involve databases, additional developer tools, and customization. Let's get started with creating one!
Prerequisites
Here are the prerequisites for creating the template:
- Tools for running Dev Container: Docker or any other container engine
- Tools for creating templates and connecting to Dev Container: Visual Studio Code
- Tools for managing connection and creation logic: Visual Studio Code Dev Containers extension
Note: After creating the template, you can switch to your preferred IDE with different backends, as we’ll see in upcoming sections. Just think of the .devcontainer.json file as a source of truth for the environment and can be easily shared.
How to build a simple dev container
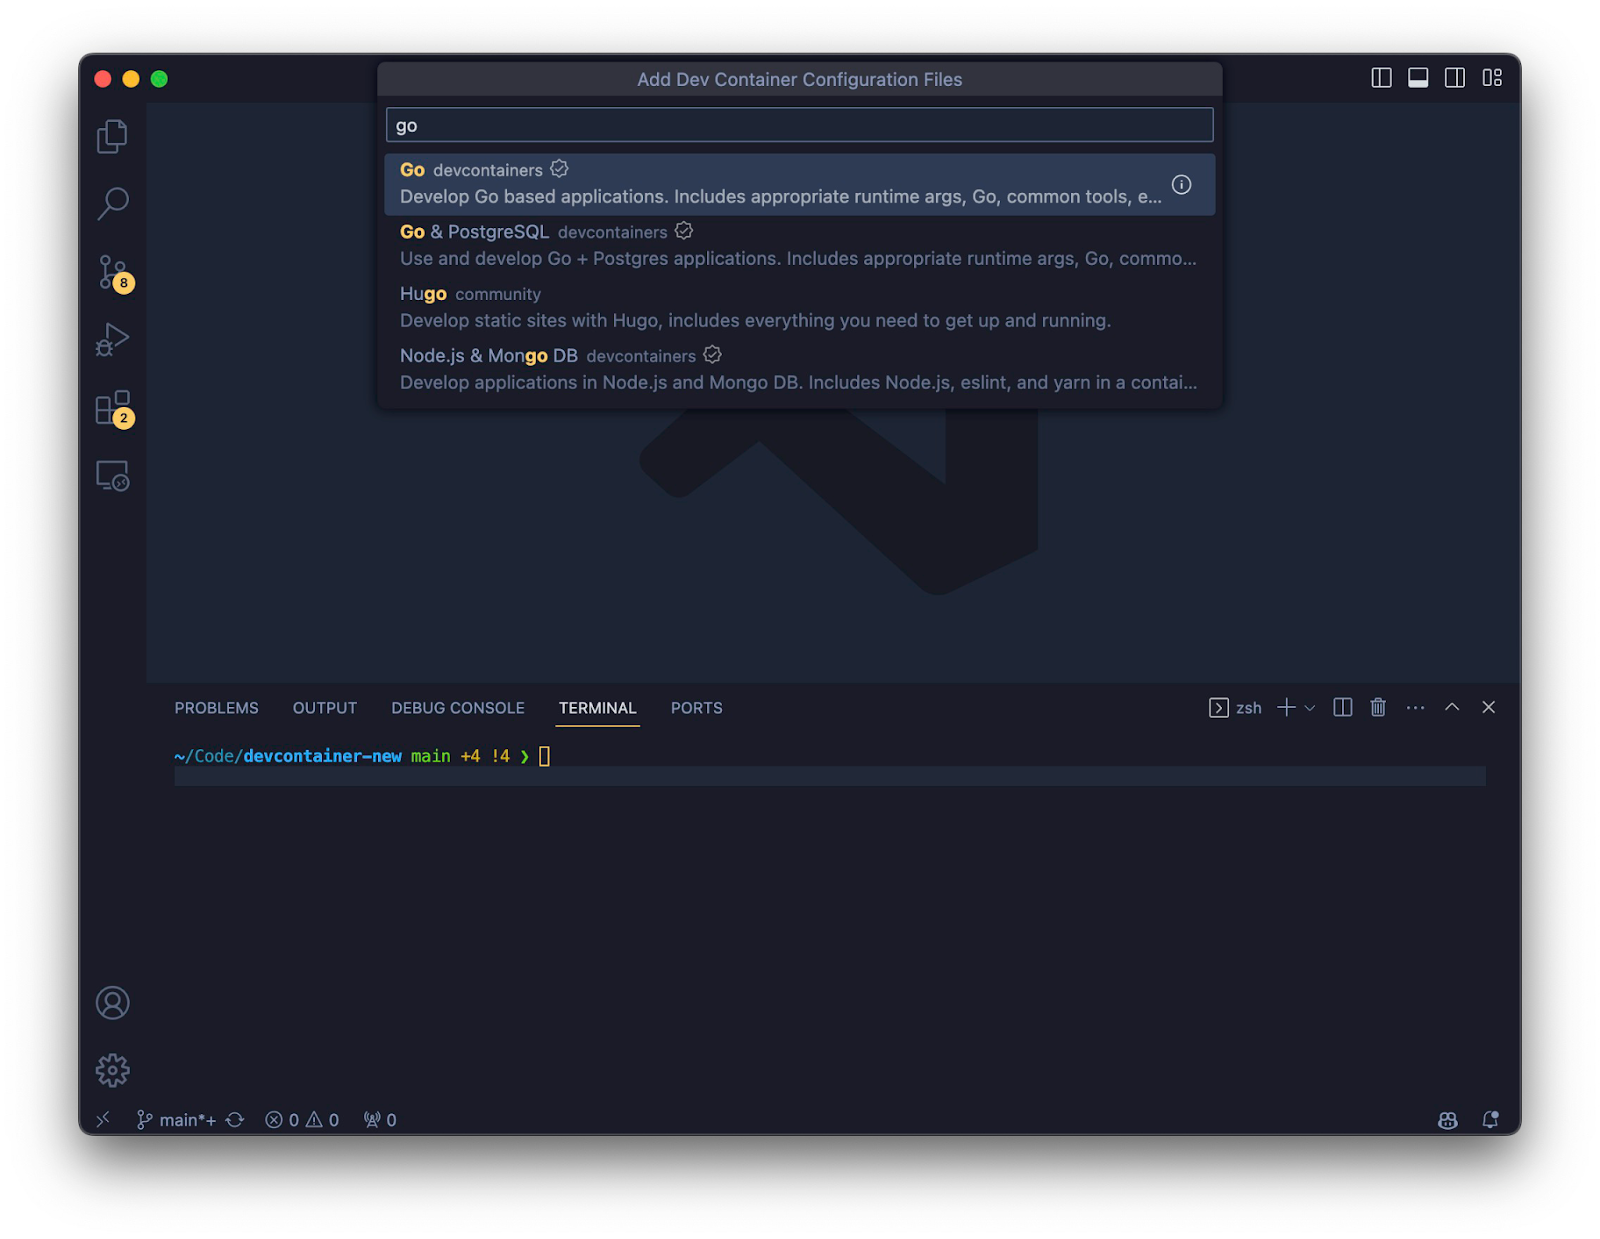
You can either create the dev container from scratch or use the VSCode utility. Starting with the utility is simple. To get your dev container set up, just use the Dev Containers: Add Dev Container Configuration Files… option from the Command Palette (Ctrl+Shift+P):

Now, let's move on to the next step, which is selecting the base image. You can choose any base image that you like. In this case, we're using the Go base image.
However, there can be a lot of versions of Go – so the next step is to choose the one you want. The latest version available is 1.21, so I recommend using that one. But if you prefer, you can also build an image from scratch or even select from older versions.
Just scroll down and take your pick.

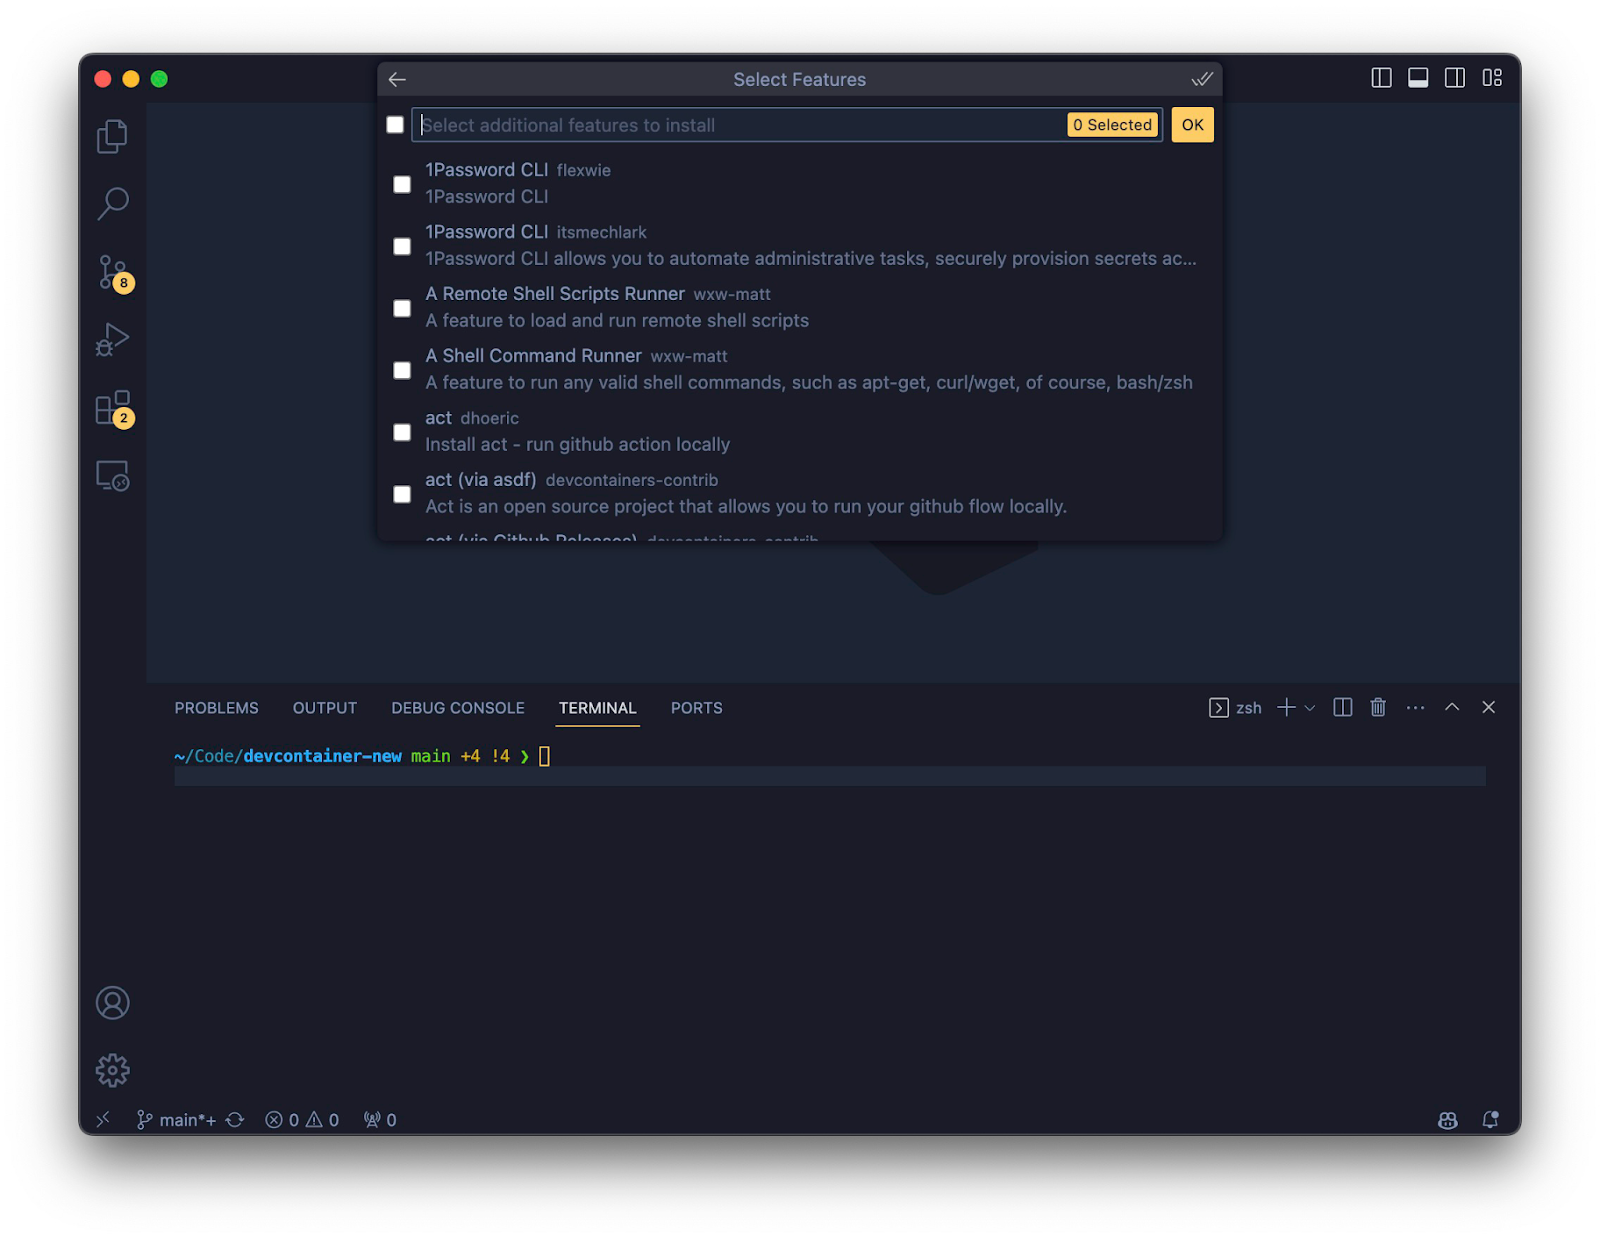
The next step is to import "Features", which are self-contained units of installation code that help induce specific tools or containers into your dev container configuration. These features can range from new tools to specific customizations which you can learn more about here.
But for a basic and simple Go environment, we will skip this step.
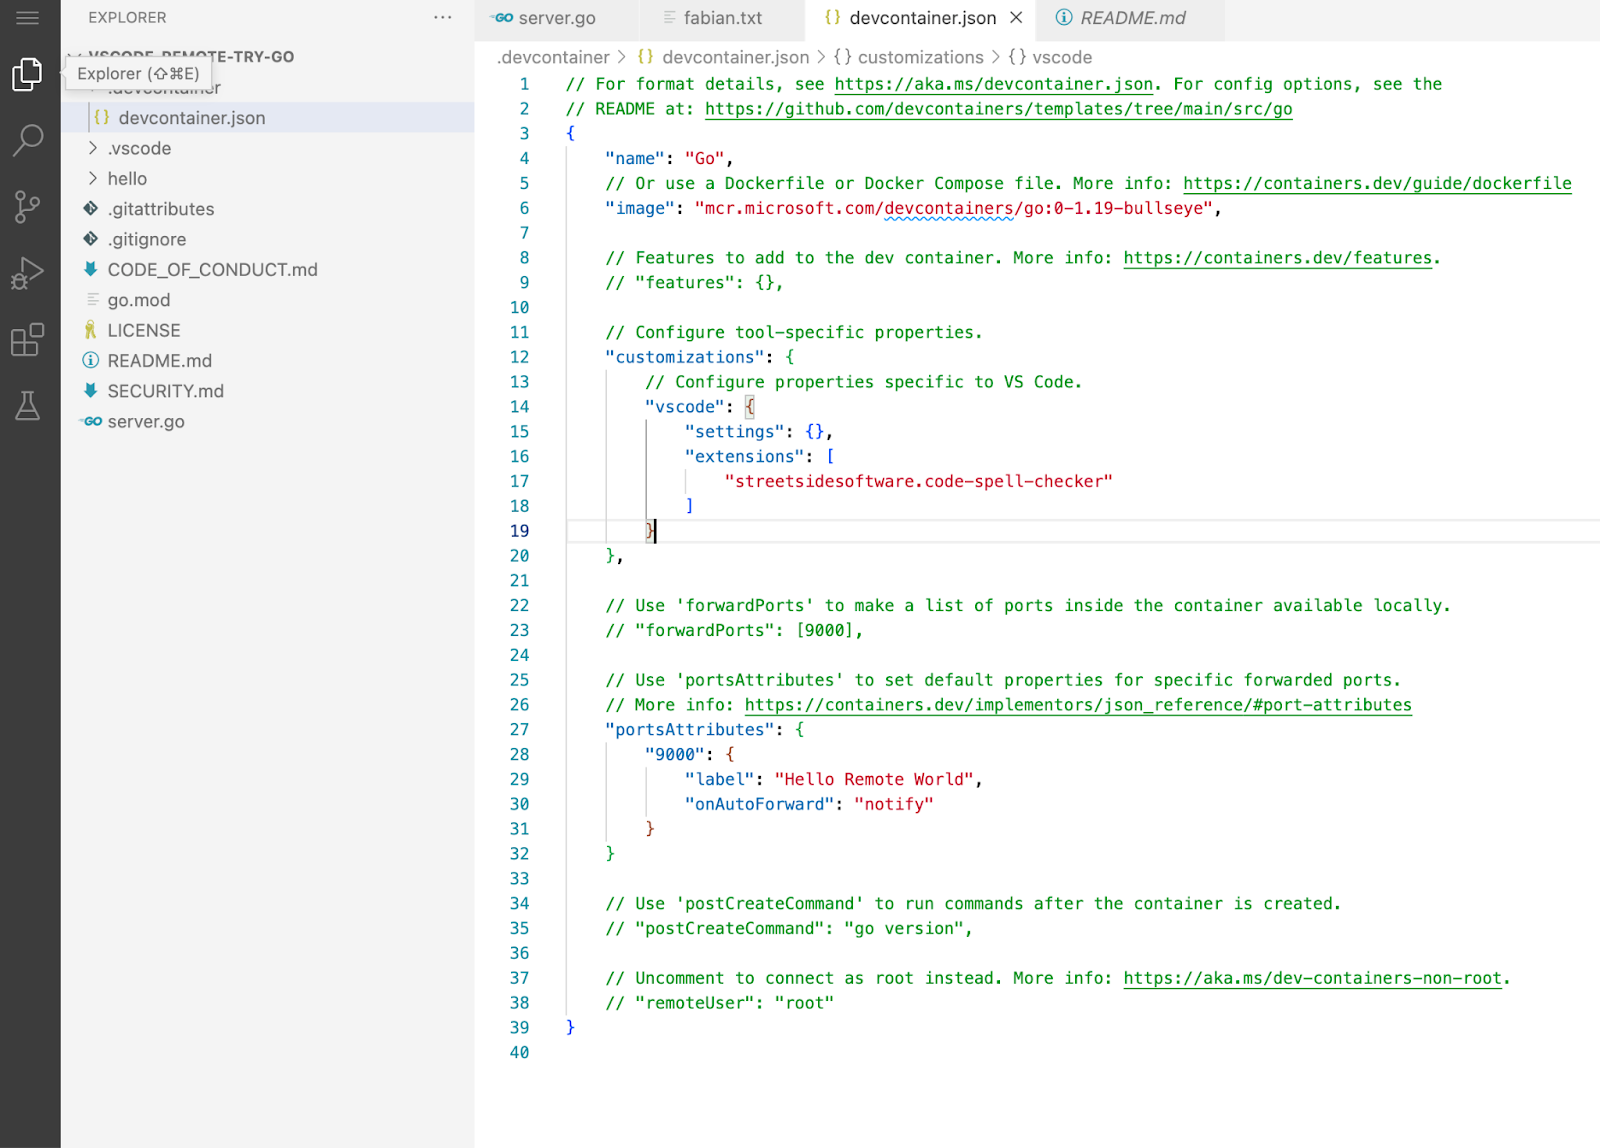
Click on Ok to generate a basic Go .devcontainer.json file in the .devcontainer directory:
~/Code/devcontainer-new main +4 !4 ❯ tree -a
.
├── .devcontainer
│   └── devcontainer.json
Congrats! Now you have an environment that is isolated and can be shared with anyone.
How to use VSCode for dev container setup
To run this configuration, you can click on Reopen in Container as the simplest way as seen below:

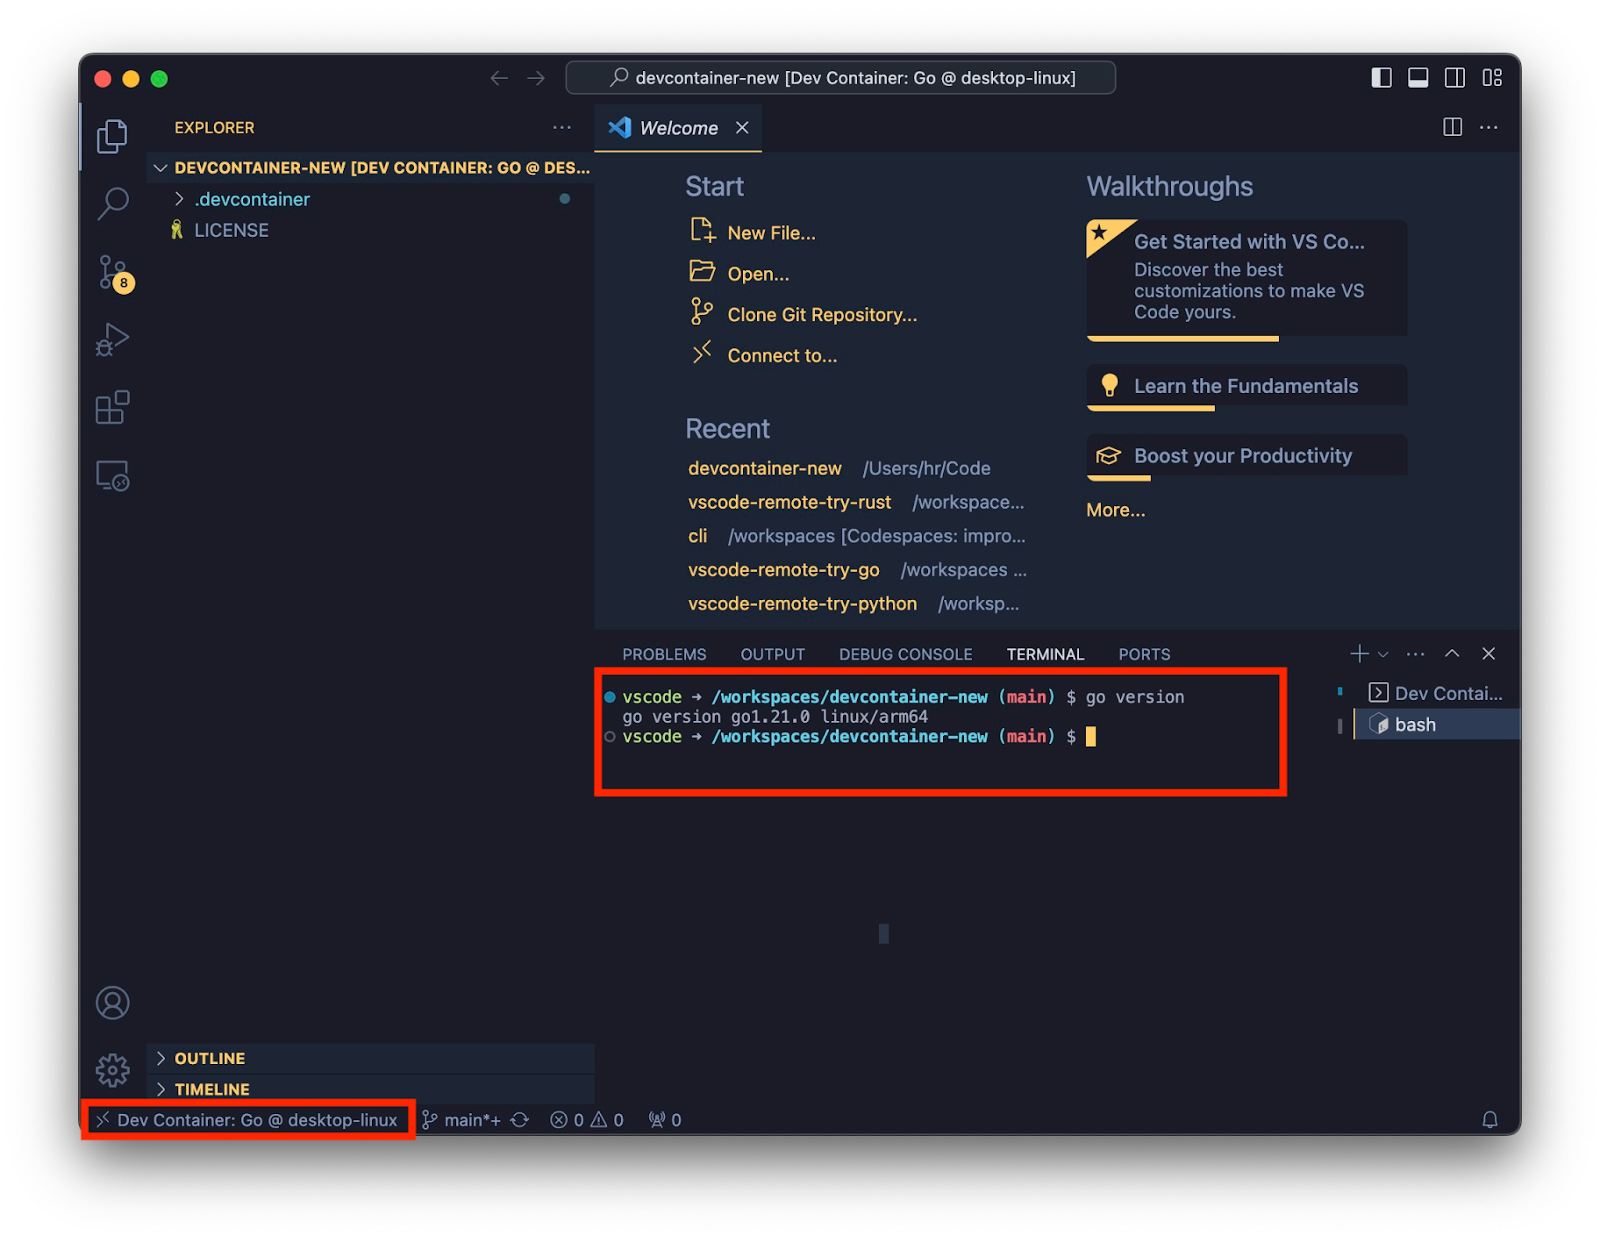
The extension will pull the image "mcr.microsoft.com/devcontainers/go:1-1.21-bullseye" and then create an SSH server in it.

After successfully building the Go version, you can confidently SSH into the environment and execute your operations. You'll see that the Go version is the same as the one you built and the connection comes from your Dev Container, which makes the connection successful:
Dev Container CLI
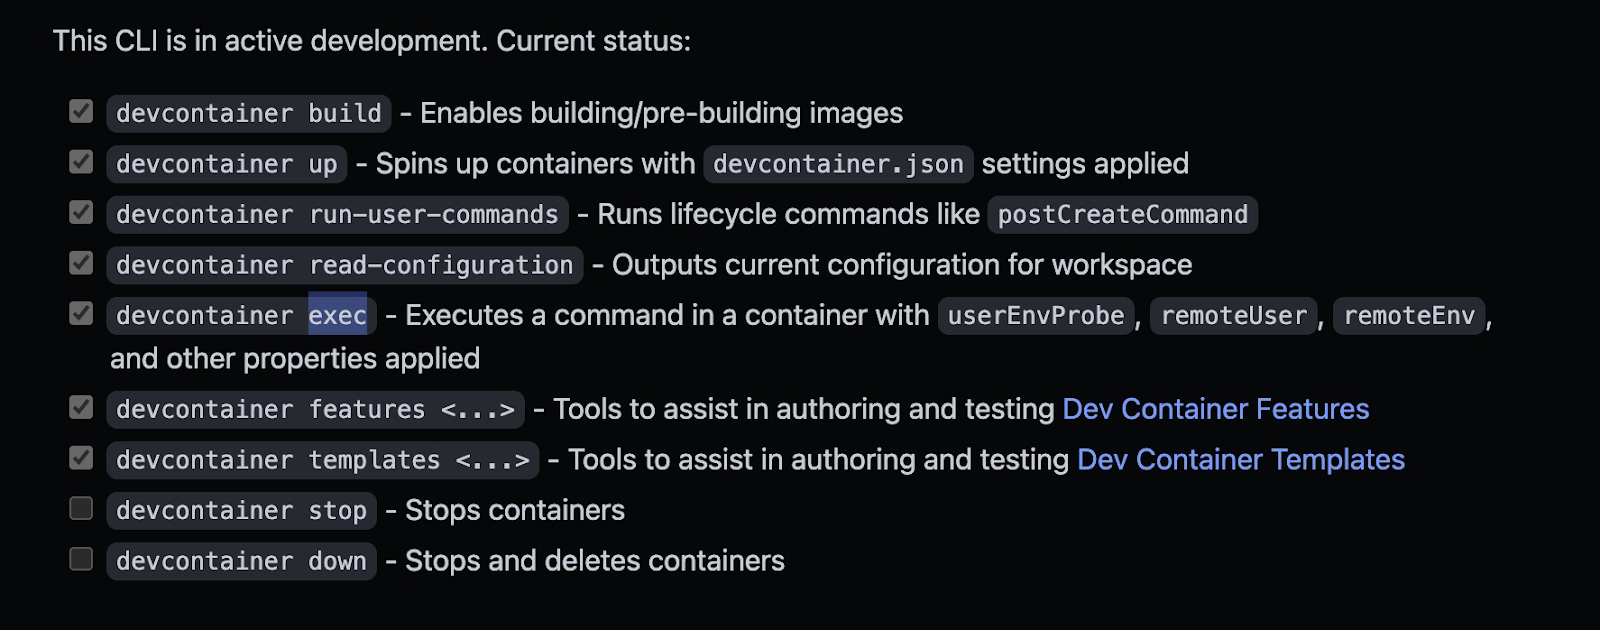
Devcontainers CLI is a command line interface that helps you execute, build, and run the container from your devcontainer configuration.
With the help of this tool, you can set up an environment without using VSCode and then connect to it manually through SSH, giving you more freedom.
Although the tool is interesting, many features have yet to be launched as listed here:
How to Use Dev Containers to it’s Full Potential
Once you distribute the devcontainer.json to your teammates, they can easily use it to launch local environments with the discussed benefits. But what if you need to help them launch the environment on the Cloud to leverage its powerful hardware?
There are a few options that can help you. The first one is GitHub Codespaces, which helps you launch on infrastructure managed by GitHub on Azure.
But there may be a requirement for using dedicated hardware from your Kubernetes cluster, or private or public cloud. How do you do it? You can use open source client-side tools like DevPod, which helps you deploy on your desired infrastructure.
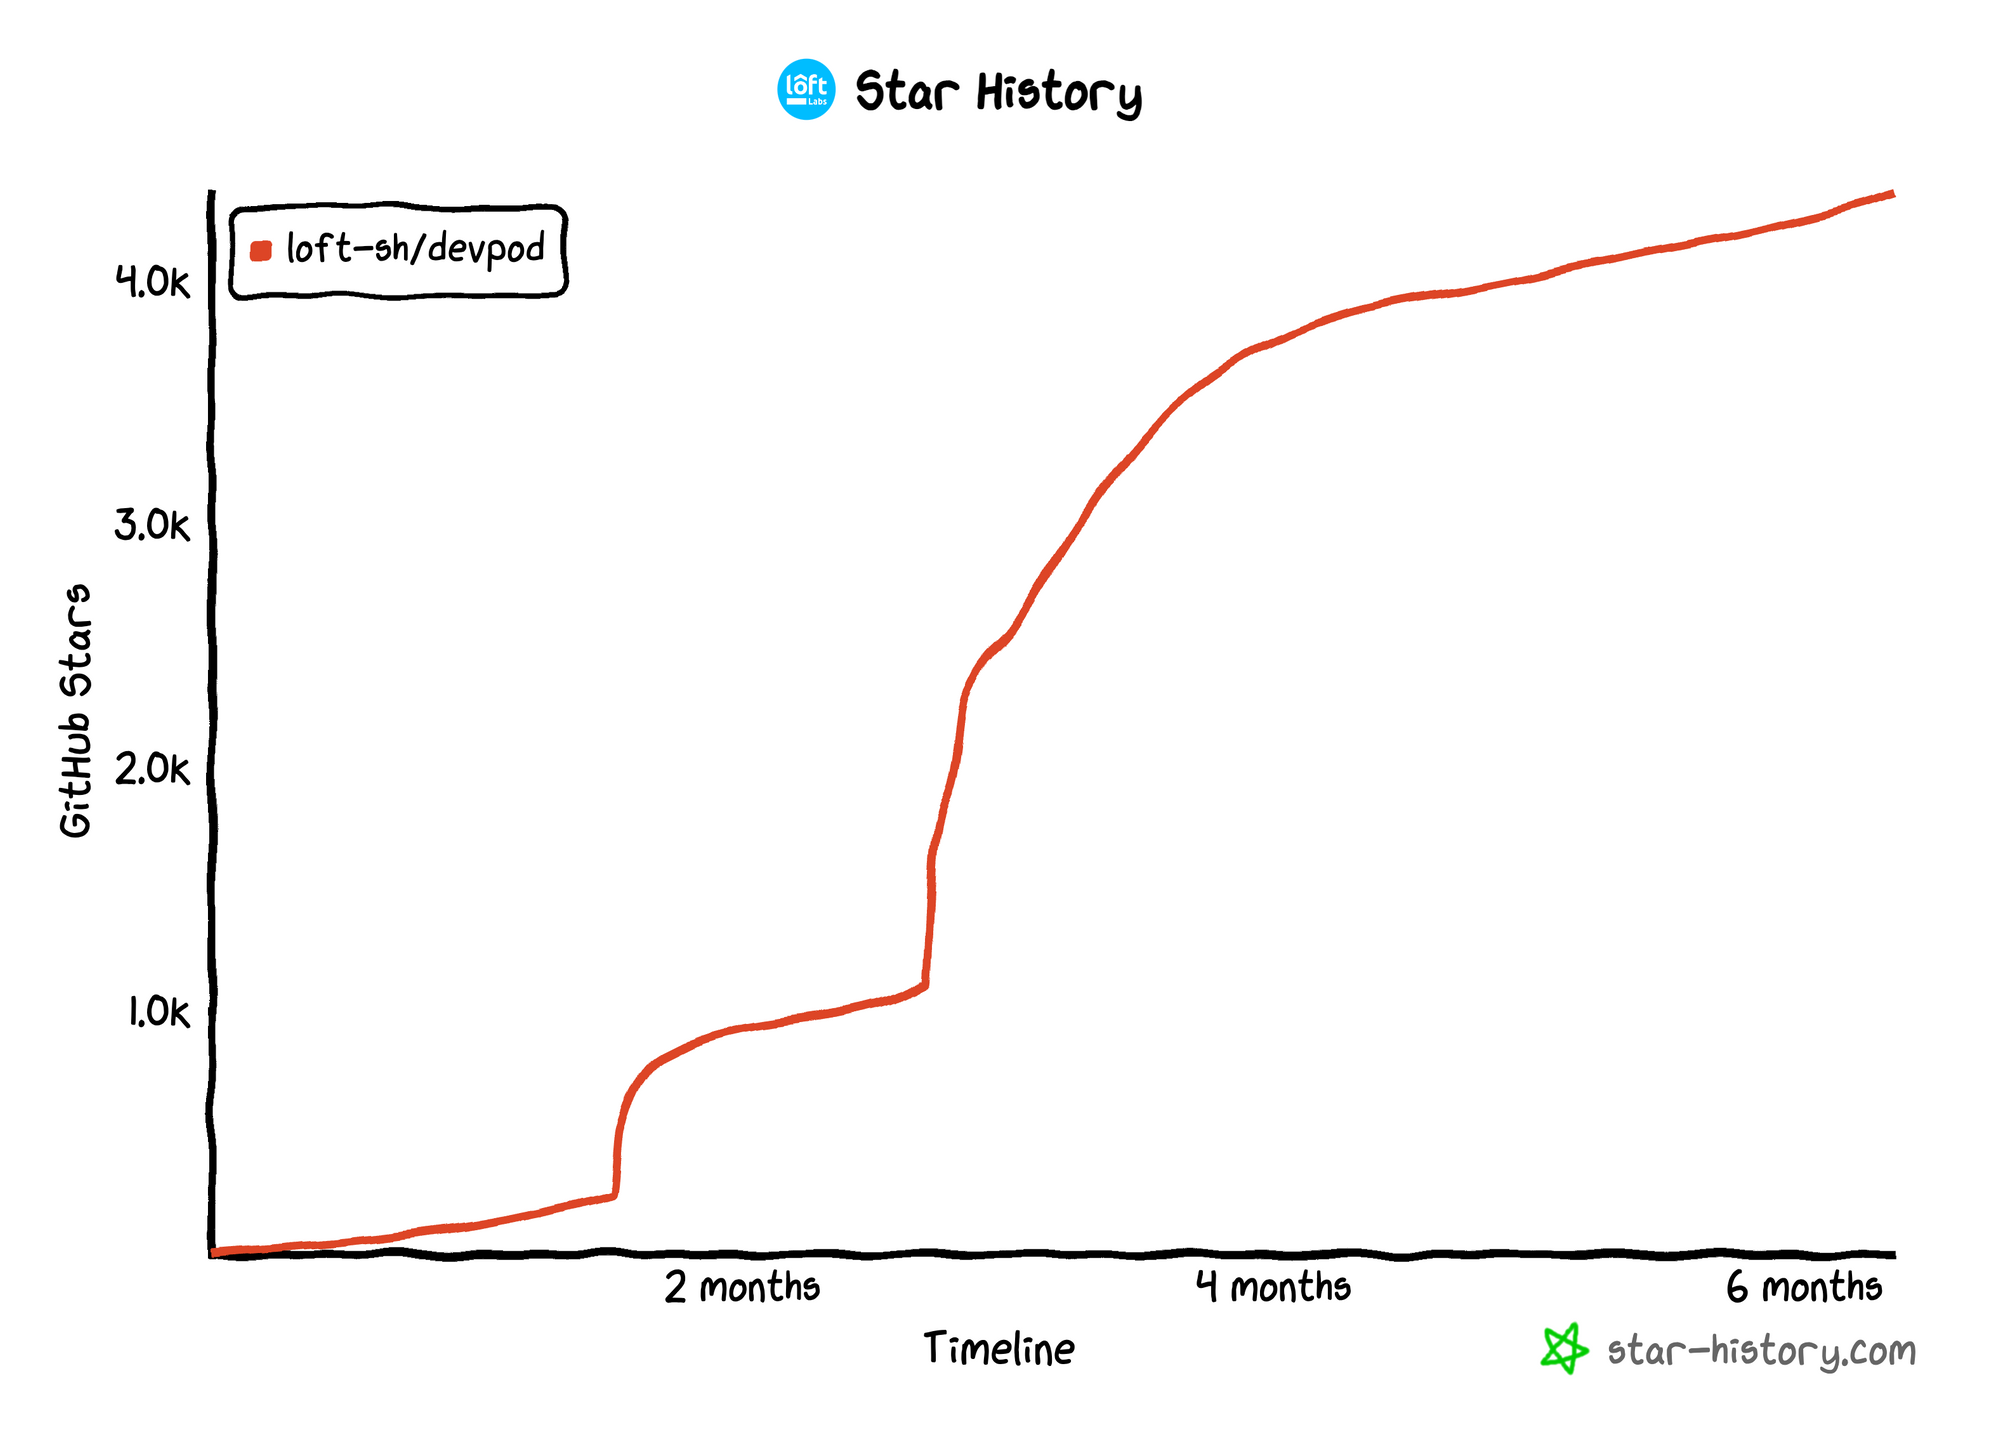
Currently, the tool has over [4.4k stars](https://www.freecodecamp.org/news/p/43b21e57-00ca-4850-9a0f-95ebce575227/(%E2%80%8B%E2%80%8Bhttps://github.com/loft-sh/devpod) and has been growing rapidly with more traction every day with a moto of _Giving the power to the user. Any Infra, any IDE, and Unopinionated_:
 GitHub growth History - DevPod
The tool is unopinionated, which means that you can use it seamlessly across various infrastructures, IDEs, and programming languages.
For example, if you want a specific backend on a cloud provider, you can do it with providers that are already available, or you can create your own like the 7 community providers:

The tool also allows for a consistent development environment that can be relied on repeatedly anywhere you want and connected to any code editor/IDE ranging from JetBrains, Jupyter, or VSCode.
How to Launch Your Development Evironment using DevPod
This tool offers both a desktop and CLI version, so you can use whichever suits you better. When using DevPod Desktop to create an environment, the process is as follows:
Step 1: Install DevPod from the official instructions.
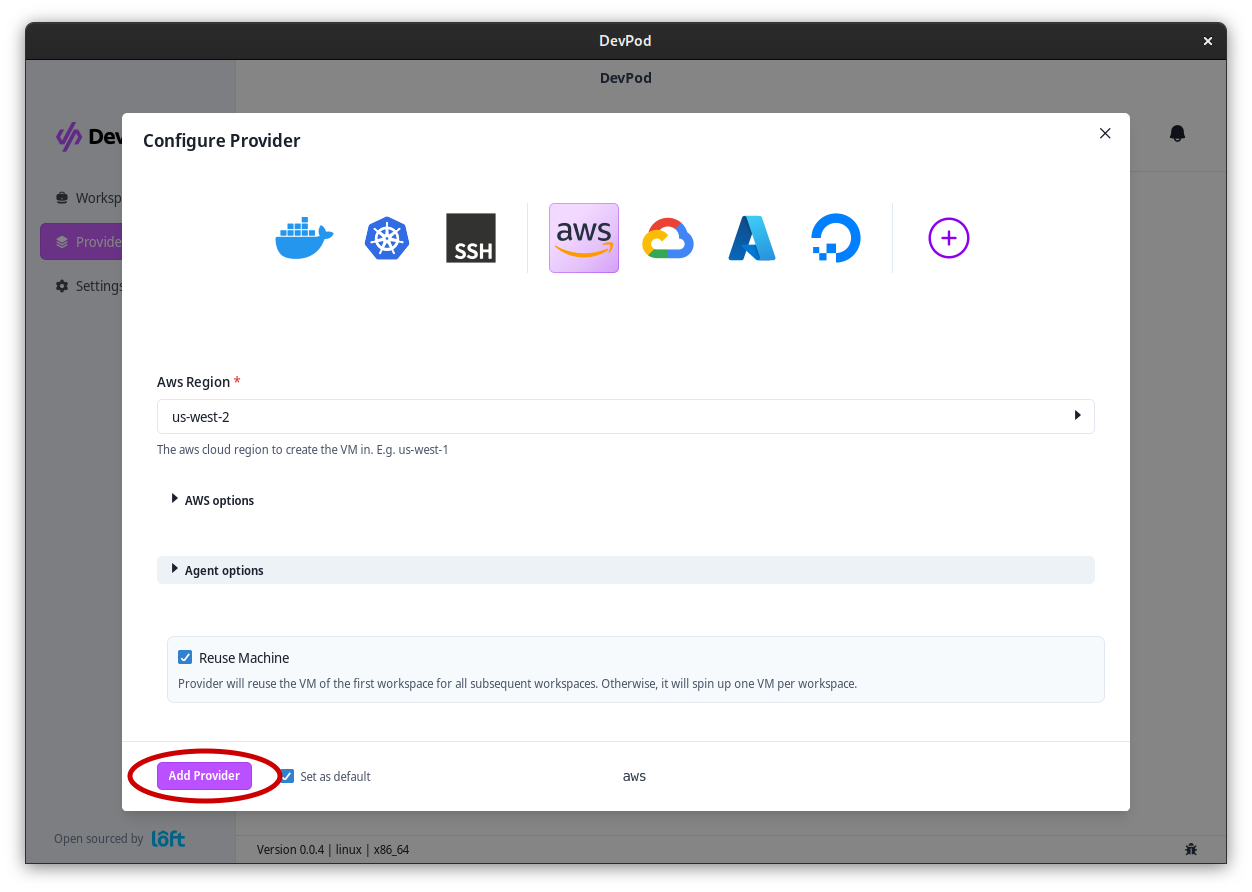
Step 2: Add a provider via 'Providers' > '+ Add'. Select a provider and select 'Continue'.
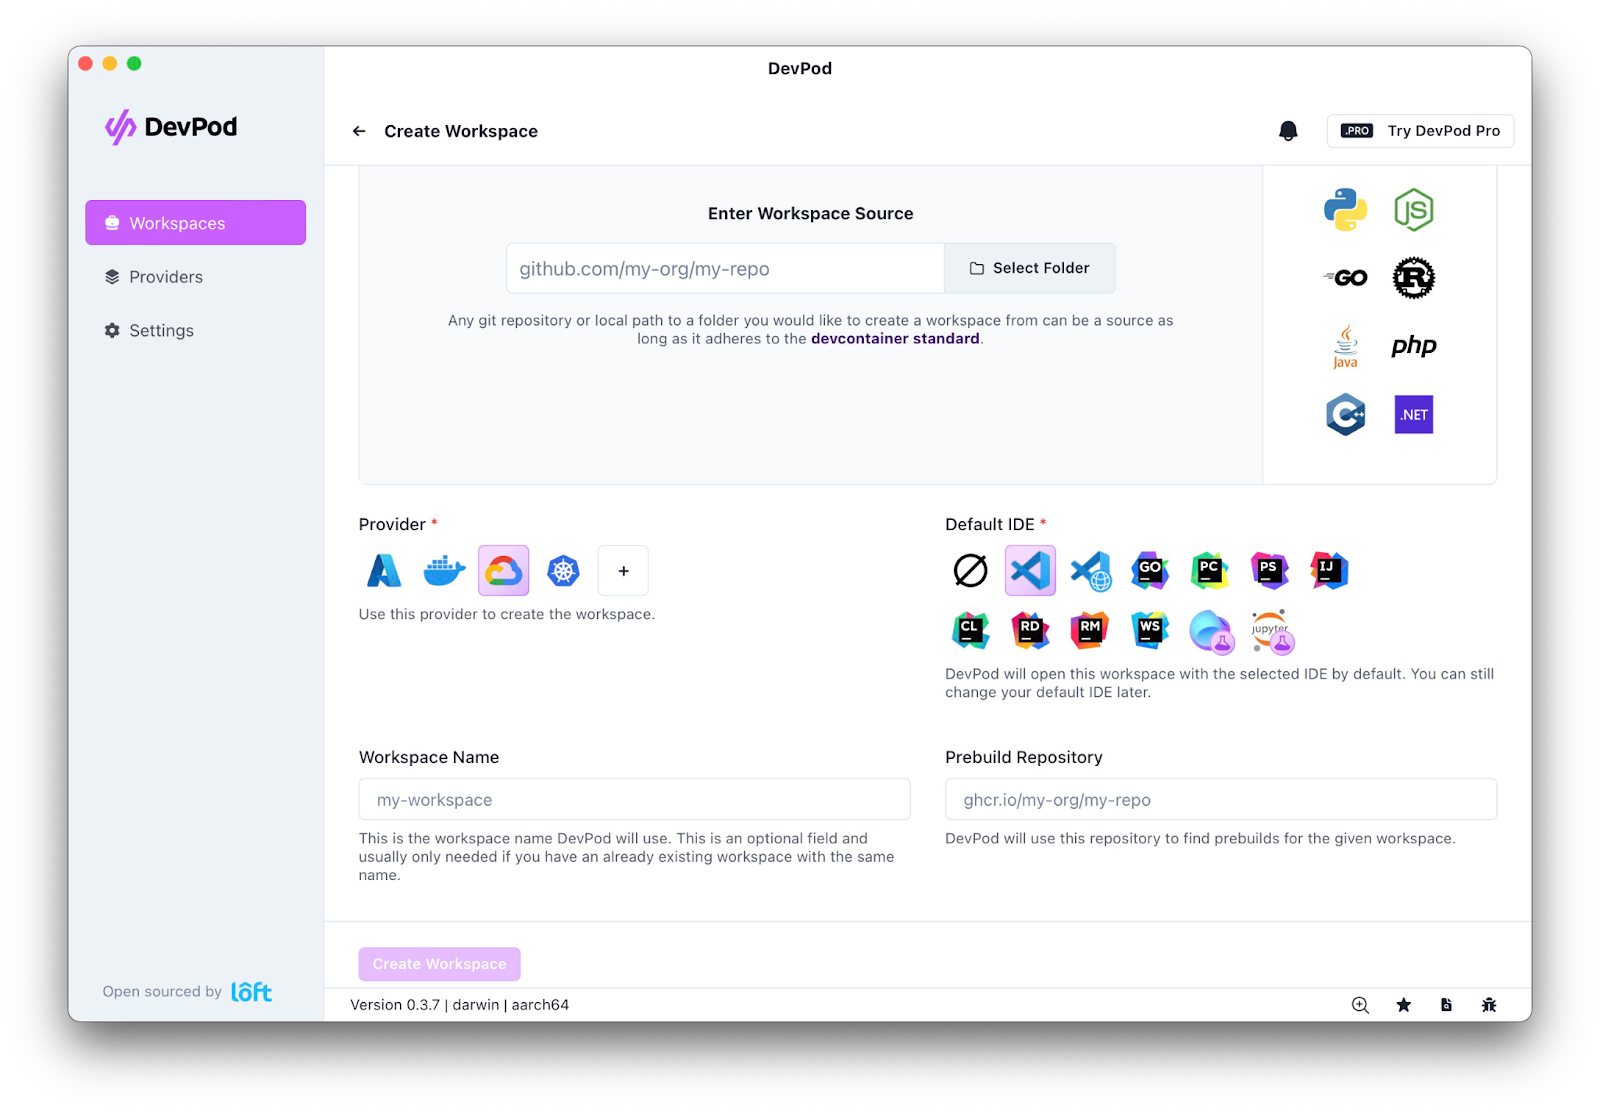
Step 3: Enter Workspace Source with your devcontainer.json path which can be a remote or local repository or the sample:
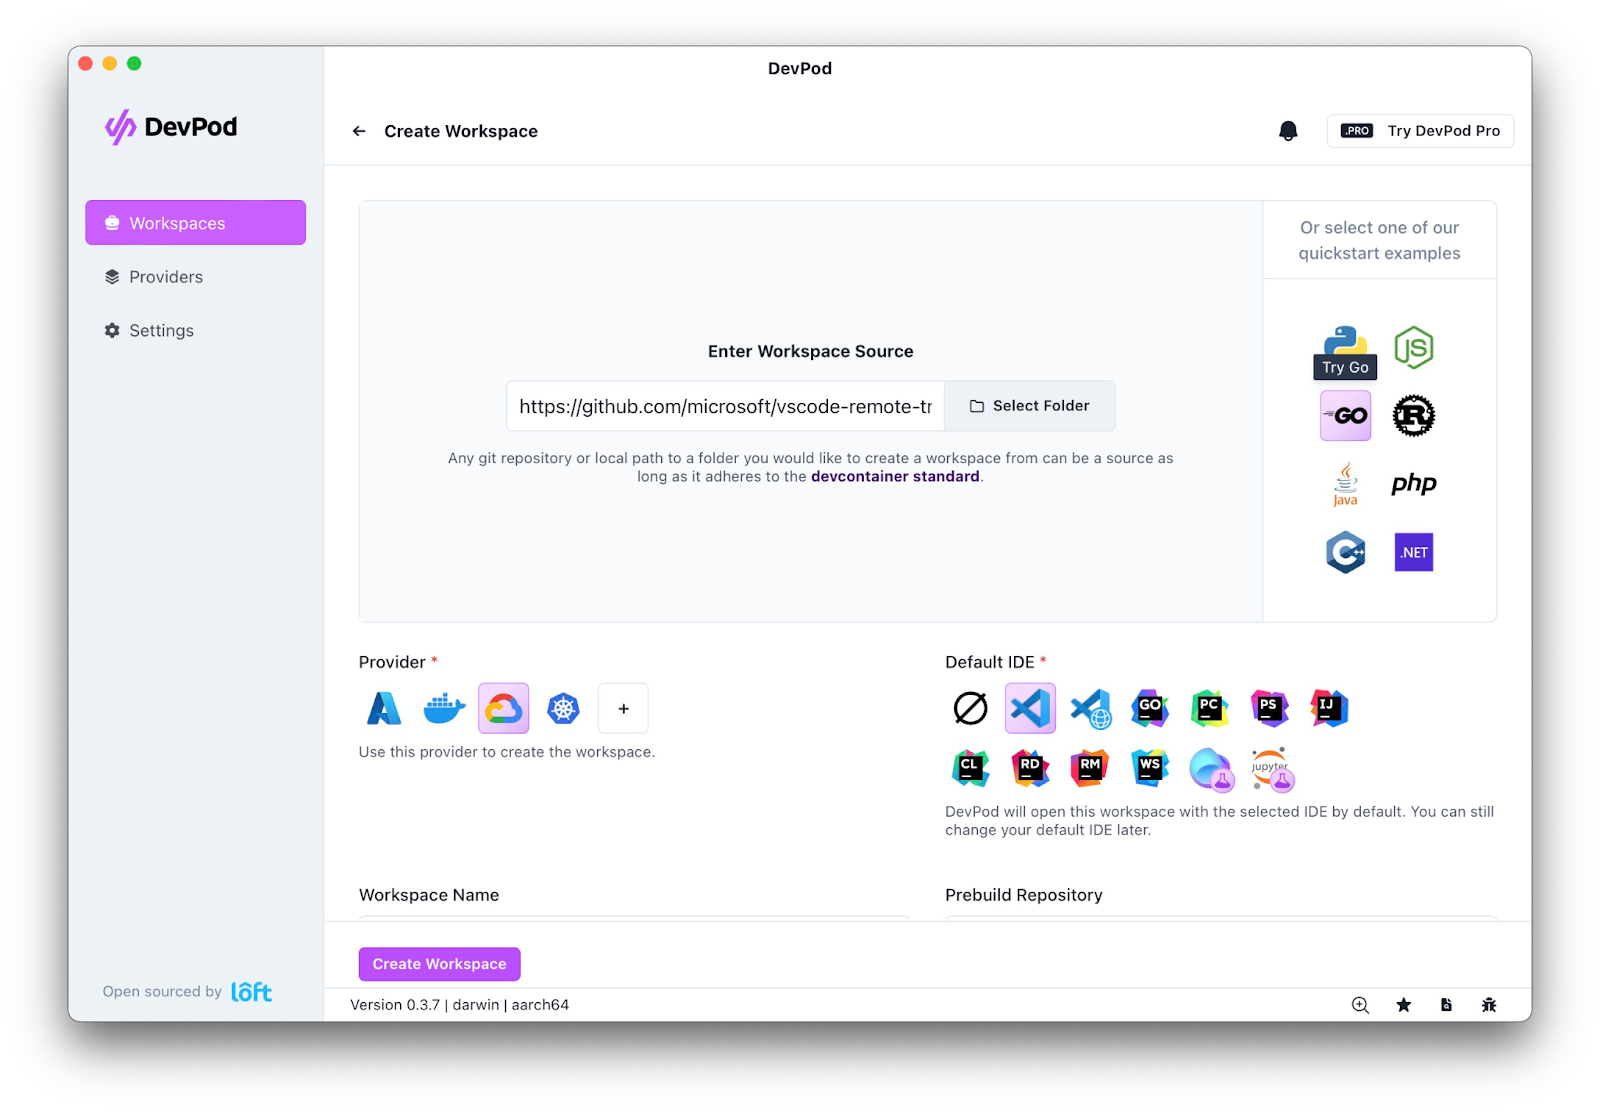
Step 4: Select your default IDE and click on Create Workspace:

Now, you can build and configure your application on your running instance:
Congratulations! You've successfully set up your first Dev Container 🎉
If you're feeling adventurous and want to explore the CLI, you can find out more about how to use it right here.
Final Thoughts
Standards like dev containers help you improve your productivity and your overall development ecosystem. This reduces costs for companies as the latest hardware can be provisioned without requiring the entire team to upgrade their local machines every two years.
It also helps you effortlessly onboard new team members and maintain a consistent user experience.
Development Container tools like DevPod can improve security and customization to cater to varying needs on any infrastructure you want while maintaining a consistent DevEx. This allows for faster building and testing using the latest hardware and replaces onboarding time with coding time.
You can join the DevPod Slack to learn more.