

React and React Native are popular JavaScript libraries that allow developers to create complex user interfaces and mobile applications with ease.
One of the key benefits of both these libraries is that they each have the ability to manage their own state within components. But managing state, along with sharable data, can be tricky – especially as the applications become more complex.
In this article, we will explore global state management – and in particular, how to use the Pullstate library. You'll learn how you can easily implement it into your React and React Native projects.
Pre-Requisites:
- Basic knowledge of React / React Native applications
- Basic knowledge of CSS and styling (not essential)
Note: in this article, I will be using TypeScript and React Native. But the implementation and concepts will be exactly the same for JavaScript users and React (without the strongly typed variables).
What is State?
State refers to an object that stores data which can change over time. It's a way to manage and update data within a component or application without affecting other parts of the application.
State in React is like a backpack you carry around with you, containing things you might need for your day. It's a way to store and manage data in your app that can change over time, like what you've picked up or dropped off along the way.
Local vs global state
Component state is local to a specific component. This means that it's only accessible and modifiable within that component. You use component state to manage data that's specific to a single component – for example like form validation messages, or the visibility of certain UI (User Interface) elements.
Global state, on the other hand, refers to data that can be accessed and modified from multiple components across the entire application. Global state would be something that is managed by a state management library. It's useful for managing shared data across multiple components, like authentication status, user preferences, or shopping cart contents.
Global state and component state both have their own advantages and disadvantages, depending on the specific needs of the application.
Global state can simplify data management and improve performance, but can also increase complexity if not managed correctly. Component state is simpler to manage and understand, but can lead to duplicated data and inconsistent behavior across the application.
What are State Management Libraries?
 logos of popular state libraries
State management libraries in React are tools that help developers manage and organize the state of their applications more easily. These libraries are designed to handle complex state management scenarios in large-scale applications so you don't have to. They also help you create a more central, organized state.
When talking about state management and data sharing, the most commonly talked about solution is Redux. But Redux is often seen as overly-complicated because it adds an additional layer of complexity.
Redux is designed to manage application state in a predictable and consistent manner, but it requires developers to learn a new set of concepts, such as actions, reducers, and the store.
Some other popular state management libraries in React include Zustand, MobX, and Recoil. These libraries provide features like global state management, immutability, and optimized re-rendering to help make applications more performant and easier to maintain.
Using a state management library can make it easier for developers to handle the state of their application, and simplify the process of passing data between components. It can take some time to learn how to use these libraries effectively, but they can be very powerful tools for building complex React applications.
What is Pullstate?
Pullstate is a much simpler and more lightweight state management library for React. It simplifies the whole process and makes it easier to build scalable applications.
Since React Native is built on React, you can use Pullstate to build not only web applications but mobile ones, too. It is is based on the concept of "pulling" data from the state, rather than pushing data into it.
How to use Pullstate
In order to use Pullstate and get up an running, you'll first need to know which package manager you're using (yarn or npm).
Open your existing React / React Native project, and in the terminal enter the following commands depending on whether you use npm or yarn:
npm install pullstate
//or
yarn add pullstate
If you haven't already got a React Native application you can create one using the React Native cli.
First, you'll need to make sure you have Node.js installed.
Open the terminal to the folder where you would like to create your React Native application:
npm uninstall -g react-native-cli
npx react-native init myReactNativeApp --template react-native-template-typescript
How to Set Up the Store
The below code and corresponding image shows how to initialize the Pullstate store code for copying and pasting below (this is how I'll include all the code in this tutorial – code for copying, along with how it should look in a snapshot).
You can put the below code in its own file, for example store.ts , in your project root folder.
import {Store} from 'pullstate';

interface UIStore {
  user: {
    firstName: string;
    lastName: string;
    acceptedTnC: boolean;
  };
  preferences: {
    isDarkMode: boolean;
    pushNotifications: boolean;
  };
}

const initialStore: UIStore = {
  user: {
    firstName: '',
    lastName: '',
    acceptedTnC: false,
  },
  preferences: {
    isDarkMode: false,
    pushNotifications: false,
  },
};

export const store = new Store<UIStore>({
  user: {
    firstName: '',
    lastName: '',
    acceptedTnC: false,
  },
  preferences: {
    isDarkMode: false,
    pushNotifications: false,
  },
});
Here's the snapshot of what that should look like:
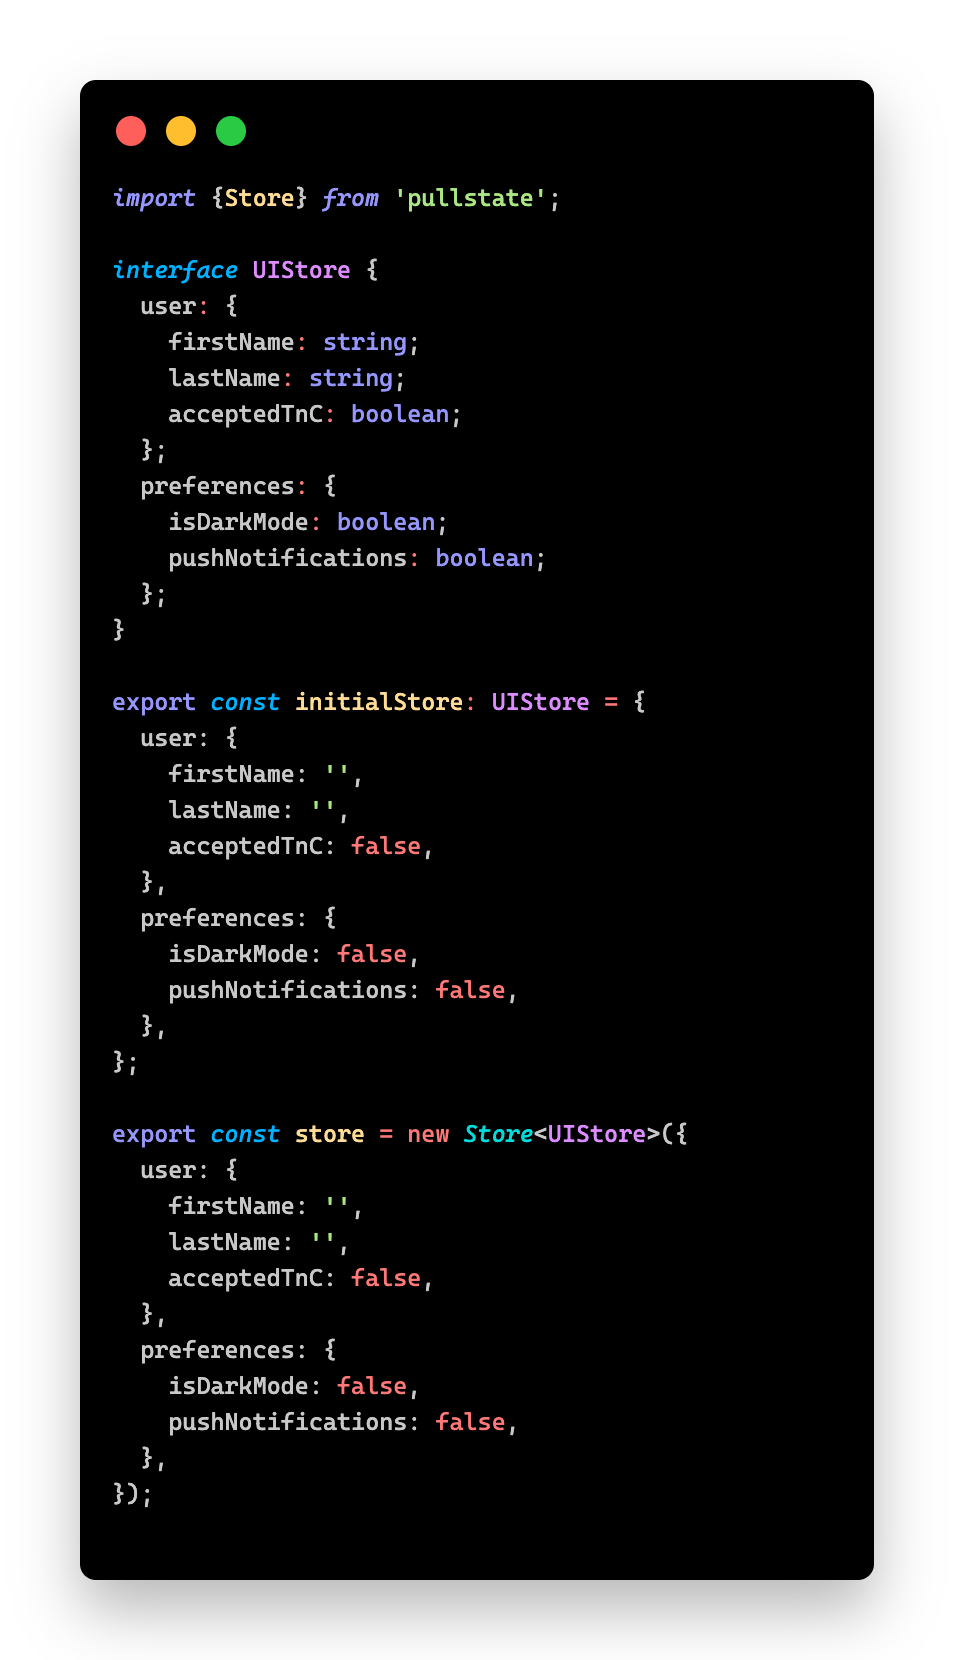 image showing code snapshot of store configuration
What is this code doing?
First, we created an interface for the Pullstate store. This holds all the information we will need to store in state across the app. We have things like the user's first name and last name (so we can use them across the application).
The store can also hold nested objects, for example our preferences object, making managing state cleaner.
To keep things simple and allow cleaner code in the future, I've created an initial store state. This resets all the state properties to their default values.
We can then (when needed) return the state back to its initial state quick and easily. This could be very useful in situations like logOut, onError, and so on.
Then we initialize the store and make it an exportable object. This means that after the first time we import the object (ideally at the top level of our application) it is then accessible throughout our app.
How to Retrieve Data from the Store
Ok, so we have our store, but how we do access this data within our component?
To retrieve the data from the store, we can utilize either the getRawState or useState functions.
getRawState() returns the raw state at this moment in time. When called it gives the live state of the pull state store. If the state is updated, the value will not be updated
For example in the code below, the acceptedTerms variable would be whatever value it was at time of calling store.getRawState():
 example of using getRawState() function
useState() acts in the same way as the React useState() function works. When the Pullstate store is updated, the acceptedTerms value will be be updated too, thus causing a re-render of the component.
Think of useState in Pullstate as a listening function – it waits for a value to be updated and then provides you with that new updated value.
 example of using the store.useState() function
Real Life Example:
Let's take a look at a real life example, involving accepting a terms and conditions page. The code below will:
- Create a card component with some terms, and
- Have two buttons, 'Back' and 'Next', which will run a function on clicking.
import React from "react";
import { StyleSheet, Text, View } from "react-native";
import { Card } from "react-native-paper";
import { store } from "./store";import { BlueButton } from "../atoms/button";

export const PullStateCard: React.FC = () => {
    const handleAgreeTerms = () => {
        store.update((state) => {
            state.user.acceptedTnC = true;
        });
    };

    const handleDisagreeTerms = () => {
        store.update((state) => {
            state.user.acceptedTnC = false;
        });
    };

    return (
        <Card style={[styles.marginTop, styles.padding]}>
            <Text>Our services are provided on an as-is basis.
            We do not guarantee the availability, accuracy, or completeness of our services.
            You may use our services only for lawful purposes and in accordance with these terms and conditions.
            </Text>
            <Text style={{ marginTop: 16 }}>
                By clicking 'Next' you are agreeing to the terms and conditions of this app
            </Text>
            <View style={styles.row}>
                <BlueButton
                    styleOverride={styles.button}
                    onPress={handleDisagreeTerms}
                    title="Back"/>
                <BlueButton
                    styleOverride={styles.button}
                    onPress={handleAgreeTerms}
                    title="Next"/>
            </View>
        </Card>

       )
}
My custom buttons:
import {
  StyleProp,
  StyleSheet,
  Text,
  TouchableOpacity,
  ViewStyle,
} from 'react-native';
import React from 'react';

interface BlueButtonProps {
  onPress: () => void;
  title: string;
  styleOverride?: StyleProp<ViewStyle>;
}

export const BlueButton: React.FC<BlueButtonProps> = ({
  onPress,
  title,
  styleOverride,
}) => (
  <TouchableOpacity onPress={onPress} style={[styles.button, styleOverride]}>
    <Text style={styles.buttonText}>{title}</Text>
  </TouchableOpacity>
);

const styles = StyleSheet.create({
  button: {
    backgroundColor: '#007AFF',
    borderRadius: 10,
    padding: 10,
    alignItems: 'center',
    marginVertical: 10,
  },
  buttonText: {
    color: 'white',
    fontSize: 16,
    fontWeight: 'bold',
  },
});
The Card component code would look like this:
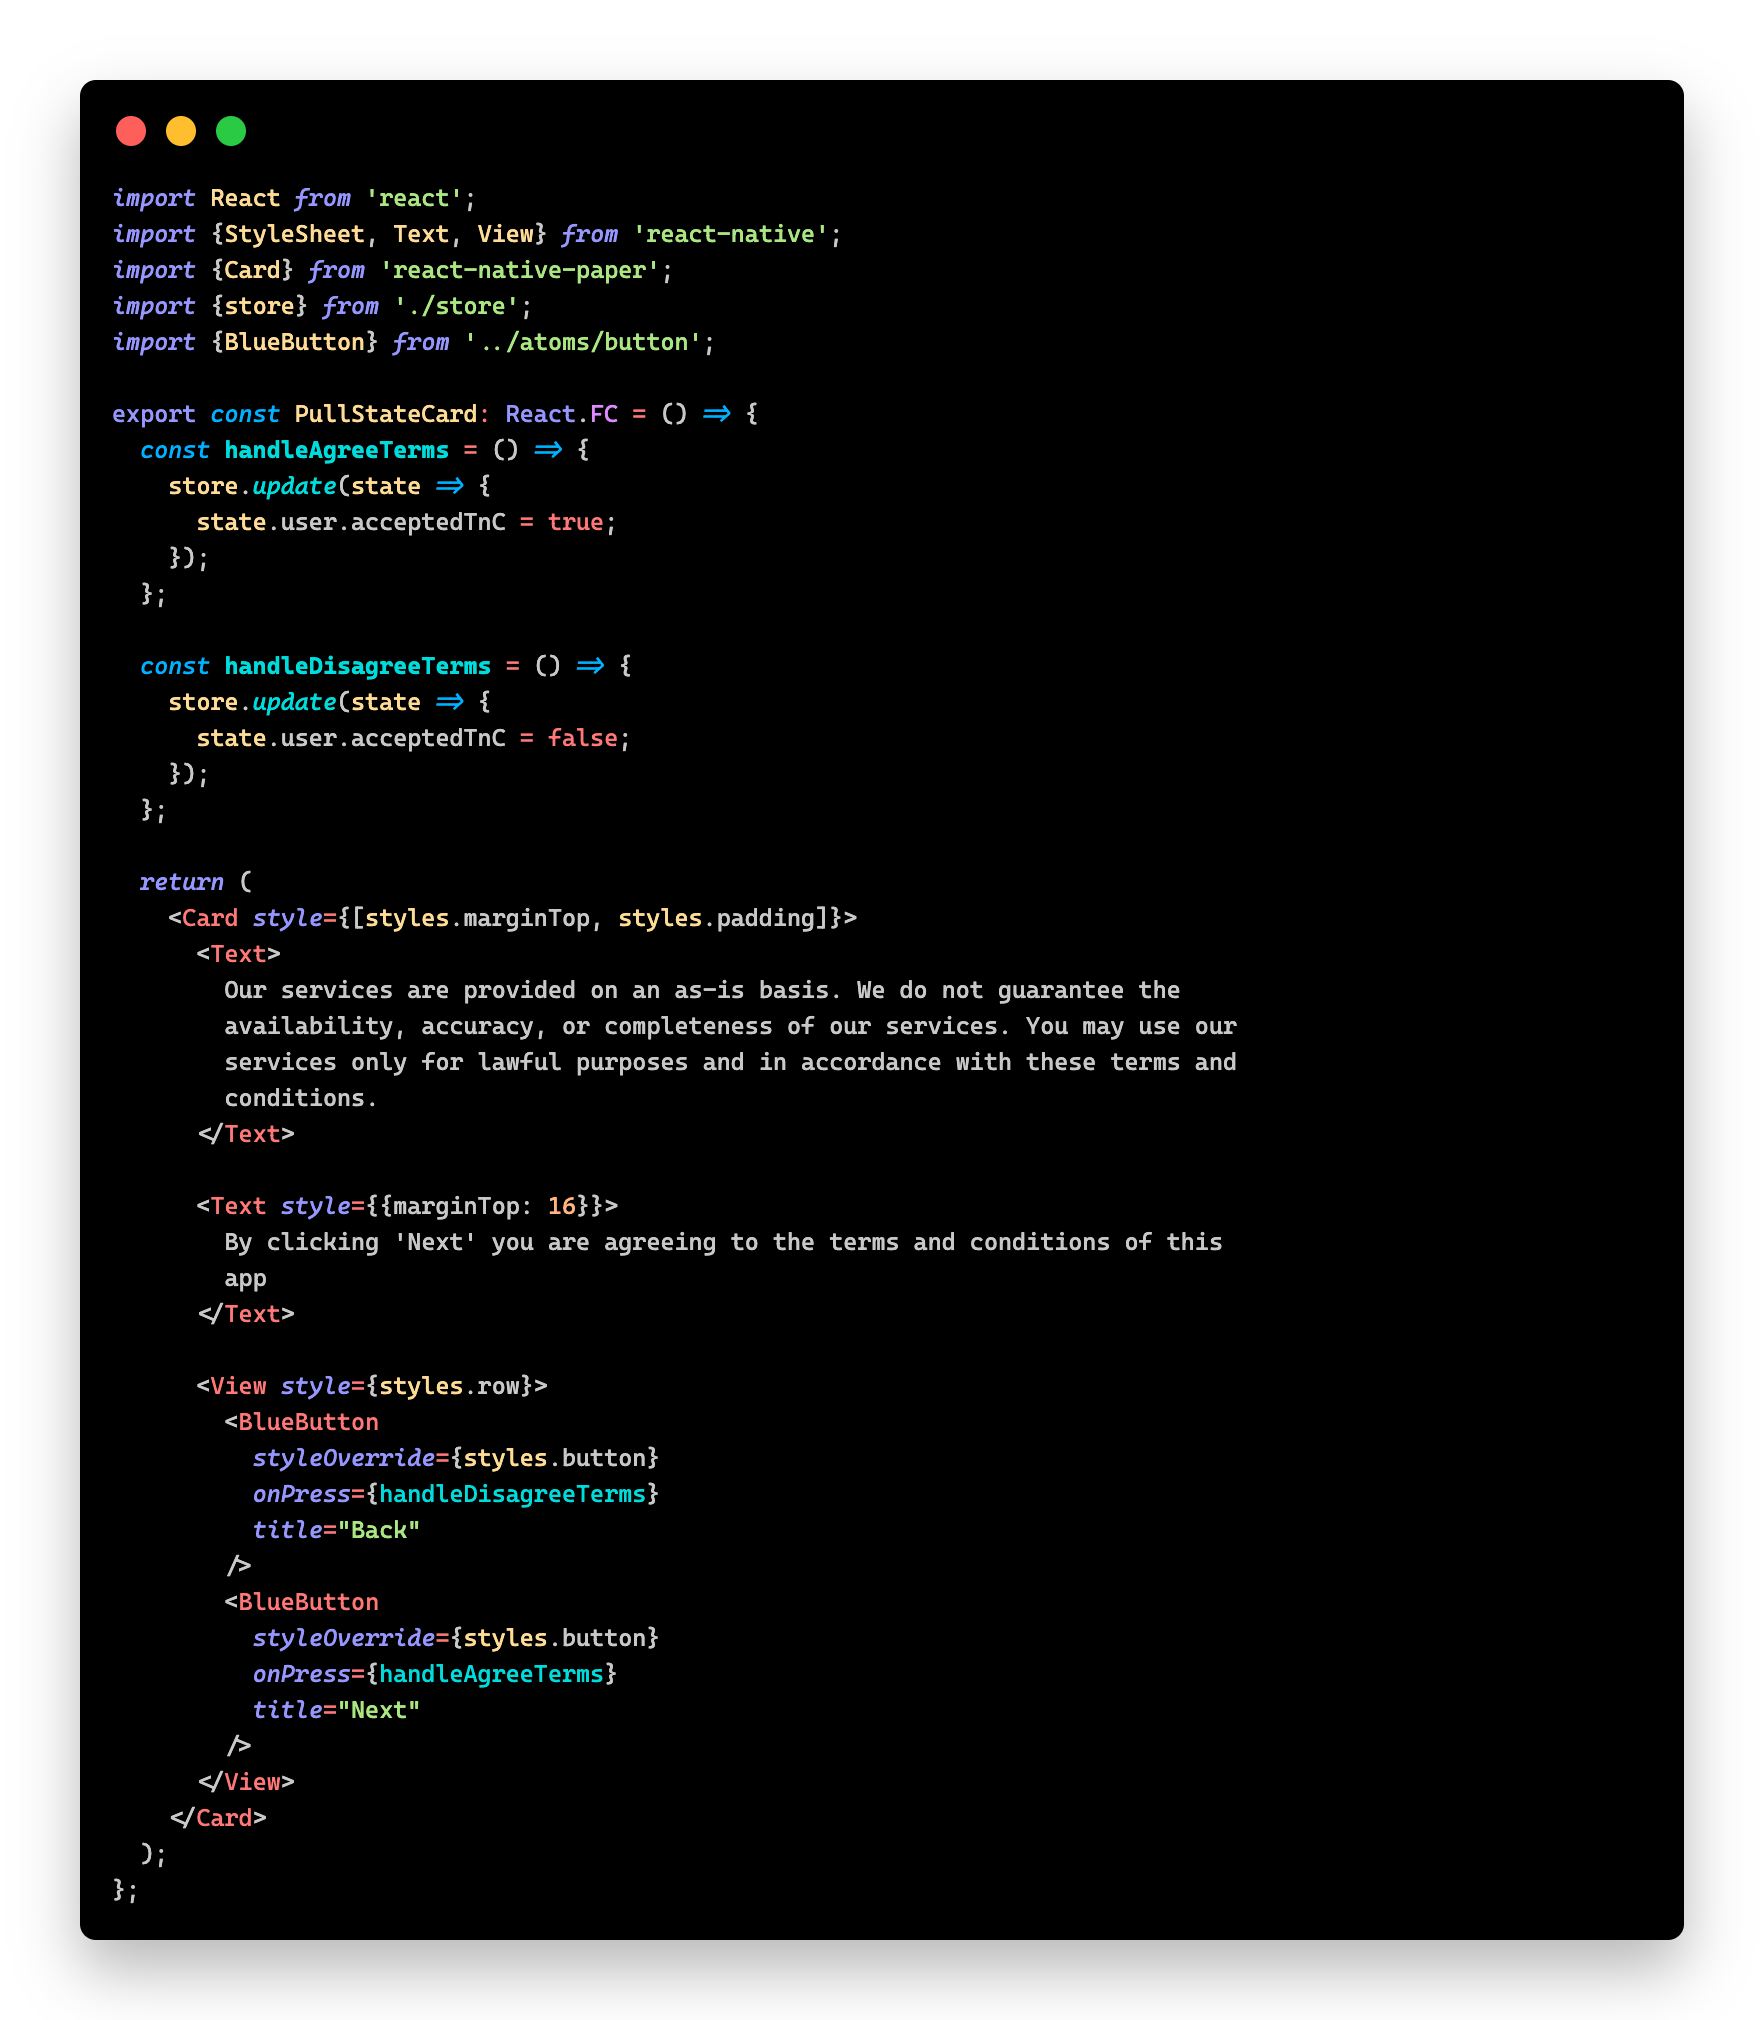
Dissecting the handle functions
The handle functions are called when the buttons are clicked. Depending on which you click, a particular action will be carried out. But the underlying intent is the same, in that they both modify the state of the pull state store we created earlier.
One will set the user.acceptedTnC to true, and the other to false. We've used the .update()function on the store object we created earlier, and passed it an anonymous function to update the properties.
The method is not limited to update just the one property, and you can update multiple properties at once, for example:
store.update((state) => {
    state.user.acceptedTnC = true;
    state.user.firstName = "John";
    state.user.lastName = "Doe";
    state.preferences.pushNotifications = true;
});
Why is Pullstate and Global State Management So Useful?
The beauty of using state in this way means that the component doesn't handle the store, the application does. You can then share this across the whole app, and have other components listen to these changes.
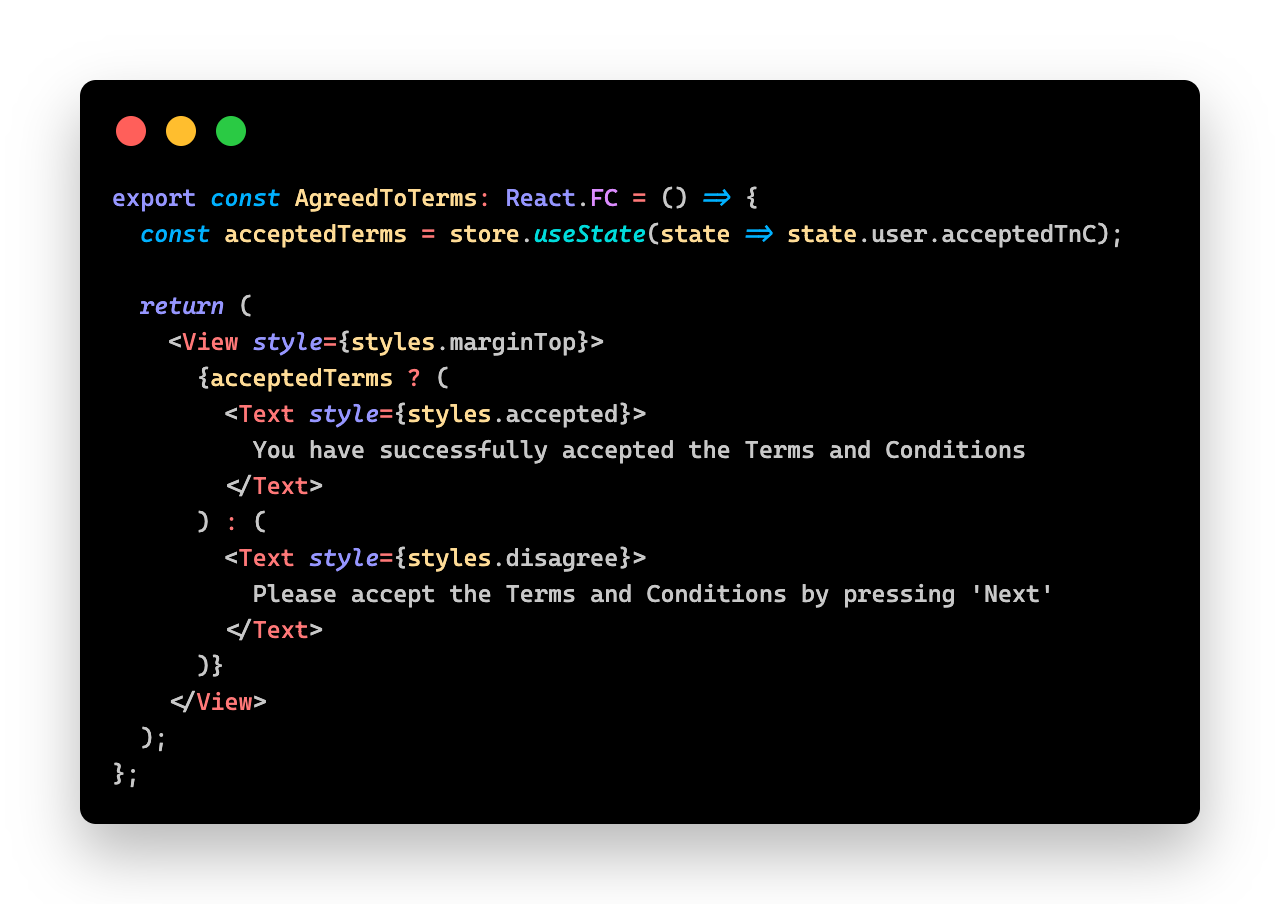
Let's take the example above one step further and have a separate component that will show a relevant message that's dependent on the state of the acceptedTnC property.
const styles = StyleSheet.create({
    disagree: {
        color: "red",
        textDecoration: "italic",
    },
    accepted: {
        color: "#0d8009",
    },
    marginTop: {
        marginTop: 10,
    },
});

export const AgreedToTerms: React.FC = () => {
    const acceptedTerms = store.useState((state) => state.user.acceptedTnC);
    return (
        <View style={styles.marginTop}>
            {acceptedTerms ? (
                <Text style={styles.accepted}>
                    You have successfully accepted the Terms and Conditions                  </Text>) : (
                 <Text style={styles.disagree}>
                     Please accept the Terms and Conditions by pressing 'Next'
                     </Text>)
            }
        </View>
    )
};
If you import these components and add your own styling to the App.tsx (App.js for JS) like so:
<PullStateCard />
<AgreedToTerms />
Your whole App.tsx code will look like this:

import React from 'react';
import {
  SafeAreaView,
  ScrollView,
  StatusBar,
  StyleSheet,
  View,
} from 'react-native';

import {AgreedToTerms, PullStateCard} from './src/pullstate/pullstate_example';

const App = () => {
  return (
    <SafeAreaView>
      <StatusBar barStyle={'light-content'} />
      <ScrollView contentInsetAdjustmentBehavior="automatic">
        <View style={styles.container}>
          <PullStateCard />
          <AgreedToTerms />
        </View>
      </ScrollView>
    </SafeAreaView>
  );
};

const styles = StyleSheet.create({
  container: {
    height: '100%',
    paddingHorizontal: 16,
    paddingVertical: 16,
  },
});

export default App;
Once you have copied the code, you can add your own styling where necessary and run the app.
Click the Next button, and your text will turn green and inform you that you've accepted the the terms.
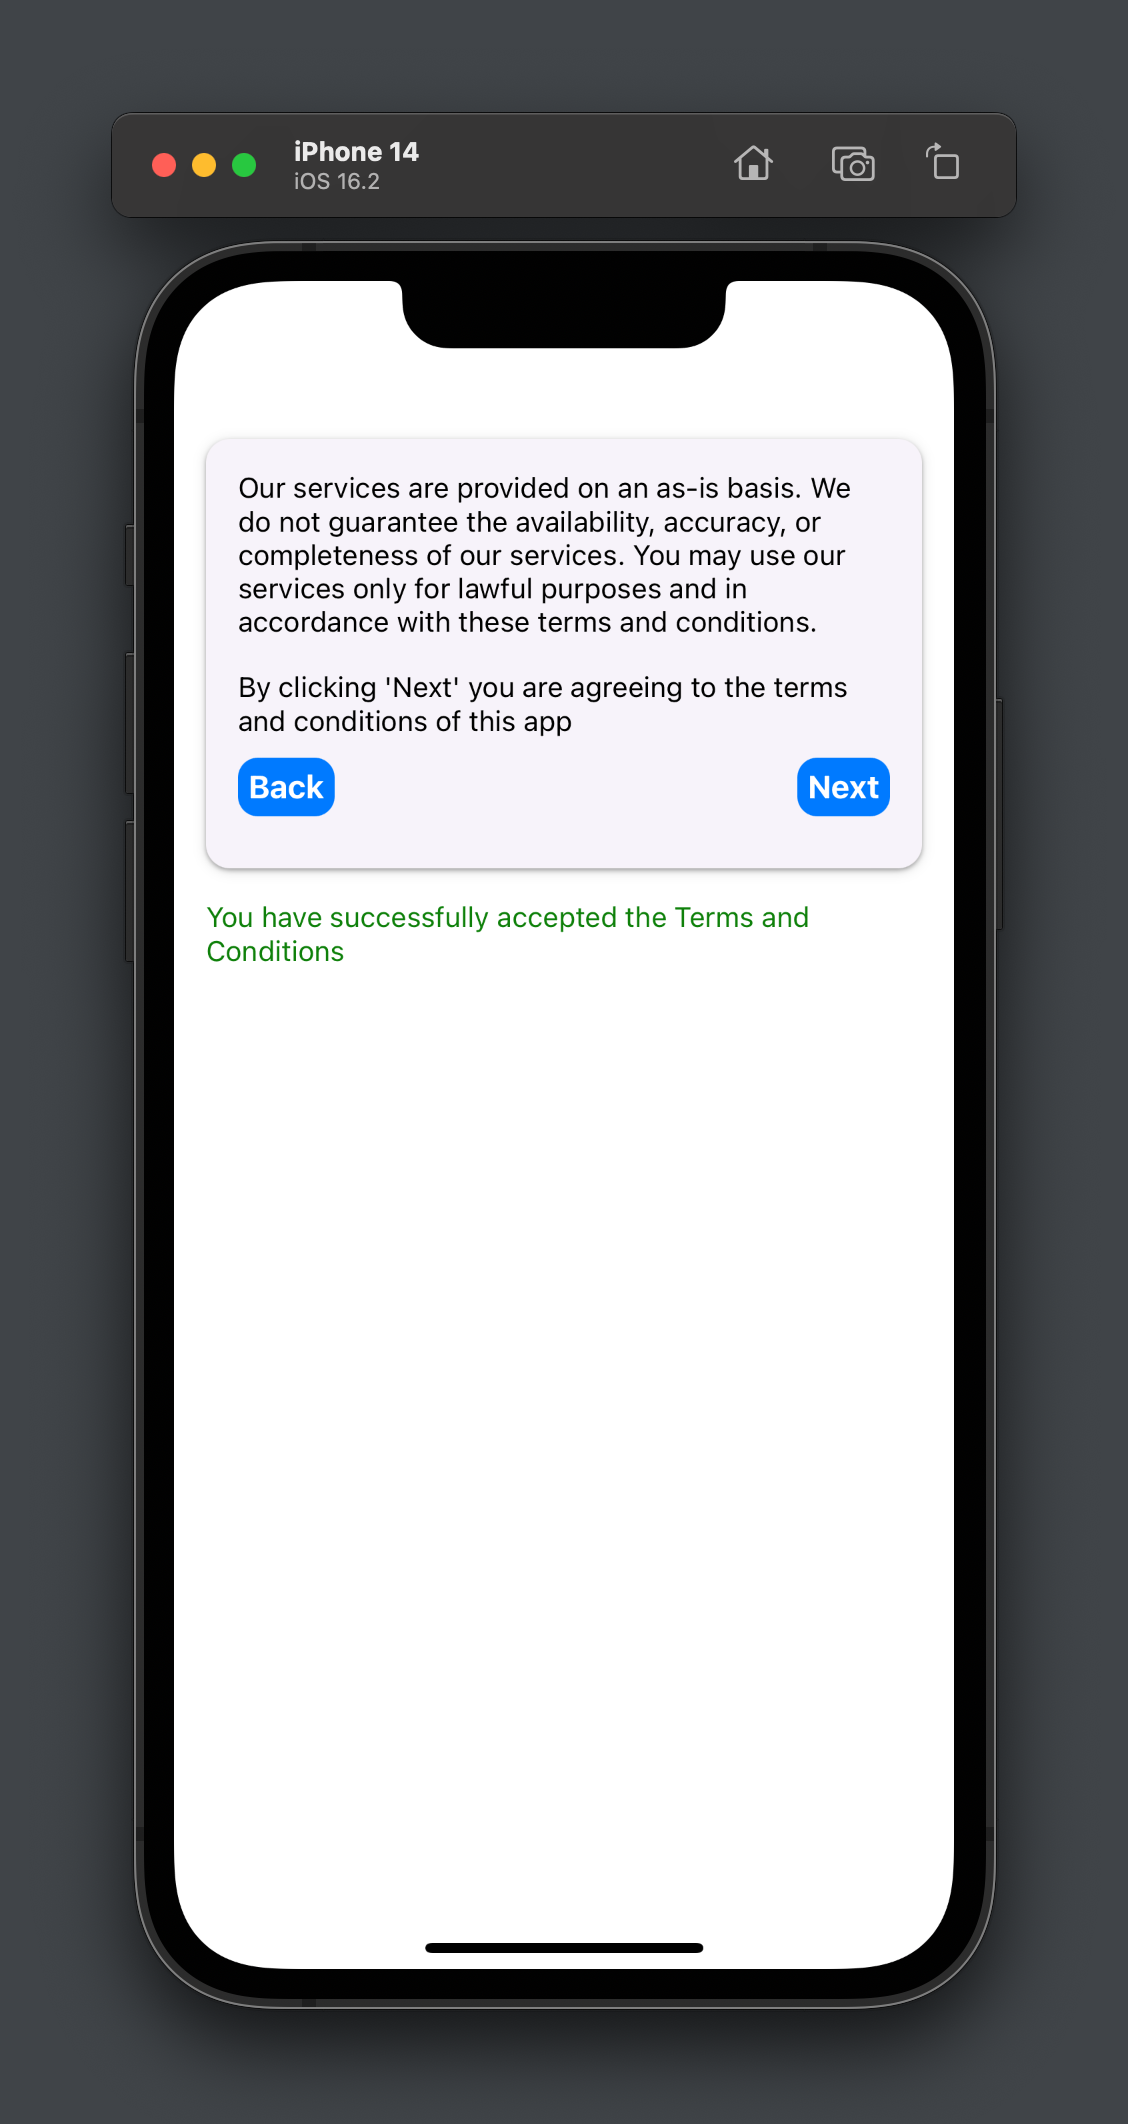
If you then click the Back button, you will see the text is red informing you that you need to accept the terms:
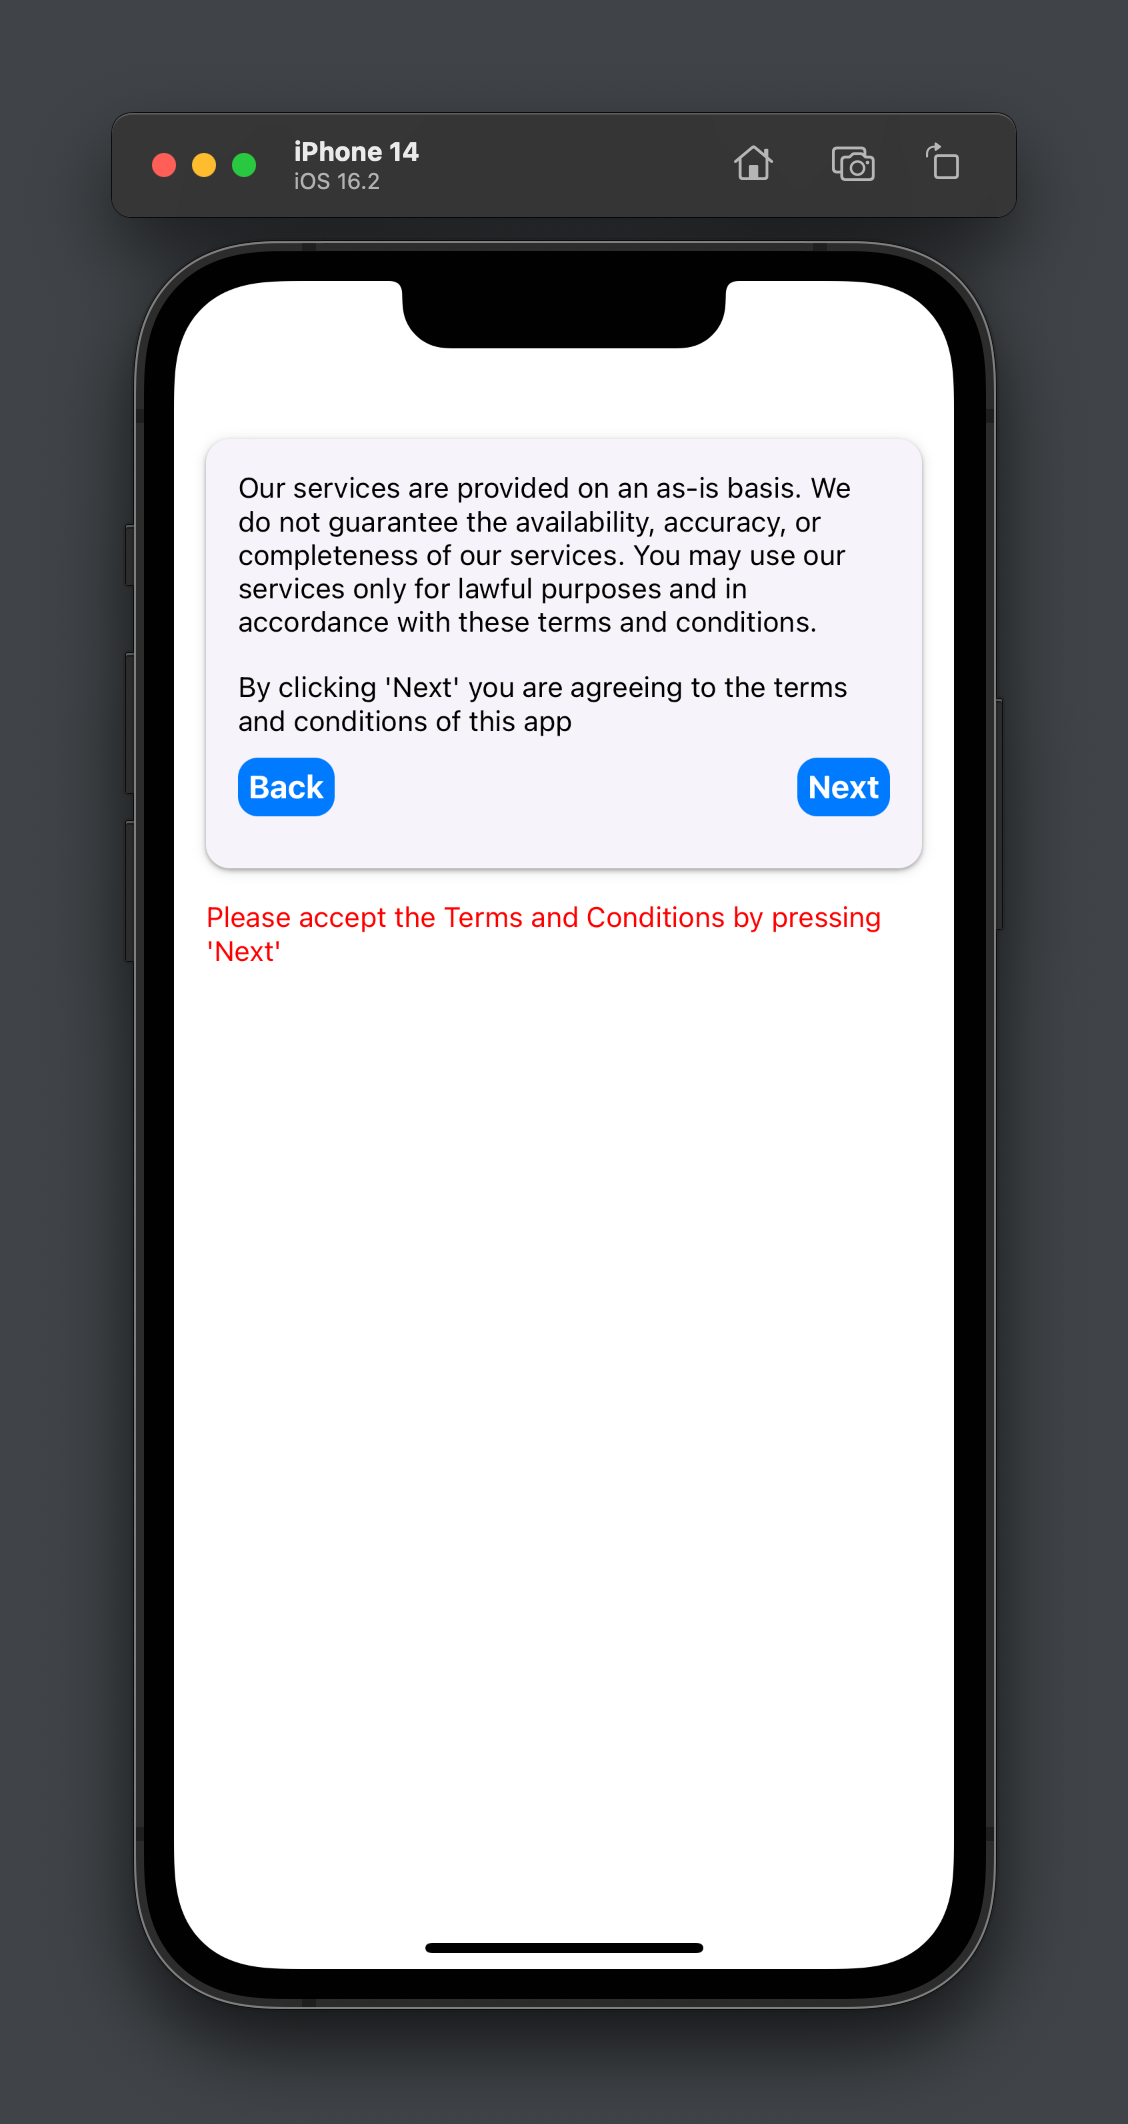
This is all powered by the global Pullstate store. There is no internal state on the AgreedToTerms component.
Decoupling Logic
Decoupling refers to the practice of separating different parts of your code so that they are not tightly dependent on / related to each other.
Think of it like building with LEGOs. When you build with LEGOs, each piece can connect to other pieces, but they can also be easily disconnected and reconnected with other pieces. This makes it easier to change and modify your LEGO build.
Similarly, in programming, when we decouple our code, we make it easier to change and modify without affecting other parts of our code. This is especially important in large applications with many different components or modules.
By moving the 'agreed to terms' acceptance state to Pullstate, it can be added and removed to any component that should need it. It's not tightly coupled with the AgreedToTerms component, and it becomes a re-usable piece of state that is globally updated. For example we could use it elsewhere in the app as an authorization mechanism, to show / hide UI elements, and much more.
Round up
I hope you've found this article useful and enjoyed this brief introduction to Pullstate and global state management.
What we've covered:
- What state management libraries are
- An introduction to Pullstate and how to integrate it into your application
- The benefits of Pullstate and how it works
For any more questions don't hesitate to reach out to me on Twitter.