
By Samuel Omole
Since the announcement of React Hooks, hundreds, if not thousands of articles, libraries, and video courses about them have been released. If you look carefully into the sea of resources, you'll find an article I wrote a while back that involved building a sample application using Hooks. You can find that article here.
Based on that article, a lot (two actually) of people asked questions related to how State can be managed in a React application using just Context and Hooks, which led to me doing a little research on the subject.
So for this article, we will be working with a pattern for managing state using two very important Hooks, useContext and useReducer, to build a simple music gallery app. The application will have only two views: one for login and the other to list the songs in that gallery.
The main reason for the login page is to show how we can share the Auth state across the application, which is a common use case for applications that use a library like Redux.
By the time we are done we should have an application that looks like the images below:
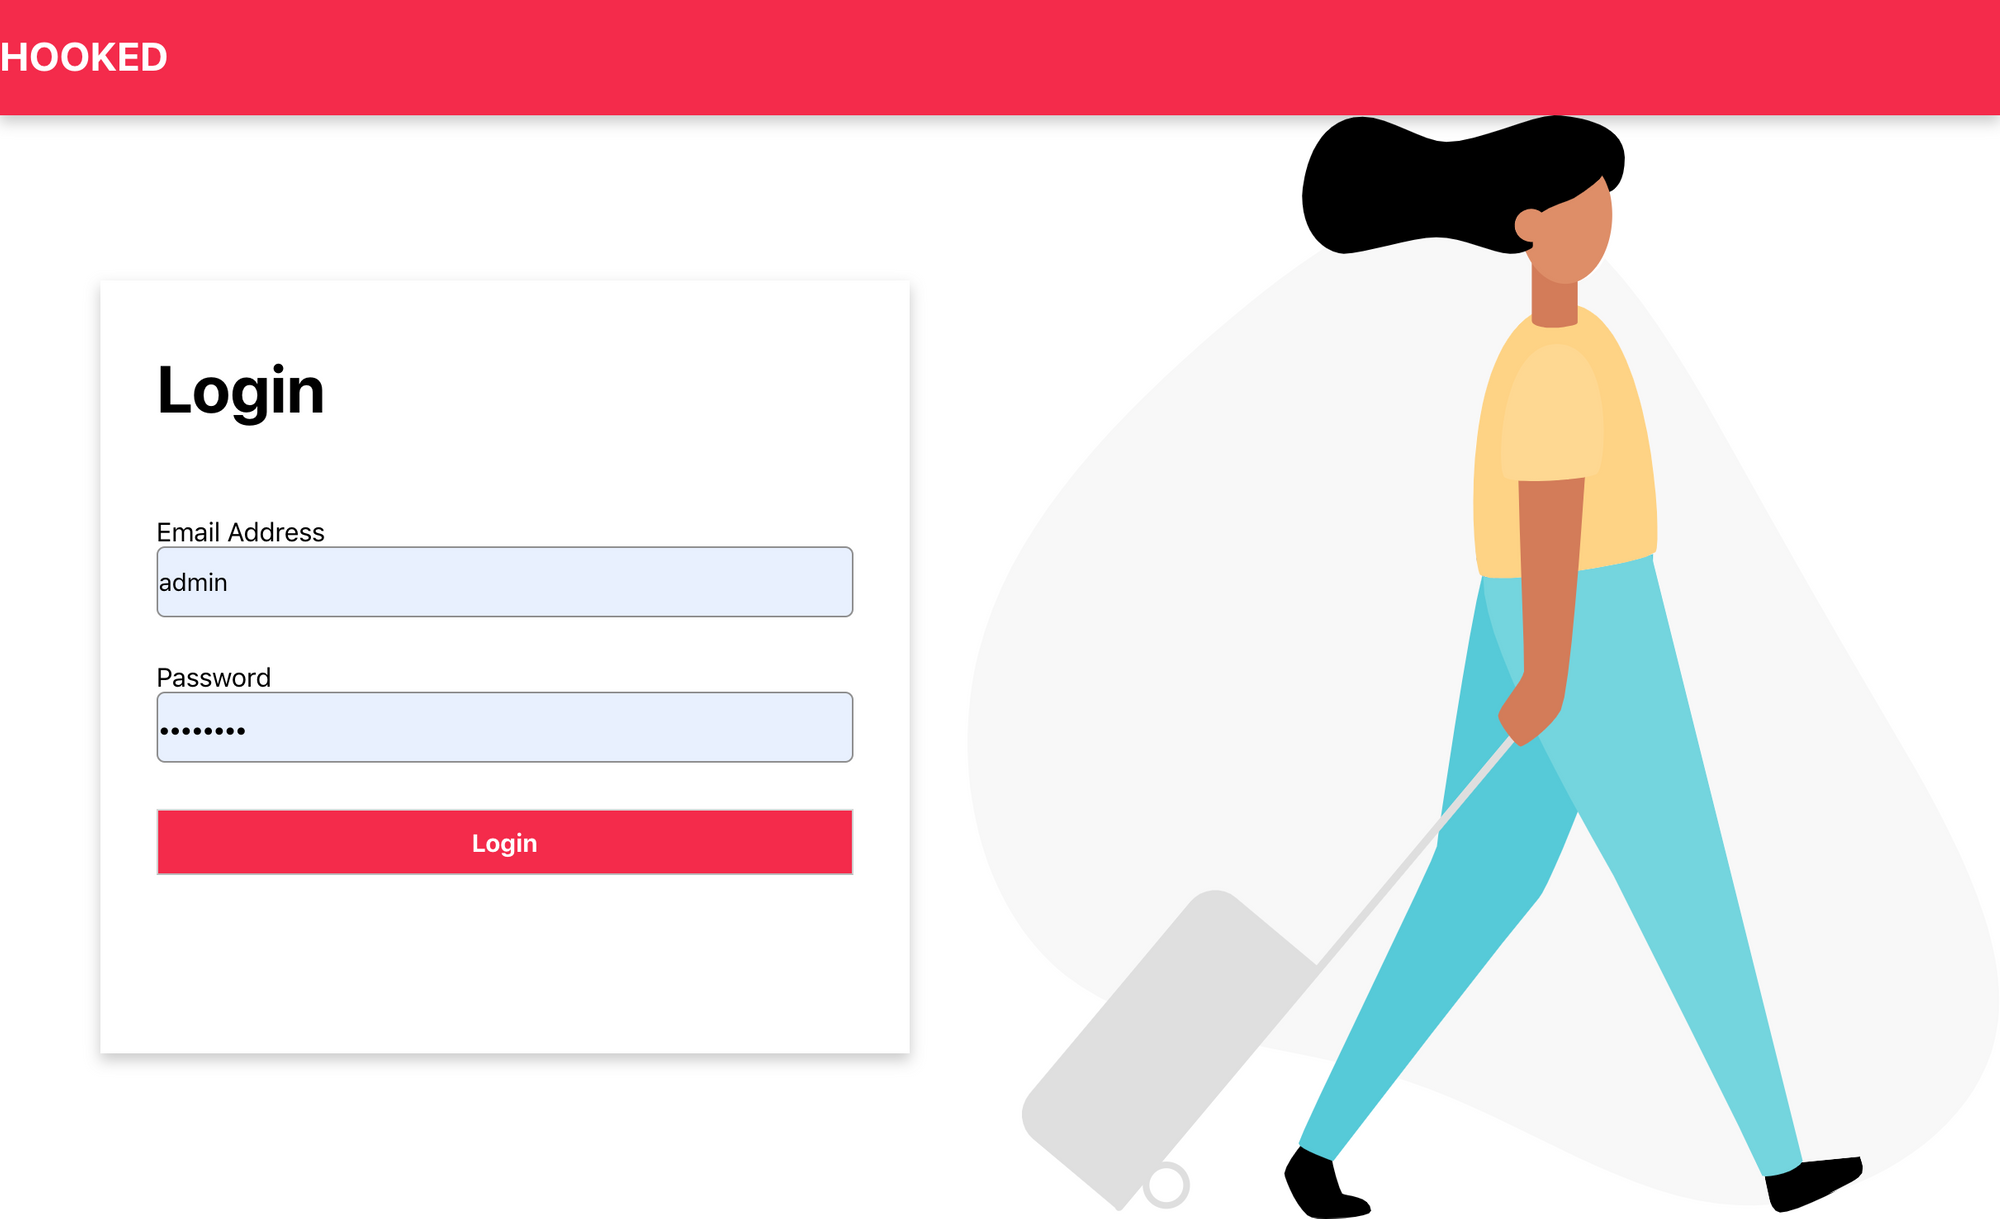 Login Page
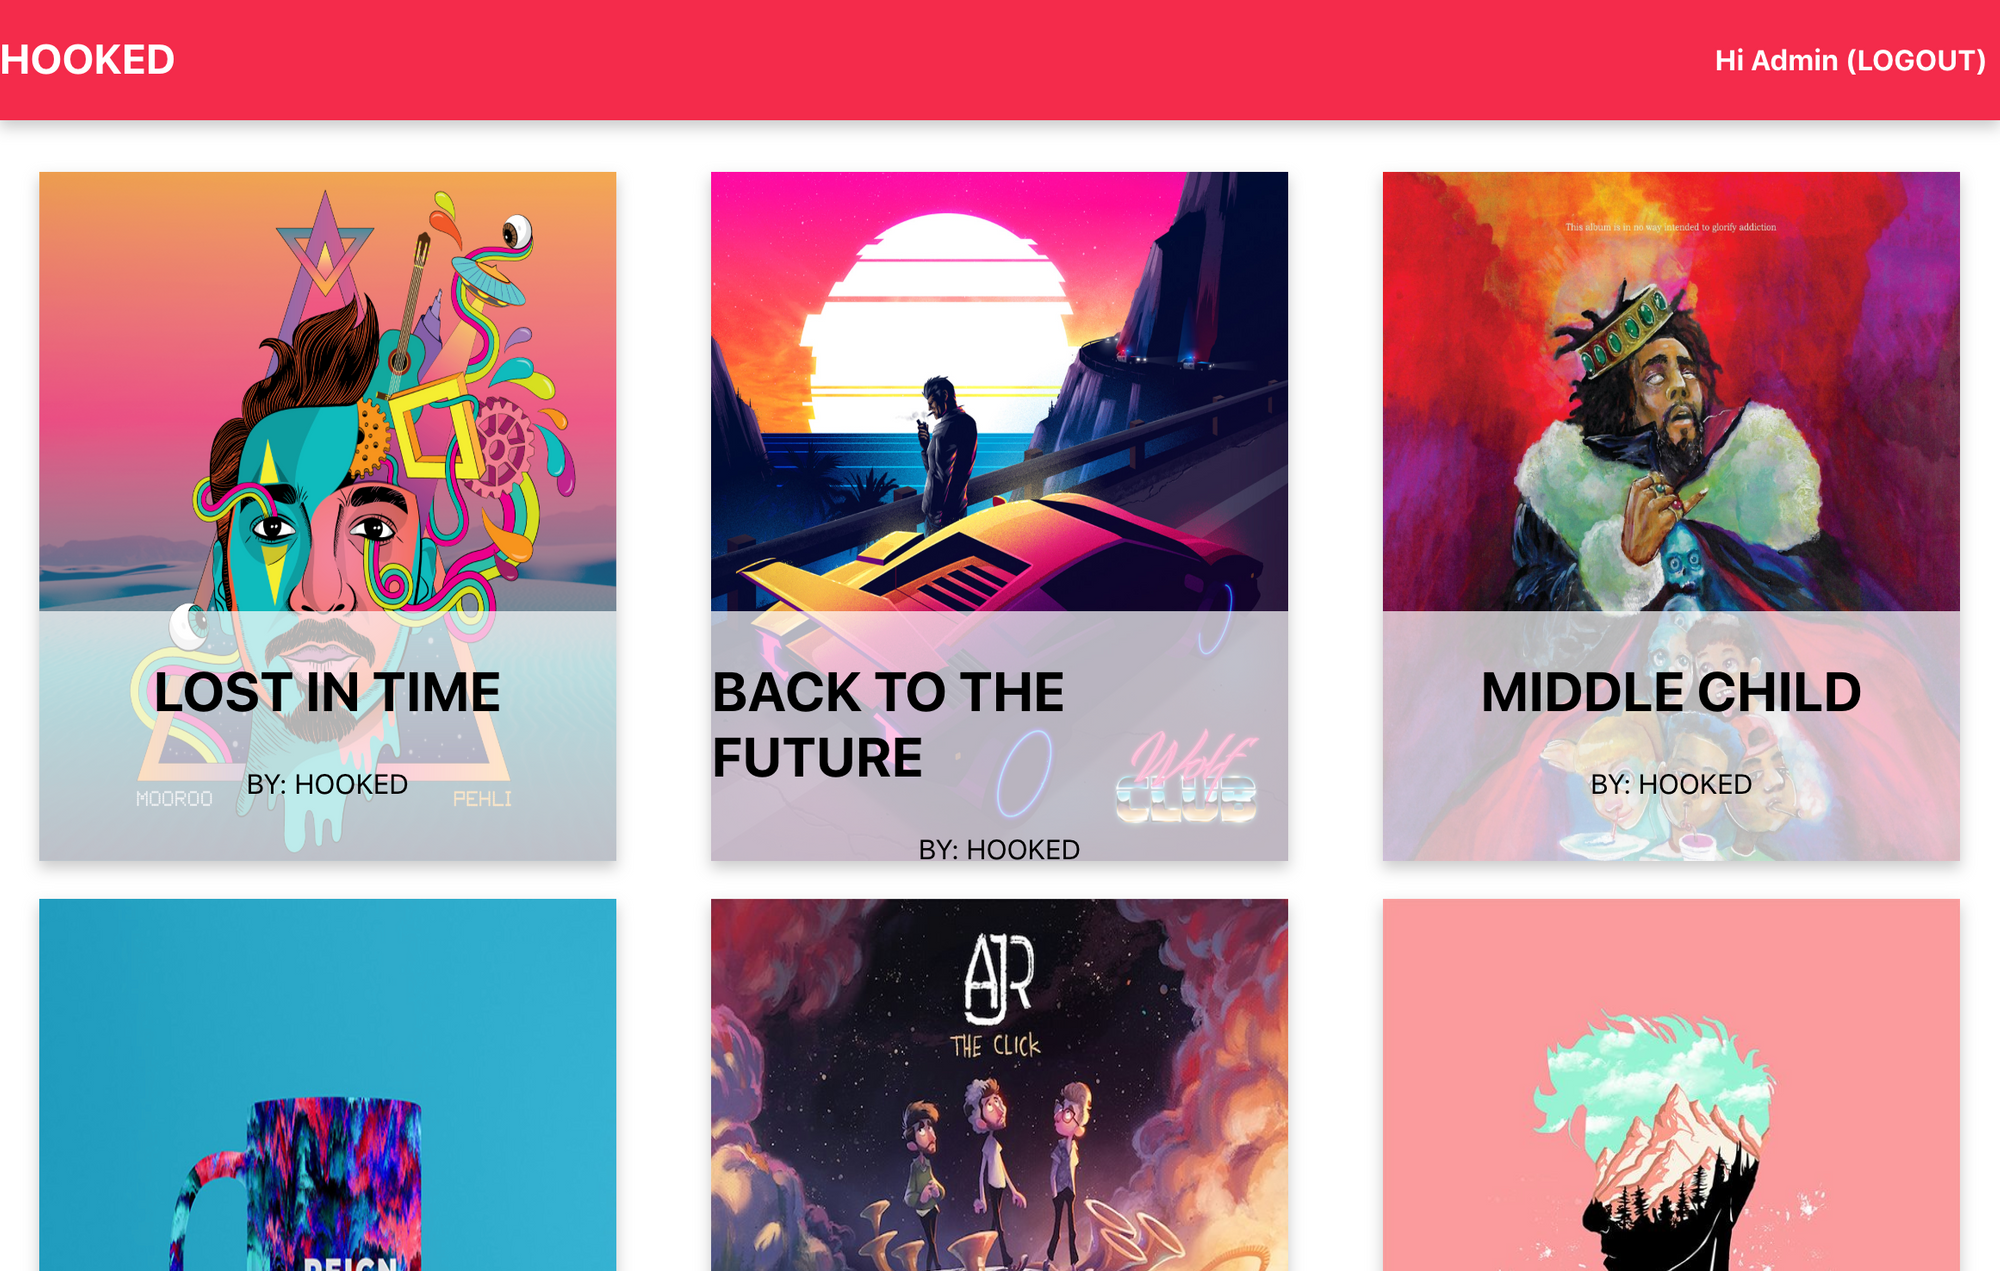 Home Page (I used the “hooked” name again, smart right?)
For the backend server, I set up a simple Express application and hosted it on Heroku. It has two main endpoints:
/login— For authentication. On successful login, it returns a JWT token and user details./songs— Returns a list of songs.
In case you want to add extra functionality, the repository for the backend application can be found here.
RECAP
Before we go into building the application, let’s look at some of the hooks we will be using:
useState— This hook allows us to use state in function components (the equivalent tothis.stateandthis.setStatein class components)useContext— This hook takes in a context object and returns whatever is passed in as a value prop inMyContext.Provider. If you do not know about context, it's a way of passing state from a parent component to any other component within the tree (no matter how deep) without having to pass it through other components that do not require it (a problem aptly named prop drilling). You can read more about context here.useReducer— This is an alternative touseStateand it can be used for complex state logic. This is my favorite hook because it works just like the Redux library. It accepts a reducer of type:
(state, action) => newState
And also an initial state object before returning the new state.
GETTING STARTED
To get started, we are going to use the create-react-app library to bootstrap the project. But before that, below are some of the requirements needed to follow along:
- Node (≥ 6)
- A text editor
In your terminal, enter the command:
npx create-react-app hooked
If you do not have npx available you can install create-react-app globally on your system:
npm install -g create-react-app
create-react-app hooked
You will create five components by the end of this article:
- Header.js — This component will contain the header of the application (obviously), and also display a logout button that contains the user’s first name. The button will only show if the user is authenticated.
- App.js — This is the top-level component where we will create the authentication context (I will talk about this later). This component will also conditionally render either the Login component if the user isn’t logged in or the Home component if the user is authenticated.
- Home.js — This component will fetch a list of songs from the server and render it on the page.
- Login.js — This component will contain the login form for the user. It will also be responsible for making a POST request to the login endpoint and updating the authentication context with the response from the server.
- Card.js — This is a presentational component (UI) that renders the details of a song passed into it.
Now let's create empty components that we will later add logic to. In the src folder, create a folder and name it components then create four these four files, namely, Header.js, Home.js, Login.js, and Card.js:
Header.js
import React from "react";
export const Header = () => {
  return (
    <nav id="navigation">
      <h1 href="#" className="logo">
        HOOKED
      </h1>
    </nav>
  );
};
export default Header;
import React from "react";
export const Home = () => {
return (
    <div className="home">
    </div>
  );
};
export default Home;
Login.js
import React from "react";
import logo from "../logo.svg";
import { AuthContext } from "../App";
export const Login = () => {
return (
    <div className="login-container">
      <div className="card">
        <div className="container">
        </div>
      </div>
    </div>
  );
};
export default Login;
And the App.js file should look like this:
import React from "react";
import "./App.css";
function App() {
return (
      <div className="App"></div>
  );
}
export default App;
In the App.js file, we will create the Auth context that will pass the auth state from this component to any other component that requires it. Create an authentication context like this below:
import React from "react";
import "./App.css";
import Login from "./components/Login";
import Home from "./components/Home";
import Header from "./components/Header";
export const AuthContext = React.createContext(); // added this
function App() {
return (
    <AuthContext.Provider>
      <div className="App"></div>
    </AuthContext.Provider>
  );
}
export default App;
Then we add the useReducer hook to handle our authentication state, and conditionally render either the Login component or the Home component.
Remember that the useReducer hook takes two parameters, a reducer (which is simply a function that takes in state and action as parameters and returns a new state based on an action) and an initial state which will be passed into the reducer. Let's then add the hook into our App component as shown below:
import React from "react";
import "./App.css";
import Login from "./components/Login";
import Home from "./components/Home";
import Header from "./components/Header";
export const AuthContext = React.createContext();
const initialState = {
  isAuthenticated: false,
  user: null,
  token: null,
};
const reducer = (state, action) => {
  switch (action.type) {
    case "LOGIN":
      localStorage.setItem("user", JSON.stringify(action.payload.user));
      localStorage.setItem("token", JSON.stringify(action.payload.token));
      return {
        ...state,
        isAuthenticated: true,
        user: action.payload.user,
        token: action.payload.token
      };
    case "LOGOUT":
      localStorage.clear();
      return {
        ...state,
        isAuthenticated: false,
        user: null
      };
    default:
      return state;
  }
};
function App() {
  const [state, dispatch] = React.useReducer(reducer, initialState);
return (
    <AuthContext.Provider
      value={{
        state,
        dispatch
      }}
    >
      <Header />
      <div className="App">{!state.isAuthenticated ? <Login /> : <Home />}</div>
    </AuthContext.Provider>
  );
}
export default App;
There is a lot going on in the snippet above, but let me explain each part:
const initialState = {
  isAuthenticated: false,
  user: null,
  token: null,
};
The above snippet is our initial state object that will be used in our reducer. The values in this object depend mainly on your use case. In our case we need to check if a user is authenticated, contains the user data, and if a token was sent back from the server after login.
const reducer = (state, action) => {
  switch (action.type) {
    case "LOGIN":
      localStorage.setItem("user", JSON.stringify(action.payload.user));
      localStorage.setItem("token", JSON.stringify(action.payload.token));
      return {
        ...state,
        isAuthenticated: true,
        user: action.payload.user,
        token: action.payload.token
      };
    case "LOGOUT":
      localStorage.clear();
      return {
        ...state,
        isAuthenticated: false,
        user: null,
        token: null,
      };
    default:
      return state;
  }
};
The reducer function contains a case-switch statement that, based on certain actions, returns a new state. The actions in the reducer are:
LOGIN— When this type of action is dispatched, it will also be dispatched with a payload (containinguserandtoken). It saves the user and token to localStorage and then returns a new state, settingisAuthenticatedtotrue, and also sets theuserandtokenkeys to their respective values based on the action’s payload.LOGOUT— When this action is dispatched, we clear localStorage of all data and setuserandtokentonull.
If no action is dispatched, it returns the initial state.
const [state, dispatch] = React.useReducer(reducer, initialState);
The useReducer hook returns two parameters, state and dispatch . state contains the state that is used in the component and it is updated based on the actions dispatched. Dispatch is a function that is used in the application to call/dispatch actions that transform or change the state.
<AuthContext.Provider
      value={{
        state,
        dispatch
      }}
    >
      <Header />
      <div className="App">{!state.isAuthenticated ? <Login /> : <Home />}</div>
 </AuthContext.Provider>
Here in the Context.Provider component, we are passing an object into the value prop. The object contains the state and the dispatch function so that it can be used by any other component that requires that context. Then we conditionally render the components–if the user is authenticated we render the Home component, else we render the Login component.
Login Component
In the login component, let us add the necessary elements for the form as shown below:
import React from "react";
export const Login = () => {
return (
    <div className="login-container">
      <div className="card">
        <div className="container">
          <form>
            <h1>Login</h1>

            <label htmlFor="email">
              Email Address
              <input
                type="text"
                name="email"
                id="email"
              />
            </label>

            <label htmlFor="password">
              Password
              <input
                type="password"
                name="password"
                id="password"
              />
            </label>

            <button>
                "Login"
            </button>

          </form>
        </div>
      </div>
    </div>
  );
};
export default Login;
In the above code, we added the JSX that displays the form, next we will be adding the useState hook to handle the form state. Once we add the hook, our code should look like this:
import React from "react";
export const Login = () => {
  const initialState = {
    email: "",
    password: "",
    isSubmitting: false,
    errorMessage: null
  };
const [data, setData] = React.useState(initialState);
const handleInputChange = event => {
    setData({
      ...data,
      [event.target.name]: event.target.value
    });
  };
return (
    <div className="login-container">
      <div className="card">
        <div className="container">
          <form>
            <h1>Login</h1>

            <label htmlFor="email">
              Email Address
              <input
                type="text"
                value={data.email}
                onChange={handleInputChange}
                name="email"
                id="email"
              />
            </label>

            <label htmlFor="password">
              Password
              <input
                type="password"
                value={data.password}
                onChange={handleInputChange}
                name="password"
                id="password"
              />
            </label>

        {data.errorMessage && (
              <span className="form-error">{data.errorMessage}</span>
            )}

            <button disabled={data.isSubmitting}>
              {data.isSubmitting ? (
                "Loading..."
              ) : (
                "Login"
              )}
            </button>
          </form>
        </div>
      </div>
    </div>
  );
};
export default Login;
In the code above, we passed in an initialState object into the useStatehook. In the object we handle the email state, the password state, a state that is used to check if the form is being sent to the server and also an errorMessage value that handles errors from the server.
Next, we will add a function that handles the form submission to the backend API. In that function, we will use the fetch API to send the payload to the server. If the response is successful, we will dispatch a LOGIN action and also pass the response from the server as a payload in the dispatched action. If there is an error from the server (if the login credentials are not valid), we call setData and pass the errorMessage from the server which will be displayed on the form. In order to call dispatch, we need to import the AuthContext from the App component into our Login component and then use the dispatch function in the app. Your final Login component should look like below:
import React from "react";
import { AuthContext } from "../App";
export const Login = () => {
  const { dispatch } = React.useContext(AuthContext);
  const initialState = {
    email: "",
    password: "",
    isSubmitting: false,
    errorMessage: null
  };
const [data, setData] = React.useState(initialState);
const handleInputChange = event => {
    setData({
      ...data,
      [event.target.name]: event.target.value
    });
  };
const handleFormSubmit = event => {
    event.preventDefault();
    setData({
      ...data,
      isSubmitting: true,
      errorMessage: null
    });
    fetch("https://hookedbe.herokuapp.com/api/login", {
      method: "post",
      headers: {
        "Content-Type": "application/json"
      },
      body: JSON.stringify({
        username: data.email,
        password: data.password
      })
    })
      .then(res => {
        if (res.ok) {
          return res.json();
        }
        throw res;
      })
      .then(resJson => {
        dispatch({
            type: "LOGIN",
            payload: resJson
        })
      })
      .catch(error => {
        setData({
          ...data,
          isSubmitting: false,
          errorMessage: error.message || error.statusText
        });
      });
  };
return (
    <div className="login-container">
      <div className="card">
        <div className="container">
          <form onSubmit={handleFormSubmit}>
            <h1>Login</h1>

            <label htmlFor="email">
              Email Address
              <input
                type="text"
                value={data.email}
                onChange={handleInputChange}
                name="email"
                id="email"
              />
            </label>

            <label htmlFor="password">
              Password
              <input
                type="password"
                value={data.password}
                onChange={handleInputChange}
                name="password"
                id="password"
              />
            </label>

            {data.errorMessage && (
              <span className="form-error">{data.errorMessage}</span>
            )}

           <button disabled={data.isSubmitting}>
              {data.isSubmitting ? (
                "Loading..."
              ) : (
                "Login"
              )}
            </button>
          </form>
        </div>
      </div>
    </div>
  );
};
export default Login;
Home Component
The Home component will handle fetching the songs from the server and displaying them. Since the API endpoint requires that we send the authentication token, we will need to find a way to get it from the App component where it was stored.
Let’s build the markup for this component. We want to fetch the songs and map through the list of returned songs and then render a Card component for each song. The Card component is a simple functional component that is passed some props to render. Create a Card.js file in the components folder, and in that file add the following code below:
import React from "react";
export const Card = ({ song }) => {

  return (
    <div className="card">
      <img
        src={song.albumArt}
        alt=""
      />
      <div className="content">
        <h2>{song.name}</h2>
        <span>BY: {song.artist}</span>
      </div>
    </div>
  );
};
export default Card;
Because it does not handle any custom logic but rather renders the props passed into it, we call it a Presentational Component.
Back in our Home component, when handling network requests in most applications, we try to visualize three main states. First, when the request is processing (by using a loader of some sort), then when the request is successful (by rendering the payload or showing a success notification), and finally, when the request fails (by showing an error notification). In order to make a request when the component is mounted and also handling these three states, we will make use of the useEffect and useReducer hooks.
For our useReducer hook, we will first create an object to hold the initial state for our reducer, the initial state object will look like the snippet below:
const initialState = {
  songs: [],
  isFetching: false,
  hasError: false,
};
songs will hold the list of songs retrieved from the server and it is initially empty. isFetching is used to represent the loading state and is initially set to false. hasError is used to represent the error state and is also initially set to false.
We can now create the reducer for this component, it will look like the snippet below:
const reducer = (state, action) => {
  switch (action.type) {
    case "FETCH_SONGS_REQUEST":
      return {
        ...state,
        isFetching: true,
        hasError: false
      };
    case "FETCH_SONGS_SUCCESS":
      return {
        ...state,
        isFetching: false,
        songs: action.payload
      };
    case "FETCH_SONGS_FAILURE":
      return {
        ...state,
        hasError: true,
        isFetching: false
      };
    default:
      return state;
  }
};
Let’s break it down. If we dispatch a FETCH_SONGS_REQUEST action in our app, we return a new state with the value of isFetching set to true . If we dispatch a FETCH_SONGS_SUCCESS action in our app, we return a new state with the value of isFetching set to false, and then songs set to the payload sent back from the server. Finally, if we dispatch a FETCH_SONGS_FAILURE action in our app, we return a new state with the value of isFetching set to false and hasError set to false .
Now that we have the useReducer hook, our Home component should look like this:
import React from "react";
import { AuthContext } from "../App";
import Card from "./Card";
const initialState = {
  songs: [],
  isFetching: false,
  hasError: false,
};
const reducer = (state, action) => {
  switch (action.type) {
    case "FETCH_SONGS_REQUEST":
      return {
        ...state,
        isFetching: true,
        hasError: false
      };
    case "FETCH_SONGS_SUCCESS":
      return {
        ...state,
        isFetching: false,
        songs: action.payload
      };
    case "FETCH_SONGS_FAILURE":
      return {
        ...state,
        hasError: true,
        isFetching: false
      };
    default:
      return state;
  }
};
export const Home = () => {
  const [state, dispatch] = React.useReducer(reducer, initialState);
return (
    <div className="home">
      {state.isFetching ? (
        <span className="loader">LOADING...</span>
      ) : state.hasError ? (
        <span className="error">AN ERROR HAS OCCURED</span>
      ) : (
        <>
          {state.songs.length > 0 &&
            state.songs.map(song => (
              <Card key={song.id.toString()} song={song} />
            ))}
        </>
      )}
    </div>
  );
};
export default Home;
To quickly run through what is going on, inside the Home function we add the useReducer hook and pass in the reducer and initialState which in turn returns two variables, namely, state and dispatch .
Then in our render function, we conditionally render a span with a “loading…” text if state.isFetching = true, or we render a span with an error message if state.hasError = true. Otherwise we loop through the list of songs and render each one as a Card component, passing in the necessary props .
To tie everything up, we will add the useEffect function that will handle the network calls and dispatch the necessary ACTION based on the server response. Adding the hook should make our Home component look like the snippet below:
import React from "react";
import { AuthContext } from "../App";
import Card from "./Card";
const initialState = {
  songs: [],
  isFetching: false,
  hasError: false,
};
const reducer = (state, action) => {
  switch (action.type) {
    case "FETCH_SONGS_REQUEST":
      return {
        ...state,
        isFetching: true,
        hasError: false
      };
    case "FETCH_SONGS_SUCCESS":
      return {
        ...state,
        isFetching: false,
        songs: action.payload
      };
    case "FETCH_SONGS_FAILURE":
      return {
        ...state,
        hasError: true,
        isFetching: false
      };
    default:
      return state;
  }
};
export const Home = () => {
  const { state: authState } = React.useContext(AuthContext);
  const [state, dispatch] = React.useReducer(reducer, initialState);
React.useEffect(() => {
    dispatch({
      type: "FETCH_SONGS_REQUEST"
    });
    fetch("https://hookedbe.herokuapp.com/api/songs", {
      headers: {
        Authorization: `Bearer ${authState.token}`
      }
    })
      .then(res => {
        if (res.ok) {
          return res.json();
        } else {
          throw res;
        }
      })
      .then(resJson => {
        console.log(resJson);
        dispatch({
          type: "FETCH_SONGS_SUCCESS",
          payload: resJson
        });
      })
      .catch(error => {
        console.log(error);
        dispatch({
          type: "FETCH_SONGS_FAILURE"
        });
      });
  }, [authState.token]);

  return (
    <React.Fragment>
    <div className="home">
      {state.isFetching ? (
        <span className="loader">LOADING...</span>
      ) : state.hasError ? (
        <span className="error">AN ERROR HAS OCCURED</span>
      ) : (
        <>
          {state.songs.length > 0 &&
            state.songs.map(song => (
              <Card key={song.id.toString()} song={song} />
            ))}
        </>
      )}
    </div>
    </React.Fragment>
  );
};
export default Home;
If you notice, in the code above, we used another hook, the useContext hook. The reason is, in order to fetch songs from the server we have to also pass the token that was given to us on the login page. But since that was another component, we stored the token in the AuthContext and we use the useContext hook to get that context value and use it in our own component.
Inside the useEffect function, we initially dispatch the FETCH_SONGS_REQUEST so that the loading span shows, then we make the network request using the fetch API and passing the token we got from the AuthContext as a header. If the response is successful, we dispatch the FETCH_SONGS_SUCCESS action and pass the list of songs gotten from the server as payload in the action. If there is an error from the server, we dispatch FETCH_SONGS_FAILURE action so that the error span is displayed on the screen.
The last thing to note in our useEffect hook is that we pass the token in the dependency array of the hook (read more about useEffect here). This means that our hook will only be called when that token changes, which can only happen if the token expires and we need to fetch a new one or we log in as a new user. So for this user, the hook will be called only once.
OK, we are done with the logic. All that’s left is the CSS. Since going into the details of the styling of the app is beyond the scope of this article, you can copy the CSS snippet below and paste it in the App.css file:
/******  LOGIN PAGE  ******/
.login-container{
  display: flex;
  align-items: center;
  background-image: url("./assets/carry-on-colour.svg");
  height: calc(100vh - 70px);
  background-repeat: no-repeat;
  background-position: right;
  padding-left: 5%;
  padding-right: 5%;
  margin-top: 70px;
}
.card {
  /* Add shadows to create the "card" effect */
  box-shadow: 0 4px 8px 0 rgba(0,0,0,0.2);
  transition: 0.3s;
  height: 70%;
  width: 45%;
}
/* On mouse-over, add a deeper shadow */
.card:hover {
  box-shadow: 0 8px 16px 0 rgba(0,0,0,0.2);
}
/* Add some padding inside the card container */
.login-container .container {
  padding-left: 7%;
  padding-right: 7%;
  height: 100%;
}
.login-container .container h1{
  font-size: 2.5rem;
}
.login-container .container form{
  display: flex;
  height: 80%;
  flex-direction: column;
  justify-content: space-around;
  align-self: center;
}
input[type="text"], input[type="password"]{
  padding-left: 1px;
  padding-right: 1px;
  height: 40px;
  border-radius: 5px;
  border: .5px solid rgb(143, 143, 143);
  font-size: 15px;
}
label{
  display: flex;
  flex-direction: column;
}
.login-container button{
  height: 40px;
  font-weight: bold;
  font-size: 15px;
  background-color: #F42B4B;
  color: rgb(255, 255, 255);
}
.login-container button:hover{
  background-color: rgb(151, 25, 46);
  cursor: pointer;
}
.login-container button:focus{
  outline: none !important;
}


.spinner {
  animation: spinner infinite .9s linear;
  height: 90%;
}
.spinner:focus{
  border:none;
}
@keyframes spinner {
  from {
    transform: rotate(0deg);
  }
  to {
    transform: rotate(360deg);
  }
}
.form-error{
  color: #F42B4B;
  text-align: center;
}
@media screen and (max-width: 700px){
  .login-container{
    justify-content: center;
    background-image: none;
  }
  .card {
    width: 80%;
    align-self: center;
  }

}
@media screen and (max-width: 350px){
  .card {
    width: 100%;
  }

}
/******  LOGIN PAGE  ******/


/******  HEADER  ******/
#navigation{
  width: 100%;
  position: fixed;
  z-index: 10;
  display: flex;
  flex-wrap: wrap;
  justify-content: space-between;
  background-color: #F42B4B;
  box-shadow: 0 4px 8px 0 rgba(0,0,0,0.2);
  height: 70px;
  top: 0;
  padding-right: 5px;
  padding-left: 5px;
}
#navigation h1{
  color: white;
}
#navigation button{
  background-color: transparent;
  border: none;
  align-self: center;
}
#navigation button:hover{
  cursor: pointer;
}
#navigation button:focus{
  outline: none !important;
}
/******  HEADER  ******/


/******  HOME PAGE  ******/
.home {
  margin-top: 100px;
  margin-left: 2%;
  margin-right: 2%;
  display: flex;
  flex-wrap: wrap;
  justify-content: space-between;
}
.home .loader{
  align-self: center;
  width: 100%;
  text-align: center;
}
.home .error{
  width: 100%;
  align-self: center;
  color: #F42B4B;
  font-size: 30px;
  font-weight: bold;
  text-align: center;
}
.home>.card {
  /* Add shadows to create the "card" effect */
  box-shadow: 0 4px 8px 0 rgba(0,0,0,0.2);
  transition: 0.3s;
  height: 400px;
  width: 30%;
  position: relative;
  margin-bottom: 2%;
}
/* On mouse-over, add a deeper shadow */
.home .card:hover {
  box-shadow: 0 8px 16px 0 rgba(0,0,0,0.2);
}
.home .card>img{
  width: 100%;
  height: 100%;
}
.home .content{
  bottom: 0;
  z-index: 9;
  position: absolute;
  background-color: rgba(255, 255, 255, 0.7);
  display: flex;
  flex-direction: column;
  width: 100%;
  align-items: center;
  height: 35%;
  padding-bottom: 5px;
  transition: 0.5s;
}
.home .content:hover{
  background-color: rgba(255, 255, 255, 1);
  height: 50%;
  cursor: pointer;
}
.content>h2{
  text-align: center;
  font-size: 2rem;
}
@media screen and (max-width: 780px){
.home{
    justify-content: space-around;
  }
  .home .card {
    width: 45%;
  }
}
@media screen and (max-width: 500px){
  .home .card {
    width: 90%;
  }
}
@media screen and (min-width: 1400px){
  .home {
    margin: auto;
    width: 1400px;
  }
  .toggle-button{
    margin-bottom: 10px;
  }
}
/******  HOME PAGE  ******/
This article was a bit long, but I hope it does cover a common use case with using hooks to manage state in our application.
You can access the GitHub repo by clicking this link. Note that the repo has some added features like creating a new song.