
By Siamak Mahmoudi
TDD, or Test-Driven Development, is a software development approach where tests are written before the actual code is implemented.
It requires a clear understanding of "What" and "How" in the the requirements of the project/feature.
TDD helps to write less, but enough code. It helps prevent common software development mistakes, such as over-engineering, too much test coverage, missing main requirements, too large functions and classes, and too many complicated code statements.
Overall, it helps to have a concise, already unit-test covered, clean codebase. Over time, it also saves development and code maintenance costs.
In this article we will discuss TDD in action.
The context is an Android development environment, so we will use Kotlin and JUnit5 with a sample project to demonstrate the steps.
However, the instructions and techniques here can be practiced in other programming languages as well.
Prerequisites
- Basic knowledge of Kotlin
- Basic knowledge of writing Unit tests
- Knowledge of mocks and assertions
We will use Kotlin as the programming language and JUnit5 to write unit tests.
Mockito will be used to work with mocks and spys.
The target audience is any software developer from any platform seeking a new chapter in their career.
Even though the context is Android, the content does not talk about platform specific properties. Instead, we focus on techniques, notes and challenges when developing with TDD.
If above is OK with you, let's get started.
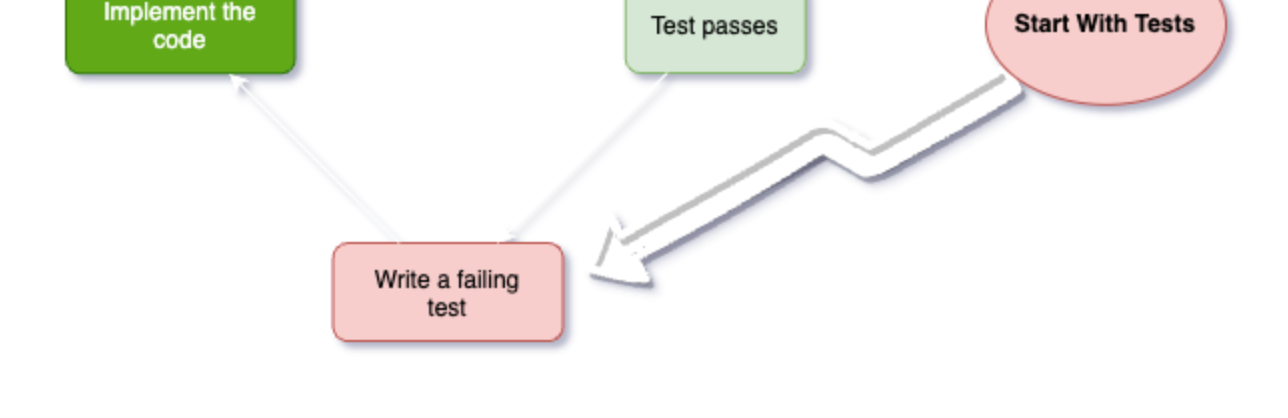
How Test Driven Development Works
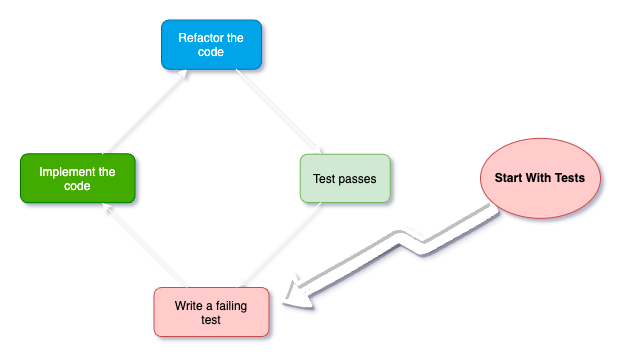 TDD Cycle
The development process follows a cycle of:
- Writing a failing test (pink square).
- Implementing the code to make the test pass (green square)
- Refactoring the code (blue square) as needed while ensuring that the tests continue to pass (pale green square).
- Writing a new failing test (restart the flow again)
Writing a Failing Test (Pink Square)
In this step, you start by describing what you want your code to do.
Imagine you're giving your code a test to check if it behaves correctly. This test is like a question you ask your code, such as "Can you do this task?"
At first, your code doesn't know the answer, so you write a test that should fail because your code doesn't know how to do the task yet. This failing test is like a pink warning sign that tells you something isn't right.
Once you've finished this stage, JUnit5 will generate a comprehensive report from the tests you've crafted. These tests will stand as a tangible representation of your work.
Now, imagine that your project manager is reading these test cases to assess both their coverage and the accuracy of your grasp on the feature or product. Embracing this perspective offers a clearer understanding of the significance of this developmental phase.
Shift your focus from technical intricacies to the software's behavior itself.
Instead of getting caught up in the nitty-gritty technical aspects, direct your attention to how the software functions and interacts with users and other components.
This shift in perspective allows you to prioritise the software's intended actions and outcomes, leading to tests that accurately reflect its real-world behavior.
By concentrating on behavior rather than technical minutiae, you ensure that your tests align closely with the software's purpose and user expectations.
In some cases, You might end up with no more than a few test cases per component (which is the purpose: less work but targeted) and that's totally fine, as long as you cover all the behavioural requirements of the project.
Tips
- Be specific: Write clear and specific test cases that focus on one aspect of your code's behavior.
- Start simple: Begin with the simplest test case that covers the basic functionality you need.
@Test fun `a sum is calculated from two input numbers`() {}
- Use meaningful names: Name your tests descriptively so that anyone reading them knows what the test is checking.
@Test fun `Font Ratio is fetched from data source INITIALLY`() {}
Common mistakes to avoid
- Testing too much at once: Avoid testing multiple things in a single test. This can make it hard to identify what's failing.
// Don't do this
@Test fun `pixelSize fits the standart sizes while fontSize is bigger than minumum supported font size but matches the list of special levels of size`() {}
- Relying on implementation details: Don't write tests that are tightly coupled to the code's inner workings. Tests should focus on behavior, not implementation.
// Don't do this
@Test fun `pixelSize is Long and Non-Null and fits the standart sizes then calculated font size is non-null and of type Dimention`() {}
Implementing the Code to Pass the Test (Green Square)
Now that you have your test in place, it's time to teach your code how to do the task correctly.
You write the actual code that should make the test pass and your code answer the question correctly.
When your code passes the test, it's like a green light saying, "Yes, I can do the task now!".
This step is about making sure your code understands and can solve the problem you're asking it to.
Tips
- Write minimal code: Write the simplest code that makes the failing test pass. You can read more about how to avoid over-engineering here.
// Test Case
@Test fun `Storage stores font ratio in key-value`() {

    // Given
    val fontRatio = 2.0f
    val mockEditor = mockk<SharedPreferences.Editor>(relaxed = true)
    every { mockSharedPreference.edit() } returns mockEditor
    every { mockEditor.putFloat(any(), any()) } returns mockEditor
    every { mockEditor.apply() } just Runs

    // When
    storage.saveFontRatio(fontRatio)

    // Then
    verify(exactly = 1) {
        mockEditor.apply()
    }
}


// Correct Implementation - Avoid extra implementation
class SharedPreferenceHelper(
    private val sharedPreferences: SharedPreferences
) {
    fun saveFontRatio(fontRatio: Float) {
        sharedPreferences.edit().putFloat("font-ratio", fontRatio).apply()
    }
}


// Wrong Implementation
class SharedPreferenceHelper(
    private val sharedPreferences: SharedPreferences
) {
    fun saveFontRatio(fontRatio: Float) {
    if (fontRatio <= 0.0f)
    throw IllegalArgumentException("Font ratio must be greater than 0.0f")

    storeValue(key = FONT_RATIO_KEY, value = fontRatio)

}

    private fun storeValue(key: String, value: Float){
        val editor = sharedPreferences.edit() editor.putFloat(key, value)
        editor.apply()
    }

    fun getFontRatio(): Float {
    return sharedPreferences.getFloat("font_ratio", 1.0f) }
}
- Avoid duplication: Don't repeat code. If you find yourself writing similar logic in multiple places, consider refactoring. This primary code improvements can be done in this phase, but if the modification can have a side-effect then ignore it.
class ... {
    override fun getDefaultFontSize(): Float {
        val zoomRatio = DEFAULT_SSPEED * DEFAULT_FONT_RATIO / deviceDensity
        val fontSize = zoomRatio * standardFontSize
        return fontSize
    }
    override fun getFontSizeBySSpeed(speed: Int): Float {
        val zoomRatio = speed * DEFAULT_FONT_RATIO / deviceDensity
        val fontSize = zoomRatio * standardFontSize
        return fontSize
    }
}
class ... {
    override fun getDefaultFontSize(): Float = calculate(DEFAULT_AGE)
    override fun getFontSizeByAge(age: Int): Float = calculate(age)

    private fun calculate(age: Int): Float {
        val zoomRatio = age * DEFAULT_FONT_RATIO / deviceDensity
        val fontSize = zoomRatio * standardFontSize
        return fontSize
    }
}
Common mistakes to avoid:
- Jumping Ahead: Don't write more code than necessary to pass the test. TDD is about incremental development. TDD encourages an incremental and step-by-step approach to development. When you jump ahead, you're essentially trying to solve problems that are not yet directly related to the current test you're working on. The primary goal is to focus on the immediate task at hand – passing the current test – without getting sidetracked by future functionalities.
- Ignoring Test Failures: If a test doesn't fail initially, you might be missing an important case. This might seem unlikely to happen at first sight, but after some development in your test components you'll start writing multiple tests for a single method to test different aspects of the logic. This is where you should not be happy if your unimplemented logic passes the test. In simple words, this is how you catch bugs in development phase. So, expect the failure when it should be.
Refactoring the Code (Blue Square) and Ensuring Test Success (Pale Green Square)
Once your code passes the test, it's time to clean things up.
You might see ways to make your code more organised, easier to understand, or even faster. Think of it as tidying up your room once you're done playing, making everything neat and organised after you've finished playing.You improve your code without changing what it does.
As you do this, you keep running all your tests to make sure they still pass. If a test fails during this step, it's like a pale green caution sign telling you that something you cleaned up might have accidentally broken the code.
You can treat this part as a separate code maintenance phase.
Assume that you are given the task to clean up an old code and make sure it follows team code quality guidelines as well as product requirements.
Throughout this process, the key is to maintain a careful balance – refining while ensuring your tests continue to succeed.
Here are some ideas and strategies for the refactoring phase:
- Code clarity: Simplify complex sections, replace unclear variable names, and enhance comments to make the code easier for others (and your future self) to understand.
- Modularity: Break down large functions into smaller, focused ones. This makes your code more modular and allows for easier maintenance and testing.
- Remove redundancy: Identify duplicated code and consolidate it into reusable functions or classes. This helps eliminate repetition and ensures consistency.
- Optimization: Identify areas where performance can be improved. However, only optimize if you have specific performance goals and evidence that the code is a bottleneck. Optimization here is to avoid resource drain and not to make the code performant.
- Consistent formatting: Maintain a consistent code style, adhering to the conventions of your team or project.
- Unused code: Remove any unused variables, functions, or imports that clutter the codebase.
- Test improvements: Unlike the usual perception regarding TDD, you can add tests whenever there is a need for it. Enhance the test suite by adding new test cases to cover scenarios that weren't previously addressed. This helps maintain comprehensive test coverage.
- Documentation: If your code's purpose isn't immediately clear from the code itself, consider adding or improving documentation to explain its intent and usage. Avoid making it a habit. This is meant to act as a complementary explanation for crucial cases to avoid confusion.
Note that TDD code should be self-expressing and independent of documentation.
Remember, while refactoring, it's crucial to keep running all your tests to ensure they continue to pass.
Tips
- Keep tests comprehensive: Make sure your tests cover various scenarios to catch unintended side effects during refactoring.
- Refactor gradually: Make small changes to your code and run tests frequently to catch any regressions early.
Common mistakes to avoid:
- Refactoring without tests: Refactoring without having tests in place can lead to unexpected behavior. If there is a chance to miss a part of the logic then consider writing tests for it.
- Large code change: Sometimes we end up changing more number of lines than what we developed to make the test pass. Always consider a separate refactoring phase over making too much changes in development phase as it's a safer & less costly option.
Writing a New Failing Test (Restarting the Flow)
Now, you think of the next thing you want your code to do.
You start by writing a new test that should fail because your code doesn't know how to do the new task yet. This is like giving your code a new challenge to solve.
Then, you repeat the whole cycle: make the test pass with code (green square), clean up if needed (blue square), and keep testing to make sure everything works (pale green square).
This way, you're always moving forward and building your code step by step.
Tips
- Incremental steps: Add new tests for new functionality in small increments to maintain a clear development path. Instead of attempting to implement a complex feature all at once, you break it down into smaller, manageable pieces and create tests for each of these pieces. This approach maintains a clear and steady development path, helping you to stay focused, reduce risks, and ensure that each addition to your software is thoroughly tested.
- Feedback loop: Use the feedback from writing failing tests to guide your implementation. Feedback loop highlights the iterative nature of TDD. As you craft new tests and observe them failing, you gain valuable insights that guide your implementation.
Here's how the feedback loop works:
- Expectation setting: When you write a new test, you define your expectations for how the code should behave. This clarifies what you're aiming to achieve with your new feature.
- Initial failure: The test fails at first because the corresponding code to fulfill its expectations is missing or incomplete. This initial failure is a natural part of the TDD process.
- Guides your implementation: The feedback from the test's failure points you in the direction of what code needs to be written or modified. It becomes a roadmap for your development, outlining what the new functionality should look like.
- Incremental Progress: As you implement the necessary code to make the test pass, you're incrementally building up the desired functionality. Each step is guided by the feedback provided by the failing test.
- Verification: Once your implementation is complete, you run the test again. If it passes, it verifies that your new code satisfies the expectations you initially set.
The feedback loop ensures that your development is tightly aligned with the intended goals of your software.
Common mistakes to avoid:
- Writing tests after implementation: Don't write tests after you've implemented the feature. TDD is about writing tests first. Even a tiny piece of logic added before the test code means there is a possible resource waste/bug in the code. The whole point is to not to add any logic unless there is a need for it from test suite.
- Skipping failing tests: Don't skip this step even if you think you know how to implement the feature.
Here is why you should not skip the failing tests step even when you're confident:
- Clarity of intent: Writing a failing test clarifies your intent for the feature. It forces you to consider the exact behavior and outcomes you're aiming for before diving into implementation.
- Verification of assumptions: Even if you think you understand the feature, creating a test ensures that your assumptions are valid. Your understanding might be correct, but the test validates it.
- Safety Net: By writing a failing test, you establish a safety net that prevents regressions in the future. It acts as a specification for the feature and helps catch unintended side effects.
- Incremental development: TDD encourages incremental development. Each new feature is built step by step, with a clear progression from failing test to working implementation. Skipping this step disrupts that progression.
- Documentation: The failing test documents the expected behavior of the feature. This documentation is valuable for you and your team, especially when revisiting the code in the future. Always remember that there are systems to generate reports by listing out all of your test code for product managers and QAs. Those reports expose the details you spotted in the product, So, try to convince them that you understood the point thoroughly.
How to Develop Using TDD
TDD emphasises the importance of writing automated tests to drive the design and development of software. This leads to code that is more reliable, maintainable, and easier to change over time.
But how can we put it into practice? By trying it out and getting used to it gradually.
Let's try TDD while developing a new feature to demonstrate how we can start using it in real world.
We will be implementing a font size auto setting feature.
We have a news app and a user can set auto-scroll-speed for news feed.
We want to implement a feature which adjusts the screen font size from the scroll speed set in the User Profile page.
If the user sets the scroll speed from 0 to 1, then the font size should increase by 1.3.
Any scroll speed increment over 1 will result in increase of the font size by 1.2.
This feature allows users to have a better experience while reading the news.
I've also shared the code we explore in this GitHub repository.
Feel free to clone and play with it.
Try to follow the steps as we progress in the development. This will help you grasp the techniques and the way of thinking in the context of TDD practically.
So, open Android Studio and create a new project.
Font Size Auto Setting Feature Data Flow Chart
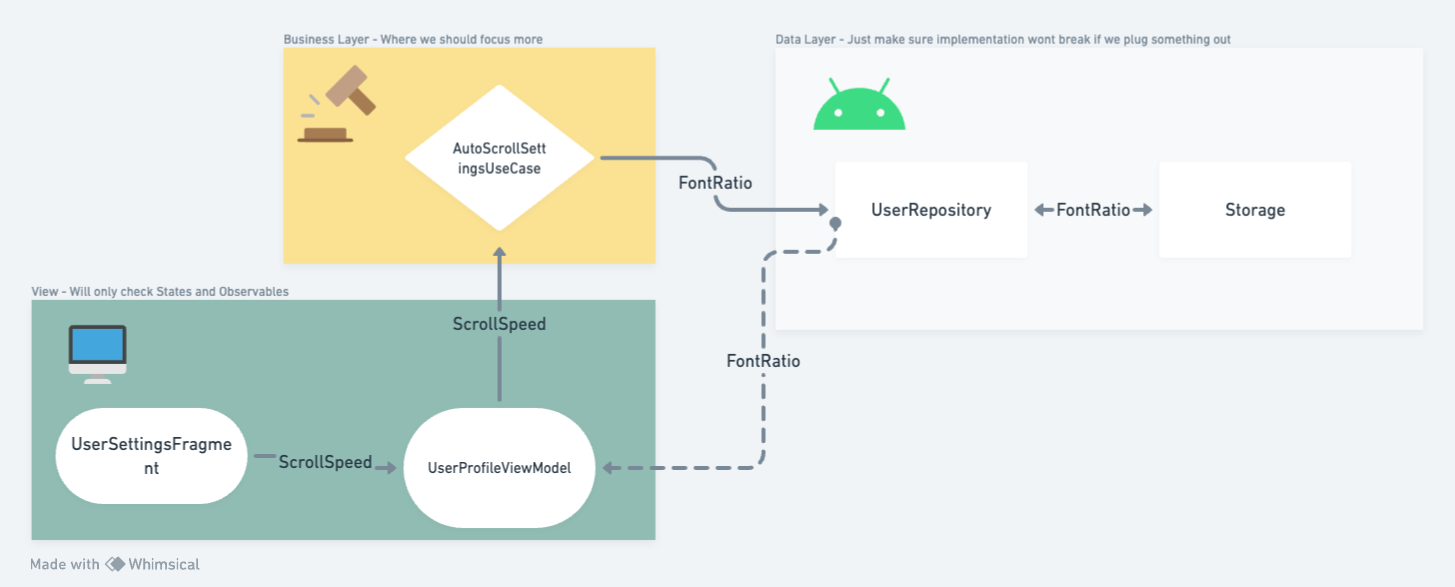 DFD of a sample feature in an android app
Above is the flowchart of what the data flow should look like in the end.
Here's an outline of each engaging component:
The AutoScrollSettingsUseCase class will handle the logic for calculating and storing the FontRatio based on the selected Scroll Speed.
This use case will have a dependency on the UserRepository storing the FontRatio value.
In the UserRepository, there are methods to store and retrieve the FontRatio value using the Storage mechanism. Whenever a new FontRatio is sent to the storage, any observables will receive an emission with the latest value.
In the UserProfileViewModel, there is an instance of the AutoScrollSettingsUseCase that is being called whenever the user updates the Scroll Speed. This will trigger the recalculation of the FontRatio and its stored via the repository.
We will have the necessary UI components in the User Setting section to allow the user to input their desired scroll speed. This can be done using standard Android UI elements such as NumberPicker or custom UI components (We will not discuss these parts).
This is the breakdown for a simple feature and every time you go through it, it becomes more clear what are the steps and the final result. It's crucial to do it for your changes.
How to Write the Tests
The first step is to always create the test class itself. In this case, we will have at least the following test classes:
UserRepositoryTestAutoScrollSettingTestUserSettingsViewModelTest
I prefer to start with the ViewModel part.
A ViewModel is an Android Architectural component which escapes lifecycle changes (such as foreground, background, focused). So, it's a fine place to store our states.
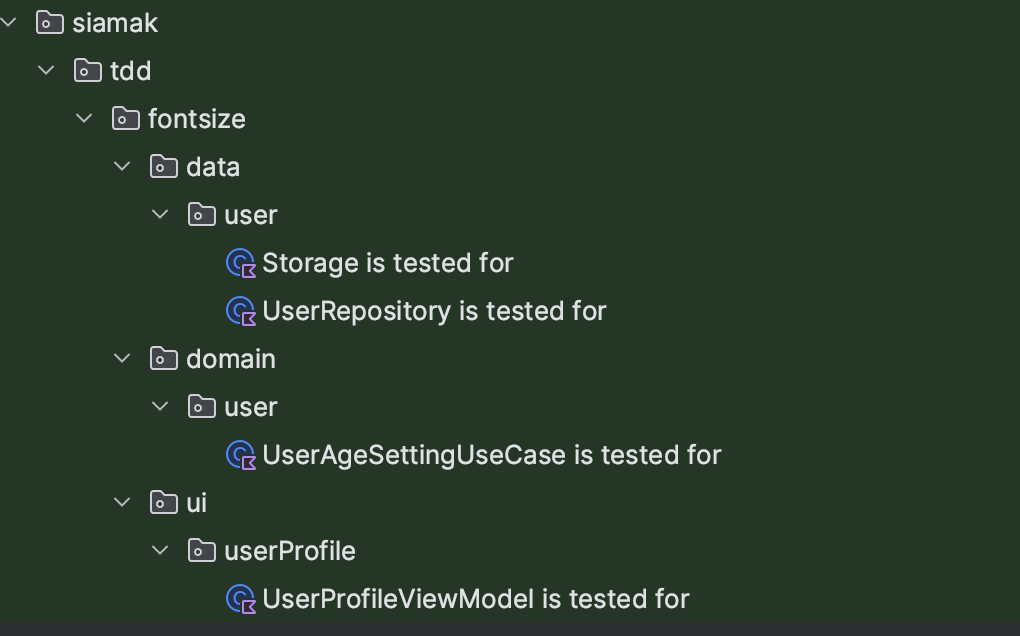
Let's create the test file inside the unitTest directory of the source code following the same package path as the real feature code.
TDD in practice is dissimilar to legacy work development.
With TDD we use an IDE to boost file and property(fields) creation process. But we create Test files manually! After a few tries, this aspect of IDE will become handy.
Create the code structure (packages) and then create your test class by right clicking on the package and selecting the Class type.
Choose a descriptive name for it (maybe you should follow a convention for it if you're not already).
For instance: xxx is tested for, where xxx is the name of the tested component.
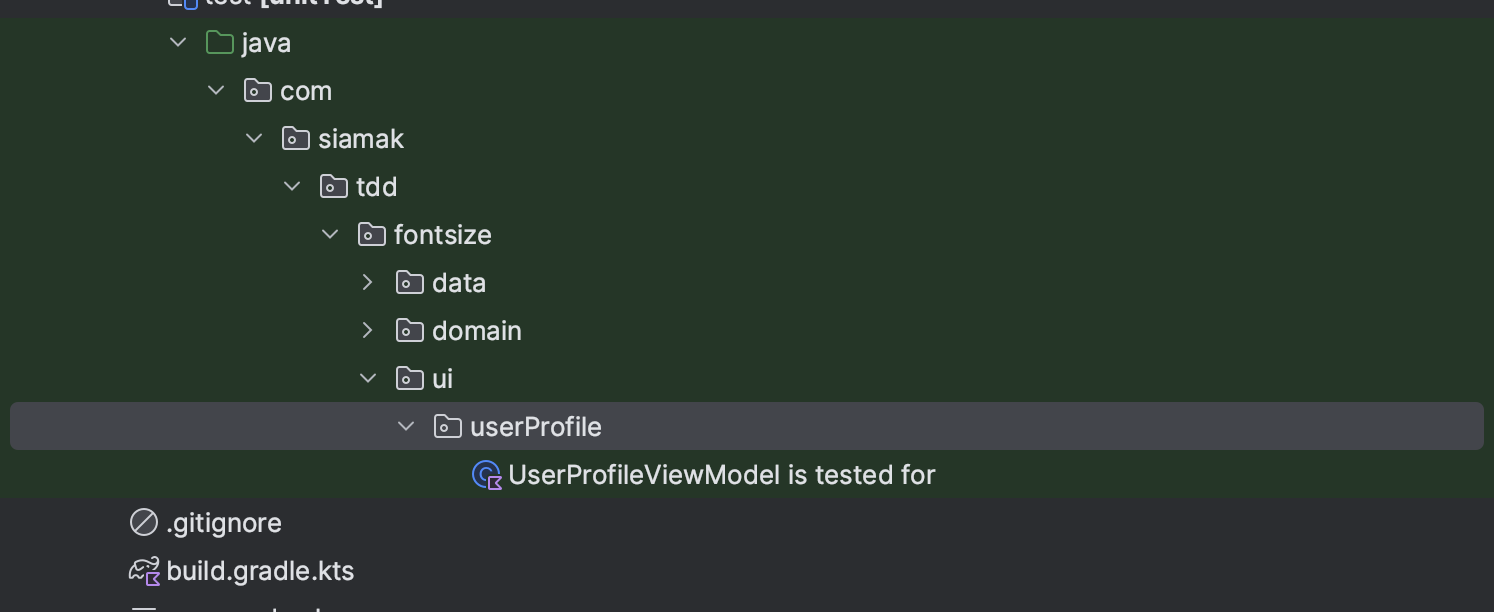
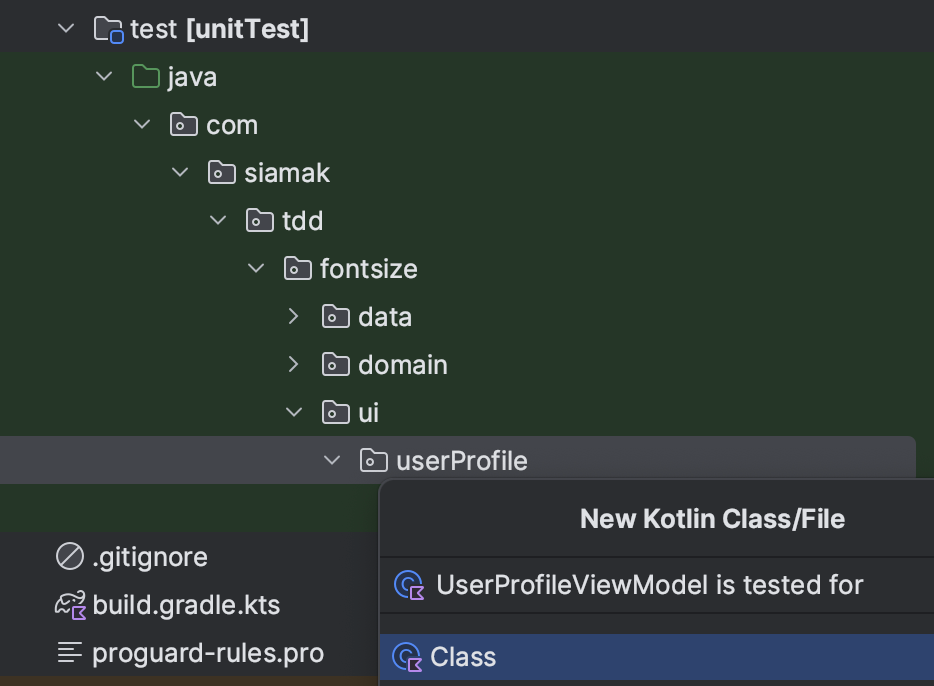 Use IDE To Create Files
Now, let's create empty tests. Try to be as broad as possible.
According to the diagram, we will not have much logic for this feature.
There are two main strategies for writing unit test functions:
- AAA
- Given/When/Then
@Test fun `strategy A`(){
    // Arrange
    // Act
    // Assert
}

@Test fun `strategy B`(){
    // Given
    // When
    // Then
}
Let's choose one and follow it for all your tests.
The concept is the same: cluster your test code to make is easy to read and maintain.
This is what I have for now:
class UserProfileViewModel is tested for` {
    // Unimplemented Class
    val viewModel = UserProfileViewModel()

    @Test
    fun Font Ratio is fetched from data source`(){}

    @Test
    fun `Scroll Speed update is called so fontSize calculations are triggered`() {}

    @Test
    fun `Font Ratio is updated with new emissions from data source`() {}
}
Let's run the tests!
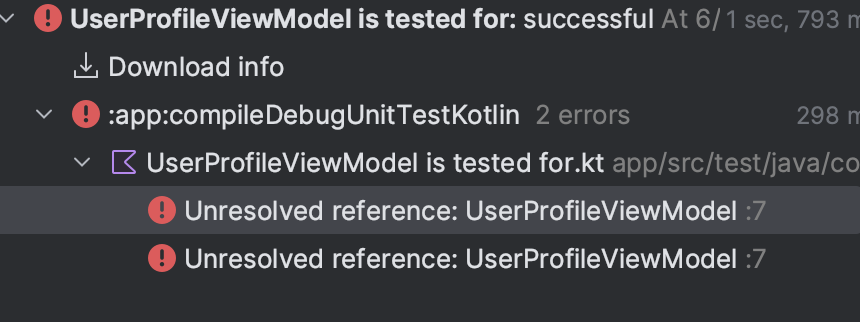 Failed Test Due To a Missing Test Target
It's failing. In fact, the build has failed- Not the test.
Congratulations! We just made it to the first step in TDD cycle:
 First step in TDD cycle
Since the ViewModel does not exist yet, we have red colors.
Now, let's create an instance of the ViewModel,
So, we use an IDE to create a missing class or unimplemented code.
To make this dialog popup, I move the pointer to the unimplemented part and hit Option + Return (on macOS).
Then, follow the provided options:
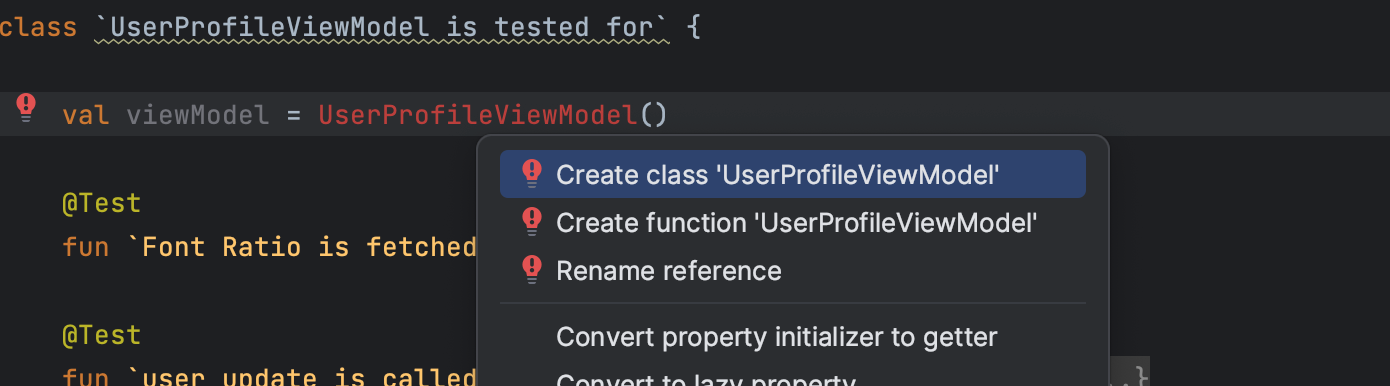 TDD Action: Create Target Files through UnitTest file
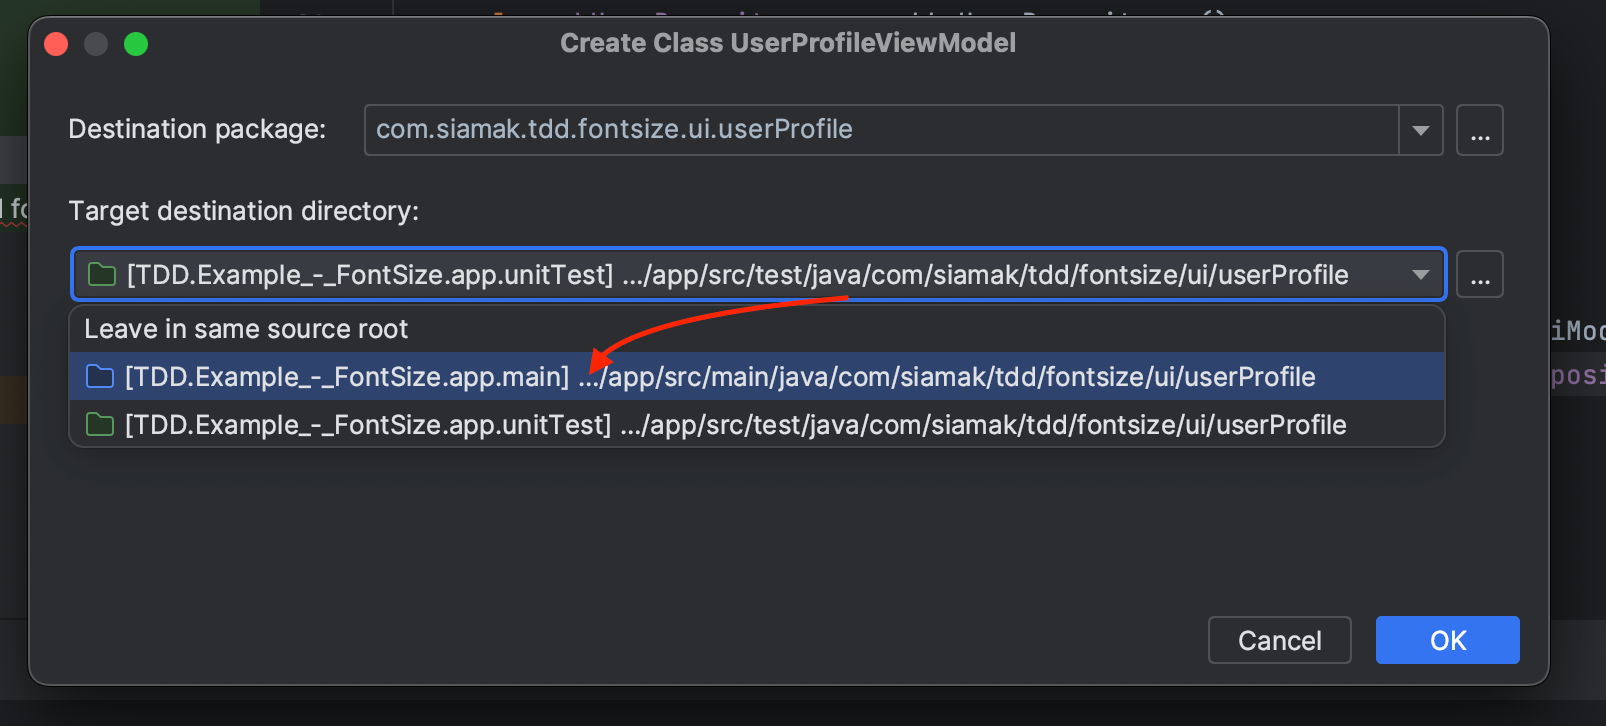 Choose The Correct Destination For The New File
And now let's re-run the tests (last step):
 Showing the test passing
Yes! It passed.
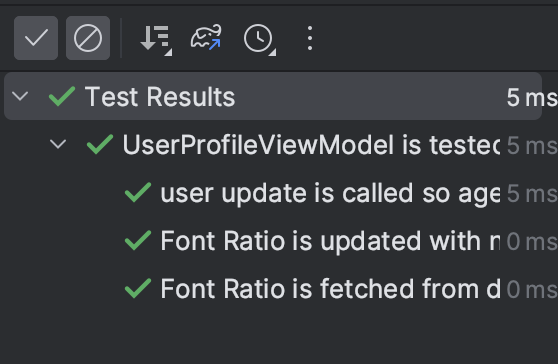
Note that these tests have an empty body and they test nothing! That's correct and alright.
We should even continue to create all the test classes (still with an empty test body) for every component in the DFD diagram - I shared these at the beginning of the article.
This further helps to have a more clear understanding of the feature before we implement it.
Eventually, we will have around 3-4 test classes containing general scenarios and Unit tests to cover.
It will look something like this:
 Minimal Empty Test Cases
Let's implement one of them as an example.
But, before that, we are going to need to work with UI and Domain data models of this feature.
So, in order to be able to move the data around, let's create the data classes you need in advance.
Back to our ProfileViewModel test class, we have an empty unit test function. Let's implement that one.
Note that the key here is to read the test carefully and avoid extra implementation neither assertions.
Only the requirement is allowed to be implemented.
In this case, we need a stream of data which is connected to a previously created data source(UserRepository).
Don't forget: We need a Failing Test first.
 Implement Inner Body
Notice the unimplemented parts inside the test function body (marked with red font).
Now, let's implement the code, then refactor it to make it just pass.
I'm using the MockK library for mocking classes and objects and Turbine to test Flow streams here.
If you are not familiar with them don't panic! Just check out their official webpage and try them out.
Let's create the dependency first and add it to the ViewModel using Named Arguments. Named Argument helps us when creating the parameter via IDE to introduce proper names through the test code.
 Create Missing Parameter Using IDE Dialogs
Do the same for the FontRatio variable inside the Repository.
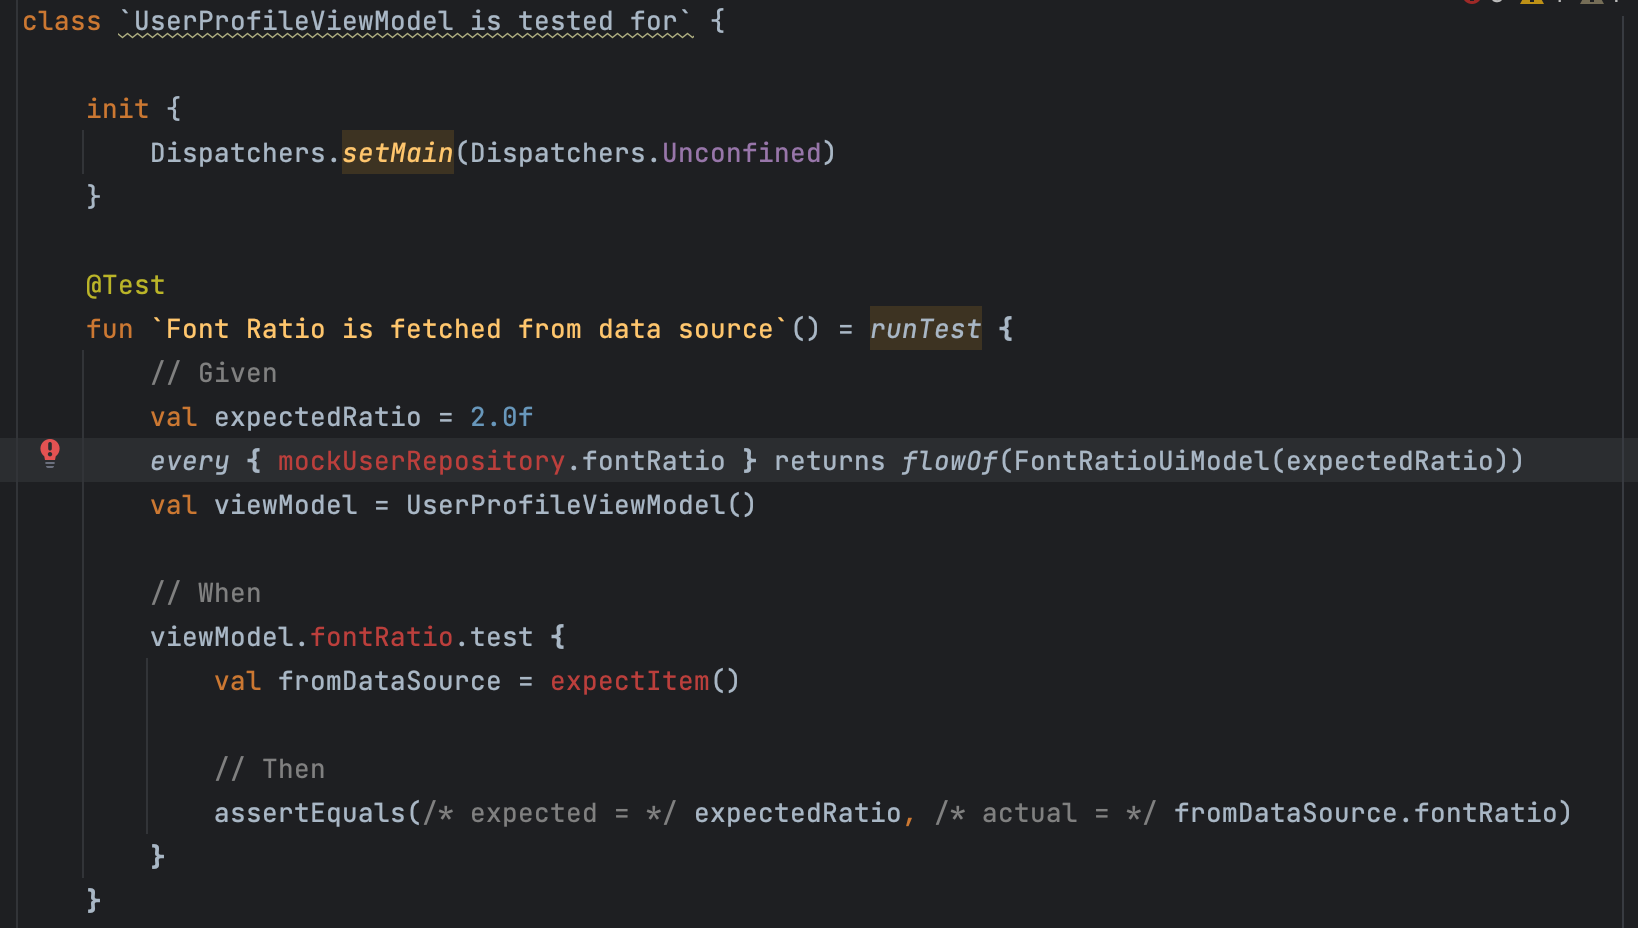
Eventually ,the final test code can be something like the code below:
class `UserProfileViewModel is tested for` {

    init {
        Dispatchers.setMain(Dispatchers.Unconfined)
    }

    val mockUserRepository = mockk<UserRepository>()

    @Test
    fun `Font Ratio is fetched from data source`() = runTest {
        // Given
        val expectedRatio = 2.0f
        every { mockUserRepository.fontRatio } returns flowOf(FontRatioUiModel(expectedRatio))
        val viewModel = UserProfileViewModel(userRepository = mockUserRepository)

        // When
        viewModel.fontRatio.test {
            val fromDataSource = expectItem()

            // Then
            assertEquals(/* expected = */ expectedRatio, /* actual = */ fromDataSource.fontRatio)
        }
    }
...
}
Note that we don't implement inner parts of the ViewModel or Repository here.
We just create the missing parts to remove error from the test body.
We will implement those details in a next iteration.
Run the test now.
Of course it will fail, because we did not implement FontRatio inside ProfileViewModel.
Now, refactor the ViewModel to make the test pass (minimal implementation).
In this case, just need to connect the state flow to the repository. We already added it as a dependency in the previous iteration.
Here is the final code:
class UserProfileViewModel(
    userRepository: UserRepository
) : ViewModel() {

    val fontRatio: StateFlow<FontRatioUiModel> = userRepository.fontRatio.stateIn(
        initialValue = FontRatioUiModel(DEFAULT_FONT_RATIO),
        scope = viewModelScope,
        started = SharingStarted.Lazily
    )

    companion object {
        private const val DEFAULT_FONT_RATIO = 1.0f
    }
}
Run the test again, And Boom! It passes!
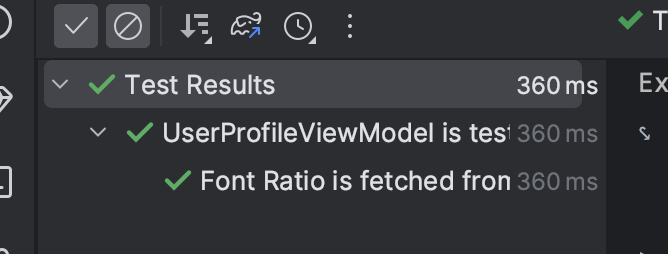 Passing Test After Minimal Implementation Of Main Code
With this Unit test, we implemented a primary part of the UserProfileViewModel component. But only the necessary parts. Do the same for the rest of the test cases.
Do not treat these test cases like you do with normal Unit tests (which run and pass quickly).
Spend some time on it to understand the technical and product requirements first. Then, rollout the plan and start implementing. After a few tries, it'll be easier to think the TDD way.
Source Code
The source code and the repository for this project is available on my GitHub page.
Feel free to check it out and complete next steps. I've separated iterations in different branches so you can compare it with your own implementation.
Conclusion
So, after diving into Test-Driven Development (TDD) and exploring its ins and outs, I've got to say, it's a game-changer!
Let me break it down for you:
Key Points:
- TDD is all about writing tests before writing the actual code. It might sound a bit weird at first, but trust me, it works wonders.
- The TDD process follows a simple cycle: write failing tests, implement the code to make those tests pass, and then refactor as needed to keep everything running smoothly.
- By emphasising automated tests, TDD helps us design and develop software that's solid, maintainable, and adaptable over time.
We started by creating test classes and writing empty test functions but it's your task now to finish it (Or you can jump to the shared repo right away :) ).
It might seem a bit odd to have tests that don't do anything, but it's all part of the plan.
Next, we laid out a clear plan of what our feature should do, based on a data flow chart. This helped us understand the requirements before diving into the implementation.
With the plan in hand, we began implementing the necessary components (ViewModel in this case), making sure our tests failed first. That's right, failing tests are actually a good thing in TDD!
Gradually, we connected pieces together, like setting up the UserAutoScrollSettingsUseCase class to handle font size calculation based on the auto-scroll speed (Check project repo).
We also tackled UI components, allowing users to input their desired scroll speed, and making sure the font size was adjusted accordingly (Check project repo).
Throughout the process, we made sure to keep our code clean and simple, focusing on what was needed to make the tests pass. No unnecessary complexity here!
By the end, we had our "Font Size Auto Setting" feature up and running, with tests that passed with flying colours.
Remember, TDD isn't about rushing through tests or coding like crazy. It's about being deliberate and thoughtful in your development process, which pays off big time in the long run.
So, if you're looking to level up your software development game, give TDD a shot! It's a powerful approach that will make your code more solid, reduce bugs, and make you a better developer overall.
What I've shared is, how we work in my team and it's working for us, but it's not the perfect solution for every team/company. You need to find out whether it's yours or not. Let me know if you think I can improve this solution.
Happy coding! 🚀