
By Nikita Kholin
Telegram is a great platform with lots of great users (I’m a Telegram user myself). And what would be the best way for Telegram users to receive notifications? We can’t know for sure. Maybe they like email or something else. But we can guess that sending notifications to Telegram would be pretty convenient.
If you would like to send Telegram notifications from your application, you’ve come to the right place. I’ve added this feature to my application and I love it.
One quick note. In this article I provide examples of code in Python. But the ideas are not Python-specific and can be translated into another language without any hastle.
So without further ado, let’s dive into how we can do it.
Create a Telegram bot
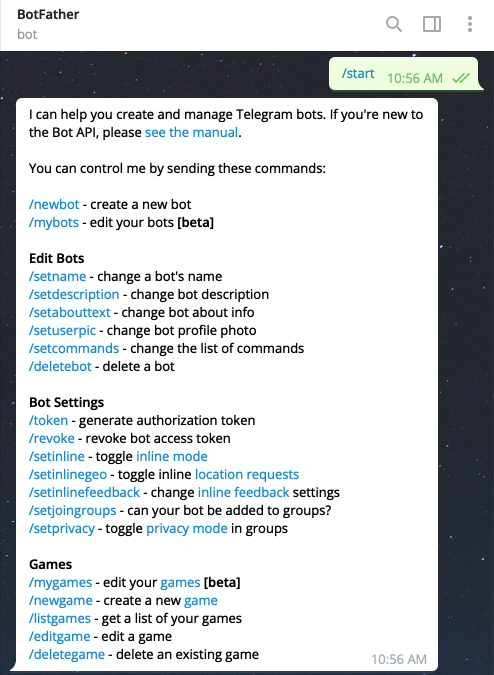
First of all, you need to create a Telegram bot. To do this you need to use another Telegram bot, BotFather. Just talk to him (press start).
Now you see what it can do. But what interests us is creating a new bot, so that’s what we’re going to choose (/newbot).
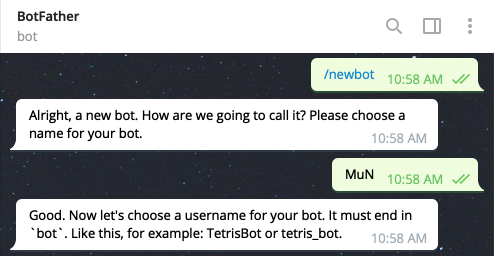
You’re quickly going to find out that bot’s name should end with “bot”. And since you’re like me and coming to the game too late, most bot names are already taken.
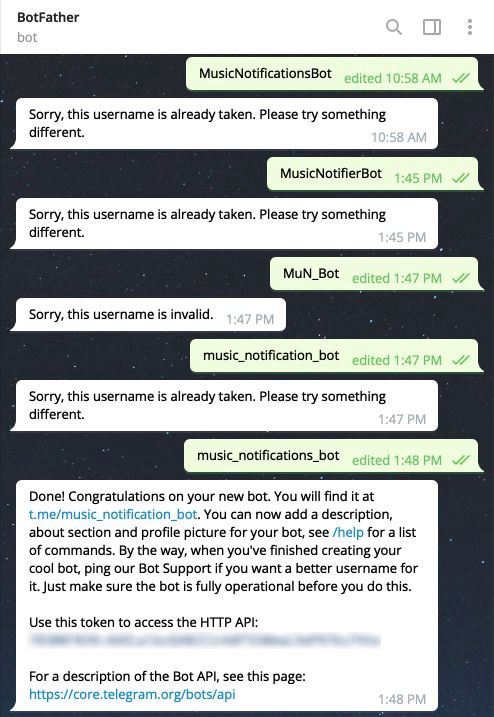
But eventually, you’re going to find a name for your bot and get an access token we’re going to need.
Now that you have a bot, Telegram users can find and use it. But there is one problem — you can’t associate users that come from Telegram to the users in your application. Let me show you why.
Once a user presses the “Start” button on your bot, you will receive an “update”. You can check all bot’s updates even in your browser by visiting the following URL https://api.telegram.org/bot{bot_token}/getUpdates (don’t forget to use your access token in the URL). Here’s what I got:
Can’t read anything? Don’t worry. You can fix it by installing some JSON prettifier extension in your browser. I use JSON Formatter for Chrome. It looks so much better.
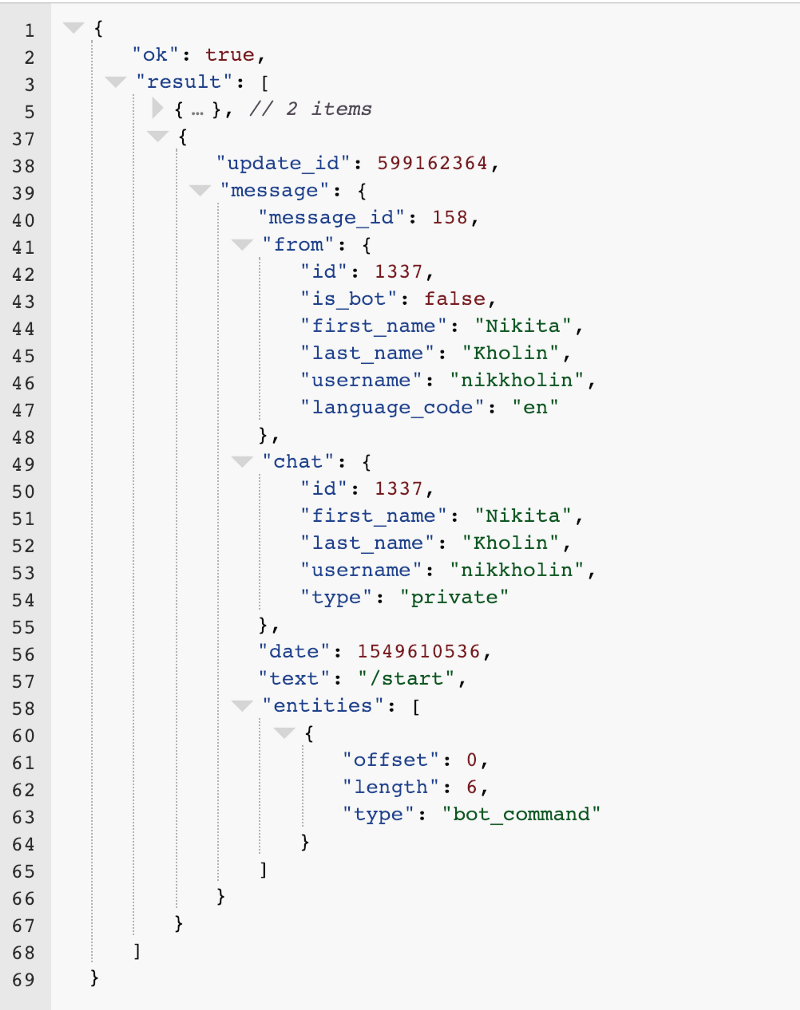
So as you can see we don’t get that much information about the person. From this information, we can get their full name. But it would be lucky if the user would provide their full name in your application, and doesn’t guarantee uniqueness of it. So we can’t use that to find a user in your applications.
Another piece of information we get is the username. That is more useful as it is unique between all Telegram users. But most likely you don’t have that available in your applications. So we would need to ask a user to enter their username somewhere in the application. It’s just too much work that I’m not sure anyone would do.
Another option to associate a user would be to ask them to provide the email that they used in your application to the bot. But this has too many flaws: the user can make a typo while entering the email, the user can enter the email of another user and exploit the system. This is just too bad.
Can we do better?
Associating a user
Of course we can. To associate the user, we’ll use a technique called deep linking.
First, you need to create a random unique token for each user. I’ve used the following code to generate the token using Python:
from secrets import token_urlsafetoken = token_urlsafe(8)token# => 'uEDbtJFHxKc'
Then you need to save that token to be able to find a user with it later. You can save it to your database or use some other place like a cache for example. I have a Notification model so I added a field to a model’s table.
class Notification(models.Model): user = models.ForeignKey(User, on_delete=models.CASCADE) # ... connect_token = models.CharField(max_length=64, null=True)
So we’ve generated uEDbtJFHxKc token and saved it. Now we need to use this token in a URL to the telegram bot which the user needs to click to make it all work:
telegram_url = 'https://www.telegram.me'bot_name = 'music_notification_bot'token = 'uEDbtJFHxKc'url = f'{telegram_url}/{bot_name}?start={token}'
Now that we have our URL, 'https://telegram.me/music_notification_bot?start=uEDbtJFHxKc', it’s time to show it to the user. Just display it in any place of your application and wait for the user to click on it.
Once the user takes the bait and clicks “Start” you should receive another update:
{ "ok": true, "result": [ // ... // previous updates // ... { "update_id": 599162365, "message": { "message_id": 174, "from": { ... }, "chat": { ... }, "date": 1549788357, "text": "/start uEDbtJFHxKc", "entities": [ ... ] } } ]}
We can finally identify our user. The text field now contains our user token. Let’s go ahead and take it out of this field:
bot_token = 'your_bot_token'updates_url = f'https://api.telegram.org/bot{bot_token}/getUpdates'import requestsresponse = requests.get(updates_url).json()text = response['result'][0]['message']['text']text# => '/start uEDbtJFHxKc'splitted_text = text.split(' ')# => ['/start', 'uEDbtJFHxKc']token = splitted_text[-1]# => 'uEDbtJFHxKc'
This token can be used to find the user. Your implementation depends on the way you saved the token in the first place. But here’s how I do it:
notification = Notification.objects.get(channel='telegram', connect_token=token)user = notification.user
So the user had pressed the “Start” button. But they see that nothing happened. Let’s welcome them at least.

To welcome the user we need to discover that the user had started a conversation with our bot. There are two options for how we can do that: polling and webhooks.
You already know what polling is. You’ve already done it. Or at least have seen me do it. Once we’ve checked out the https://api.telegram.org/bot{bot_token}/getUpdates page we did one poll. Polling is checking for updates constantly, every 2 seconds for example. This way we can always know when someone interacted with the bot.
Webhooks take a bit of a different direction. Instead of checking every 2 seconds for updates, we just wait for an update to happen. And when it happens Telegram will send a request with the update data to a URL that we specify. This way we can give both our and Telegram servers some rest and just wait for the update to come.
Polling can be better if you’ve got high traffic but, unfortunately, it’s rather an exception so I’ve decided to go with the webhook.
Webhooks

Setting a webhook in Telegram is very easy. You just need to send a request to https://api.telegram.org/bot{bot_token}/setWebhook?url={your_server_url}. Opening this link in your browser works too. your_server_url is the URL Telegram will send updates to. Here’s what you should get in the response:
{ "ok": true, "result": true, "description": "Webhook was set"}
If you don’t trust yourself you can visit https://api.telegram.org/bot{bot_token}/getWebhookInfo just to doublecheck that everything is OK. You should see something like this:
{ "ok": true, "result": { "url": "https://example.com/your_server_endpoint", "has_custom_certificate": false, "pending_update_count": 0, "max_connections": 40 }}
Now. If something is not OK (like you’ve set a wrong URL) you can always delete the webhook by visiting [https://api.telegram.org/bot{bot_token}/deleteWebhook](https://api.telegram.org/bot{bot_token}/deleteWebhook) and then setting the webhook again.
Local development
Before continuing I would like to say a few words about local development. Webhooks are not very suitable for it. Webhooks are sent to a URL and most likely you don’t know your computer’s URL. Also, a Telegram webhook requires the URL to be secure (HTTPS).
But there is a solution to this problem: ngrok. ngrok is a tool that exposes your local environment to the world. Download ngrok, install it and start it with the port your server is running on. My server is running on 8000 port so I would need to run in a console
/path/to/ngrok http 8000
Then ngrok should give you a URL that you can use to set a webhook up.
Welcoming a user

Now that you’re ready to develop, let’s welcome our user — they’re waiting for it.
Once the user clicks “Start”, your Telegram will send an update to your server’s URL. The interesting parts of the update should look like this:
{ "message": { "chat": { "id": 457 }, "text": "/start uEDbtJFHxKc", }}
This is a perfect time to associate the user using message text. There is also an interesting piece of information, chat ID. Chat ID is what we need to send a message to that user. Telegram has an API endpoint to send a message that looks like this https://api.telegram.org/bot{bot_token}/sendMessage?chat_id={chat_id}&text={text}. I’m not sure I need to explain how to use it but here’s what my code that processes the webhook looks like:
import jsonimport requestsdef callback(request): body = json.loads(request.body) text = body['message']['text'] token = text.split(' ')[-1] associate_user_by_token(token) bot_key = os.environ.get('TELEGRAM_API_KEY') chat_id = body['message']['chat']['id'] text = "Welcome!" send_message_url = f'https://api.telegram.org/bot{bot_key}/sendMessage?chat_id={chat_id}&text={text}' requests.post(send_message_url)
If we send a welcome message after the user clicked the famous “Start” button, the user won’t have any second thoughts whether everything is working or not.
Pushing notifications

Finally, we get to the point why we’re doing all of this — push notifications. You may want to notify the user about some information that happened in your application. For example, someone liked the user’s post or whatever. I use Telegram to notify about new music releases from the user’s favorite artists.
You already know how to send notifications. You just need to send a message using [https://api.telegram.org/bot{bot_token}/sendMessage?chat_id={chat_id}&text={notification_text}](https://api.telegram.org/bot{bot_token}/sendMessage?chat_id={chat_id}&text={notification_text}.).
Of course, if you’re planning to send notifications not only when the user interacts with the bot, you need to save chat_id in your database.
You might also want to include links or some other formatting in your message. In this case, you would need to add another parameter to the send message URL, parse_mode. There are 2 parsing options: Markdown or HTML. I use Markdown since I find it simpler to use. If you’re not familiar with Markdown you can use HMTL, but I would recommend reading how easy Markdown is.
Here’s how the send message URL looks with parse_mode parameter [https://api.telegram.org/bot{bot_token}/sendMessage?chat_id={chat_id}&text={notification_text}&parse_mode=markdown](https://api.telegram.org/bot{bot_token}/sendMessage?chat_id={chat_id}&text={notification_text}&parse_mode=markdown.).
I add links to new releases to the notifications text like so {release.date}: {release.artist.name} - [{release.title}]({release.url}). You can read more about how to format you messages here.
Also, there are more parameters available for the send message URL like disable_notification. There is always a place to explore.
Conclusion
Now you should know how to
- create a bot in Telegram using BotFather
- check for updates (and what is a better way — webhooks or polling)
- associate user using deep linking
- send a welcome message and continue sending notifications
- format messages you send
Hopefully, this article was useful to you. This is the fifth part of a series of articles about the MuN. Stay tuned for part 6. You can find the code of this project, as well as my other projects, on my GitHub page. Leave your comments down below and follow me if you liked this article.
Originally published at https://kholinlabs.com/telegram-push-notifications on February 12, 2019.