
Hi everyone! In this article we're going to talk about testing. I'll give you a good overview of what testing is and an introduction of how you can implement it on your JavaScript projects. We'll use four very popular tools – Jest, Testing library, Cypress and Supertest.
First we're going to talk about what testing is, why is it a good idea to test our code, and the different kinds of tests that can be implemented.
Then we're going to introduce each of the tools we will be using, and finally we'll give practical examples for vanilla JS code, a front-end React app, and a back-end Node app.
Andiamo via!
Table of Contents
What is Testing and Why is it Valuable
Testing is the practice of checking if a piece of software runs as expected. This is often recognized as QA or quality assurance, and aims to reduce to a bare minimum the amount of bugs that get to production.
We test software to identify errors, gaps or missing requirements and fix those things before shipping code to production.
Testing our code thoroughly improves our project's reliability, saves us later bug-fixing time and hence reduces costs, and improves the chance of our customer being fully satisfied with our product.
Here's a nice short video by Fireship introducing some of the concepts we'll talk about later.
Different Types of Tests
Testing practices can be classified in different types according to many factors. Personally I think there's a lot of mumbo jumbo about this topic, with hundreds of terms that often refer to very similar things. So let's keep it simple and review only the most popular terms and what they mean.
This will help clarify the many ways in which a software can be tested and better understand the tools we're going to present later on.
Manual vs Automated testing
Depending on the tools we use to test our software, we can classify testing into manual or automated testing.
Manual testing is the practice of "clicking around" and manually checking all the features our product has, simulating what an actual user would do.
Automated testing is done through code, writing programs that check how our application runs.
There're many testing frameworks and libraries we can use for this. When it comes to functional testing (we're going to see what that means in a sec), most libraries work in a similar way:
First we define what piece of code we want to test.
Then we provide that piece of code some sort of input or execute an action on it.
Then we define what that piece of code should do given the input/action we performed.
And finally we will compare what that piece of code actually did against what we said it should do.
If it did what we said it should, the test passed. If it didn't, it failed.
Functional vs Non-functional testing
Functional testing refers to the actual features of our product. For example, if we have a blog platform, functional testing should assure the users can create new articles, edit those articles, browse through articles written by other people, and so on.
Non-functional testing refers to anything that's not strictly related to the core features of our product. And that again can be classified into different categories, for example:
Stress testing checks how infrastructure responds to heavy usage.
Security testing checks if an application is vulnerable to common hacking attacks.
Accessibility testing checks if an application is coded in a way that is accessible for people with different disabilities.
Unit vs Integration testing vs End-to-end testing
Another way to classify testing is depending how broad or comprehensive it is.
Unit testing aims to test individual functions, methods or small chunks of code in an independent way. In unit testing, small pieces of code are checked in an isolated way.
Integration testing checks how individual pieces of code interact with each other and work together. In integration testing, we put pieces together and see if they interact correctly.
End-to-end testing, also known as E2E, executes programs in a simulated environment that emulates actual user behavior. Having a website as an example, our code would open in an actual browser and all the features would be executed in the same way a user would use them. E2E testing is a lot like manual testing in that sense, but fully automated.
E2E testing is the most broad or comprehensive type of these three, as it evaluates whole features and behaviors, not specific parts of our code.
White box vs Black box vs Grey box testing
The last classification we're going to see depends on how much our tests focus on implementation details or user experience.
Let's say we have a simple website with a button that, when it gets clicked, it opens a modal. In our code, the button has a click event listener that executes a function. That function changes the CSS class of our modal HTML element, and that gets the modal rendered in the screen.
We talk about "white box" testing when we test implementation details. Following the example, under this paradigm we could test that the button click executes the corresponding function, and that after the function execution, the CSS class of our modal element is changed accordingly.
Another way to do this is to forget about implementation all together and just check if the modal is rendered after the button click. We don't care what the CSS class is, or if the corresponding function is executed or not. We just focus on testing what the user should perceive. That's "black box" testing.
And, as you may have guessed, "grey box" testing is just a combination of the previous two.
One last thing to mention here is that these different types of tests aren't necessarily mutually exclusive. I mean, they can and often are implemented at the same time on the same projects.
It's very common to have both manual and automated testing, functional and non-functional testing, unit and E2E testing ... The idea will always be to try to anticipate and solve the greatest possible number of problems in reasonable time and effort.
When to Test
This may seem like a simple question at first, but there are actually different approaches to this, too.
Some people like to test their app once it's been fully developed. Others like to write tests at the same time they code the application, and test each feature as it's being developed.
Others like to write tests first before anything else, defining in this way the minimum requirements for the program to accomplish. And then they code the app in a way that passes those tests as fast as possible (this is called test driven development or TDD).
Once you have an app or a whole feature developed, and you have a test suite in place (a test suite is a group of tests that check a particular feature or an entire app), another common practice is to run your tests each time you make any kind of modification to the codebase, to verify nothing gets broken.
Lastly, if you have a CI/CD system in place, it's common to automate the execution of tests before any deployment. So that if any test fails, the deployment is stopped and some kind of alert is dispatched (which of course is always better than seeing your app catch fire on prod 🔥😱).
Same as with test types, it's common to test applications at different times. Each company normally has its own testing schedule or practice to follow, tailored to their needs.
Our Toolset
Ok, now that we have a clearer idea of what testing is and the types of tests we can perform, let's review the tools we're going to use in our examples.
As mentioned before, there are a lot of different libraries to choose to run our tests. I chose these four because they are some of the most popular when it comes to JavaScript apps, but know there are more options out there. I'll be naming alternatives for most of the tools we'll use in case you'd like to investigate more. 😉
What is Jest
Jest is a JavaScript test-runner. A test-runner is a piece of software that allows you to run tests to evaluate your app. It's an open-source project maintained by Meta (formerly Facebook), and was first open-sourced in 2014.
Side comment: Every time I say "test runner" I picture this. Am I the only one? 🤔

Test runner, not Blade runner!
Anyway...you can use Jest in projects that use Babel, TypeScript, Node.js, React, Angular, Vue.js, Svelte and other technologies too. You can install Jest through NPM just like any library and it requires very little configuration to start off.
Jest comes installed by default when setting up React apps with create-react-app.
Jest is often also called a testing framework, as it comes with many other built-in features besides just running tests (which is not the case with all test runners). Some of those features are:
Assertion library: Jest comes with a lot of built-in functions and methods you can use to assert your code (asserting basically means checking if a piece of code behaves like it's expected).
Snapshot testing: Jest allows you to use snapshots, which are a way of capturing a large object and storing it in memory so you can later on compare it with something else.
Code coverage: Jest allows you to get code coverage reports of your tests. These reports show what percentage of your code is currently being tested, and you can even see the exact lines of code that aren't currently being covered.
Mocking library: Jest also works like a mocking library in the sense that it allows you to mock data (like a function or a module) and use that in your tests.
Some well known alternatives to Jest are Mocha, Jasmine, and Karma.
Here's a nice little video explaining what Jest is.
What is Testing Library?
Testing library is not a test runner, but a set of utilities that will work together with a test runner like Jest or Mocha. This utilities are tools we can use to test our code easily and with a deeper focus on user experience (black box testing).
Testing library was developed by Kent C Dodds (who also happens to be one of the best JS teachers on earth, so I recommend that you follow him).
Quoting the official docs:
"The Testing Library family of libraries is a very light-weight solution for testing without all the implementation details.
The main utilities it provides involve querying for nodes similarly to how users would find them. In this way, testing-library helps ensure your tests give you confidence in your UI code."
In plain English, with the testing library we can test UI elements (like a paragraph, a button, a div...) instead of testing the code responsible for rendering the UI.
The principle behind the library is:
"The more your tests resemble the way your software is used, the more confidence they can give you."
... and that's exactly what we mean by "black box" testing. 😉
The testing library is actually a set of libraries, each created to achieve the same objective but adapted to work with different technologies such as React, Angular, Vue, Svelte, React Native and more... That's why you might hear "React-testing-library" or "Vue-testing-library". It's the same thing but adapted to work with different technologies.
React-testing-library comes installed by default when setting up React apps with create-react-app.
An alternative to testing library is Enzyme (a UI testing set of utilities developed by Airbnb).
What is Cypress?
Cypress is an open source test-runner that allows you to execute your projects in an automated browser, in the same way a user would.
With Cypress, we can program what the browser will do (like visit a URL, click a button, complete and submit a form...) and check that each action is matched with the corresponding response.
What's sweet about this is that the testing resembles A LOT to what the user will experience. And since the whole point of making software is the user, the closer we are to their perspective, the closer we should be to catching the most meaningful bugs in our code. (Plus it's really cool to see an automated browser go through your entire app in just a few seconds... 🤓)
Another nice feature of Cypress is "time travel". On Cypress's automated browser we can see all the test's we've written, and simply hover over them to see a graphical snapshot of its result. It's a very useful thing to better understand what's breaking and when.
Even though it can be used for unit and integration testing, Cypress is mostly used for end-to-end testing as it can easily evaluate complete features in a matter of seconds.
You can use Cypress to test anything that runs in a browser, so you can easily implement it on React, Angular, Vue, and so on.
Unlike Jest and React-Testing-Library, Cypress doesn't come pre-installed with create-react-app. But we can easily install it with NPM or your package manager of choice.
Some alternatives to Cypress are Selenium and Puppeteer.
Here's a sweet video by Fireship explaining what Cypress is and how it works.
Side comment: ...and every time I talk about Cypress this plays in my mind. 😎
What is Supertest?
Supertest is a library that simulates HTTP requests. It's super handy to test back-end Node apps together with Jest (as we will see in the coming examples).
Tools roundup
As a quick round-up about this topic:
Jest is the library that we'll use to write and run tests for JavaScript.
Testing library works together with Jest, and provides us with functions and methods to test the UI directly, forgetting about the code behind it.
Cypress runs your app in a simulated browser and checks if actions performed in the UI respond as expected.
Supertest is a library that mocks HTTP requests and it can be used together with Jest to test back-end apps.
Now let's begin with the fun part ...

Let the testing begin!!
How to Test Vanilla JS Code
Ok, let's start by testing some simple vanilla JS code. The idea here is to see how we can implement Jest in our project and learn the basics of how it works.
Let's start by creating a new directory in our machine and creating a Node app with npm init -y. Then install Jest by running npm i -D jest (-D saves it as a development dependency).
Now you should see something like this in your package.json file: "devDependencies": { "jest": "^27.5.1" } .
And speaking about it, in your package.json, replace your test script with "test": "jest". This will allow us to later run our tests by running npm test. ;)
Your entire package.json file should look something like this:
{
  "name": "vanillatesting",
  "version": "1.0.0",
  "description": "",
  "main": "index.js",
  "scripts": {
    "test": "jest"
  },
  "keywords": [],
  "author": "",
  "license": "ISC",
  "devDependencies": {
    "jest": "^27.5.1"
  }
}
Cool, we're all set to write some JS we can actually test! Create an index.js file and put this code in it:
// index.js
function isPalindrome(string) {
    // O(n)
    // Put a pointer at each extreme of the word and iterate "inwards"
    // At each iteration, check if the pointers represent equal values
    // If this condition isn't accomplished, the word isn't a palindrome
    let left = 0
    let right = string.length-1

    while (left < right) {
        if (string[left] === string[right]) {
            left += 1
            right -= 1
        }
        else return false
    }

    return true
}
This function is a palindrome checker. It receives a string as parameter, and returns true if the string is a palindrome and false if it's not. (This is a classic technical interview question btw, but that's stuff for another article.🤫)
See that we're exporting the function too. Side comment: If you'd like to know more about this and how JS modules work, I recently wrote an article about it.
Great, so now let's test this function and see if it works as expected. Let's create a file called index.test.js.
This file is where we'll write our tests. The suffix we're using (.test.js) is important here, as Jest will automatically identify the .test files and execute them when we order Jest to test our project.
Jest also identifies files with the .spec suffix, like index.spec.js (for "specification", which refers to the requirements of your project). Personally I prefer .test as it feels more explicit to me, but both work the same.
Now let's write our first tests! Put this within your index.test.js file.
// index.test.js
isPalindrome = require('./index.js')

test('neuquen is palindrom', () => {
    expect(isPalindrome("neuquen")).toBe(true)
})

test('bariloche is not palindrom', () => {
    expect(isPalindrome("bariloche")).toBe(false)
})
Let's recap what we're actually doing:
Require the function we want to test:
isPalindrome = require('./index.js')The
test()function is provided by Jest and within it we will put the code we want Jest to execute.test()takes two parameters. The first is a test description, which is a distinctive name that will show on our console when the test is run. We'll see an example in a sec.The second parameter is a callback, which contains the actual testing code.
Within this callback we're calling the
expect()function (also provided by Jest).expect()takes our function as parameter, which itself is receiving a parameter we made up.Last, we chain the
.toBe()function (provided by Jest too) and as parameter we pass it the value we expectisPalindrome()to return for each case. ("neuquen" is a palindrome so our function should returntrue, and "bariloche" is not, so it should returnfalse.)
One of the things I like the most about Jest is how easy it is to set it up. Another thing I like a lot is how self explanatory its syntax is. Notice that we can easily understand what our tests will evaluate by just reading them.👌
Now let's try this! If we run npm test in our console, we should get the following:
// console
> jest PASS
./index.test.js
✓ neuquen is palindrom (1 ms)
✓ bariloche is not palindrom

Test Suites: 1 passed, 1
total Tests:       2 passed, 2
total Snapshots:   0
total Time:        0.244 s
Ran all test suites.
Congratulations, you just passed your first Jest test ever.


To see how a failing test looks too, let's change our function by editing the return lines.
// index.js
function isPalindrome(string) {
    // O(n)
    // Put a pointr at each extreme of the word and iterate "inwards"
    // At each iteration, check if the pointers represent equal values
    // If this condition isn't accomplished, the word isn't a palindrome
    let left = 0
    let right = string.length-1

    while (left < right) {
        if (string[left] === string[right]) {
            left += 1
            right -= 1
        }
        else return 1
    }

    return 2
}
Now you should get something like this:
// console
> vanillatesting@1.0.0 test
> jest

 FAIL  ./index.test.js
  ✕ neuquen is palindrom (4 ms)
  ✕ bariloche is not palindrom

  ● neuquen is palindrom

    expect(received).toBe(expected) // Object.is equality

    Expected: true
    Received: 2

      3 | // describe('isPalindrome function', () => {
      4 |   test('neuquen is palindrom', () => {
    > 5 |     expect(isPalindrome("neuquen")).toBe(true)
        |                                     ^
      6 |   })
      7 |
      8 |   test('bariloche is not palindrom', () => {

      at Object.<anonymous> (index.test.js:5:37)

  ● bariloche is not palindrom

    expect(received).toBe(expected) // Object.is equality

    Expected: false
    Received: 1

       7 |
       8 |   test('bariloche is not palindrom', () => {
    >  9 |     expect(isPalindrome("bariloche")).toBe(false)
         |                                       ^
      10 |   })
      11 | // })
      12 |

      at Object.<anonymous> (index.test.js:9:39)

Test Suites: 1 failed, 1 total
Tests:       2 failed, 2 total
Snapshots:   0 total
Time:        0.28 s, estimated 1 s
Ran all test suites.
See that you get a nice description of what tests failed and at which point they failed. In our case they failed when we asserted (checked) the return values.
This is very useful and we should always pay attention to these descriptions, as some times our tests may fail because they're not written correctly. And we don't normally write tests for our tests, yet... 😅 So when you see a failing test, first check that it's working as expected and then go review your actual code.
Now let's add and test another function to show some more Jest features:
// index.js
function twoSum(nums, target) {
    // O(n)
    // Iterate the array once
    // At each iteration, calculate the value needed to get to the target, which is target - currentValue
    // If the neededValue exists in the array, return [currentValue, neededValue], else continue iteration
    for (let i = 0; i < nums.length; i++) {
        const neededNum = target - nums[i]
        if (nums.indexOf(neededNum) !== -1 && nums.indexOf(neededNum) !== i) return [nums[i], nums[nums.indexOf(neededNum)]]
    }
    return false
}

module.exports = { isPalindrome, twoSum }
This is another classic interview question. The function takes two parameters, an array of numbers and a target value number. What it does is to identify if there are two numbers in the array that add up to the second parameter value. If the two values exist in the array, it returns them in an array, and if they don't, it returns false.
Now let's write some tests for this:
({ isPalindrome, twoSum } = require('./index.js'))

...

test('[2,7,11,15] and 9 returns [2, 7]', () => {
    expect(twoSum([2,7,11,15], 9)).toEqual([2,7])
})

test('[3,2,4] and 6 returns [2, 4]', () => {
    expect(twoSum([3,2,4], 6)).toEqual([2,4])
})

test('[3,2,4] and 10 returns false', () => {
    expect(twoSum([3,2,4], 10)).toBe(false)
})
See that the structure is almost the same, except we're using a different matcher in two of the tests, toEqual().
Matchers are the functions Jests provides us with to evaluate values. There are many types of matchers that can be used for many different occasions.
For example, .toBe() is used to evaluate primitives like strings, numbers, or booleans. toEqual() is used to evaluate objects (which covers pretty much everything else in Javascript).
If you need to compare the return value with a number you could use .toBeGreaterThan() or toBeGreaterThanOrEqual() and so on...
To see a full list of the available matchers, check the docs.
If we run our tests now, we will get the following:
> vanillatesting@1.0.0 test
> jest

 PASS  ./index.test.js
  ✓ neuquen is palindrom (2 ms)
  ✓ bariloche is not palindrom
  ✓ [2,7,11,15] and 9 returns [2, 7] (1 ms)
  ✓ [3,2,4] and 6 returns [2, 4]
  ✓ [3,2,4] and 10 returns false (1 ms)

Test Suites: 1 passed, 1 total
Tests:       5 passed, 5 total
Snapshots:   0 total
Time:        0.256 s, estimated 1 s
Ran all test suites.
That's cool, but our tests results look a bit messy. And as our tests suite grows, it will probably be harder to identify each separate result.
To help us with this, Jest provides us with a describe() function, which we can use to group tests together and show results in a more schematic way. We can use it like this:
({ isPalindrome, twoSum } = require('./index.js'))

describe('isPalindrome function', () => {
  test('neuquen is palindrom', () => {
    expect(isPalindrome("neuquen")).toBe(true)
  })

  test('bariloche is not palindrom', () => {
    expect(isPalindrome("bariloche")).toBe(false)
  })
})

describe('twoSum function', () => {
  test('[2,7,11,15] and 9 returns [2, 7]', () => {
    expect(twoSum([2,7,11,15], 9)).toEqual([2,7])
  })

  test('[3,2,4] and 6 returns [2, 4]', () => {
    expect(twoSum([3,2,4], 6)).toEqual([2,4])
  })

  test('[3,2,4] and 10 returns false', () => {
    expect(twoSum([3,2,4], 10)).toBe(false)
  })
})
The first parameter is the description we want to show for the given group of tests, and the second is a callback that contains our tests. Now if we run npm test again, we get this 😎:
// console
> vanillatesting@1.0.0 test
> jest

 PASS  ./index.test.js
  isPalindrome function
    ✓ neuquen is palindrom (2 ms)
    ✓ bariloche is not palindrom
  twoSum function
    ✓ [2,7,11,15] and 9 returns [2, 7] (1 ms)
    ✓ [3,2,4] and 6 returns [2, 4]
    ✓ [3,2,4] and 10 returns false

Test Suites: 1 passed, 1 total
Tests:       5 passed, 5 total
Snapshots:   0 total
Time:        0.216 s, estimated 1 s
Ran all test suites.
How to Test a Front-end React App with Jest and React Testing Library
Now that we know the basics of Jest, let's hop on to see how we can combine it with Testing library to test a React app.
For this we're going to use a dead simple example. Just a page with random text, a button that toggles another piece of text, a text input, and a button that toggles the rendering of the input.
Take into account we'll be using create-react-app to create this app (which has Jest and Testing library installed by default). If you're not using create-react-app, you might need to install both libraries and add some extra config.
We're not going to see any React code here, we're just going to focus on the tests.
The folder structure of our project is the following:
> src
    > components
        - About.jsx
    - App.jsx
    - Index.js
    - setupTests.js
The setupTests.js file is important here. It's created by default with create-react-app with this content:
// jest-dom adds custom jest matchers for asserting on DOM nodes.
// allows you to do things like:
// expect(element).toHaveTextContent(/react/i)
// learn more: https://github.com/testing-library/jest-dom
import '@testing-library/jest-dom';
It globally imports the jest-dom library provided by Testing library, which gives us additional Jest matchers we can use to test the DOM (like toHaveTextContent(), toBeInTheDocument(), etc).
We're going to see examples in a bit, but know that some of the functions and matchers we'll use come from here.
Regarding our tests files, the common practice is to have a different test file for each component we're testing.
Regarding where to place them, two common practices are to have them all together in a single folder, like __tests__ or similar, or to have each test file in the same folder as the component it's testing.
I prefer the later as I'll often be hopping from the component code to the test code, and it's nice to have them nearby. But trully it doesn't matter. As long as we use the .test or .spec suffixes, Jest will identify and run the files anyway.
Having created our tests files, our folder structure should look like this:
> src
    > components
        - About.jsx
        - About.test.jsx
    - App.jsx
    - Index.js
    - setupTests.js
Cool! Let's start by testing our About component.
First lets test that it's rendering correctly, like this:
// About.test.jsx
import { render, screen } from '@testing-library/react'
import About from './About'

describe('About', () => {

  test('About renders correctly', () => {
    render( <About/> )
    expect(screen.getByText("I'm the about page!")).toBeInTheDocument()
  })

})
- See that we start by importing two things from Testing library:
import { render, screen } from '@testing-library/react'.
The render function takes a React component as a parameter and it will render it so we can test it.
screen is an object that comes with lots of queries we can use to test the UI directly, skipping implementation details and focusing on what the user will actually see.
Then we import our
Aboutcomponent:import About from './About'We use the
describeandtestJest functions previously mentioned.We render the
Aboutcomponent:render( <About/> )We use the
expectJest function, and as a parameter we use thescreenobject provided by Testing library. We use itsgetByTextquery, which scans the React component for the text we pass as parameter.To end, we use the Testing library's
.toBeInTheDocument()matcher, which just checks if the previous query result is being rendered.
Then we can test that the "Switch state" toggle button works correctly, like this:
// About.test.jsx
import { render, screen } from '@testing-library/react'
import userEvent from '@testing-library/user-event'
import About from './About'

describe('About', () => {

  ...

  test('Switch state works correctly', async () => {
    render( <About/> )

    expect(screen.getByText("It's on!")).toBeInTheDocument()
    userEvent.click(screen.getByText('Switch state'))
    expect(screen.getByText("It's rolling!")).toBeInTheDocument()
    userEvent.click(screen.getByText('Switch state'))
    expect(screen.getByText("It's on!")).toBeInTheDocument()
  })

})
See that we import an additional utility called userEvent. This is an object that contains many methods we can use to simulate user fired events, like clicks, hovers, writting in an input, and so on.
We first check that the default string is rendered:
expect(screen.getByText("It's on!")).toBeInTheDocument()Then we simulate a click and check that the string changes in the screen:
userEvent.click(screen.getByText('Switch state'))
expect(screen.getByText("It's rolling!")).toBeInTheDocument()
- And last we simulate another click and check that the string reverses back to default:
userEvent.click(screen.getByText('Switch state'))
expect(screen.getByText("It's on!")).toBeInTheDocument()
To finish, we're going to write another test to verify that the text input and its toggle work correctly.
import { render, screen } from '@testing-library/react'
import userEvent from '@testing-library/user-event'
import About from './About'

describe('About', () => {

  ...

  test('Input works correctly', async () => {
    render( <About/> )

    userEvent.type(screen.getByTestId("testInput"), "Testing the test")
    userEvent.click(screen.getByText("Print input"))

    expect(screen.getByText("Testing the test")).toBeInTheDocument()

    userEvent.click(screen.getByText("Print input"))
    expect(screen.queryByText("Testing the test")).not.toBeInTheDocument()
  })


})
Again we use the
userEventto simulate text being writen into our input element:userEvent.type(screen.getByTestId("testInput"), "Testing the test")Then we simulate a click on the toggle button, and check for the input text to be in the document:
userEvent.click(screen.getByText("Print input"))
expect(screen.getByText("Testing the test")).toBeInTheDocument()
- And we close by simulating another click and checking that the test is no longer present:
userEvent.click(screen.getByText("Print input"))
expect(screen.getByText("Testing the test")).toBeInTheDocument()
You can see how nice the utilities provided by Testing libraries are, and how easy it is to combine them with Jest. 🤓
We can run this specific test file by running npm test -- About.test.jsx and this is the result we get:
// console
PASS  src/components/About.test.jsx
  About
    ✓ About renders correctly (34 ms)
    ✓ Switch state works correctly (66 ms)
    ✓ Input works correctly (67 ms)

Test Suites: 1 passed, 1 total
Tests:       3 passed, 3 total
Snapshots:   0 total
Time:        0.997 s, estimated 1 s
Ran all test suites matching /About.test.jsx/i.
The last Jest feature I'd like to show you is test coverage. You can obtain a coverage report by running npm test -- --coverage.
This will run your tests normally and at the end of the results report you should see something like this:
// console
...

----------------|---------|----------|---------|---------|-------------------
File            | % Stmts | % Branch | % Funcs | % Lines | Uncovered Line #s
----------------|---------|----------|---------|---------|-------------------
All files       |      75 |      100 |   85.71 |      70 |
 src            |       0 |      100 |       0 |       0 |
  App.jsx       |       0 |      100 |       0 |       0 | 7
  App.t.js      |       0 |        0 |       0 |       0 |
  index.js      |       0 |      100 |     100 |       0 | 5-6
 src/components |     100 |      100 |     100 |     100 |
  About.jsx     |     100 |      100 |     100 |     100 |
----------------|---------|----------|---------|---------|-------------------
In the report we can see that our About.jsx component is completely covered, but our App.jsx and index.js files are not being tested.
This feature is very handy when working on big projects and you want to quickly know if most of your code is being tested correctly.
How to Test a Front-end React App with Cypress
We've talked a lot about Jest, so now let's take a look at how we can test our app using Cypress.
We'll start off by installing Cypress by running npm i -D cypress.
This should add this to our package.json:
"devDependencies": {
    "cypress": "^9.5.4"
}
Then we'll run npx cypress open. This will open the Cypress browser, and create a cypress directory within our project. Within this directory you'll find examples, documentation, and config options.
You'llo also find an "integration" folder, in which we have to put our tests. So let's create our About.test.js file in that folder and replicate the same test examples we've seen with Jest:
// About.test.js
describe('AboutPage', () => {
    it('Renders correctly', () => {
        cy.visit('http://localhost:3000/about')
        cy.contains("I'm the about page!")
    })

    it('switch btn toggles text', () => {
        cy.contains("It's on!")
        cy.get('.switchBtn').click()
        cy.contains("It's rolling!")
        cy.get('.switchBtn').click()
        cy.contains("It's on!")
    })

    it('Input works correctly', () => {
        cy.get(".testInput").type("Testing the test")
        cy.get('.printInputBtn').click()
        cy.contains("Testing the test")

        cy.get('.printInputBtn').click()
        cy.contains("Testing the test").should('not.exist')
    })
})
The
describefunction works the same as in jest.it()is the same as thetest()function we've previously seen.In the first test we tell the browser to visit our app's URL and check that the corresponding text is rendered:
cy.visit('http://localhost:3000/about')
cy.contains("I'm the about page!")
- Then we check that the default toggle text is rendered, simulate a click and check that it changes accordingly:
cy.contains("It's on!")
cy.get('.switchBtn').click()
cy.contains("It's rolling!")
cy.get('.switchBtn').click()
cy.contains("It's on!")
- And to end we simulate a text input, simulate a click, and check that the input text is rendered:
cy.get(".testInput").type("Testing the test")
cy.get('.printInputBtn').click()
cy.contains("Testing the test")

cy.get('.printInputBtn').click()
cy.contains("Testing the test").should('not.exist')
The syntaxt is slightly different than Jest, but the idea and structure are pretty much the same.🤙
Now if we run npx cypress open again, a window should open with this content:
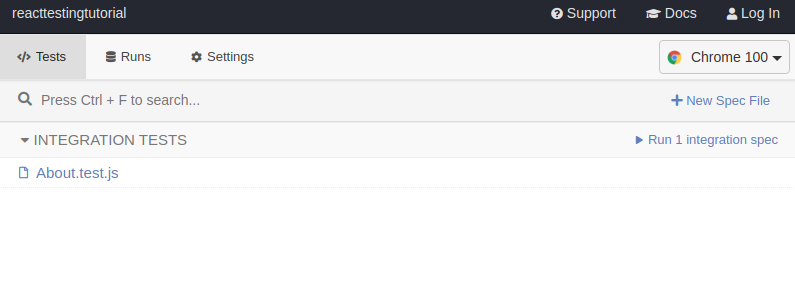
We can click on "Run integration spec" and our test will run automatically in the mock browser. After the tests have run, on the left panel we'll see the results:
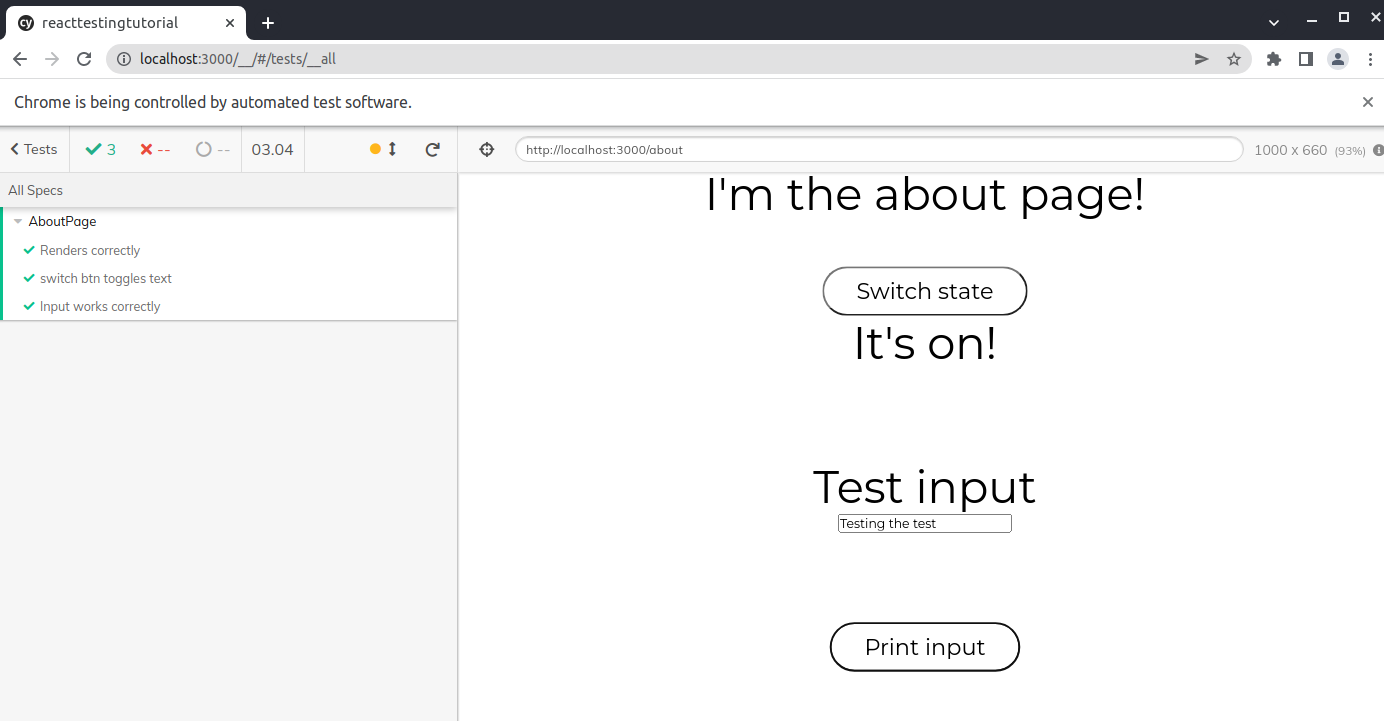
We can open those results to see each step the test executed. If we hover over each step, we'll see it executed in the browser in real time. A real sweet feature of Cypress.👌👌

As you can see, it's very easy to set up tests with Cypress. And if you're already familiar with Jest, you can quickly pick it up as the syntax is not that different.
If you're wondering if it makes sense to use both Jest and Cypress as test runners in the same project, I think this stack-overflow answer sums it up quite nicely.
How to Test a Back-end Node App
Now that we have a basic understanding of the ways we can tests a front-end app, let's cross the river and see how we can use similar tools to test a back end app.
For this we'll use a simple Node and Express API with just 3 endpoints.
Create a directory and run npm init -y to create a Node app. Run npm i express to install Express, and then run npm i -D jest supertest to install both Jest and Supertest as development dependencies.
Inside your package.json, add "scripts": { "test": "jest" }. Your entire package.json should look like this:
{
  "dependencies": {
    "express": "^4.17.3"
  },
  "devDependencies": {
    "jest": "^27.5.1",
    "supertest": "^6.2.2"
  },
    "scripts": {
    "test": "jest"
  }
}
Then create an app.js file and put this code in it:
// app.js
/* Import and initialize express */
const express = require('express')
const app = express()
const server = require('http').Server(app)
/* Global middlewares */
app.use(express.json())

/* Endpoint 1 */
app.get('/', async (req, res) => {

    try {
        res.status(200).json({ greeting: "Hello there!" })
    } catch (err) {
        res.status(500).send(err)
    }
})

/* Endpoint 2 */
app.get('/isPalindrome', async (req, res) => {

    try {
        const string = req.body.string
        let result = true
        let left = 0
        let right = string.length-1

        while (left < right && result) {
            if (string[left] === string[right]) {
                left += 1
                right -= 1
            }
            else result = false
        }

        res.status(200).json({ result: result })

    } catch (err) {
        res.status(500).send(err)
    }
})

/* Endpoint 3 */
app.get('/twoSum', async (req, res) => {

    try {
        const nums = JSON.parse(req.body.nums)
        const target = JSON.parse(req.body.target)

        let result = false

        for (let i = 0; i < nums.length; i++) {
            const neededNum = target - nums[i]
            if (nums.indexOf(neededNum) !== -1 && nums.indexOf(neededNum) !== i) result = [nums[i], nums[nums.indexOf(neededNum)]]
        }

        res.status(200).json({ result: result })

    } catch (err) {
        res.status(500).send(err)
    }
})

/* Export server object */
module.exports = server

/* Initialize server */
server.listen(3001, () => console.log('Server is listening.') )
server.on('error', error => console.error(error) )
As you can see, endpoint 1 just returns a greeting message. Endpoint 2 and 3 are adaptations of the functions we've seen in our vanilla JS examples. They now receive the parameters within the request and the return values go in the response. 😉
Now the testing! Create an app.test.js file and put this code within it:
// app.test.js
const supertest = require('supertest') // Import supertest
const server = require("./app") // Import the server object
const requestWithSupertest = supertest(server) // We will use this function to mock HTTP requests

afterEach(done => { // afterEach function is provided by Jest and executes once all tests are finished
    server.close() // We close the server connection once all tests have finished
    done()
})

test('GET "/" returns greeting', async () => {
    const res = await requestWithSupertest.get('/')
    expect(res.status).toEqual(200)
    expect(res.type).toEqual(expect.stringContaining('json'))
    expect(res.body).toEqual({ greeting: "Hello there!" })
})

describe("/isPalindrome", () => {
    test('GET "/isPalindrome" neuquen returns true', async () => {
        const res = await requestWithSupertest.get('/isPalindrome').set('Content-type', 'application/json').send({ "string":"neuquen" })
        expect(res.status).toEqual(200)
        expect(res.type).toEqual(expect.stringContaining('json'))
        expect(res.body).toEqual({ result: true })
    })

    test('GET "/isPalindrome" bariloche returns true', async () => {
        const res = await requestWithSupertest.get('/isPalindrome').set('Content-type', 'application/json').send({ "string":"bariloche" })
        expect(res.status).toEqual(200)
        expect(res.type).toEqual(expect.stringContaining('json'))
        expect(res.body).toEqual({ result: false })
    })
})

describe("/twoSum", () => {
    test('GET "/twoSum" [2,7,11,15] and 9 returns [7, 2]', async () => {
        const res = await requestWithSupertest.get('/twoSum').set('Content-type', 'application/json').send({ "nums":"[2,7,11,15]", "target": "9" })
        expect(res.status).toEqual(200)
        expect(res.type).toEqual(expect.stringContaining('json'))
        expect(res.body).toEqual({ result: [7, 2] })
    })

    test('GET "/twoSum" [3,2,4] and 6 returns [4, 2]', async () => {
        const res = await requestWithSupertest.get('/twoSum').set('Content-type', 'application/json').send({ "nums":"[3,2,4]", "target": "6" })
        expect(res.status).toEqual(200)
        expect(res.type).toEqual(expect.stringContaining('json'))
        expect(res.body).toEqual({ result: [4, 2] })
    })

    test('GET "/twoSum" [3,2,4] and 10 returns false', async () => {
        const res = await requestWithSupertest.get('/twoSum').set('Content-type', 'application/json').send({ "nums":"[3,2,4]", "target": "10" })
        expect(res.status).toEqual(200)
        expect(res.type).toEqual(expect.stringContaining('json'))
        expect(res.body).toEqual({ result: false })
    })
})
Let's analyze what we're doing:
We mock the request with
requestWithSupertest.get('/')Then we "break" the
resobject in pieces and assert each part of it:Check the response status:
expect(res.status).toEqual(200)Check the response format:
expect(res.type).toEqual(expect.stringContaining('json'))Check the response body content:
expect(res.body).toEqual({ greeting: "Hello there!" })
The other tests are really similar, except we're sending data in the mock requests bodies, like this:
const res = await requestWithSupertest.get('/isPalindrome').set('Content-type', 'application/json').send({ "string":"bariloche" })
As you can see, testing in this way is really simple once you're familiar with Jest. We just need a little help by Supertest to mock the HTTP request and the rest is just asserting the response. 👏👏
We can run our tests with npm test and we should get the following response:
// console
 PASS  ./app.test.js
  ✓ GET "/" returns greeting (46 ms)
  /isPalindrome
    ✓ GET "/isPalindrome" neuquen returns true (18 ms)
    ✓ GET "/isPalindrome" bariloche returns true (3 ms)
  /twoSum
    ✓ GET "/twoSum" [2,7,11,15] and 9 returns [7, 2] (4 ms)
    ✓ GET "/twoSum" [3,2,4] and 6 returns [4, 2] (3 ms)
    ✓ GET "/twoSum" [3,2,4] and 10 returns false (2 ms)

Test Suites: 1 passed, 1 total
Tests:       6 passed, 6 total
Snapshots:   0 total
Time:        0.552 s, estimated 1 s
Ran all test suites.
Wrap up
And that's it! We've covered the basics of four very popular tools that will allow you to test both the front-end and back-end of your JS apps.
Of course there's much more to all the tools we've seen and many features we haven't covered. But the idea was to give you an introduction so you can take your first steps in the testing world.
As always, I hope you enjoyed the article and learned something new. If you want, you can also follow me on linkedin or twitter.
Cheers and see you in the next one! =D