
Understanding test-driven development is an essential part of being a prolific software developer. Testing provides a solid platform for building reliable programs.
This tutorial will show you all you need to implement test-driven development in your JavaScript and React applications.
Table of Contents
- What Is Test-Driven Development?
- JavaScript Example of a Test-Driven Development Workflow
- How to Use Jest as a Test Implementation Tool
- Important Stuff to Know about Using ES6 Modules with Jest
- What Are the Advantages of Test-Driven Development?
- What is a Unit Test in Test-Driven Development?
- What is an Integration Test in Test-Driven Development?
- What is an End-to-End Test in Test-Driven Development?
- What are Test Doubles in Test-Driven Development?
- Quick Overview of Test-Driven Development So Far
- How to Test React Components
- Test Runner vs. React Component Testing Tool: What's the Difference?
- Project: How React Testing Works
- Overview
So, without any further ado, let's get started by discussing what test-driven development means.
What Is Test-Driven Development?
Test-driven development (TDD) is a coding practice where you write the result you want your program to produce before creating the program.
In other words, TDD requires you to pre-specify the output your intended program must produce to pass the test of functioning the way you envisioned.
So, in an effective test-driven development practice, you would first write tests that express the result you expect from your intended program.
Afterward, you would develop the program to pass the prewritten test.
For instance, suppose you wish to create an addition calculator. In such a case, the TDD approach will be like so:
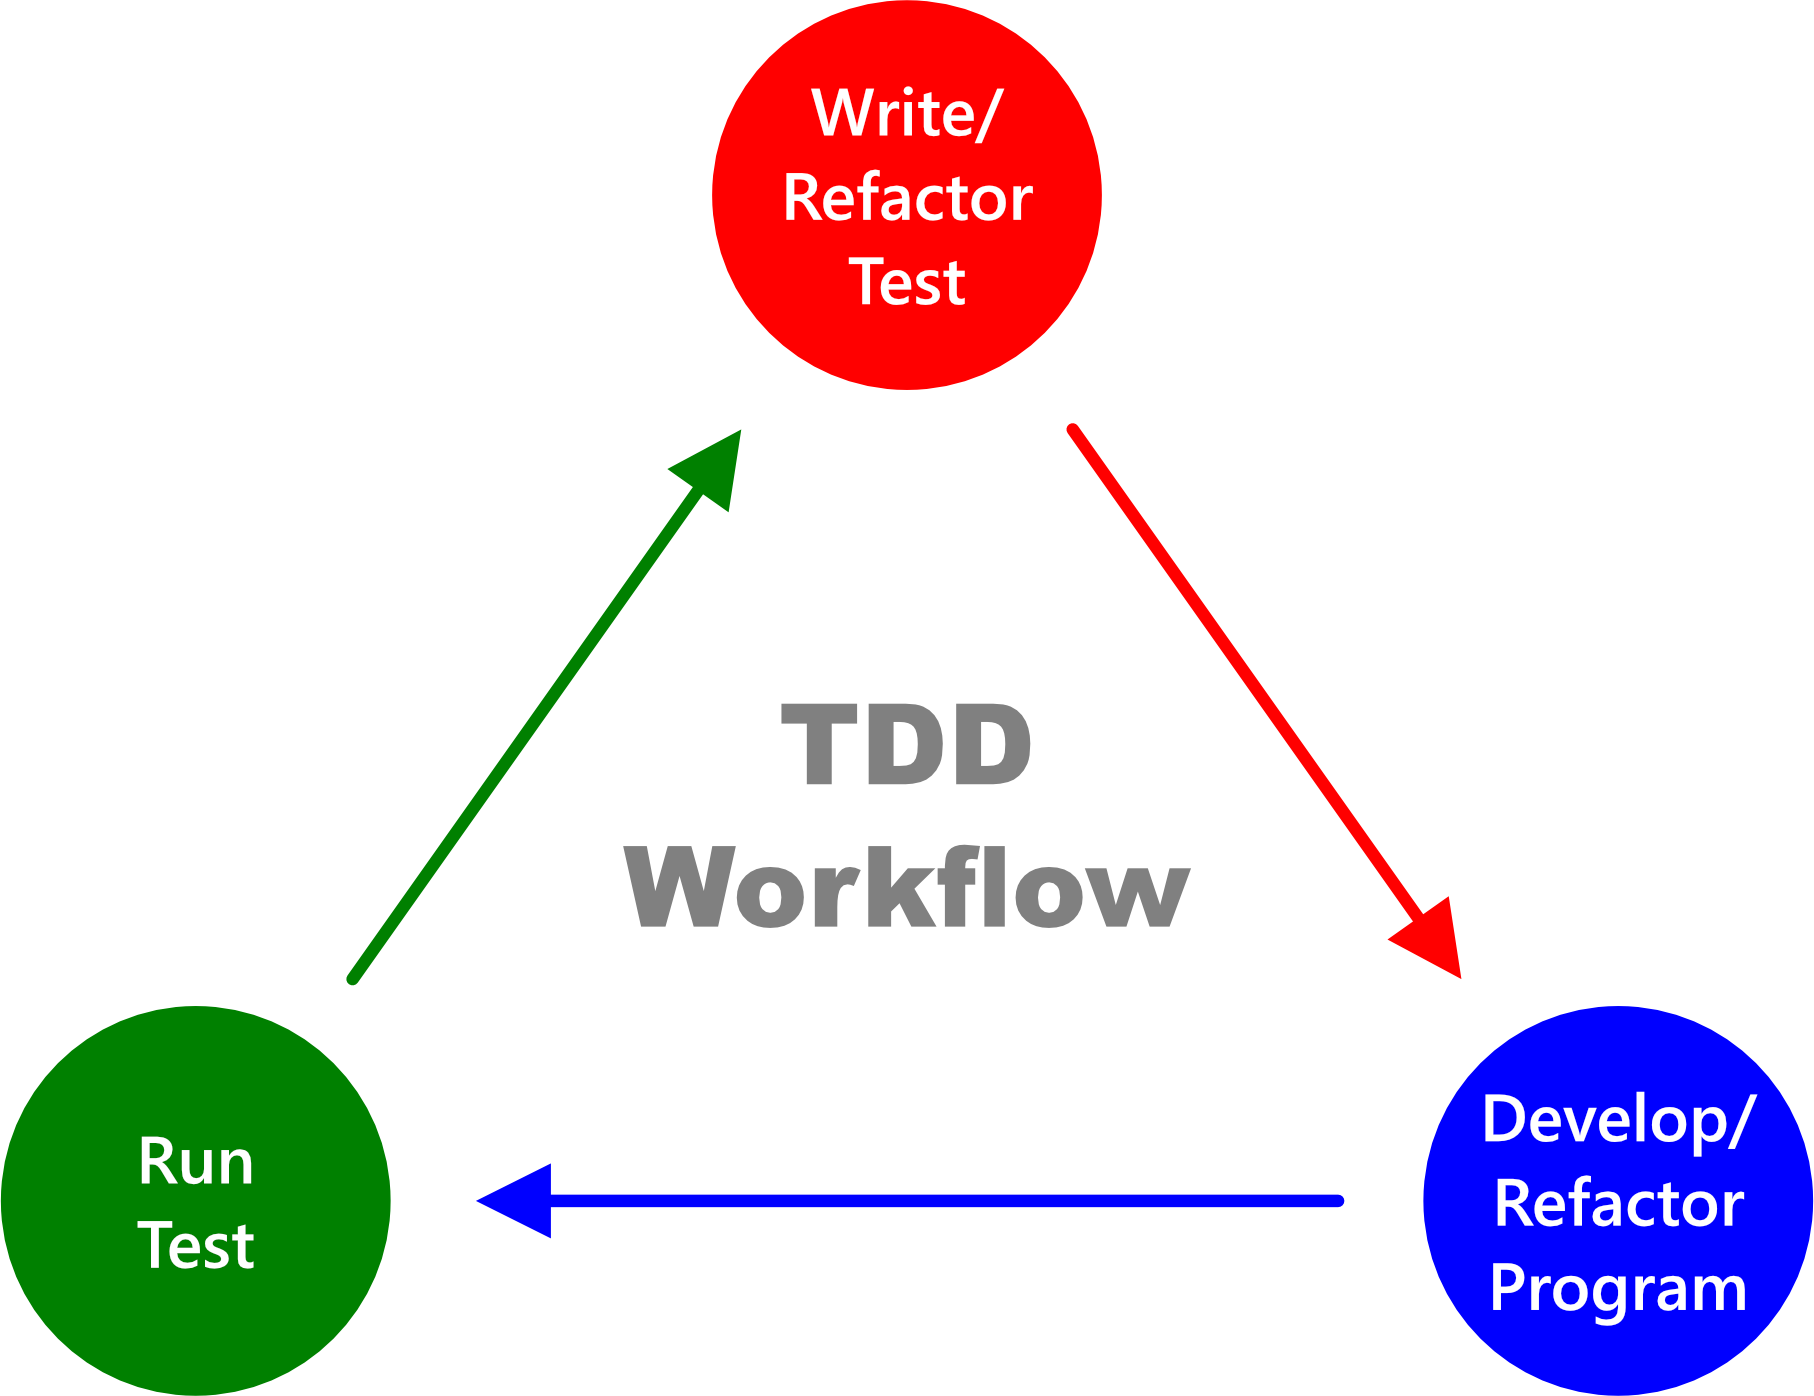 Test-driven development workflow diagram
- Write a test specifying the result you expect the calculator to produce to pass the test of being the program you had in mind.
- Develop the calculator to pass the prewritten test.
- Run the test to check whether the calculator passes or fails the test.
- Refactor your test code (if necessary).
- Refactor your program (if necessary).
- Continue the cycle until the calculator matches your vision.
Let's now see a JavaScript example of a TDD workflow.
JavaScript Example of a Test-Driven Development Workflow
The steps below will use a simple JavaScript program to show you how to approach TDD.
1. Write your test
Write a test that specifies the result you expect your calculator program to produce:
function additionCalculatorTester() {
  if (additionCalculator(4, 6) === 10) {
    console.log("✔ Test Passed");
  } else {
    console.error("❌ Test Failed");
  }
}
2. Develop your program
Develop the calculator program to pass the prewritten test:
function additionCalculator(a, b) {
  return a + b;
}
3. Run the test
Run the test to check whether the calculator passes or fails the test:
additionCalculatorTester();
4. Refactor the test
After you've confirmed that your program passed the prewritten test, it's time to check if there's any need to refactor it.
For instance, you could refactor additionCalculatorTester() to use a conditional operator like so:
function additionCalculatorTester() {
  additionCalculator(4, 6) === 10
    ? console.log("✔ Test Passed")
    : console.error("❌ Test Failed");
}
5. Refactor the program
Let's also refactor the program's code to use an arrow function.
const additionCalculator = (a, b) => a + b;
6. Run the test
Rerun the test to ensure your program still works as intended.
additionCalculatorTester();
Notice that in the examples above, we implemented TDD without using any libraries.
But you can also use powerful test-running tools like Jasmine, Mocha, Tape, and Jest, to make your test implementation faster, simpler, and more fun.
Let's see how to use Jest, for example.
How to Use Jest as a Test Implementation Tool
Here are the steps you'll need to follow to get started using Jest as your test implementation tool:
Step 1: Get the right Node and NPM version
Make sure you have Node 10.16 (or greater) and NPM 5.6 (or greater) installed on your system.
You can get both by installing the latest LTS from the Node.js website.
If you prefer to use Yarn, ensure you have Yarn 0.25 (or greater).
Step 2: Create a project directory
Create a new folder for your project.
mkdir addition-calculator-jest-project
Step 3: Navigate to your project folder
Using the command line, navigate to your project directory.
cd path/to/addition-calculator-jest-project
Step 4: Create a package.json file
Initialize a package.json file for your project.
npm init -y
Or, if your package manager is Yarn, run:
yarn init -y
Step 5: Install Jest
Install Jest as a development dependency package like so:
npm install jest --save-dev
Alternatively, if your package manager is Yarn, run:
yarn add jest --dev
Step 6: Make Jest your project's test runner tool
Open your package.json file and add Jest to the test field.
{
  "scripts": {
    "test": "jest"
  }
}
Step 7: Create your project file
Create a file that you will use to develop your program.
touch additionCalculator.js
Step 8: Create your test file
Create a file that you will use to write your test cases.
touch additionCalculator.test.js
Note: Your test file's name must end with .test.js—so that Jest can recognize it as the file containing your test code.
Step 9: Write your test case
Open your test file and write some test code that specifies the result you expect your program to produce.
Here's an example:
// additionCalculator.test.js

const additionCalculator = require("./additionCalculator");

test("addition of 4 and 6 to equal 10", () => {
  expect(additionCalculator(4, 6)).toBe(10);
});
Here's what we did in the snippet above:
- We imported the
additionCalculator.jsproject file into theadditionCalculator.test.jstest file. - We wrote a test case specifying that we expect the
additionCalculator()program to output10whenever users provide4and6as its argument.
Note:
test()is one of Jest's global methods. It accepts three arguments:- The name of the test (
"addition of 4 and 6 to equal 10"). - A function containing the expectations you wish to test.
- An optional timeout argument.
- The name of the test (
expect()is a Jest method that lets you test the output of your code.toBe()is a Jest matcher function that enables you to compareexpect()'s argument to primitive values.
Suppose you run the test code now. The test would fail because you've not developed the program for which you created the test. So, let's do that now.
Step 10: Develop your program
Open your project file and develop a program to pass the prewritten test.
Here's an example:
// additionCalculator.js

function additionCalculator(a, b) {
  return a + b;
}

module.exports = additionCalculator;
The snippet above created an additionCalculator() program and exported it with the module.exports statement.
Step 11: Run the test
Run the prewritten test to check if your program passed or failed.
npm run test
Alternatively, you can use Yarn like so:
yarn test
Suppose your project contains multiple test files, and you wish to run a specific one. In such a case, specify the test file as follow:
npm run test additionCalculator.test.js
Alternatively, you can use Yarn like this:
yarn test additionCalculator.test.js
Once you've initiated the test, Jest will print a pass or fail message on your editor's console. The message will look similar to this:
$ jest
 PASS  ./additionCalculator.test.js
  √ addition of 4 and 6 to equal 10 (2 ms)

Test Suites: 1 passed, 1 total
Tests:       1 passed, 1 total
Snapshots:   0 total
Time:        2.002 s
Ran all test suites.
Done in 7.80s.
If you prefer Jest to run your test automatically, add the --watchAll option to your package.json's test field.
Here's an example:
{
  "scripts": {
    "test": "jest --watchAll"
  }
}
After adding --watchAll, re-execute the npm run test (or yarn test) command to make Jest automatically begin rerunning your test whenever you save changes.
Note: You can quit the watch mode by pressing the Q key on your keyboard.
Step 12: Refactor the test code
So, now that you've confirmed that your program is working as intended, it's time to check if there's any need to refactor the test code.
For instance, suppose you realized that the additionalCalculator should allow users to add any number of digits. In that case, you can refactor your test code like so:
// additionCalculator.test.js

const additionCalculator = require("./additionCalculator");

describe("additionCalculator's test cases", () => {
  test("addition of 4 and 6 to equal 10", () => {
    expect(additionCalculator(4, 6)).toBe(10);
  });

  test("addition of 100, 50, 20, 45 and 30 to equal 245", () => {
    expect(additionCalculator(100, 50, 20, 45, 30)).toBe(245);
  });

  test("addition of 7 to equal 7", () => {
    expect(additionCalculator(7)).toBe(7);
  });

  test("addition of no argument provided to equal 0", () => {
    expect(additionCalculator()).toBe(0);
  });
});
Note that the describe() method we used in the snippet above is optional code—it helps organize related test cases into groups.
describe() accepts two arguments:
- A name you wish to call the test case group—for instance,
"additionCalculator's test cases". - A function containing your test cases.
Step 13: Refactor the program
So, now that you've refactored your test code, let's do the same for the additionalCalculator program.
// additionCalculator.js

function additionCalculator(...numbers) {
  return numbers.reduce((sum, item) => sum + item, 0);
}

module.exports = additionCalculator;
Here's what we did in the snippet above:
- The
...numberscode used JavaScript's rest operator (...) to put the function's arguments into an array. - The
numbers.reduce((sum, item) => sum + item, 0)code used JavaScript's reduce() method to sum up all the items in thenumbersarray.
Step 14: Rerun the test
Once you've finished refactoring your code, rerun the test to confirm that your program still works as expected.
And that's it!
Congratulations! You've successfully used Jest to develop an addition calculator program using a test-driven development approach! 🎉
Important Stuff to Know about Using ES6 Modules with Jest
Jest does not currently recognize ES6 modules.
However, suppose you prefer to use ES6's import/export statements. In that case, do the following:
1. Install Babel as a development dependency
npm install @babel/preset-env --save-dev
Or, you can use Yarn:
yarn add @babel/preset-env --dev
2. Create a .babelrc file in your project's root
touch .babelrc
3. Open the .babelrc file and replicate the code below
{ "presets": ["@babel/preset-env"] }
The configuration above will now allow you to change step 9's require() statement from this:
const additionCalculator = require("./additionCalculator");
...to this:
import additionCalculator from "./additionCalculator";
Likewise, you can now also substitute step 10's export statement from this:
module.exports = additionCalculator;
...to this:
export default additionCalculator;
Note: Jest also specified similar instructions in their using Babel documentation.
4. Rerun the test
You can now rerun the test to confirm that your program still works!
So, now that we know what test-driven development is, we can discuss its advantages.
What Are the Advantages of Test-Driven Development?
Below are two main advantages of adopting test-driven development (TDD) in your programming workflow.
1. Understand your program's purpose
Test-driven development helps you understand the purposes of your program.
In other words, since you write your test before the actual program, TDD makes you think about what you want your program to do.
Then, after you've documented the program's purposes using one or more tests, you can confidently proceed to create the program.
Therefore, TDD is a helpful way to jot down the specific results you expect your intended program to produce.
2. Confidence booster
TDD is a benchmark for knowing that your program is working as expected. It gives you the confidence that your program is working correctly.
Therefore, irrespective of any future development on your codebase, TDD provides an effective way to test if your program is still working appropriately.
Let's now discuss some popular TDD terms: "unit test," "integration test," "E2E," and "test doubles."
What is a Unit Test in Test-Driven Development?
A unit test is a test you write to assess the functionality of an independent piece of a program. In other words, a unit test checks if a fully isolated unit of program is working as intended.
The test we wrote for step 10's additionalCalculator program is an excellent unit test example.
Step 10's additionalCalculator()'s test is a unit test because the program is an independent function that does not depend on any external code.
Note that a unit test's primary purpose is not to check for bugs. Instead, a unit test's core purpose is to check whether an independent piece of program (called unit) behaves as intended under various test cases.
What is an Integration Test in Test-Driven Development?
An integration test assesses the functionality of a dependent piece of program. In other words, an integration test checks if a program—which depends on other code—is working as intended.
The test we wrote for step 13's additionalCalculator program is an excellent example of an integration test.
Step 13's additionalCalculator()'s test is an integration test because the program is a dependent function that depends on JavaScript's reduce() method.
In other words, we used the prewritten test case to assess the integration of additionalCalculator() and reduce().
Therefore, suppose JavaScript makes reduce() an obsolete method. In such a case, additionalCalculator will fail its test because of the reduce() method.
What is an End-to-End Test in Test-Driven Development?
An End-to-End (E2E) test assesses the functionality of a user interface. In other words, E2E checks if your user interface is working as intended.
Watch Max's YouTube video for a good illustration of an End-to-End test.
What are Test Doubles in Test-Driven Development?
Test doubles are the imitation objects used to mimic real dependencies like databases, libraries, networks, and APIs.
A test double allows you to bypass the natural objects on which your program depends. They let you test your code independently of any dependencies.
For instance, suppose you need to verify if an error detected in your app originates from an external API or your code.
But suppose the API's service is available only in production—not in the development environment. In that case, you've got two options:
- Wait until your app goes live—which could take months.
- Clone the API so you can continue your test irrespective of the dependency's availability.
Test doubles provide a helpful way to clone your program's dependencies so that your testing activities won't encounter any disruptions.
Typical examples of test doubles are dummy objects, mocks, fakes, and stubs. Let's discuss them below.
What is a dummy in test-driven development?
A dummy is a test double used to mimic the value of a specific dependency.
For instance, suppose your app depends on a third-party method that requires you to provide some arguments. In such a case, a dummy allows you to pass in pretend values to the parameters of that method.
What is a mock in test-driven development?
Mock is a test double used to mimic an external dependency without considering the responses the dependency may return.
For instance, suppose your app depends on a third-party API (for example, Facebook)—which you cannot access in the development mode. Mock allows you to bypass the API so that you can focus on testing your code regardless of the Facebook API's availability.
What is a stub in test-driven development?
A stub is a test double used to mimic an external dependency while returning hand-coded values. You can use the returned value to assess your program's behavior with various test case responses from the dependency.
For instance, suppose your app depends on a third-party API (for example, Facebook)—which you cannot access in the development mode. Stub allows you to bypass the API while mimicking the exact values Facebook will return.
Therefore, stub helps you assess your program's behavior with various response scenarios.
What is a fake in test-driven development?
Fake is a test double used to create a working test implementation of an external dependency with dynamic values.
For instance, you can use fake to create a local database that allows you to test how a real database will work with your program.
Quick Overview of Test-Driven Development So Far
We've learned that test-driven development helps you jot down your program's behavior before creating the program.
We also saw a simple JavaScript test and used Jest as a test implementation tool.
Let's now see how to test React components.
How to Test React Components
The two main tools you need to test your React components are:
- A test runner tool
- A React component testing tool
But what exactly is the difference between a test runner and a React component testing tool? Let's find out.
Test Runner vs. React Component Testing Tool: What's the Difference?
Below are the differences between a test runner and a React component testing tool.
What is a test runner?
A test runner is a tool developers use to run a test script and print the test's results on the command line (CLI).
For instance, suppose you wish to run the test cases in your project's App.test.js test script. In such a case, you will use a test runner.
The test runner will execute App.test.js and print the test's results on the command line.
Typical examples of test runners are Jasmine, Mocha, Tape, and Jest.
What is a React component testing tool?
A React component testing tool provides helpful APIs for defining a component's test cases.
For instance, suppose you need to test your project's <App /> component. In such a case, you will use a React component testing tool to define the component's test cases.
In other words, a React component testing tool provides the APIs for writing your component's test cases.
Typical examples are Enzyme and the React Testing Library.
So, now that we know what a test runner and React component testing tool are, let's use a mini-project to understand how React testing works.
Project: How React Testing Works
In the following steps, we will use Jest and the React Testing Library (by Kent C. Dodds) to learn how React testing works.
Note: The React official docs recommend the Jest and React Testing Library combination for testing React components.
Step 1: Get the right Node and NPM version
Make sure that you have Node 10.16 (or greater) and NPM 5.6 (or greater) installed on your system.
If you prefer to use Yarn, ensure you have Yarn 0.25 (or greater).
Step 2: Create a new React app
Use NPM's create-react-app package to create a new React app called react-testing-project.
npx create-react-app react-testing-project
Alternatively, you can use Yarn to configure your project like so:
yarn create react-app react-testing-project
Step 3: Go inside the project directory
After the installation process, navigate into the project directory like so:
cd react-testing-project
Step 4: Set up your test environment
Install the following test packages:
- jest
- @testing-library/react
- @testing-library/jest-dom
- @testing-library/user-event
Note: If you've initialized your React project with create-react-app (step 2), you do not need to install any of the above packages. They come preinstalled and preconfigured in your package.json file.
Now, let's discuss the purpose of each of the above test packages.
What is Jest?
jest is the test runner tool we will use to run this project's test scripts and print the test results on the command line.
What is @testing-library/react?
@testing-library/react is the React Testing Library which gives you the APIs you need to write test cases for your React components.
What is @testing-library/jest-dom?
@testing-library/jest-dom provides some set of custom Jest matchers for testing the DOM's state.
Note: Jest already comes with lots of matchers, so using jest-dom is optional. jest-dom simply extends Jest by providing matchers that make your test more declarative, clear to read, and easy to maintain.
What is @testing-library/user-event?
@testing-library/user-event provides the userEvent API for simulating users' interaction with your app on a web page.
Note: @testing-library/user-event is a better alternative to the fireEvent API.
Step 5: Clean up the src folder
Delete all files inside the project directory's src folder.
Step 6: Create your code files
Create the following files inside your project's src folder.
index.jsApp.jsApp.test.js
Step 7: Render the App component
Open your index.js file and render the App component to the DOM like so:
// index.js

import React from "react";
import { createRoot } from "react-dom/client";
import App from "./App";

// Render the App component into the root DOM
createRoot(document.getElementById("root")).render(<App />);
Step 8: Write your test case
Suppose you want your App.js file to render a <h1>CodeSweetly Test</h1> element to the web page. In that case, open your test script and write some test code specifying the result you expect your <App /> component to produce.
Here's an example:
// App.test.js

import React from "react";
import { render, screen } from "@testing-library/react";
import "@testing-library/jest-dom";
import App from "./App";

test("codesweetly test heading", () => {
  render(<App />);
  expect(screen.getByRole("heading")).toHaveTextContent(/codesweetly test/i);
});
Here are the main things we did in the test snippet above:
- We imported the packages needed to write our test case.
We wrote a test case specifying that we expect our
<App />component to render a heading element with a"codesweetly test"text.test()is one of Jest's global methods. We use it to run a test case. The method accepts three arguments:- The name of the test (
"codesweetly test heading") - A function containing the expectations you wish to test
- An optional timeout argument
- The name of the test (
render()is one of the React Testing Library APIs. We use it to render the component we wish to test.expect()is a Jest method that lets you test the output of your code.screenis a React Testing Library's object containing numerous methods for finding elements on a page.getByRole()is one of the React Testing Library's query methods for finding elements on a page.toHaveTextContent()is one ofjest-dom's custom matchers that you can use to confirm the presence of a text content in a specific node./codesweetly test/iis a regular expression syntax that we used to specify a case-insensitive search forcodesweetly test.
Keep in mind that there are three alternative ways to write the above expect statement:
// 1. Using jest-dom's toHaveTextContent() method:
expect(screen.getByRole("heading")).toHaveTextContent(/codesweetly test/i);

// 2. Using the heading's textContent property and Jest's toMatch() method:
expect(screen.getByRole("heading").textContent).toMatch(/codesweetly test/i);

// 3. Using React Testing Library's name option and jest-dom's toBeInTheDocument() method
expect(screen.getByRole("heading", { name: /codesweetly test/i })).toBeInTheDocument();
Tip:
Add a level option to the getByRole() method to specify your heading's level.
Here's an example:
test("codesweetly test heading", () => {
  render(<App />);
  expect(screen.getByRole("heading", { level: 1 })).toHaveTextContent(/codesweetly test/i);
});
The level: 1 option specifies an <h1> heading element.
Suppose you run the test code now. The test will fail because you've not developed the component for which you created the test. So, let's do that now.
Step 9: Develop your React component
Open your App.js file and develop the component to pass the prewritten test.
Here's an example:
// App.js

import React from "react";

const App = () => <h1>CodeSweetly Test</h1>;

export default App;
The App component, in the snippet above, renders a <h1> element containing the "CodeSweetly Test" text.
Step 10: Run the test
Run the prewritten test to check if your program passed or failed.
npm test App.test.js
Alternatively, you can use Yarn like so:
yarn test App.test.js
Once you've initiated the test, Jest will print a pass or fail message on your editor's console. The message will look similar to this:
$ jest
 PASS  src/App.test.js
  √ codesweetly test heading (59 ms)

Test Suites: 1 passed, 1 total
Tests:       1 passed, 1 total
Snapshots:   0 total
Time:        3.146 s
Ran all test suites related to changed files.
Note: The create-react-app configured Jest in watch mode by default. Therefore, after running npm test (or yarn test), your currently opened terminal will continue to process the test command's activities. So, you won't be able to input any command on that terminal until you stop test's execution. But you can open a new terminal window simultaneously with the one processing test.
In other words, use one terminal to run test and another to input commands.
Step 11: Run the application
Take a look at your app in the browser by running:
npm start
Or, if your package manager is Yarn, run:
yarn start
Once you run the command above, your app will automatically open on your default browser.
Step 12: Refactor the test code
Suppose you wish to change the heading's text when users click a button. In that case, you can simulate users' interaction with the button to confirm that it works as intended.
Here's an example:
// App.test.js

import React from "react";
import { render, screen } from "@testing-library/react";
import userEvent from "@testing-library/user-event";
import "@testing-library/jest-dom";
import App from "./App";

describe("App component", () => {
  test("codesweetly test heading", () => {
    render(<App />);
    expect(screen.getByRole("heading")).toHaveTextContent(/codesweetly test/i);
  });

  test("a codesweetly project heading", () => {
    render(<App />);

    const button = screen.getByRole("button", { name: "Update Heading" });

    userEvent.click(button);

    expect(screen.getByRole("heading")).toHaveTextContent(/a codesweetly project/i);
  });
});
Here are the main things we did in the test snippet above:
- We imported the packages needed to write our test case.
- We wrote a test case specifying that we expect the
<App />component to render a heading element with a"codesweetly test"text. - We wrote another test case simulating users' interaction with the app's button element. In other words, we specified that whenever a user clicks the button, we expect
<App />'s heading to update to"a codesweetly project"text.
Note:
describe()is one of Jest's global methods. It is optional code that helps organize related test cases into groups.describe()accepts two arguments:- A name you wish to call the test case group—for instance,
"App component". - A function containing your test cases.
- A name you wish to call the test case group—for instance,
userEventis the React Testing Library's package containing several methods for simulating users' interaction with an app. For instance, in the snippet above, we useduserEvent'sclick()method to simulate a click event on the button element.- We rendered
<App />for each test case because React Testing Library unmounts the rendered components after each test. However, suppose you have numerous test cases for a component. In that case, use Jest'sbeforeEach()method to runrender(<App />)before each test in your file (ordescribeblock).
Step 13: Refactor your React component
So, now that you've refactored your test code, let's do the same for the App component.
// App.js

import React, { useState } from "react";

const App = () => {
  const [heading, setHeading] = useState("CodeSweetly Test");

  const handleClick = () => {
    setHeading("A CodeSweetly Project");
  };

  return (
    <>
      <h1>{heading}</h1>
      <button type="button" onClick={handleClick}>
        Update Heading
      </button>
    </>
  );
};

export default App;
Here are the main things we did in the snippet above:
App'sheadingstate got initialized with a"CodeSweetly Test"string.- We programmed a
handleClickfunction to update theheadingstate. - We rendered a
<h1>and<button>elements to the DOM.
Note the following:
<h1>'s content is theheadingstate's current value.- Whenever a user clicks the button element, the
onClick()event listener will trigger thehandleClick()function. AndhandleClickwill updateApp'sheadingstate to"A CodeSweetly Project". Therefore,<h1>'s content will change to"A CodeSweetly Project".
Step 14: Rerun the test
Once you've refactored your component, rerun the test (or check the actively running test) to confirm that your app still works as expected.
Afterward, check the browser to see your recent updates.
And that's it!
Congratulations! You've successfully used Jest and the React Testing Library to test a React component. 🎉
Overview
This article discussed how test-driven development works in JavaScript and ReactJS applications.
We also learned how to use Jest and the React Testing Library to make testing simpler and faster.
Thanks for reading!
And here's a useful ReactJS resource:
I wrote a book about React!
- It's beginner friendly ✔
- It has live code snippets ✔
- It contains scalable projects ✔
- It has plenty of easy-to-grasp examples ✔
The React Explained Clearly book is all you need to understand ReactJS.