By Gilad Haimov
This article will show you how you can create and deploy a full-fledged ERC20 token in less than an hour.
In the last couple of years the ERC20 token specification has practically become the standard for Ethereum tokens. In fact most Ethereum tokens are ERC20-compliant.
There are several factors that make ERC20 so successful:
- It is simple. Really simple. As we will soon find out.
- It solves a real problem: blockchain marketplaces and crypto-wallets need a single set of commands to communicate with all of the tokens they manage, including interaction rules between tokens and token purchase rules
- It was the first (well almost the first) specification to offer Ethereum token standardization.
As any other Ethereum token, ERC-20 tokens are implemented as smart contracts and are executed on the Ethereum Virtual Machine (EVM) in a decentralized manner.
Ethereum smart contracts are written in a language called Solidity (there are other options, but hardly anyone uses them). Solidity is somewhat similar to JavaScript. In fact, if you have some knowledge of JavaScript, Java or other C-like languages you will probably figure out what a Solidity piece of code does even before learning the language.
And now comes the fun part: creating a basic ERC20 contract. This is in fact a rather simple task. Simple enough that we will be able to write and deploy your first ERC20 token in no more than an hour.
Granted, the token we will be creating will be a bare bones implementation, but I have seen many bare bones tokens that do real well.
The Standard

What is this ERC20 anyway?
The ERC20 standard defines a short and basic set of functions to be implemented by all ERC20 compatible tokens so as to allow integration with other contracts, wallets, or marketplaces:
function totalSupply() public view returns (uint256); function balanceOf(address tokenOwner) public view returns (uint); function allowance(address tokenOwner, address spender) public view returns (uint);
function transfer(address to, uint tokens) public returns (bool); function approve(address spender, uint tokens) public returns (bool); function transferFrom(address from, address to, uint tokens) public returns (bool);
These functions will allow an external user, say a wallet, to find out a user’s balance and to perform safe and authorized fund transfers from one user to another.
Additionally, the contract defines two events:
event Approval(address indexed tokenOwner, address indexed spender, uint tokens);event Transfer(address indexed from, address indexed to, uint tokens);
These events will be invoked or emitted when another user has been granted the right to withdraw tokens from an account, and when tokens have actually been transferred.
Many tokens also add the following fields which have became de-facto part of the standard:
string public constant name; string public constant symbol; uint8 public constant decimals;
Regarding the nomenclature:
- A
publicfunction can be accessed outside of the contract itself viewbasically means constant, i.e. the contract’s internal state will not be changed by the function- An
eventis Solidity’s way of allowing clients e.g. your application frontend to be notified on specific occurrences within the contract
The rest of the language constructs should be clear if you’ve ever learned Java/JavaScript.
The Code
So far we’ve discussed the interface. Now let’s actually write some logic.
For this, we will need to define two mapping objects, which is the Solidity notion for an associative or key/value array:
mapping(address => uint256) balances; mapping(address => mapping (address => uint256)) allowed;
The expression mapping(address => uint256) defines an associative array whose keys are of type address— a number used to denote account addresses, and whose values are of type uint256 — a 256-bit integer typically used to store token balances.
The first mapping object, balances, will hold the token balance of each owner account.
The second mapping object, allowed, will include all of the accounts approved to withdraw from a given account together with the withdrawal sum allowed for each.
As you can see, the value field of the allowed mapping is by itself a mapping plotting account address to its approved withdrawal sum.
These mappings together with all other contract fields will be stored in the blockchain and will be mined resulting in changes being propagated to all network user nodes.
Blockchain storage is expensive. It costs gas that users of your contract will need to pay for. Where possible, always try to minimize both storage size and writes into the blockchain.
Now that we have the required data structures set, let’s continue and actually write the ERC20 logic into the appropriate functions.
Get the total number of tokens
There are several approaches to setting the maximal number of an ICO tokens and, in fact, this issue might be worth a discussion by itself.
For our needs we will use the simplest approach, which is to set the total amount of tokens at contract creation time and initially assign all of them to the ‘contract owner’ account i.e. the account that deployed the contract:
uint256 totalSupply_; constructor(uint256 total) public { totalSupply_ = total; balances[msg.sender] = _totalSupply; }
A constructor is a special function automatically called by Ethereum right after the contract’s deployment. You would typically use it, as we do here, to initialize the token’s state using parameters passed by the contract’s deployer.
msg is a global variable declared and populated by Ethereum itself, and which contains important data for performing the contract’s duty. The field we are using here: msg.sender contains the Ethereum account executing the current contract function.
Since only the deploying account can ever enter a contract’s constructor, what this function does is, at the contract’s startup, it allocates all available tokens to the ‘contract owner’ account.
Get total token supply
function totalSupply() public view returns (uint256) { return totalSupply_;}
This function will return the number of all tokens allocated by this contract regardless of who their owner is.
Get token balance of owner
function balanceOf(address tokenOwner) public view returns (uint) { return balances[tokenOwner];}
balanceOf will return the current token balance of an account, identified by its owner’s address.
Transfer tokens to other account
function transfer(address receiver, uint numTokens) public returns (bool) { require(numTokens <= balances[msg.sender]); balances[msg.sender] = balances[msg.sender] — numTokens; balances[receiver] = balances[receiver] + numTokens; emit Transfer(msg.sender, receiver, numTokens); return true;}
The transfer function does what its name implies, which is to move numTokens amount of tokens from the owner’s balance to that of another user receiver. Note that the transferring owner is msg.sender i.e. the one executing the function, which implies that only the owner of the tokens can transfer them to others.
require is Solidity’s way of asserting a predicate, in this case that the transferring account has enough balance to transfer. If a require statement fails, the transaction is immediately rolled back with no changes written into the blockchain.
Right before exiting, the function fires ERC20 event Transfer allowing registered listeners to react to its completion.
Allow delegate to withdraw tokens from my account
function approve(address delegate, uint numTokens) public returns (bool) { allowed[msg.sender][delegate] = numTokens; emit Approval(msg.sender, delegate, numTokens); return true;}
This function is typically used in a token marketplace context. What it does is to allow an owner i.e. msg.sender to approve a delegate account — possibly the marketplace itself — to withdraw some tokens from his account and to transfer them to other accounts.
A typical use case for this scenario would be an owner offering tokens for sale in a marketplace without having to need his own approval before the actual transaction takes place. At the end of its execution this function fires an Approval event.
Get number of tokens approved for withdrawal
function allowance(address owner, address delegate) public view returns (uint) { return allowed[owner][delegate];}
This function returns the current approved number of tokens by an owner to a specific delegate, as set in the approve function.
Transfer tokens by delegate:
function transferFrom(address owner, address buyer, uint numTokens) public returns (bool) { require(numTokens <= balances[owner]); require(numTokens <= allowed[owner][msg.sender]);
balances[owner] = balances[owner] — numTokens; allowed[owner][msg.sender] = allowed[from][msg.sender] — numTokens; balances[buyer] = balances[buyer] + numTokens; Transfer(owner, buyer, numTokens); return true;}
transferFrom is the peer of approve function we have already visited. It allows a delegate approved for withdrawal to actually transfer owner funds to a 3rd party account.
The two require statements at function start are to verify that the transaction is a legal one, i.e. that the owner has enough tokens to transfer and that the delegate has an allowance for at least numTokens to withdraw.
Other than moving numTokens amount from the owner to the buyer, this function also subtracts numTokens from the delegate’s allowance. This allows a delegate with a given allowance to break it into several withdrawals which is a typical marketplace behavior.
If fact, we could stop here and have a valid ERC20 implementation. But we are aiming higher: we want an industrial strength token, albeit a simple one. This requires us to make our code a bit more secure.
SafeMath is a Solidity library aimed at dealing with one way hackers have been known to break contracts: integer overflow attack. In such an attack, the hacker forces the contract to use incorrect numeric values by passing parameters that will take the relevant integers past their maximal values.
SafeMath protects against this by testing for overflow before performing the arithmetic action, thus removing the danger of overflow attack. It is also really small so that the impact on contract size is minimal, so let’s use it.
First we will add it to our code:
library SafeMath { // Only relevant functions
function sub(uint256 a, uint256 b) internal pure returns (uint256) { assert(b <= a); return a — b;} function add(uint256 a, uint256 b) internal pure returns (uint256) { uint256 c = a + b; assert(c >= a); return c; }}
SafeMath uses assert statements to verify the correctness of the passed parameters. When assert fails, the function execution is immediately stopped and all blockchain changes are rolled back.
Next let us add the following statement introducing the library to the Solidity compiler:
using SafeMath for uint256;
and finally, we’ll replace the naive arithmetics we used at the beginning with SafeMath functions:
balances[msg.sender] = balances[msg.sender].sub(numTokens);
balances[receiver] = balances[receiver].add(numTokens); balances[buyer] = balances[buyer].add(numTokens); balances[owner] = balances[owner].sub(numTokens);
Let us now pack it all together
In Solidity, the contract’s functions and events are wrapped into an entity called a contract which you can silently translate to a “blockchain class”. Below is the ERC20-compatible contract we have thus far created. The name and symbol fields can be changed at will. Most tokens keep the decimal value at 18. We will do the same here:
Contract Deployment
We will now deploy our contract into the blockchain. Once deployed, the contract will be transferred to all nodes participating in the network and all changes made to the contract will be propagated to all participating nodes.
Ethereum professionals usually work with deployment tools such as Truffle.
For our need, a simple online tool called Remix will suffice.
You will first need to have a MetaMask plugin installed on your browser (which I hope is Chrome..) and a Rinkeby (Ethereum test network) account with at least some Rinkeby Ether in it. These two pre requisites are out of our current scope and also rather simple to do.
If you do not have any of them, feel free to visit MetaMask and Rinkeby
to get clear installation and usage directions.
Assuming we have the prerequisites set we will now go to Remix and paste the code above including the pragma line and the SafeMath library into the online editor.
After this, we will move to the 2nd tab ‘Run’ on right panel and click ‘Deploy’. A MetaMask popup will appear asking us to confirm the transaction which we of course will.
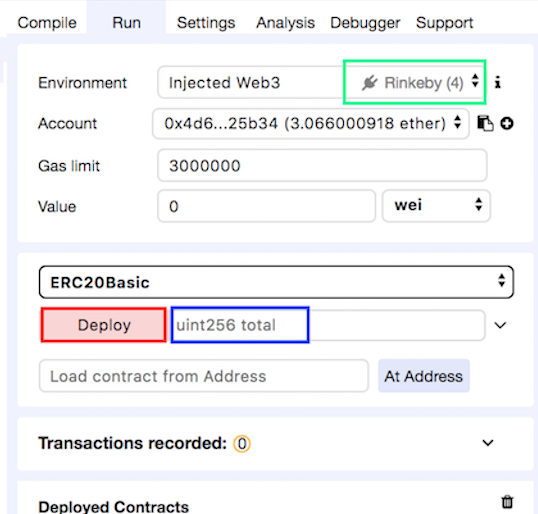
- Green marker: Make sure you’re on Rinkeby network
- Blue marker: Set total token supply
- Red marker: Deploy!
Congrats! You have just deployed your first ERC20 token. It is simple yet fully functional, standard compliant, secure and ready to be purchased, paid with and transferred throughout the Blockchain network!
Is that all there is to it?
Not at all. Smart contracts can get way more complex depending on your business logic, your modeling of the user interaction, on whether or not you allow token minting and burning, on lifecycle changes you introduce into the contract, on the need for admin-level capabilities which usually comes with admin-authorized set of functions and… well you get the picture.
Still, what you have achieved here is a solid base to move on from when a more complex contract is needed.
Hopefully it was also just a bit fun.