
By Nader Dabit
Supabase is an open source Firebase alternative that lets you create a real-time backend in less than two minutes.
Supabase has continued to gain hype and adoption with developers in my network over the past few months. And a lot of the people I've talked to about it prefer the fact that it leverages a SQL-style database, and they like that it's open source, too.
When you create a project Supabase automatically gives you a Postgres SQL database, user authentication, and API. From there you can easily implement additional features like realtime subscriptions and file storage.
In this guide, you will learn how to build a full stack app that implements the core features that most apps require – like routing, a database, API, authentication, authorization, realtime data, and fine grained access control. We'll be using a modern stack including React, Next.js, and TailwindCSS.
I've tried to distill everything I've learned while myself getting up to speed with Supabase in as short of a guide as possible so you too can begin building full stack apps with the framework.
The app that we will be building is a multi-user blogging app that incorporates all of the types of features you see in many modern apps. This will take us beyond basic CRUD by enabling things like file storage as well as authorization and fine grained access control.
You can find the code for the app we will be building here.
By learning how to incorporate all of these features together you should be able to take what you learn here and build out your own ideas. Understanding the basic building blocks themselves allows you to then take this knowledge with you in the future to put it to use in any way you see fit.
Supabase Overview
How to Build Full Stack Apps
I'm fascinated by full stack Serverless frameworks because of the amount of power and agility they give to developers looking to build complete applications.
Supabase brings to the table the important combination of powerful back end services and easy to use client-side libraries and SDKs for an end to end solution.
This combination lets you not only build out the individual features and services necessary on the back end, but easily integrate them together on the front end by leveraging client libraries maintained by the same team.
Because Supabase is open source, you have the option to self-host or deploy your backend as a managed service. And as you can see, this will be easy for us to do on a free tier that does not require a credit card to get started with.
Why Use Supabase?
I've led the Front End Web and Mobile Developer Advocacy team at AWS, and written a book on building these types of apps. So I've had quite a bit of experience building in this space.
And I think that Supabase brings to the table some really powerful features that immediately stood out to me when I started to build with it.
Data access patterns
One of the biggest limitations of some of the tools and frameworks I've used in the past is the lack of querying capabilities. What I like a lot about Supabase is that, since it's built on top of Postgres, it enables an extremely rich set of performant querying capabilities out of the box without having to write any additional back end code.
The client-side SDKs provide easy to use filters and modifiers to enable an almost infinite combination of data access patterns.
Because the database is SQL, relational data is easy to configure and query, and the client libraries take it into account as a first class citizen.
Permissions
When you get past "hello world" many types of frameworks and services fall over very quickly. This is because most real-world use cases extend far beyond the basic CRUD functionality you often see made available by these tools.
The problem with some frameworks and managed services is that the abstractions they create are not extensible enough to enable easy to modify configurations or custom business logic. These restrictions often make it difficult to take into account the many one-off use cases that come up with building an app in the real-world.
In addition to enabling a wide array of data access patterns, Supabase makes it easy to configure authorization and fine grained access controls. This is because it is simply Postgres, enabling you implement whatever row-level security policies you would like directly from the built-in SQL editor (something we will cover here).
UI components
In addition to the client-side libraries maintained by the same team building the other Supabase tooling, they also maintain a UI component library (beta) that allows you to get up and running with various UI elements.
The most powerful is Auth which integrates with your Supabase project to quickly spin up a user authentication flow (which I'll be using in this tutorial).
Multiple authentication providers
Supabase enables all of the following types of authentication mechanisms:
- Username & password
- Magic email link
- Apple
- GitHub
- Azure
- GitLab
- Bitbucket
Open Source
One of the biggest things it has going for it is that it is completely open source (yes the back end too). This means that you can choose either the Serverless hosted approach or to host it yourself.
That means that if you wanted to, you could run Supabase with Docker and host your app on AWS, GCP, or Azure. This would eliminate the vendor lock-in issue you may run into with Supabase alternatives.
How to Get Started with Supabase
Project setup
To get started, let's first create the Next.js app.
npx create-next-app next-supabase
Next, change into the directory and install the dependencies we'll be needing for the app using either NPM or Yarn:
npm install @supabase/supabase-js @supabase/ui react-simplemde-editor easymde react-markdown uuid
npm install tailwindcss@latest @tailwindcss/typography postcss@latest autoprefixer@latest
Next, create the necessary Tailwind configuration files:
npx tailwindcss init -p
Now update tailwind.config.js to add the Tailwind typography plugin to the array of plugins. We'll be using this plugin to style the markdown for our blog:
plugins: [
  require('@tailwindcss/typography')
]
Finally, replace the styles in styles/globals.css with the following:
@tailwind base;
@tailwind components;
@tailwind utilities;
Supabase project initialization
Now that the project is created locally, let's create the Supabase project.
To do so, head over to Supabase.io and click on Start Your Project. Authenticate with GitHub and then create a new project under the organization that is provided to you in your account.
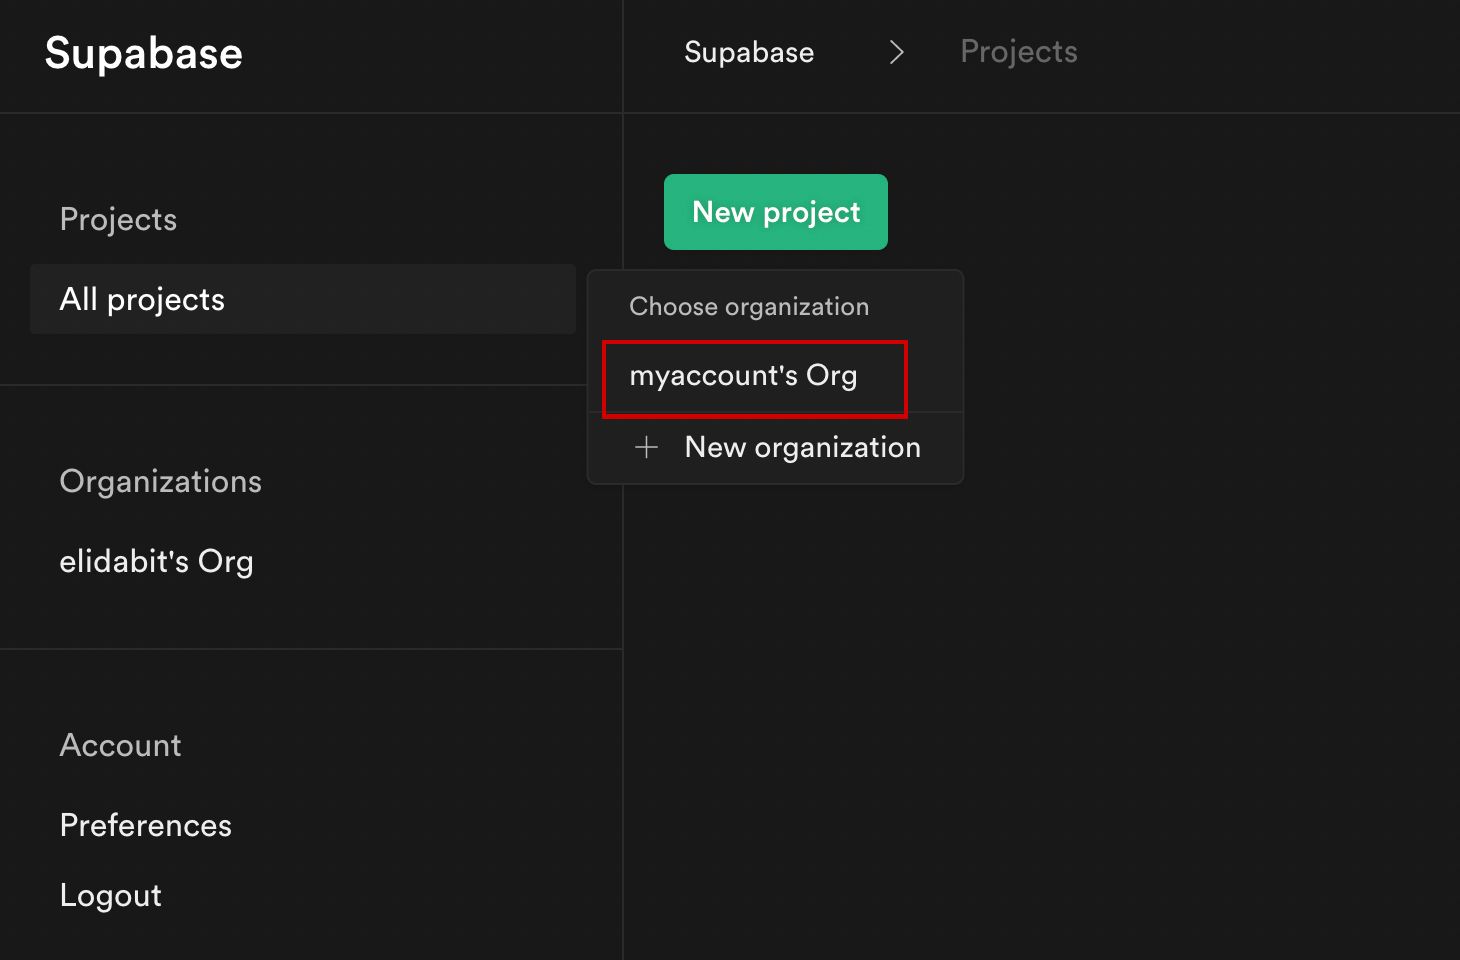
Give the project a Name and Password and click Create new project.
It will take approximately 2 minutes for your project to be created.
How to create a database table in Supabase
Once you've created your project, let's go ahead and create the table for our app along with all of the permissions we'll need. To do so, click on the SQL link in the left hand menu.

In this view, click on Query-1 under Open queries and paste in the following SQL query and click RUN:
CREATE TABLE posts (
  id bigint generated by default as identity primary key,
  user_id uuid references auth.users not null,
  user_email text,
  title text,
  content text,
  inserted_at timestamp with time zone default timezone('utc'::text, now()) not null
);

alter table posts enable row level security;

create policy "Individuals can create posts." on posts for
    insert with check (auth.uid() = user_id);

create policy "Individuals can update their own posts." on posts for
    update using (auth.uid() = user_id);

create policy "Individuals can delete their own posts." on posts for
    delete using (auth.uid() = user_id);

create policy "Posts are public." on posts for
    select using (true);
This will create the posts table that we'll be using for the app. It also enabled some row level permissions:
- All users can query for posts
- Only signed in users can create posts, and their user ID must match the user ID passed into the arguments
- Only the owner of the post can update or delete it
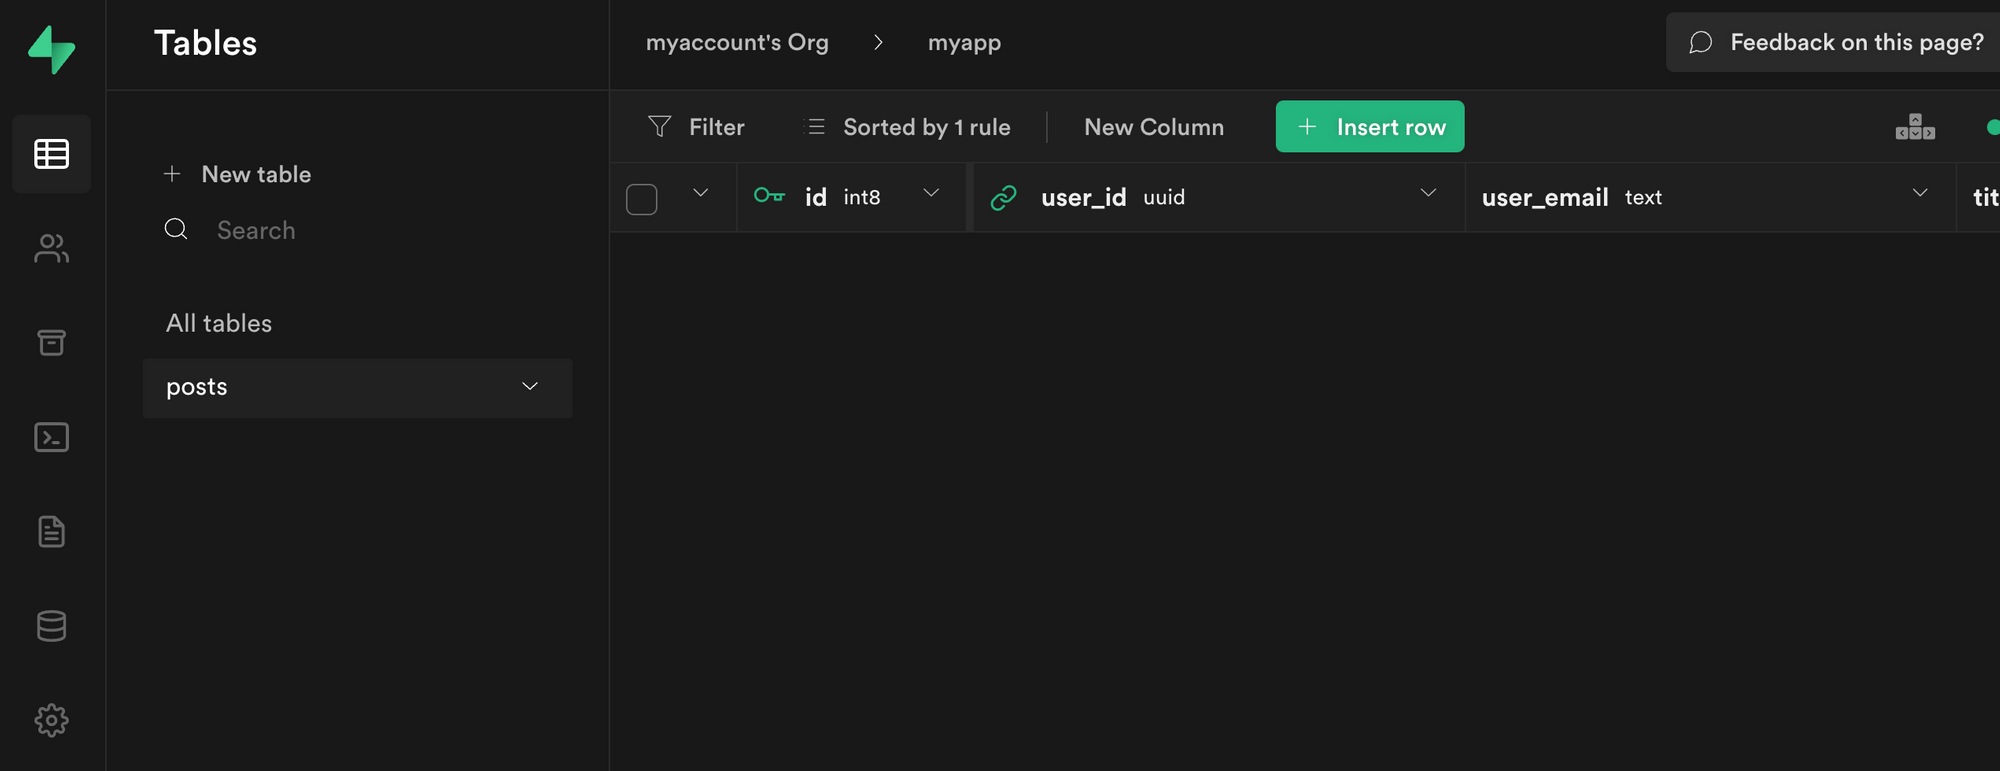
Now, if we click on the Table editor link, we should see our new table created with the proper schema.
That's it! Our back end is ready to go now and we can start building out the UI. Username + password authentication is already enabled by default, so all we need to do now is wire everything up on the front end.
Next.js Supabase configuration
Now that the project has been created, we need a way for our Next.js app to know about the back end services we just created for it.
The best way for us to configure this is using environment variables. Next.js allows environment variables to be set by creating a file called .env.local in the root of the project and storing them there.
In order to expose a variable to the browser you have to prefix the variable with NEXT_PUBLIC_.
Create a file called .env.local at the root of the project, and add the following configuration:
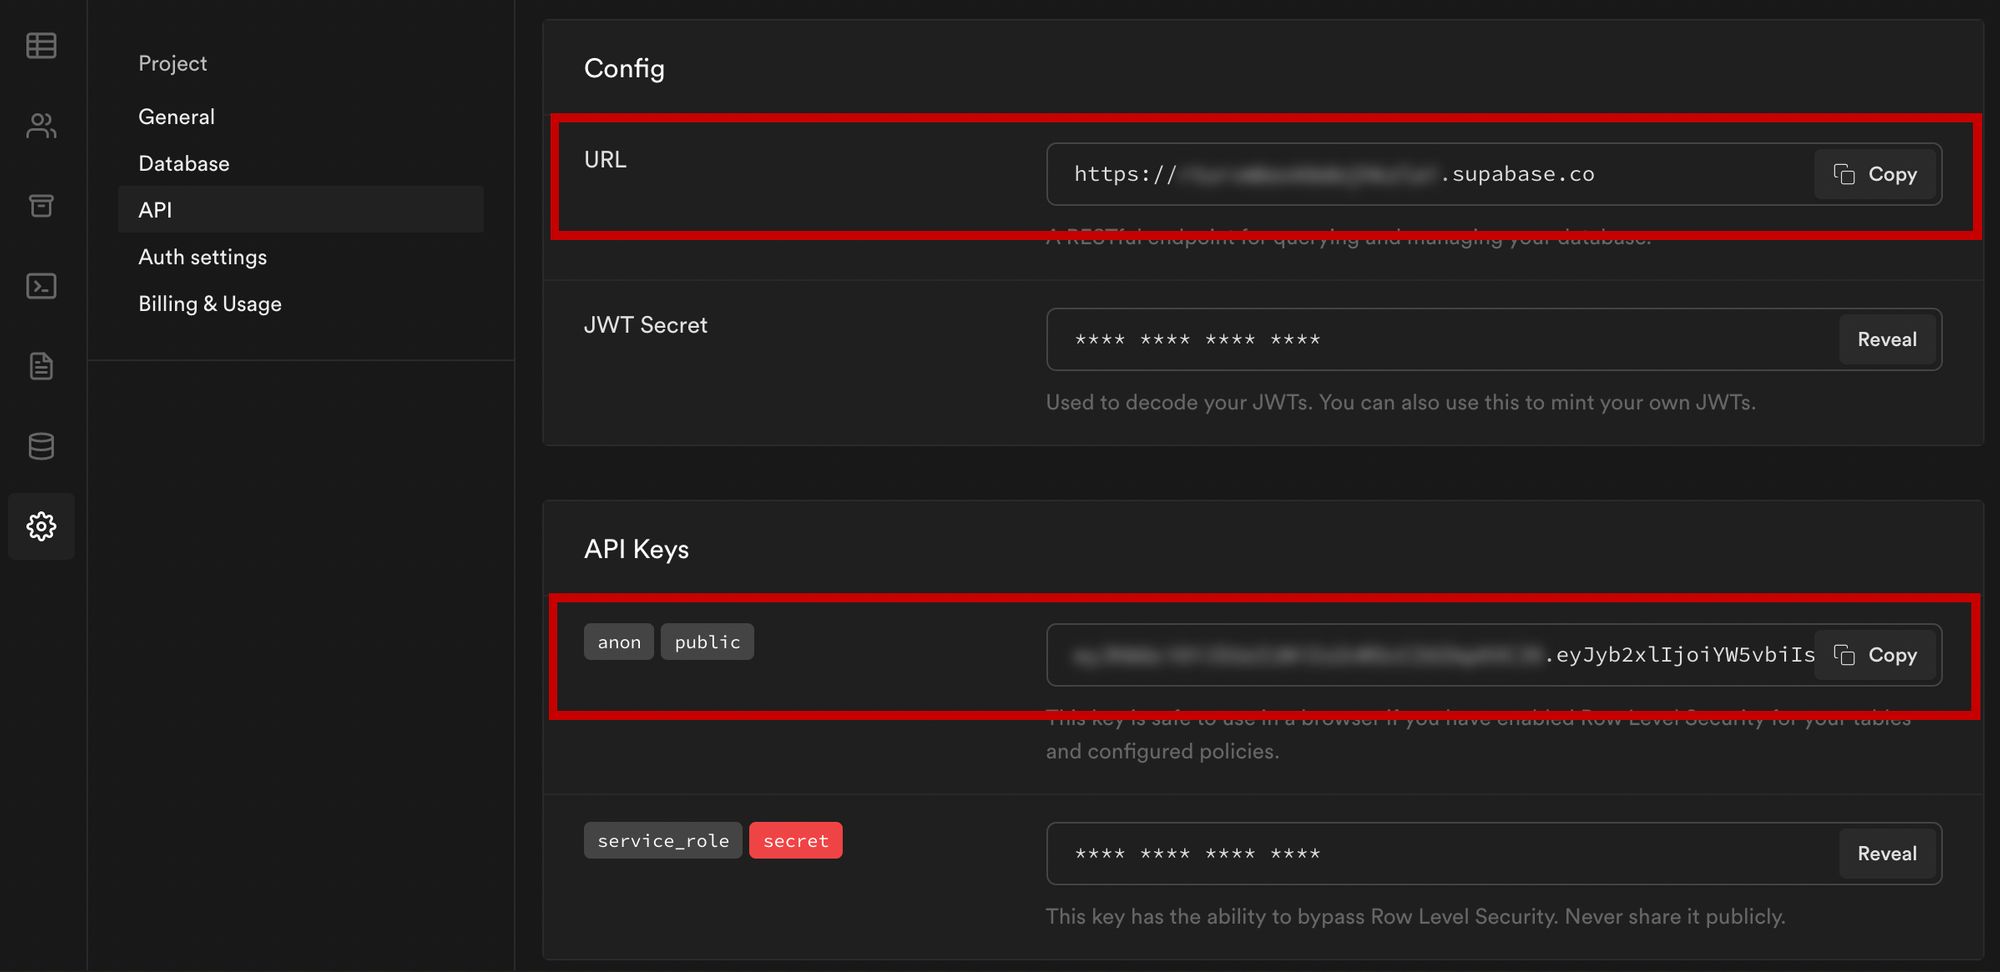
NEXT_PUBLIC_SUPABASE_URL=https://app-id.supabase.co
NEXT_PUBLIC_SUPABASE_ANON_KEY=your-public-api-key
You can find the values of your API URL and API Key in the Supabase dashboard settings:
Next, create a file called api.js in the root of the project and add the following code:
// api.js
import { createClient } from '@supabase/supabase-js'
export const supabase = createClient(
  process.env.NEXT_PUBLIC_SUPABASE_URL,
  process.env.NEXT_PUBLIC_SUPABASE_ANON_KEY
)
Now we will be able to import the supabase instance and use it anywhere in our app.
Here's an overview of what it looks like to interact with the API using the Supabase JavaScript client.
Querying for data:
import { supabase } from '../path/to/api'

const { data, error } = await supabase
  .from('posts')
  .select()
Creating new items in the database:
const { data, error } = await supabase
  .from('posts')
  .insert([
    {
      title: "Hello World",
      content: "My first post",
      user_id: "some-user-id",
      user_email: "myemail@gmail.com"
    }
  ])
As I mentioned earlier, the filters and modifiers make it really easy to implement various data access patterns and selection sets of your data.
Authentication – signing up:
const { user, session, error } = await supabase.auth.signUp({
  email: 'example@email.com',
  password: 'example-password',
})
Authentication – signing in:
const { user, session, error } = await supabase.auth.signIn({
  email: 'example@email.com',
  password: 'example-password',
})
In our case we won't be writing the main authentication logic by hand, we'll be using the Auth component from Supabase UI.
How to Build the App
Now let's start building out the UI!
To get started, let's first update the app to implement some basic navigation and layout styling.
We will also configure some logic to check if the user is signed in, and show a link for creating new posts if they are.
Finally we'll implement a listener for any auth events. And when a new auth event occurs, we'll check to make sure there is currently a signed in user in order to show or hide the Create Post link.
Open _app.js and add the following code:
// pages/_app.js
import Link from 'next/link'
import { useState, useEffect } from 'react'
import { supabase } from '../api'
import '../styles/globals.css'

function MyApp({ Component, pageProps }) {
  const [user, setUser] = useState(null);
  useEffect(() => {
    const { data: authListener } = supabase.auth.onAuthStateChange(
      async () => checkUser()
    )
    checkUser()
    return () => {
      authListener?.unsubscribe()
    };
  }, [])
  async function checkUser() {
    const user = supabase.auth.user()
    setUser(user)
  }
  return (
  <div>
    <nav className="p-6 border-b border-gray-300">
      <Link href="/">
        <span className="mr-6 cursor-pointer">Home</span>
      </Link>
      {
        user && (
          <Link href="/create-post">
            <span className="mr-6 cursor-pointer">Create Post</span>
          </Link>
        )
      }
      <Link href="/profile">
        <span className="mr-6 cursor-pointer">Profile</span>
      </Link>
    </nav>
    <div className="py-8 px-16">
      <Component {...pageProps} />
    </div>
  </div>
  )
}

export default MyApp
How to make a user profile page
Next, let's create the profile page. In the pages directory, create a new file named profile.js and add the following code:
// pages/profile.js
import { Auth, Typography, Button } from "@supabase/ui";
const { Text } = Typography
import { supabase } from '../api'

function Profile(props) {
    const { user } = Auth.useUser();
    if (user)
      return (
        <>
          <Text>Signed in: {user.email}</Text>
          <Button block onClick={() => props.supabaseClient.auth.signOut()}>
            Sign out
          </Button>
        </>
      );
    return props.children
}

export default function AuthProfile() {
    return (
        <Auth.UserContextProvider supabaseClient={supabase}>
          <Profile supabaseClient={supabase}>
            <Auth supabaseClient={supabase} />
          </Profile>
        </Auth.UserContextProvider>
    )
}
The profile page uses the Auth component from the Supabase UI library. This component will render a "sign up" and "sign in" form for unauthenticated users, and a basic user profile with a "sign out" button for authenticated users. It will also enable a magic sign in link.
How to create new posts
Next, let's create the create-post page. In the pages directory, create a page named create-post.js with the following code:
// pages/create-post.js
import { useState } from 'react'
import { v4 as uuid } from 'uuid'
import { useRouter } from 'next/router'
import dynamic from 'next/dynamic'
import "easymde/dist/easymde.min.css"
import { supabase } from '../api'

const SimpleMDE = dynamic(() => import('react-simplemde-editor'), { ssr: false })
const initialState = { title: '', content: '' }

function CreatePost() {
  const [post, setPost] = useState(initialState)
  const { title, content } = post
  const router = useRouter()
  function onChange(e) {
    setPost(() => ({ ...post, [e.target.name]: e.target.value }))
  }
  async function createNewPost() {
    if (!title || !content) return
    const user = supabase.auth.user()
    const id = uuid()
    post.id = id
    const { data } = await supabase
      .from('posts')
      .insert([
          { title, content, user_id: user.id, user_email: user.email }
      ])
      .single()
    router.push(`/posts/${data.id}`)
  }
  return (
    <div>
      <h1 className="text-3xl font-semibold tracking-wide mt-6">Create new post</h1>
      <input
        onChange={onChange}
        name="title"
        placeholder="Title"
        value={post.title}
        className="border-b pb-2 text-lg my-4 focus:outline-none w-full font-light text-gray-500 placeholder-gray-500 y-2"
      />
      <SimpleMDE
        value={post.content}
        onChange={value => setPost({ ...post, content: value })}
      />
      <button
        type="button"
        className="mb-4 bg-green-600 text-white font-semibold px-8 py-2 rounded-lg"
        onClick={createNewPost}
      >Create Post</button>
    </div>
  )
}

export default CreatePost
This component renders a Markdown editor, allowing users to create new posts.
The createNewPost function will use the supabase instance to create new posts using the local form state.
You may notice that we are not passing in any headers. This is because if a user is signed in, the Supabase client libraries automatically include the access token in the headers for a signed in user.
How to view a single post
We need to configure a page to view a single post.
This page uses getStaticPaths to dynamically create pages at build time based on the posts coming back from the API.
We also use the fallback flag to enable fallback routes for dynamic SSG page generation.
We use getStaticProps to enable the Post data to be fetched and then passed into the page as props at build time.
Create a new folder in the pages directory called posts and a file called [id].js within that folder. In pages/posts/[id].js, add the following code:
// pages/posts/[id].js
import { useRouter } from 'next/router'
import ReactMarkdown from 'react-markdown'
import { supabase } from '../../api'

export default function Post({ post }) {
  const router = useRouter()
  if (router.isFallback) {
    return <div>Loading...</div>
  }
  return (
    <div>
      <h1 className="text-5xl mt-4 font-semibold tracking-wide">{post.title}</h1>
      <p className="text-sm font-light my-4">by {post.user_email}</p>
      <div className="mt-8">
        <ReactMarkdown className='prose' children={post.content} />
      </div>
    </div>
  )
}

export async function getStaticPaths() {
  const { data, error } = await supabase
    .from('posts')
    .select('id')
  const paths = data.map(post => ({ params: { id: JSON.stringify(post.id) }}))
  return {
    paths,
    fallback: true
  }
}

export async function getStaticProps ({ params }) {
  const { id } = params
  const { data } = await supabase
    .from('posts')
    .select()
    .filter('id', 'eq', id)
    .single()
  return {
    props: {
      post: data
    }
  }
}
How to query for and render the list of posts
Next, let's update index.js to fetch and render a list of posts:
// pages/index.js
import { useState, useEffect } from 'react'
import Link from 'next/link'
import { supabase } from '../api'
export default function Home() {
const [posts, setPosts] = useState([])
const [loading, setLoading] = useState(true)
useEffect(() => {
fetchPosts()
}, [])
async function fetchPosts() {
const { data, error } = await supabase
.from('posts')
.select()
setPosts(data)
setLoading(false)
}
if (loading) return <p className="text-2xl">Loading ...</p>
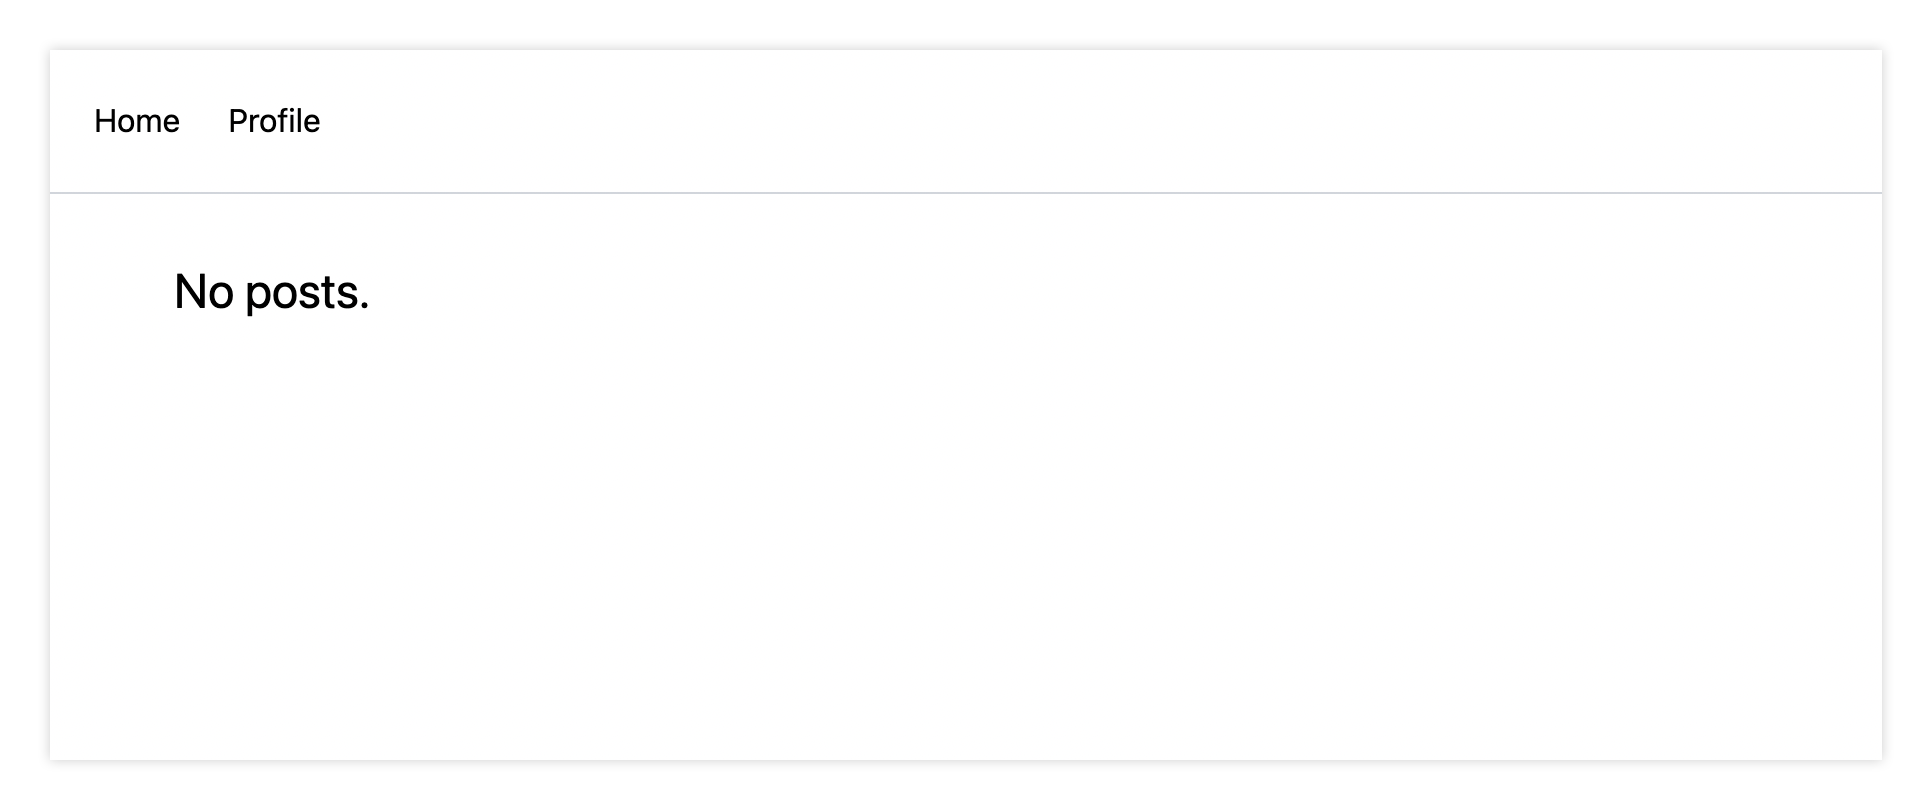
if (!posts.length) return <p className="text-2xl">No posts.</p>
return (
<div>
<h1 className="text-3xl font-semibold tracking-wide mt-6 mb-2">Posts</h1>
{
posts.map(post => (
<Link key={post.id} href={`/posts/${post.id}`}>
<div className="cursor-pointer border-b border-gray-300 mt-8 pb-4">
<h2 className="text-xl font-semibold">{post.title}</h2>
<p className="text-gray-500 mt-2">Author: {post.user_email}</p>
</div>
</Link>)
)
}
</div>
)
}
Let's test it out
We now have all of the pieces of our app ready to go, so let's try it out.
To run the local server, run the dev command from your terminal:
npm run dev
When the app loads, you should see the following screen:
To sign up, click on Profile and create a new account. You should receive an email link to confirm your account after signing up.
You can also create a new account by using the magic link.
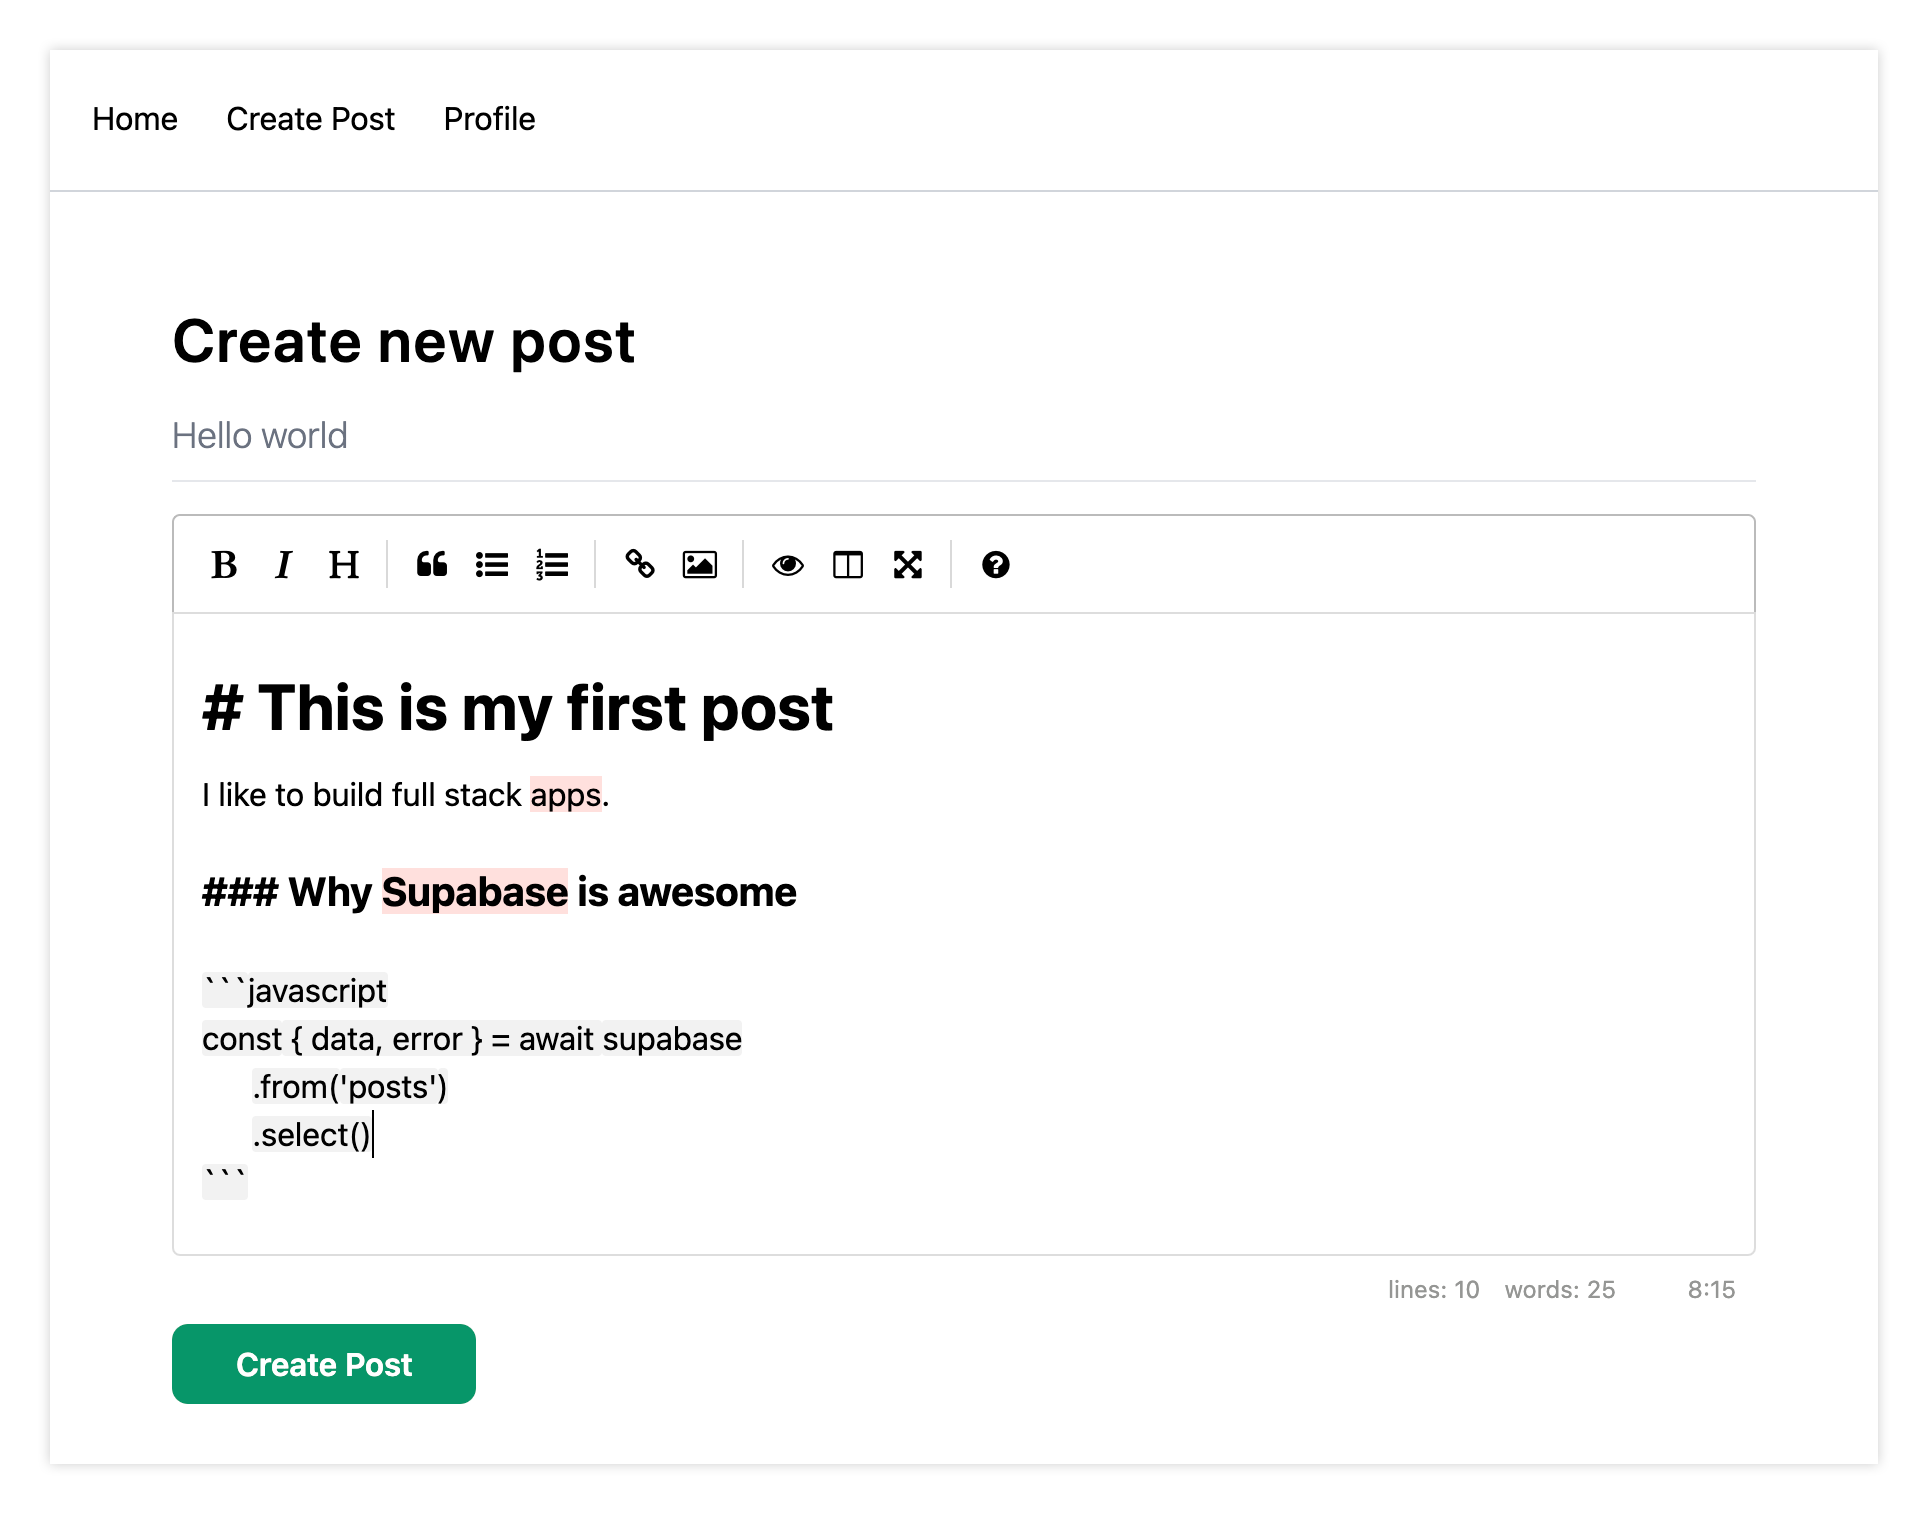
Once you're signed in, you should be able to create new posts:
Navigating back to the home page, you should be able to see a list of the posts that you've created and be able to click on a link to the post to view it:

How to Edit Posts
Now that we have the app up and running, let's learn how to edit posts. To get started with this, let's create a new view that will fetch only the posts that the signed in user has created.
To do so, create a new file named my-posts.js in the root of the project with the following code:
// pages/my-posts.js
import { useState, useEffect } from 'react'
import Link from 'next/link'
import { supabase } from '../api'

export default function MyPosts() {
  const [posts, setPosts] = useState([])
  useEffect(() => {
    fetchPosts()
  }, [])

  async function fetchPosts() {
    const user = supabase.auth.user()
    const { data } = await supabase
      .from('posts')
      .select('*')
      .filter('user_id', 'eq', user.id)
    setPosts(data)
  }
  async function deletePost(id) {
    await supabase
      .from('posts')
      .delete()
      .match({ id })
    fetchPosts()
  }
  return (
    <div>
      <h1 className="text-3xl font-semibold tracking-wide mt-6 mb-2">My Posts</h1>
      {
        posts.map((post, index) => (
          <div key={index} className="border-b border-gray-300    mt-8 pb-4">
            <h2 className="text-xl font-semibold">{post.title}</h2>
            <p className="text-gray-500 mt-2 mb-2">Author: {post.user_email}</p>
            <Link href={`/edit-post/${post.id}`}><a className="text-sm mr-4 text-blue-500">Edit Post</a></Link>
            <Link href={`/posts/${post.id}`}><a className="text-sm mr-4 text-blue-500">View Post</a></Link>
            <button
              className="text-sm mr-4 text-red-500"
              onClick={() => deletePost(post.id)}
            >Delete Post</button>
          </div>
        ))
      }
    </div>
  )
}
In the query for the posts, we use the user id to select only the posts created by the signed in user.
Next, create a new folder named edit-post in the pages directory. Then, create a file named [id].js in this folder.
In this file, we'll be accessing the id of the post from a route parameter. When the component loads, we will then use the post id from the route to fetch the post data and make it available for editing.
In this file, add the following code:
// pages/edit-post/[id].js
import { useEffect, useState } from 'react'
import { useRouter } from 'next/router'
import dynamic from 'next/dynamic'
import "easymde/dist/easymde.min.css"
import { supabase } from '../../api'

const SimpleMDE = dynamic(() => import('react-simplemde-editor'), { ssr: false })

function EditPost() {
  const [post, setPost] = useState(null)
  const router = useRouter()
  const { id } = router.query

  useEffect(() => {
    fetchPost()
    async function fetchPost() {
      if (!id) return
      const { data } = await supabase
        .from('posts')
        .select()
        .filter('id', 'eq', id)
        .single()
      setPost(data)
    }
  }, [id])
  if (!post) return null
  function onChange(e) {
    setPost(() => ({ ...post, [e.target.name]: e.target.value }))
  }
  const { title, content } = post
  async function updateCurrentPost() {
    if (!title || !content) return
    await supabase
      .from('posts')
      .update([
          { title, content }
      ])
      .match({ id })
    router.push('/my-posts')
  }
  return (
    <div>
      <h1 className="text-3xl font-semibold tracking-wide mt-6 mb-2">Edit post</h1>
      <input
        onChange={onChange}
        name="title"
        placeholder="Title"
        value={post.title}
        className="border-b pb-2 text-lg my-4 focus:outline-none w-full font-light text-gray-500 placeholder-gray-500 y-2"
      />
      <SimpleMDE value={post.content} onChange={value => setPost({ ...post, content: value })} />
      <button
        className="mb-4 bg-blue-600 text-white font-semibold px-8 py-2 rounded-lg"
        onClick={updateCurrentPost}>Update Post</button>
    </div>
  )
}

export default EditPost
Now, add a new link to our navigation located in pages/_app.js:
// pages/_app.js
{
  user && (
    <Link href="/my-posts">
      <span className="mr-6 cursor-pointer">My Posts</span>
    </Link>
  )
}
When running the app, you should be able to view your own posts, edit them, and delete them from the updated UI.
How to enable real-time updates
Now that we have the app running it's trivial to add real-time updates.
By default, Realtime is disabled on your database. Let's turn on Realtime for the posts table.
To do so, open the app dashboard and click on Databases -> Replication -> 0 Tables (under Source). Toggle on Realtime functionality for the posts table. Here is a video walkthrough of how you can do this for clarity.
Next, open src/index.js and update the useEffect hook with the following code:
  useEffect(() => {
    fetchPosts()
    const mySubscription = supabase
      .from('posts')
      .on('*', () => fetchPosts())
      .subscribe()
    return () => supabase.removeSubscription(mySubscription)
  }, [])
Now, we will be subscribed to realtime changes in the posts table.
The code for the app is located here.
Next Steps
By now you should have a good understanding of how to build full stack apps with Supabase and Next.js.
If you'd like to learn more about building full stack apps with Supabase, I'd check out the following resources.