
If you were listening to music on an app and you wanted to pause or skip a song, you'd have to do that through the app.
This process is similar to how the Document Object Model or DOM works. Here, the music app represents the DOM because it serves as a medium to make changes to the music.
In this tutorial, you'll learn what the DOM is and how it works in a practical way.
What is the DOM?
The DOM is a Web API that allows developers to use programming logic to make changes to their HTML code. It's a reliable way to make changes that turn static websites into dynamic ones.
It's an important topic in web development because the DOM serves as the initial use of JavaScript in the browser.
HTML code isn’t considered part of the DOM until its parsed by the browser. To see what happens to your HTML code when this parsing happens, copy your code from the <body> tag and paste it here (within the box with the title 'Markup to test' after the three dots).
What are we building?
In this article, we’re going to learn the most important and often used parts of the DOM by building this simple project:
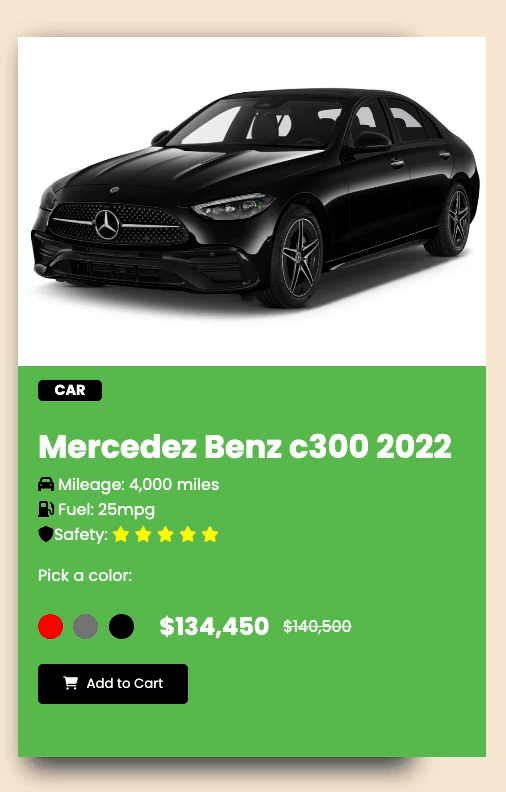
Check it out on CodePen here.
Project Functionality
As you can see in the project demo above, these are the functionalities we’ll implement:
- Dynamic color change: When a color is clicked, the color of the car image, addToCart button, and tag all change to match the selected color.
- Button switch: Clicking on the addToCart button reveals the success button and vice versa.
Prerequisites
- basic knowledge of HTML and CSS.
- basic knowledge of JavaScript
- an IDE (text editor)
- a web browser
NB: Because the goal of the article is to learn about JavaScript and the DOM, we won't place a lot of emphasis on the HTML and CSS code. We'll just go through it quickly first so you can set up the app. Then we'll dive into learning about the DOM.
HTML code:
In our index.html file, we'll create the basic structure of the project which includes linking our CSS file, Font Awesome, and Google Fonts – all within our <head> tag. Within our <body> tag, we'll create our product card and link our JavaScript tag at the end of the <body> tag.
<!DOCTYPE html>
<html lang="en">
  <head>
    <meta charset="UTF-8" />
    <meta http-equiv="X-UA-Compatible" content="IE=edge" />
    <meta name="viewport" content="width=device-width, initial-scale=1.0" />
    <link
      rel="stylesheet"
      href="https://cdnjs.cloudflare.com/ajax/libs/font-awesome/6.1.2/css/all.min.css"
      integrity="sha512-1sCRPdkRXhBV2PBLUdRb4tMg1w2YPf37qatUFeS7zlBy7jJI8Lf4VHwWfZZfpXtYSLy85pkm9GaYVYMfw5BC1A=="
      crossorigin="anonymous"
      referrerpolicy="no-referrer"
    />
    <link rel="preconnect" href="https://fonts.gstatic.com" crossorigin />
    <link
      href="https://fonts.googleapis.com/css2?family=Poppins:wght@400;500;700&display=swap"
      rel="stylesheet"
    />
    <link rel="stylesheet" href="style.css" />
    <title>Practicalized DOM</title>
  </head>
  <body>
    <div class="product-card">
      <div class="product-image">
        <!-- <img src="./img/gray-benz.jpg" alt="cars" /> -->
      </div>
      <div class="product-description">
        <h3 class="tag">CAR</h3>
        <h1 class="product-title">Mercedez Benz c300 2022</h1>
        <p class="product-details">
          <span class="mileage">
            <span style="font-size: 1em; color: black"
              ><i class="fa-solid fa-car"></i
            ></span>
            Mileage: 4,000 miles
          </span>
          <span class="fuel">
            <span style="font-size: 1em; color: black"
              ><i class="fa-solid fa-gas-pump"></i
            ></span>
            Fuel: 25mpg
          </span>
          <span class="safety">
            <span style="font-size: 1em; color: black"
              ><i class="fa-solid fa-shield"></i></span
            >Safety:
            <span class="stars">
              <i class="fa-solid fa-star"></i>
              <i class="fa-solid fa-star"></i>
              <i class="fa-solid fa-star"></i>
              <i class="fa-solid fa-star"></i>
              <i class="fa-solid fa-star"></i>
            </span>
          </span>
        </p>
        <p>Pick a color:</p>
        <div class="colors-price">
          <div class="colors">
            <span class="red"></span>
            <span class="gray"></span>
            <span class="black"></span>
          </div>
          <div class="pricing">
            <h2 class="new-price">$134,450</h2>
            <h4 class="old-price"><s>$140,500</s></h4>
          </div>
        </div>
        <button id="button">
          <span style="font-size: 1em; color: white">
            <i class="fa-solid fa-cart-shopping"></i>
          </span>
          <span class="button-text">Add to Cart</span>
        </button>
        <button class="feedback">
          <span id="white-button"
            >🥳 Woohoo, You're about to own a benz 🎊</span
          >
        </button>
      </div>
    </div>
    <script src="app.js"></script>
  </body>
</html>
CSS code:
In our style.css file, we'll first of all set our general styles like this:
* {
  font-family: "Poppins", sans-serif;
}

body {
  height: 100vh;
  display: flex;
  justify-content: center;
  align-items: center;
  overflow-y: hidden;
  background-color: antiquewhite;
}
Next, we'll style our product, starting with the tag, image, description and details.
/* product tag */
.tag {
  font-size: 0.9rem;
  background-color: black;
  border-radius: 5px;
  width: 4rem;
  display: flex;
  justify-content: center;
  color: #fff;
}

/* product*/
.product-title {
  font-size: 2rem;
  font-weight: 700;
}

.product-card {
  background: #fff;
  display: grid;
  /* align-items: center; */
  grid-template-rows: 55% 45%;
  height: 80%;
  width: 30%;
  box-shadow: 10px 10px 25px 0px #3c3c3c;
}

.product-image {
  /* border: 2px solid black; */
  background-image: url("./img/black-benz.jpg");
  background-position: center;
  background-repeat: no-repeat;
  background-size: cover;
  padding: 40px 10px;
  width: 28rem;
  height: 66%;
}

.product-description {
  background-color: #62c256;
  color: #fff;
  padding-left: 20px;
  margin-top: -67px;
}

.product-details {
  display: flex;
  flex-direction: column;
  margin-top: -20px;
}

.product-image img {
  width: 28rem;
}

.stars {
  color: yellow;
  font-size: 1em;
}
Then, we'll style our colors: their prices, colors as a group, and individual colors.
/* colors */
.colors-price {
  display: flex;
  align-items: center;
  width: 70%;
  justify-content: space-between;
  margin-top: -15px;
}

.colors {
  display: flex;
  width: 6rem;
  justify-content: space-between;
  cursor: pointer;
}

.red {
  background: red;
  width: 25px;
  height: 25px;
  border-radius: 50%;
}

.gray {
  background: gray;
  width: 25px;
  height: 25px;
  border-radius: 50%;
}

.black {
  background: black;
  width: 25px;
  height: 25px;
  border-radius: 50%;
}

.pricing {
  display: flex;
  width: 12rem;
  justify-content: space-between;
  align-items: center;
}

.old-price {
  font-weight: 100;
}
Finally, we'll style our buttons with this code:
/* buttons */
button {
  cursor: pointer;
}

#button {
  background-color: #000;
  padding: 10px 25px;
  border: none;
  border-radius: 5px;
}

button white-button {
  background-color: #fff;
}

.button-text {
  color: #fff;
  margin-left: 5px;
}

.feedback {
  display: none;
  padding: 10px 25px;
  border: none;
  border-radius: 5px;
}
DOM Implementation
Everything in the DOM falls into one of these two categories: selecting elements and manipulating elements. After creating our HTML and CSS files, we head into our app.js file to implement the following:
- Select: We reference all elements we want to make dynamic from our HTML code and assign them variables in our JavaScript file.
- Manipulate: Once we have selected and linked the variables, we create the various functions responsible for the manipulations and then link to the variables.
How to Select Elements in the DOM
To get access to the HTML elements that you want to manipulate, you need to make the JavaScript aware that such elements exist. This is what is generally referred to as "selecting" elements – basically linking them.
In the DOM, there’s no one way to locate and reference an element for manipulation. Instead, it’ll depend on the selector you've used in the element's tag.
You do this by assigning the element to a variable. It takes the following format. Keep in mind that all DOM selectors are preceded by the document object and a dot:
const example = document.[DOMselector]
In our JavaScript file, we have to select all the elements that we want to manipulate such as the button, the colors, the image card, and the tag.
We’re going to use as many of the DOM selectors as possible, so let's learn more about them.
How to use querySelector
querySelector is a method which accepts the exact CSS selector in a string and returns one element. You can use it to select the red and black colors as well as the image card, using their class names.
If you wanted to use this approach to select and return more than one element, you can use QuerySelectorAll instead.
const redColor = document.querySelector(".red");
The code above links the span with class "red" <span class="red"></span> from our HTML code to the variable redColor in our JavaScript.
const blackColor = document.querySelector(".black");
The code above links the span with class "black" <span class="black"></span> from our HTML code to the variable blackColor in our JavaScript.
const imageCard = document.querySelector(".product-image");
The code above links the div with class "product-image" <div class="product-image"> from our HTML code to the variable imageCard in our JavaScript.
const feedbackBtn = document.querySelector(".feedback");
The code above links the button with class "feedback" <button class="feedback"> from our HTML code to the variable feedbackBtn in our JavaScript.
How to use getElementsByClassName
You can use this selector to select the gray color. It's very similar to the querySelector. The only difference is that this method accepts just the name of the class, without the preceding dot (.)
const grayColor = document.getElementsByClassName("gray");
The code above links the span with class "gray" <span class="gray"></span> from our HTML code to the variable grayColor in our JavaScript.
How to use getElementById
You can use this selector to select the cart button. It's very similar to the getElementsByClassName. The only difference is that because we use the ID to show uniqueness, it's used on only one element. This method reads getElement, without an s.
const cartButton = document.getElementById("button");
The code above links the button with id "button" <button id="button"> from our HTML code to the variable cartButton in our JavaScript.
How to use GetElementsByTagName
Attributes are not the only ways to select an element. You can also use tag names. If you've used the tag you're targeting more than once, then it will return a list of elements. Use indexing to select the right one.
const itemTag = document.getElementsByTagName("h3")[0];
The code above links the h3 that contains our product tag <h3 class="tag"> from our HTML code to the variable itemTag in our JavaScript.
Of all these, the querySelector and querySelectorAll are probably the most popular because of how general and less restricting they are.
How to Manipulate Elements in the DOM
Manipulation is the main purpose of the DOM. It's everything that happens after you reference and select the element(s) you want to work with. This leads to a change in the state of the element, from static to dynamic.
Two concepts that you need to know to understand DOM manipulation are events and handlers.
What are Events?
Let's use the same music analogy from earlier. On the music app, you have to perform an action [click or swipe] before the functionalities kick in.
In the DOM, this action is known as an event. There are events such as click, scroll, mouseover, change, and more.
In the DOM, responses are tied to each event. This means that there should be a lookout for the event in order to give a response. This is known as an event listener. Event listeners usually come in the form of an addEventListener method which takes two arguments(event, event handler).
Anatomy of an Event
DOM events normally contain an element, its event listener, and a function.
element.[eventListenerMethod(event, eventHandler)
What are Event Handlers?
Event handlers are the responses that are triggered when our event listener methods read an event. Without event handlers, there would be no way to alert our code that an event has occurred.
All the modifications that happen within the DOM such as styling, appending, removing, and so on rely on event handlers. They are the functions found in the second argument of an addEventListener method. They are always alert to run as soon as the event (first argument) happens.
redColor.addEventListener("click", function () {
  cartButton.style.backgroundColor = "red";
  itemTag.style.backgroundColor = "red";
  imageCard.style.backgroundImage = 'url("./img/red-benz.webp")';
});
In the code above, the function after the 'click' event, is the event handler. This means that everything within that function will be implemented as soon as the red color is clicked.
How to Implement Events and Event Handlers
In this project, we’re going to use events and event handlers for about 5 implementations. We'll go through each one now.
First, we'll use them to make the red color functional. Once a user clicks the red color, the cart button and item tag are assigned styles in the form of a red background color. The image card also gets assigned a red background image.
We do this by taking the variable redColor and adding an event listener of 'click'. This means we want our code to be alerted when the red color is clicked. In return, the event handler function is in place to run immediately.
redColor.addEventListener("click", function () {
  cartButton.style.backgroundColor = "red";
  itemTag.style.backgroundColor = "red";
  imageCard.style.backgroundImage = 'url("./img/red-benz.webp")';
});
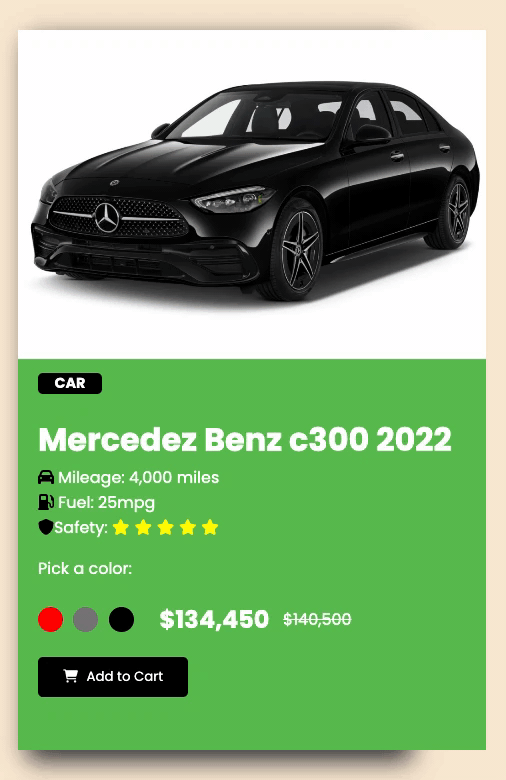 Red color preview
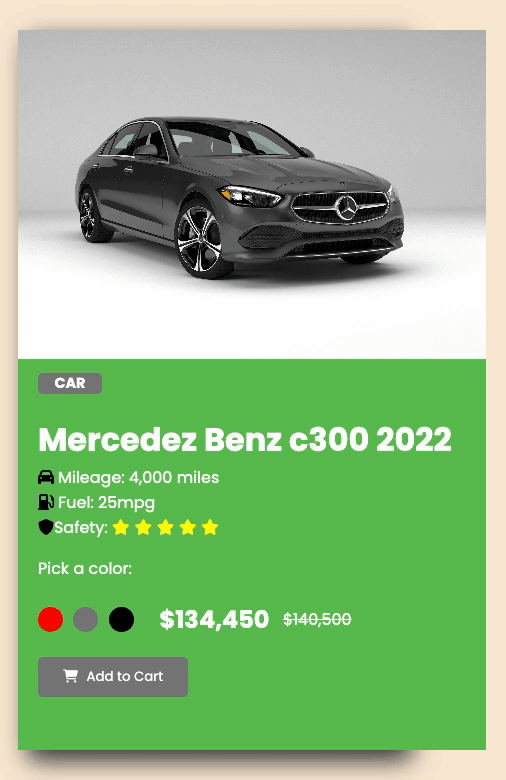
Then we'll make the gray color functional. When a user clicks the gray color, the cart button and item tag are assigned styles in the form of a gray background color. The image card is also assigned a gray background image.
We do this by taking the variable grayColor and adding an event listener of 'click'. This means we want our code to be alerted when the gray color is clicked. In return, the event handler function is in place to run immediately.
grayColor[0].addEventListener("click", function () {
  cartButton.style.backgroundColor = "gray";
  itemTag.style.backgroundColor = "gray";
  imageCard.style.backgroundImage = 'url("./img/gray-benz.jpg")';
});
 Gray color preview
Next we'll make the black color functional. When the user clicks the black color, the cart button and item tag are assigned styles in the form of a black background color. The image card is also assigned a black background image.
We do this by taking the variable blackColor and adding an event listener of 'click'. This means we want our code to be alerted when the black color is clicked. In return, the event handler function is in place to run immediately.
blackColor.addEventListener("click", function () {
  cartButton.style.backgroundColor = "black";
  itemTag.style.backgroundColor = "black";
  imageCard.style.backgroundImage = 'url("./img/black-benz.jpg")';
});
 Black color preview
We've looked at one approach to event handlers, which is creating the function within the addEventListener method.
Another approach is to create a function before passing the name of the function as an argument in the addEventListener method.
How to Implement the Cart Button
We start by creating a function named cart. The cart function hides the cart button and shows the feedback button. The function name cart is then passed to the event listener method as the second argument.
const cart = () => {
  cartButton.style.display = "none";
  feedbackBtn.style.display = "block";
};
cartButton.addEventListener("click", cart);
 Cart button preview
How to Implement the Feedback Button
We first create a function named feedback. The feedback function hides the feedback button and shows the cart button. The function name feedback is then passed to the event listener method as the second argument.
const feedback = () => {
  cartButton.style.display = "block";
  feedbackBtn.style.display = "none";
};
feedbackBtn.addEventListener("click", feedback);
 Feedback button preview
Full Project Code
This is the project we’ve built together in this article:

Here's the full HTML code:
<!DOCTYPE html>
<html lang="en">
  <head>
    <meta charset="UTF-8" />
    <meta http-equiv="X-UA-Compatible" content="IE=edge" />
    <meta name="viewport" content="width=device-width, initial-scale=1.0" />
    <link
      rel="stylesheet"
      href="https://cdnjs.cloudflare.com/ajax/libs/font-awesome/6.1.2/css/all.min.css"
      integrity="sha512-1sCRPdkRXhBV2PBLUdRb4tMg1w2YPf37qatUFeS7zlBy7jJI8Lf4VHwWfZZfpXtYSLy85pkm9GaYVYMfw5BC1A=="
      crossorigin="anonymous"
      referrerpolicy="no-referrer"
    />
    <link rel="preconnect" href="https://fonts.gstatic.com" crossorigin />
    <link
      href="https://fonts.googleapis.com/css2?family=Poppins:wght@400;500;700&display=swap"
      rel="stylesheet"
    />
    <link rel="stylesheet" href="style.css" />
    <title>Practicalized DOM</title>
  </head>
  <body>
    <div class="product-card">
      <div class="product-image">
        <!-- <img src="./img/gray-benz.jpg" alt="cars" /> -->
      </div>
      <div class="product-description">
        <h3 class="tag">CAR</h3>
        <h1 class="product-title">Mercedez Benz c300 2022</h1>
        <p class="product-details">
          <span class="mileage">
            <span style="font-size: 1em; color: black"
              ><i class="fa-solid fa-car"></i
            ></span>
            Mileage: 4,000 miles
          </span>
          <span class="fuel">
            <span style="font-size: 1em; color: black"
              ><i class="fa-solid fa-gas-pump"></i
            ></span>
            Fuel: 25mpg
          </span>
          <span class="safety">
            <span style="font-size: 1em; color: black"
              ><i class="fa-solid fa-shield"></i></span
            >Safety:
            <span class="stars">
              <i class="fa-solid fa-star"></i>
              <i class="fa-solid fa-star"></i>
              <i class="fa-solid fa-star"></i>
              <i class="fa-solid fa-star"></i>
              <i class="fa-solid fa-star"></i>
            </span>
          </span>
        </p>
        <p>Pick a color:</p>
        <div class="colors-price">
          <div class="colors">
            <span class="red"></span>
            <span class="gray"></span>
            <span class="black"></span>
          </div>
          <div class="pricing">
            <h2 class="new-price">$134,450</h2>
            <h4 class="old-price"><s>$140,500</s></h4>
          </div>
        </div>
        <button id="button">
          <span style="font-size: 1em; color: white">
            <i class="fa-solid fa-cart-shopping"></i>
          </span>
          <span class="button-text">Add to Cart</span>
        </button>
        <button class="feedback">
          <span id="white-button"
            >🥳 Woohoo, You're about to own a benz 🎊</span
          >
        </button>
      </div>
    </div>
    <script src="app.js"></script>
  </body>
</html>
Here's the CSS:
* {
  font-family: "Poppins", sans-serif;
}

body {
  height: 100vh;
  display: flex;
  justify-content: center;
  align-items: center;
  overflow-y: hidden;
  background-color: antiquewhite;
}

/* product tag */
.tag {
  font-size: 0.9rem;
  background-color: black;
  border-radius: 5px;
  width: 4rem;
  display: flex;
  justify-content: center;
  color: #fff;
}

/* product*/
.product-title {
  font-size: 2rem;
  font-weight: 700;
}

.product-card {
  background: #fff;
  display: grid;
  /* align-items: center; */
  grid-template-rows: 55% 45%;
  height: 80%;
  width: 30%;
  box-shadow: 10px 10px 25px 0px #3c3c3c;
}

.product-image {
  /* border: 2px solid black; */
  background-image: url("./img/black-benz.jpg");
  background-position: center;
  background-repeat: no-repeat;
  background-size: cover;
  padding: 40px 10px;
  width: 28rem;
  height: 66%;
}

.product-description {
  background-color: #62c256;
  color: #fff;
  padding-left: 20px;
  margin-top: -67px;
}

.product-details {
  display: flex;
  flex-direction: column;
  margin-top: -20px;
}

.product-image img {
  width: 28rem;
}

.stars {
  color: yellow;
  font-size: 1em;
}

/* colors */
.colors-price {
  display: flex;
  align-items: center;
  width: 70%;
  justify-content: space-between;
  margin-top: -15px;
}

.colors {
  display: flex;
  width: 6rem;
  justify-content: space-between;
  cursor: pointer;
}

.red {
  background: red;
  width: 25px;
  height: 25px;
  border-radius: 50%;
}

.gray {
  background: gray;
  width: 25px;
  height: 25px;
  border-radius: 50%;
}

.black {
  background: black;
  width: 25px;
  height: 25px;
  border-radius: 50%;
}

.pricing {
  display: flex;
  width: 12rem;
  justify-content: space-between;
  align-items: center;
}

.old-price {
  font-weight: 100;
}

/* buttons */
button {
  cursor: pointer;
}

#button {
  background-color: #000;
  padding: 10px 25px;
  border: none;
  border-radius: 5px;
}

button white-button {
  background-color: #fff;
}

.button-text {
  color: #fff;
  margin-left: 5px;
}

.feedback {
  display: none;
  padding: 10px 25px;
  border: none;
  border-radius: 5px;
}
Here's the JavaScript code:
// 1. Change color of car and addToCart button color when a color is selected
// - Selecting Elements
const redColor = document.querySelector(".red");
const grayColor = document.getElementsByClassName("gray");
const blackColor = document.querySelector(".black");
const cartButton = document.getElementById("button");
const itemTag = document.getElementsByTagName("h3")[0];
const imageCard = document.querySelector(".product-image");
const feedbackBtn = document.querySelector(".feedback");

// Modifying Elements
// - Add Event Listeners
// - Red Color
redColor.addEventListener("click", function () {
  cartButton.style.backgroundColor = "red";
  itemTag.style.backgroundColor = "red";
  imageCard.style.backgroundImage = 'url("./img/red-benz.webp")';
});

// - Gray Color
grayColor[0].addEventListener("click", function () {
  cartButton.style.backgroundColor = "gray";
  itemTag.style.backgroundColor = "gray";
  imageCard.style.backgroundImage = 'url("./img/gray-benz.jpg")';
});

// - Black Color
blackColor.addEventListener("click", function () {
  cartButton.style.backgroundColor = "black";
  itemTag.style.backgroundColor = "black";
  imageCard.style.backgroundImage = 'url("./img/black-benz.jpg")';
});

// Button Click Implementation
// - Cart Button
const cart = () => {
  cartButton.style.display = "none";
  feedbackBtn.style.display = "block";
};
cartButton.addEventListener("click", cart);

// - Feedback Button
const feedback = () => {
  cartButton.style.display = "block";
  feedbackBtn.style.display = "none";
};
feedbackBtn.addEventListener("click", feedback);
Conclusion
The DOM is an essential part of modern web development because it helps developers transform websites and web applications from static to dynamic.
As a beginner, it can be quite hard to wrap your head around the DOM and all that it entails. Taking time to build a few simple projects like this will help you reinforce the concepts.
Thanks for reading 👋🏾. I hope you found it helpful.