
By Ben Robertson
On Twitter, in Slack, on Discord, in IRC, or wherever you hang out with other developers on the internet, you may have heard some formulation of the following statements:
- React doesn't support accessibility
- React makes websites inaccessible
- People should write accessible HTML instead of React
- React is ruining the internet
There's a somewhat common misperception that JavaScript frameworks and web accessibility don't mix. React, being one of the largest JavaScript libraries, is often the target.
In my career, however, I have had the interesting experience of being introduced to accessibility and ReactJS at around the same time. I found tooling in React that helped me learn a lot about accessibility that I never would have encountered otherwise.
And while I don't disagree that there are plenty of libraries, websites, apps, etc. written in React that are inaccessible, I do disagree there is something inherent in ReactJS that makes developers build inaccessible sites. In fact, I love the accessibility tooling available in the React ecosystem, so this post is really about how React can help you make more accessible websites than you've ever made before.
I'll outline how you can combine React linting tools, DOM auditing, and Storybook (a component library tool) to provide a really supportive accessibility environment for developers -- whether they are accessibility pros or just getting started. By the end of this post, you'll have the following configured for your Gatsby project (or other React project):
- in-editor reporting of accessibility errors
- a pre-commit hook for preventing accessibility errors from getting into the repository
- browser console reporting of accessibility errors during development, with links to info on how to resolve the errors
- a component library with built-in accessibility testing so all project stakeholders can hold the team accountable for accessibility issues
Want to get started right away? I created a Gatsby starter with all these accessibility tools built in. Checkout the gatsby-starter-accessibility repo that has all these features available out of the box.
Tools and Setup
eslint-plugin-jsx-a11y
If you've written JavaScript over the past few years, you've probably used or at least heard of ESLint. If not, now is a great time to get started with it!
ESLint is a linting utility for JavaScript that helps you catch formatting and syntax errors while you are writing code. Most editors have some sort of linting configuration built in, which lets you see errors in your editor while you code.
This is really helpful for keeping code consistent, especially when there's a lot of people working on a project.
ESLint also has a really healthy plugin ecosystem. You can include rules specific to the JavaScript framework you are working with (i.e., React, Angular, Vue, etc), among others. For React, I typically use the eslint-plugin-react and the really helpful eslint-plugin-jsx-a11y. This plugin lints your code for known accessibility violations, using these rules.
Having these automated tests run while you are writing code can prevent so many errors. Even though automated accessibility testing catches only about 20-30% of all accessibility errors, catching these errors before they make it into a codebase can save time, budget, and energy for doing more manual testing once the code is in the browser.
Usage
Here's how you can get started with accessibility linting in your React project.
First, we'll need to install the necessary eslint packages:
npm install eslint eslint-plugin-react eslint-plugin-jsx-a11y --save-dev
In your package.json, add the following configuration:
"eslintConfig": {
    "parserOptions": {
      "sourceType": "module"
    },
    "env": {
      "node": true,
      "browser": true,
      "es6": true
    },
    "plugins": [
      "react",
      "jsx-a11y"
    ],
    "extends": [
      "eslint:recommended",
      "plugin:react/recommended",
      "plugin:jsx-a11y/recommended"
    ]
}
With this added to your package.json, ESLint will use the rules recommended by ESLint, React, and the jsx-a11y plugin while you are working.
You'll want to make sure your editor is set up to display linting errors in the editor for this to be really useful.
Add a pre-commit hook for preventing inaccessible code in the codebase using lint:staged
Now we've got some accessibility linting set up, and hopefully everyone working on the project has linting turned on in their editor so they can see any errors while they work.
But you can't be 100% sure that everyone will be paying attention to the linter. And even if they are, it's easy to make a quick change, switch files, and any errors will be out of sight, out of mind.
What we can do as an extra check to prevent inaccessible code from entering the codebase is to add a pre-commit hook that runs the linting we set up above every time a developer tries to commit code. If an accessibility error is found, an error message will display with the relevant linting error and location of the error, and the commit will be prevented until the developer resolves the issue.
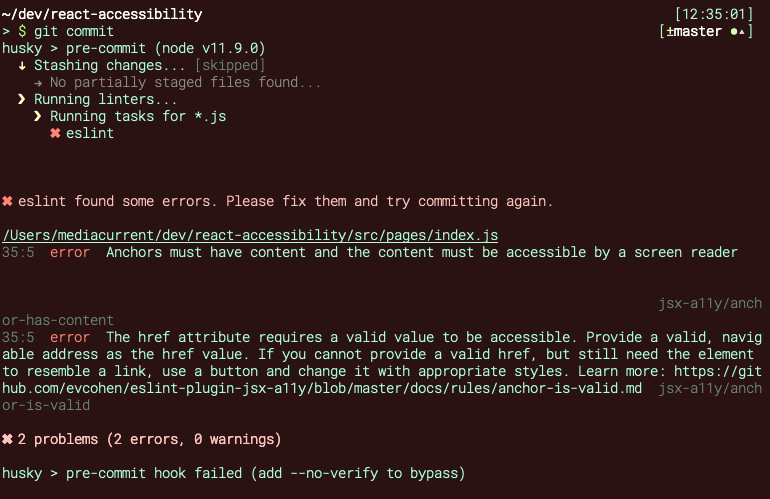 lint-staged will run a pre-commit hook that will catch any accessibility errors raised by eslint-plugin-jsx-a11y
Usage
The easiest way to set up pre-commit linting hooks is using the [lint-staged](https://www.npmjs.com/package/lint-staged) package. After you've got all your eslint configuration set up (from our first step), run the following command in your project directory:
npx mrm lint-staged
This command will install the [husky](https://www.npmjs.com/package/husky) package for managing the pre-commit hooks and look in your package.json to automatically setup a pre-commit hook based on your linting configuration.
A simple configuration that lints all JS files based on the existing eslint configuration in the repo will look like this (from package.json):
"husky": {
    "hooks": {
      "pre-commit": "lint-staged"
    }
},
"lint-staged": {
    "*.js": [
      "eslint"
    ]
}
You can adjust this as you see fit. For example, sometimes you want to limit linting to certain directories. To run the pre-commit hook only on JS files in the src directory, you would update the lint-staged configuration like this:
"lint-staged": {
    "src/*.js": [
      "eslint"
    ]
}
The great thing about lint-staged is that it only lints the files that are part of the current commit. If for some reason there is some pre-existing errors in another part of the codebase, the commit won't be prevented--it only prevents new errors from being introduced.
react-axe
The great thing about the linting setup we have now is that it will prevent a lot of errors from being introduced into the codebase. It won't prevent all errors, however. Some errors only exist when several components are used together, or from certain content, and can only be caught in the browser.
Luckily, we have a solution for this, too. Axe is an open source engine for automated accessibility testing, supported by Deque. I first became familiar with axe by using their really useful browser extension for testing individual pages in the browser.
The problem with browser-extension accessibility testing is that they are typically only run after development is complete. Using the react-axe library, you can have automated accessibility testing run on every page during development, so developers can get real-time feedback on accessibility issues. This helps make sure that accessibility issues never make it to production, and it also educates developers who may not be accessibility experts on potential pitfalls.
The react-axe library is an easy to use implementation of the axe engine, specifically for React.
Usage
Here's how to get started using react-axe with Gatsby (someone made a Gatsby plugin for it!):
npm install --save gatsby-plugin-react-axe
Add gatsby-plugin-react-axe to your plugins array in gatsby-config.js
module.exports = {
 siteMetadata: {
        title: 'Gatsby Default Starter',
    description:
      'Kick off your next, great Gatsby project with this default starter. This barebones starter ships with the main Gatsby configuration files you might need.',
    author: '@gatsbyjs',
  },
  plugins: [
    'gatsby-plugin-react-axe',
    // other plugins go here
  ],
};
Now, when the page renders, the plugin will print any accessibility errors to the browser console. Here's an example, where I've put an <h5> directly underneath an <h1>:
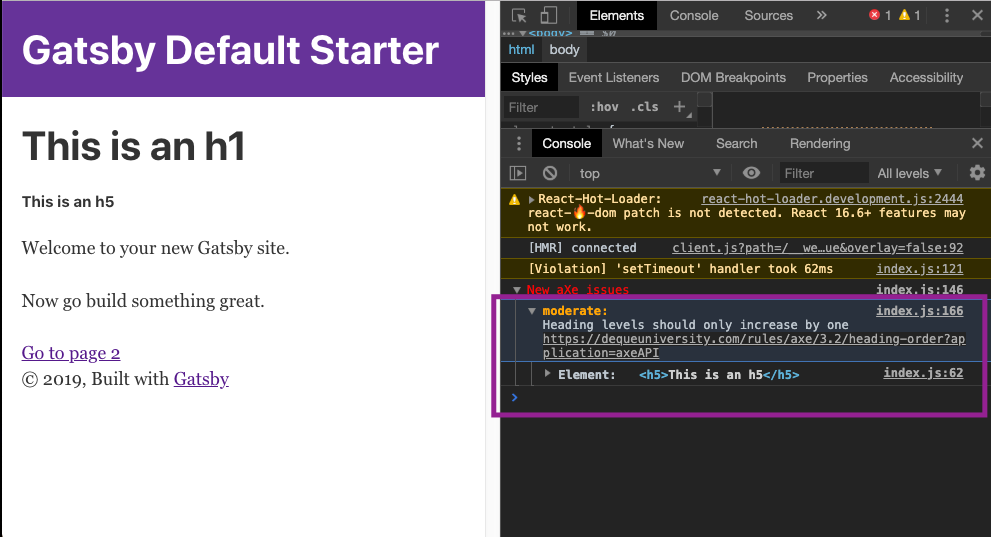 React aXe will show accessibility errors in the console while you are developing.
React aXe will show accessibility errors in the console while you are developing.
You can see that in the axe message in the console that it has identified my heading issue: "Heading issues should only increase by one" as a moderate issue. It also includes a link to learn more about why this is an issue and how to resolve it: https://dequeuniversity.com/rules/axe/3.2/heading-order. And lastly, it displays the specific element that is causing the issue for easy identification.
This kind of instant feedback is so important, whether you are an accessibility beginner or even a seasoned pro. Catching the automated issues instantaneously can give you more bandwidth to focus on other more involved tasks.
Storybook and Accessibility
The last piece of our accessibility workflow has to do with our component-driven workflow. For React projects, I have really enjoyed using Storybook to build and document our front end components.
Storybook is an open source tool for developing UI components in isolation for React, Vue, and Angular. It makes building stunning UIs organized and efficient.
Besides having a nice workflow and UI, Storybook has an awesome accessibility add-on that adds a panel to each component in your component library highlighting accessibility issues.
Our storybook configuration has built-in axe tests for each component and a color blindness simulator, provided by the storybook accessibility add-on.
Behind the scenes, the add-on actually also uses aXe for testing. This is really nice, because it means that the testing we are using in development is the same as what we are using in the component library. Having the errors highlighted in the component library also helps everyone on our project teams catch accessibility issues as they are browsing the library, either for QA purposes or design inspiration.
Setup
The setup for Storybook is a bit more involved, so if you haven't used Storybook before, you can checkout the Storybook for React documentation for a generic React setup.
If you want to get Storybook running with Gatsby, see Visual Testing with Storybook in the Gatsby docs.
Once you have Storybook setup, adding the accessibility add-on is pretty straightforward.
First, install the add-on:
npm install @storybook/addon-a11y --save-dev
Then add this line to your addons.js file in your storybook config directory:
import '@storybook/addon-a11y/register';
And lastly, add this line in your Storybook config.js file to automatically add the accessibility panel to all components:
addDecorator(withA11y);
When you run Storybook now, you should now see the accessibility panel (see a live version here):
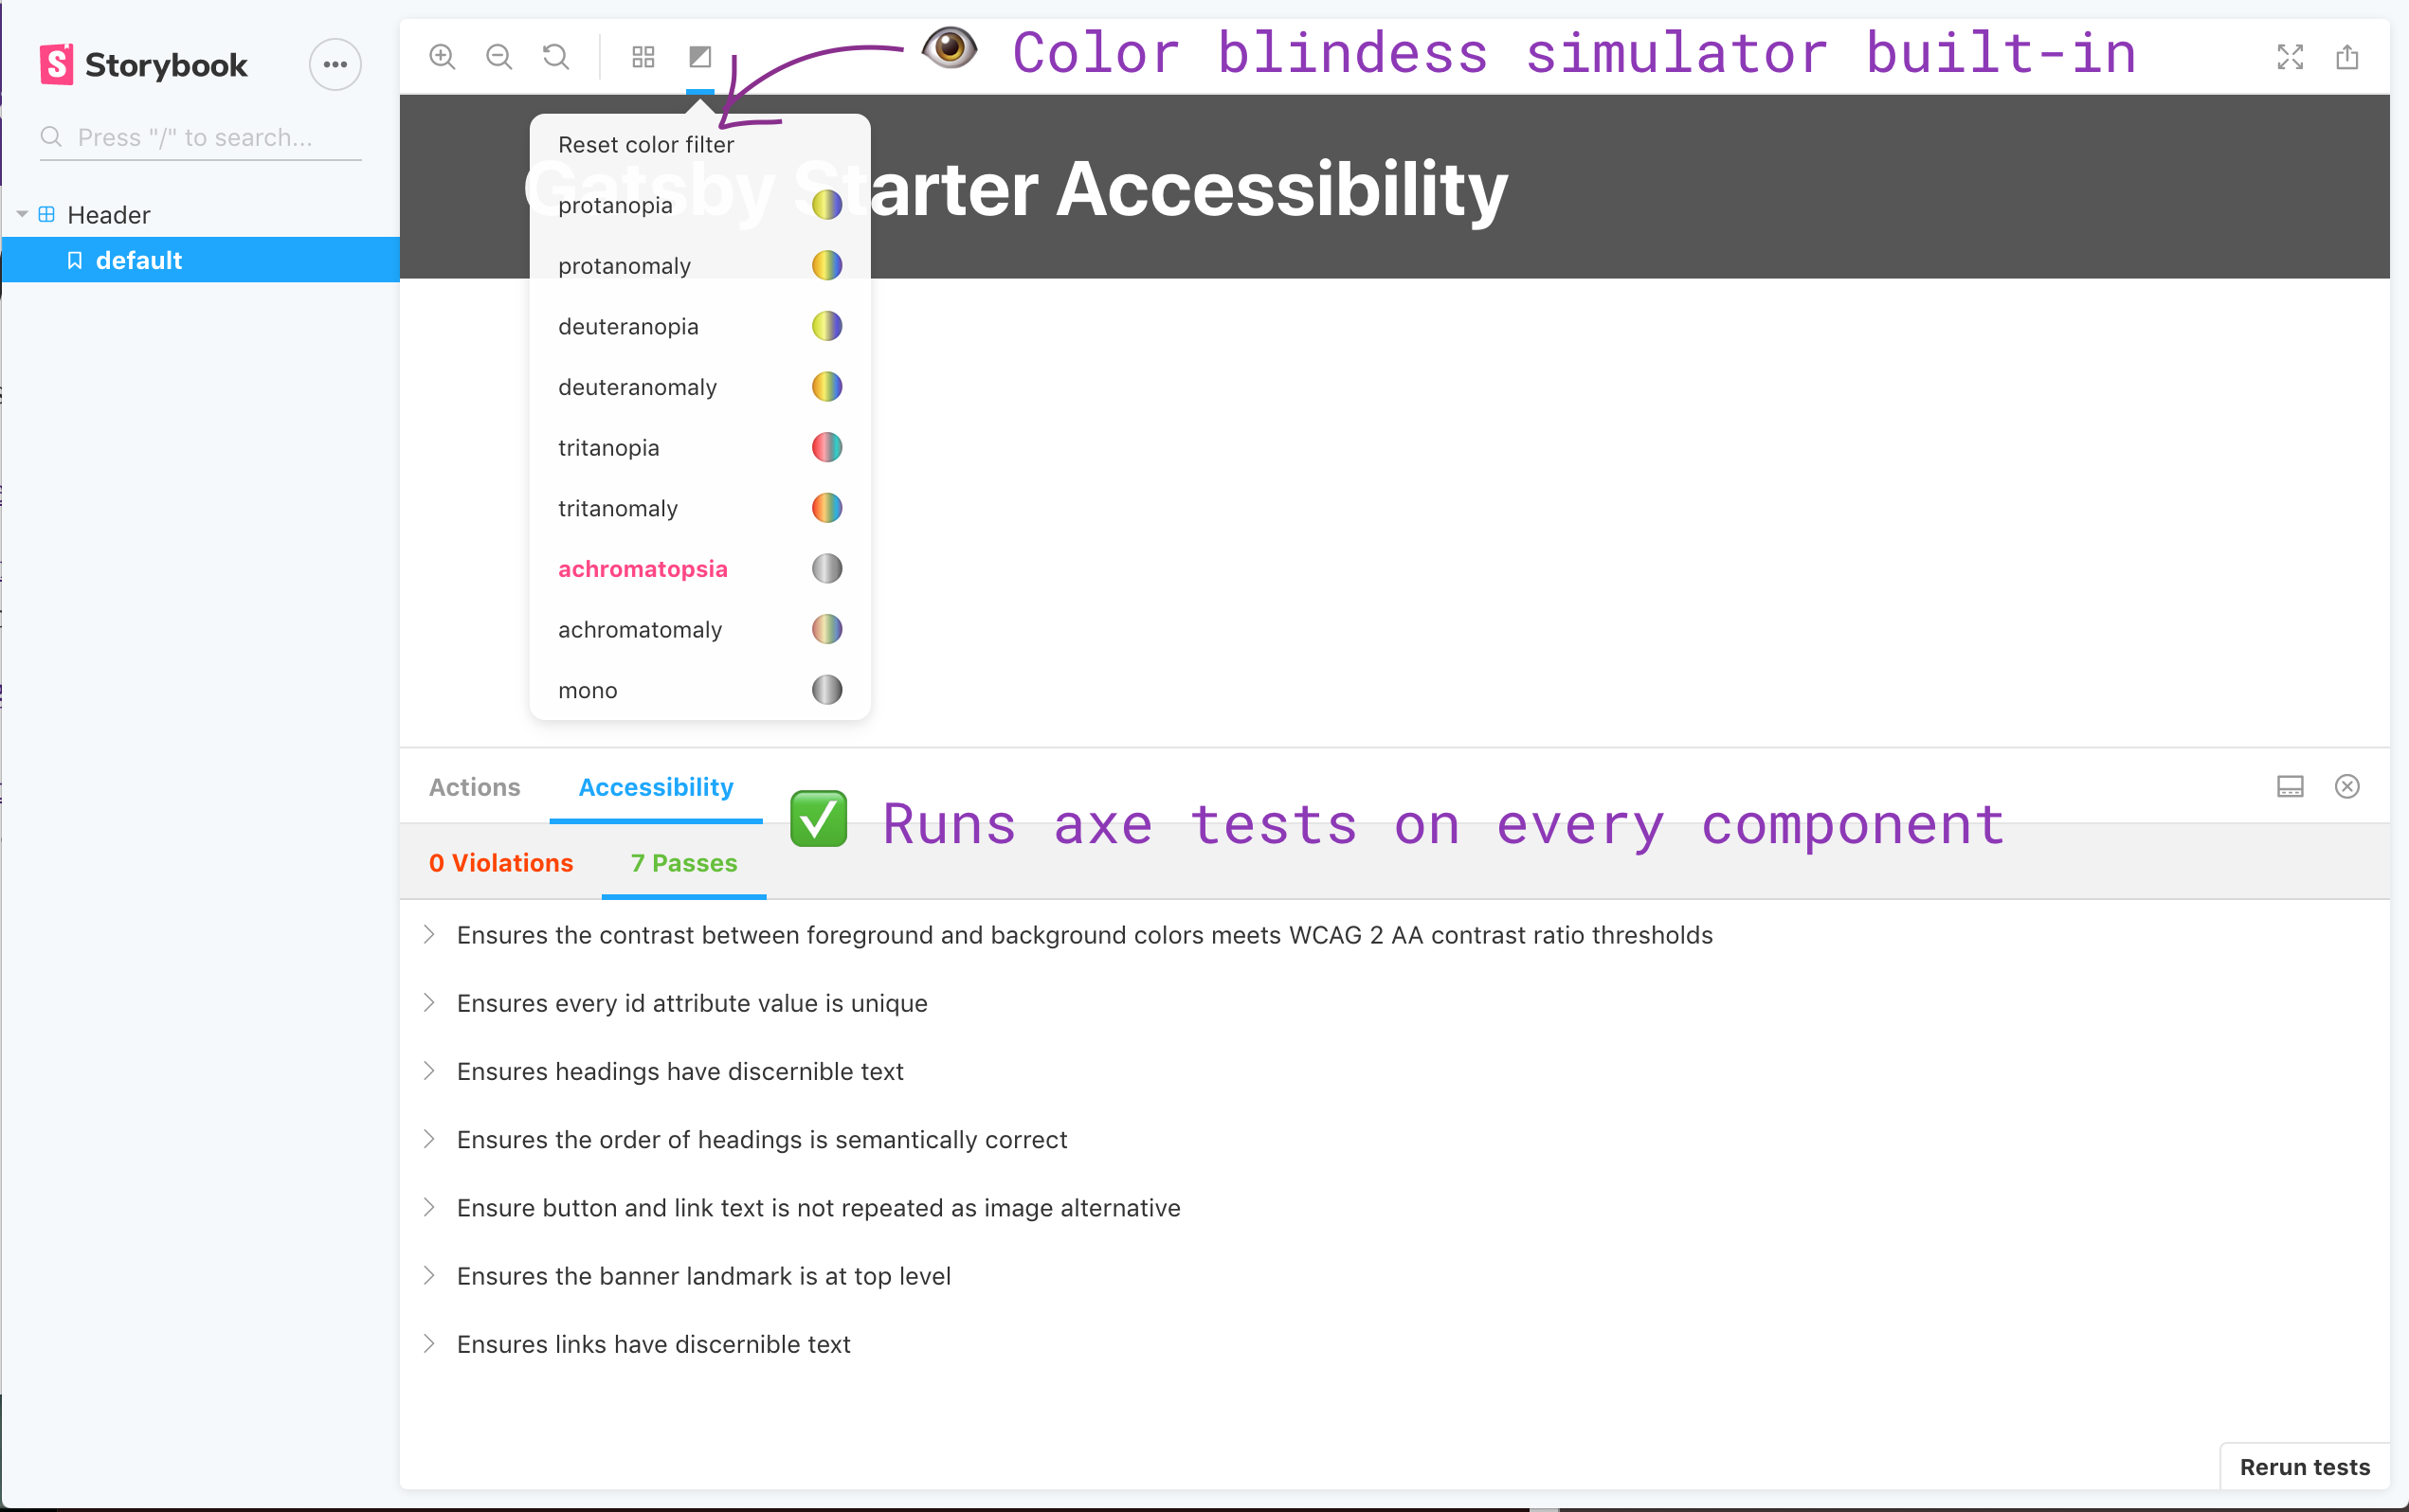 Our storybook configuration has built-in axe tests for each component and a color blindness simulator, provided by the storybook accessibility add-on.
As a side note - you can control the order of the tabs in your add-ons panel based on the order that you import add-ons into your addons.js file, if you want to have the accessibility panel display by default, make sure it is the first line in your addons.js.
Wrap up
If you didn't follow along with the setup or just want to get a new project setup quickly with this workflow, checkout the gatsby-starter-accessibility Gatsby starter!
You can create a new Gatsby site with all the configuration I described above out-of-the box with this single line in your terminal:
npx gatsby new my-accessible-project https://github.com/benjamingrobertson/gatsby-starter-accessibility
Or you can checkout the specific configuration in the repo.
Whether you ran through all the steps above or use with the starter, you'll have the following features set up in your Gatsby / React project:
- in-editor reporting of accessibility errors
- a pre-commit hook for preventing accessibility errors from getting into the repository
- browser console reporting of accessibility errors during development, with links to info on how to resolve the errors
- a component library with built-in accessibility testing so all project stakeholders can hold the team accountable for accessibility issues
On a complex project with many team members and moving parts, automating accessibility testing will help save time to make sure you can pay more attention to the accessibility tasks that can't be caught by automated tests.
Beyond that, tools like this can really help developers level up their accessibility knowledge.
I know it's helped me--I hope it helps your team too!
Want to dive deeper into building accessible websites? Join my free email course: ? Common accessibility mistakes and how to avoid them. 30 days, 10 lessons, 100% fun! ? Sign up here!