

Don’t try to convince yourself otherwise: along with all the good stuff, you’re going to have bad days with Linux.
- You (or the users you support) are going to mistype commands and permanently destroy documents.
- You’re going to experience that sinking feeling when you realize that some really important piece of hardware or software has just gone and failed. That’s gratitude after everything you did for it all those years.
Being properly backed up means that you can walk away from a non-functioning OS or computer and rebuild it all somewhere else. But that’s always going to be Plan B. Plan A is to recover.
Using recovery mode on Ubuntu
Linux not letting you log in normally (perhaps the boot process unexpectedly stops before displaying the login screen, for instance)? You’ll want some basic system administration tools.
But wait: if Linux won’t load, how are you going to launch those tools? Well, even if Linux won’t load all the way to a normal command prompt, often it’ll get you to the GRUB menu. From there you can use the up and down arrow keys and then Enter to select a Linux kernel running in recovery mode which, as you’ll soon see, will open up a whole bag of tricks.
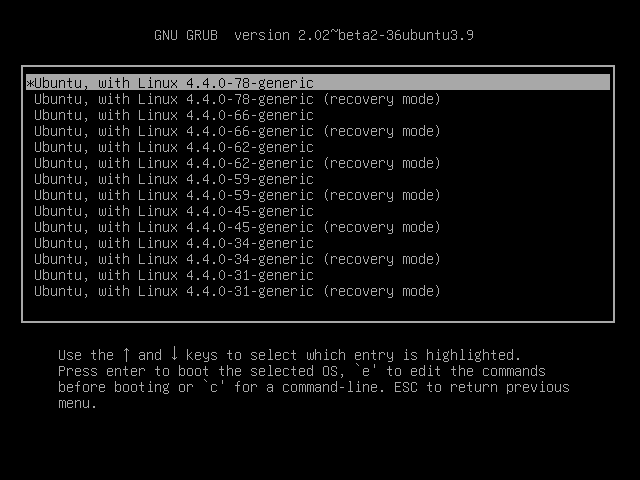 The GRUB “Advance options” menu of an Ubuntu installation with links to both current and older kernel versions along with options for launching in recovery mode
As you can see from the figure below, once Ubuntu is loaded in recovery mode, you’ll be shown a menu of tools that address some common boot-time problems. It’s worth trying each one that seems like it might address your root problem. “Clean”, for instance, will remove unused files if you suspect the trouble stems from a full disk. “dpkg” will attempt to fix any broken apt-based software packages that might be gumming things up. (The “dpkg” tool might require that you first enable networking.)
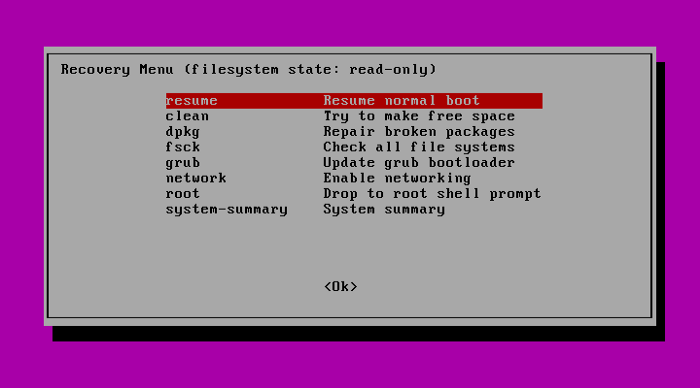 The Ubuntu Recovery Menu with links to some basic diagnostic and repair tools, along with the option of opening a shell session as “root”
The “root” option will open a root command line shell session for you where you’ll have Bash at your disposal. In general, using a simple shell session for recovery rather than a full GUI desktop makes a lot of sense, because the fewer complicated services you’ve got running, the more likely it is that you’ll be able to at least get your system running. Once you do manage to get a working command prompt, you can start poking around to see if you can identify and fix the problem.
But at the very least, you’ll look mighty cool doing it.
But what are those tools? Got an Ubuntu machine running? Go take a look for yourself. The code running the menu must already exist somewhere within an Ubuntu file system. Use “locate” to find it.
locate recovery-mode
/lib/recovery-mode
/lib/recovery-mode/l10n.sh
/lib/recovery-mode/options
/lib/recovery-mode/recovery-menu
/lib/recovery-mode/options/apt-snapshots
/lib/recovery-mode/options/clean
/lib/recovery-mode/options/dpkg
/lib/recovery-mode/options/failsafeX
/lib/recovery-mode/options/fsck
/lib/recovery-mode/options/grub
/lib/recovery-mode/options/network
/lib/recovery-mode/options/root
/lib/recovery-mode/options/system-summary
Note that the “l10n.sh” script sets appropriate environment variables for the menu. If you navigate over to the /lib/recovery-mode/ directory you’ll see that the “recovery-menu” file is the script that displays the menu interface that you saw above. The /lib/recovery-mode/options/ directory contains files for executing each of the menu items…like “fsck” that will check and, if possible, fix any broken file systems.
Since, based on previous chapters in the book, you’re now an accomplished Bash scripting expert, why not take a look at each of the scripts in the options/ directory to see if you can figure out how they work. Here are the contents of the “fsck” script to get you going. Note the way the script is nicely documented (using the “#” character) to help you understand what’s going on.
cat /lib/recovery-mode/options/fsck
#!/bin/sh
. /lib/recovery-mode/l10n.sh  <1>
if [ "$1" = "test" ]; then
  echo $(eval_gettext "Check all file systems")
  exit 0
fi
# Actual code is in recovery-menu itself  <2>
exit 0
Here are a couple of things you can try on your own:
- Manually run the “clean” script on a Debian/Ubuntu machine. What happened?
- Then try carefully editing the /lib/recovery-mode/recovery-menu script (make a backup copy first). Perhaps just change something simple, like the menu title or one of the script descriptions. Then reboot your machine and, from the GRUB menu, go into Recovery Mode to see what it looks like.
With some variations and exceptions, you should be able to put those examples to good use elsewhere.
This article is adapted from chapter 6 (Emergency tools: build a system recovery device) of my Manning “Linux in Action” book. There’s lots more fun where this came from, including a hybrid course called Linux in Motion that’s made up of more than two hours of video and around 40% of the text of Linux in Action. Who knows…you might also enjoy my Learn Amazon Web Services in a Month of Lunches.