
If you have an interest in Data Science, Web Development, Robotics, or IoT you must learn Python. Python has become the fastest-growing programming language due to its heavy usage and wide range of applications.
For a beginner or a person from a non-tech background, learning Python is a good choice. The syntax is like talking and writing plain English. For example, consider this syntax which shows its resemblance to the English language.
print("Hello folks")
We will use Python3 in this tutorial as it is widely used. Most of Python's frameworks and libraries support this version.
Note: Any version above 3.5.2 supports most of the libraries and frameworks.
Index:
Note: The beginning of this guide is geared towards beginners. If you have intermediate experience in Python, feel free to skip ahead using the links above.
Introduction:
As per Github's octoverse, Python is the second most used language by developers in 2019.
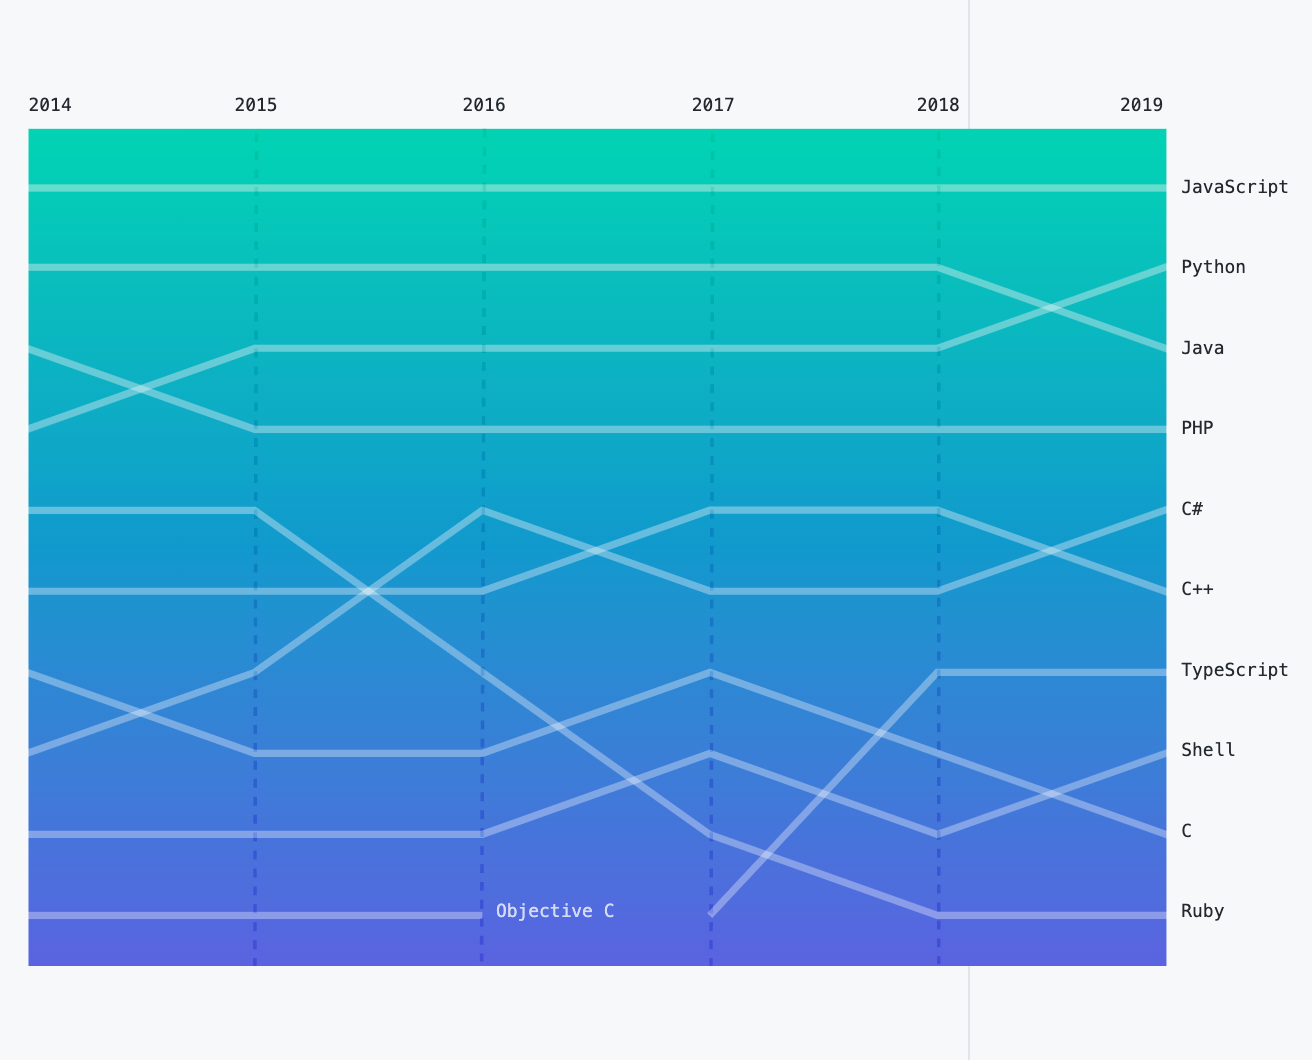
Octoverse graph of how languages have evolved
Before learning any language, it's helpful to know how that language came into existence. Well, Python was developed by Guido van Rossum, a Dutch programmer, and was released in 1991.
Python is an Interpreted language. It uses the CPython Interpreter to compile the Python code to byte code. For a beginner, you don't need to know much about CPython, but you must be aware of how Python works internally.
The philosophy behind Python is that code must be readable. It achieves this with the help of indentation. It supports many programming paradigms like Functional and Object Oriented programming. You will understand more about these as you read through the article.
The basic question that most beginners have in mind is what a language can do. Here are some of the use-cases of Python:
Server-side development ( Django, Flask )
Data Science ( Pytorch, Tensor-flow )
Data analysis / Visualisation ( Matplotlib )
Scripting ( Beautiful Soup )
Embedded development
Note: I do not endorse any of the above-mentioned libraries or frameworks in particular. They are popular and broadly used in their respective domains.
Installation
The first step of learning any programming language is installing it. Python comes bundled with most operating systems nowadays. Use the following command in your terminal to check if Python is available:
python3 --version
You'll see the following output:
Python 3.7.0
Note that your version of Python might be different. If you have Python installed and the version is above 3.5.2 then you can skip this section.
For those who don't have Python installed, follow the steps below:
Windows User:
Go to Python's official website.
Click on the download button ( Download Python 3.8.2 ) [ Note: The version may differ based on when you are reading this article ]
Go to the path where the package is downloaded and double-click the installer.
Check the box indicating to "Add Python 3.x to PATH" and then click on "Install Now".
Once done you'll get a prompt that "Setup was successful". Check again if python is configured properly using the above command.
To confirm if Python is installed and configured properly, use the command
python3 --version.
Mac User:
First install xcode from the app store.
If you want to install Xcode using the terminal then use the following command:
xcode-select --install
- After that, we will use the brew package manager to install Python. To install and configure brew, use the following command:
/bin/bash -c "$(curl -fsSL https://raw.githubusercontent.com/Homebrew/install/master/install.sh)"
- Once brew setup is done, use the following command to update any outdated packages:
brew update
- Use the following command to install Python:
brew install python3
- To confirm if Python is installed and configured properly, use the command
python3 --version.
Linux User:
- To install Python using
apt, use the following command:
sudo apt install python3
- To install the Python using
yum, use the following command:
sudo yum install python3
- To confirm if Python is installed and configured properly, use the command
python3 --version.
Python shell:
The shell is one of the most useful tools you'll come across. The Python shell gives us the power to quickly test any concept before integrating it into our application.
Go to the terminal or command line prompt. Enter python3 command and you'll get the following output:
➜ python3.7
Python 3.7.0 (v3.7.0:1bf9cc5093, Jun 26 2018, 23:26:24)
[Clang 6.0 (clang-600.0.57)] on darwin
Type "help", "copyright", "credits" or "license" for more information.
>>>
In this tutorial, we will learn some concepts with the help of the python3 shell which you can see above. From now on, whenever I mention go to the Python shell, it means that you have to use the python3 command.
To learn the remaining concepts we will create a file called "testing" with the extension .py. To run this file we will use the following command:
python3 testing.py
Let's go to the Python shell. Type 10 + 12 after the >>> mark. You'll get the output 22:
>>> 10 + 12
22
Commenting:
Comments make it easy to write code as they help us (and others) understand why a particular piece of code was written. Another awesome thing about comments is that they help improve the readability of the code.
# Stay Safe
When you add the above syntax, the Python interpreter understands that it is a comment. Everything after # is not executed.
You may be wondering why you should use comments. Imagine you are a developer and you have been assigned to a huge project. The project has more than a thousand lines of code. To understand how everything works you'll need to go line by line and read through all the code.
What's a better solution than that? Ah-ha! Comments. Comments help us understand why a particular piece of code was written and what it returns or does. Consider it as documentation for every piece of code.
Print:
Other than debugging tools from the editor, the thing which helps developers solve problems most often is a print statement. The print statement is one of the most underrated pieces of syntax in all of programming.
So how does it help in debugging an issue? Well, consider that you have a module and you want to check the flow of execution to understand or debug it. There are two options. Either you can use a debugger or add a print statement.
It's not always possible to use a debugger. For example, if you are using the Python shell, then a debugger is not available. In such a scenario, print helps us. Another scenario is when your application is running. You can add a print statement that will display in the logs of your application and monitor them in runtime.
Python provides a inbuilt print method with the following syntax:
print("Stay safe...")
Indentation:
Another interesting part of this language is indentation. Why? Well, the answer is simple: It makes the code readable and well-formatted. It is compulsory in Python to follow the rules of indentation. If proper indentation is not followed you'll get the following error:
IndentationError: unexpected indent
See, even the errors in Python are so readable and easy to understand. At the start, you may be annoyed by the compulsion of indentation. But with the time you'll understand that indentation is a developer's friend.
Variables:
As the name implies, a variable is something that can change. A variable is a way of referring to a memory location used by a computer program.
Well in most programming languages you need to assign the type to a variable. But in Python, you don’t need to. For example, to declare an integer in C, the following syntax is used: int num = 5;. In Python it's num = 5 .
Go to the Python shell and perform the operation step by step:
Integer: Numerical values that can be positive, negative, or zero without a decimal point.
>>> num = 5
>>> print(num)
5
>>> type(num)
<class 'int'>
As you can see here we have declared a num variable and assigned 5 as a value. Python's inbuilt type method can be used to check the type of variable. When we check the type of num we see the output <class 'int'>. For now, just focus on the int in that output. int represents an integer.
Float: Similar an integer but with one slight difference – floats are a numerical value with a decimal place.
>>> num = 5.0
>>> print(num)
5.0
>>> type(num)
<class 'float'>
Here we have assigned a number with a single decimal to the num. When we check the type of num we can see it is float.
String: A formation of characters or integers. They can be represented using double or single quotes.
>>> greet = "Hello user"
>>> print(greet)
Hello user
>>> type(greet)
<class 'str'>
Here we have assigned a string to greet. The type of greet is a string as you can see from the output.
Boolean: A binary operator with a True or False value.
>>> is_available = True
>>> print(is_available)
True
>>> type(is_available)
<class 'bool'>
Here we have assigned a True value to is_available. The type of this variable is boolean. You can only assign True or False. Remember T and F should be capital or it will give an error as follows:
>>> is_available = true
Traceback (most recent call last):
  File "<stdin>", line 1, in <module>
NameError: name 'true' is not defined
NoneType: This is used when we don't have the value of the variable.
>>> num = None
>>> print(num)
None
>>> type(num)
<class 'NoneType'>
Operators:
Take a look at the image below to see all the arithmetic operators available in Python:
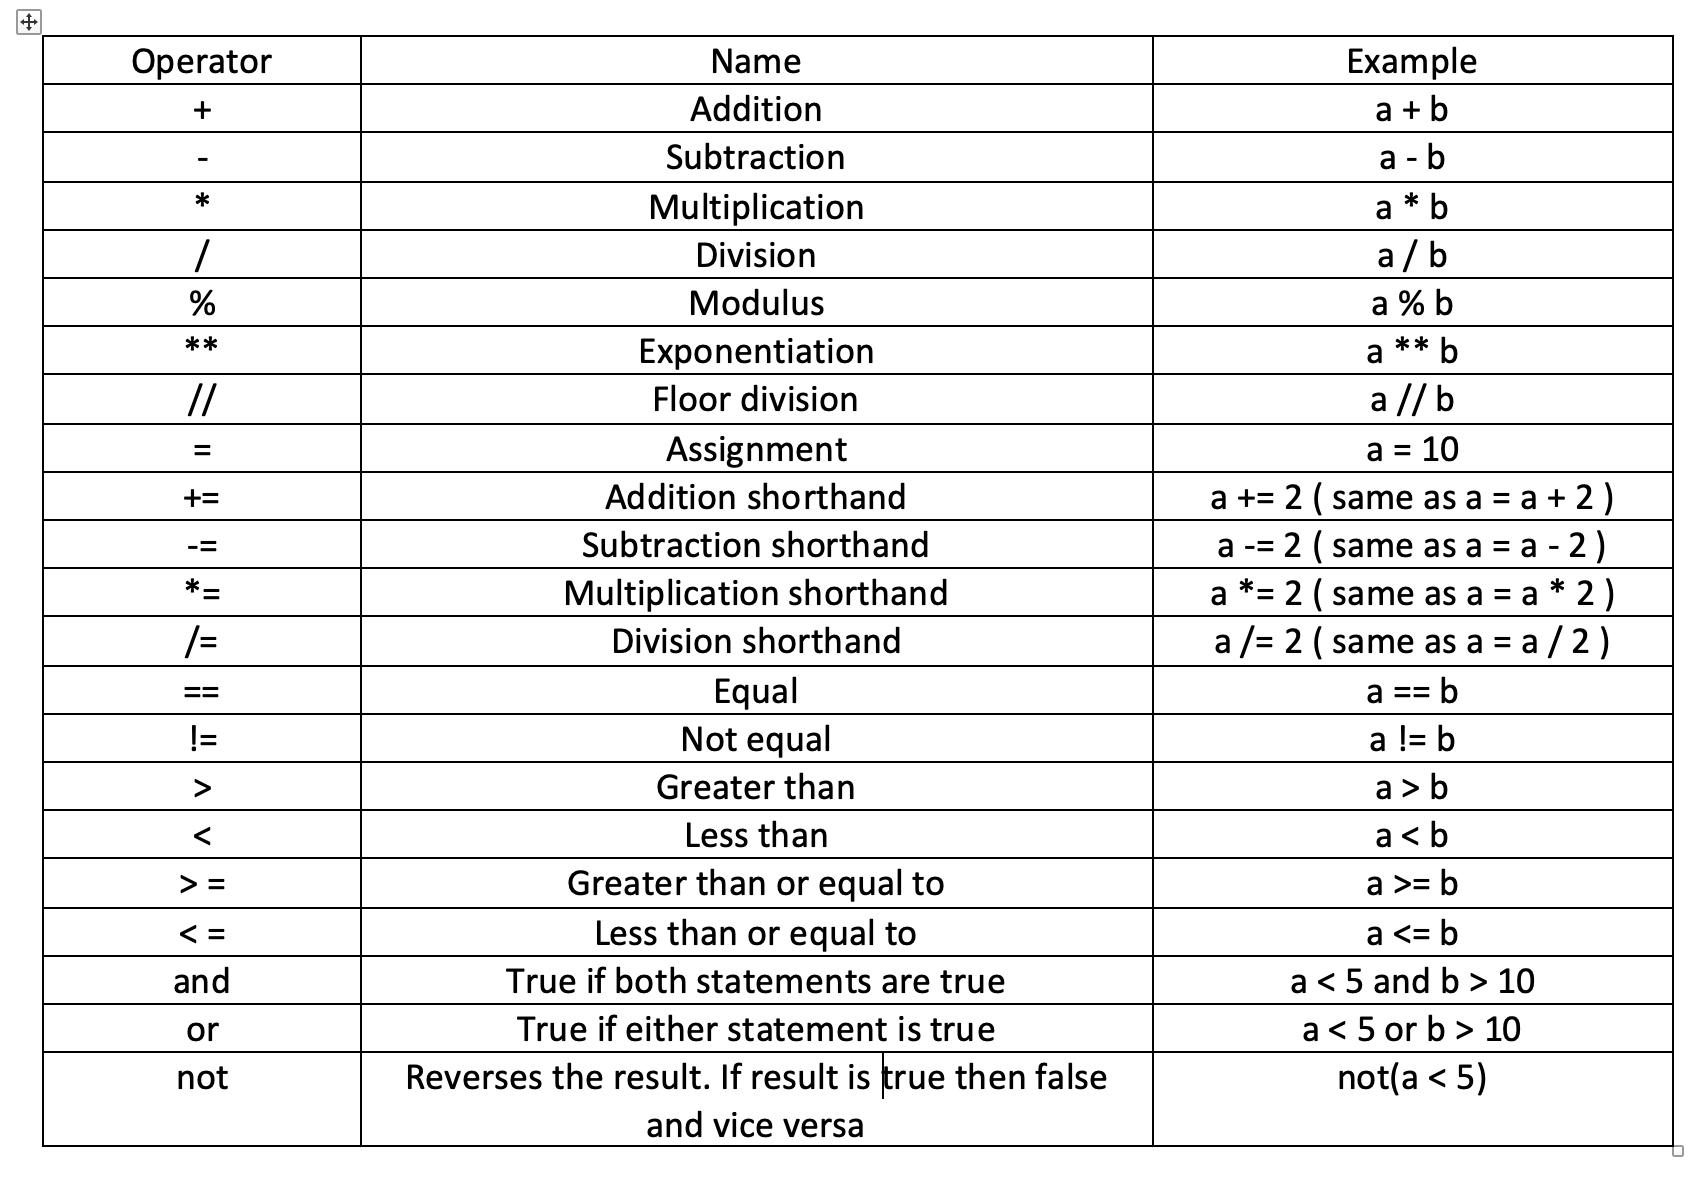
Operators table
Let's go over the operators one by one.
Arithmetic operators
These include addition, subtraction, deletion, exponentiation, modulus, and floor division. Also the shorthand syntax for some operators.
First, we will declare two variables, a and b.
>>> a = 6 # Assignment
>>> b = 2
Let's try our basic arithmetic operations:
>>> a + b # Addition
8
>>> a - b # Subtraction
4
>>> a * b # Multiplication
12
>>> a / b # Division
3.0
>>> a ** b # Exponentiation
36
To test for other arithmetic operations let's change the value of a and b.
>>> a = 7
>>> b = 3
>>> a % b # Modulus
1
>>> a // b # Floor division
2
Shorthand arithmetic operations are also available in Python. Refer back to the image above to test them out. To print the output of the shorthand operations use the print statement.
Comparison operators
These include equal to, greater than, and less than.
>>> a = 5 # Assign
>>> b = 2 # Assign
>>> a > b # Greater than
True
>>> a < b # less then
False
>>> a == b # Equal to
False
>>> a >= 5 # Greater than or equal to
True
>>> b <= 1 # Less than or equal to
False
Logical operators
These operators include not, and, & or.
>>> a = 10
>>> b = 2
>>> a == 2 and b == 10 # and
False
>>> a == 10 or b == 10 # or
True
>>> not(a == 10) # not
False
>>> not(a == 2)
True
Conditional Statements:
As the name suggests, conditional statements are used to evaluate if a condition is true or false.
Many times when you are developing an application you need to check a certain condition and do different things depending on the outcome. In such scenarios conditional statements are useful. If, elif and else are the conditional statements used in Python.
We can compare variables, check if the variable has any value or if it's a boolean, then check if it's true or false. Go to the Python shell and perform the operation step by step:
Condition Number 1: We have an integer and 3 conditions here. The first one is the if condition. It checks if the number is equal to 10.
The second one is the elif condition. Here we are checking if the number is less than 10.
The last condition is else. This condition executes when none of the above conditions match.
>>> number = 5
>>> if number == 10:
...     print("Number is 10")
... elif number < 10:
...     print("Number is less than 10")
... else:
...     print("Number is more than 10")
...
Output:
Number is less than 10
Note: It is not compulsory to check that two conditions are equal in the if condition. You can do it in the elif also.
Condition Number 2: We have a boolean and 2 conditions here. Have you noticed how we are checking if the condition is true? If is_available, then print "Yes it is available", else print "Not available".
>>> is_available = True
>>> if is_available:
...     print("Yes it is available")
... else:
...     print("Not available")
...
Output:
Yes it is available
Condition Number 3: Here we have reversed condition number 2 with the help of the not operator.
>>> is_available = True
>>> if not is_available:
...     print("Not available")
... else:
...     print("Yes it is available")
...
Output:
Yes it is available
Condition Number 4: Here we are declaring the data as None and checking if the data is available or not.
>>> data = None
>>> if data:
...     print("data is not none")
... else:
...     print("data is none")
...
Output:
data is none
Condition Number 5: You can also use an inline if in Python. The syntax to achieve this is the following:
>>> num_a = 10
>>> num_b = 5
>>> if num_a > num_b: print("num_a is greater than num_b")
...
Output:
num_a is greater than num_b
Condition Number 6: You can also use an inline if else in Python. The syntax to achieve this is the following:
expression_if_true if condition else expression_if_false
Example:
>>> num = 5
>>> print("Number is five") if num == 5 else print("Number is not five")
Output:
Number is five
Conditional Number 7: You can also use nested if-else statements. The syntax to achieve this is the following:
>>> num = 25
>>> if num > 10:
...     print("Number is greater than 10")
...     if num > 20:
...             print("Number is greater than 20")
...     if num > 30:
...             print("Number is greater than 30")
... else:
...     print("Number is smaller than 10")
...
Output:
Number is greater than 10
Number is greater than 20
Condition Number 8: You can also use the and operator in a conditional statement. It states if condition1 and condition2 both are true then execute it.
>>> num = 10
>>> if num > 5 and num < 15:
...     print(num)
... else:
...     print("Number may be small than 5 or larger than 15")
...
Output:
10
As our number is between 5 and 15 we get the output of 10.
Condition Number 9: You can also use the or operator in a conditional statement. It states that if either condition1 or condition2 is true then execute it.
>>> num = 10
>>> if num > 5 or num < 7:
...     print(num)
...
Output:
10
Are you confused because the value of num is 10 and our second condition states that num is less than 7? So why do we get the output as 10? It's because of the or condition. As one of the conditions matches, it will execute it.
For Loops:
Another useful method in any programming language is an iterator. If you have to implement something multiple times, what will you do?
print("Hello")
print("Hello")
print("Hello")
Well, that's one way to do it. But imagine you have to do it a hundred or a thousand times. Well, that's a lot of print statements we have to write. There's a better way called iterators or loops. We can either use a for or while loop.
Here we are using the range method. It specifies the range until which the loop should be repeated. By default, the starting point is 0.
>>> for i in range(3):
...     print("Hello")
...
Output:
Hello
Hello
Hello
You can also specify the range in this way range(1,3).
>>> for i in range(1,3):
...     print("Hello")
...
Output:
Hello
Hello
"Hello" is only printed two times as we have specified the range here. Think of the range as Number on right - Number on left.
Well, you can also add an else statement in the for loop.
>>> for i in range(3):
...     print("Hello")
... else:
...     print("Finished")
Output:
Hello
Hello
Hello
Finished
See our loop iterated 3 times ( 3 - 0 ) and once that is done it executed the else statement.
We can also nest a for loop inside another for loop.
>>> for i in range(3):
...     for j in range(2):
...             print("Inner loop")
...     print("Outer loop")
...
Output:
Inner loop
Inner loop
Outer loop
Inner loop
Inner loop
Outer loop
Inner loop
Inner loop
Outer loop
As you can see the inner loop print statement executed two times. After that outer loop print statement executed. Again the inner loop executed two times. So what is happening here? If you are confused then consider this to solve it:
Our Interpreter comes and sees that there is a
forloop. It goes down again and checks there is anotherforloop.So now it will execute the inner
forloop two times and exit. Once it's finished it knows that outer for loop has instructed it to repeat two more times.It starts again and sees the inner for loop and repeats.
Well, you can also choose to pass a certain for loop condition. What does pass mean here? Well whenever that for loop will occur and the Interpreter sees the pass statement it won't execute it and will move to the next line.
>>> for i in range(3):
...     pass
...
You will not get any output on the shell.
While loops:
Another loop or iterator available in Python is the while loop. We can achieve some of the same results with the help of a while loop as we achieved with the for loop.
>>> i = 0
>>> while i < 5:
...     print("Number", i)
...     i += 1
...
Output:
Number 0
Number 1
Number 2
Number 3
Number 4
Remember whenever you use a while loop it's important that you add an increment statement or a statement that will end the while loop at some point. If not then the while loop will execute forever.
Another option is to add a break statement in a while loop. This will break the loop.
>>> i = 0
>>> while i < 5:
...     if i == 4:
...             break
...     print("Number", i)
...     i += 1
...
Output:
Number 0
Number 1
Number 2
Number 3
Here we are breaking the while loop if we find the value of i to be 4.
Another option is to add an else statement in while loop. The statement will be executed after the while loop is completed.
>>> i = 0
>>> while i < 5:
...     print("Number", i)
...     i += 1
... else:
...     print("Number is greater than 4")
...
Output:
Number 0
Number 1
Number 2
Number 3
Number 4
Number is greater than 4
The continue statement can be used to skip the current execution and to proceed to the next.
>>> i = 0
>>> while i < 6:
...     i += 1
...     if i == 2:
...             continue
...     print("number", i)
...
Output:
number 1
number 3
number 4
number 5
number 6
User Input:
Imagine you are building a command-line application. Now you have to take the user input and act accordingly. To do that you can use Python's inbuilt input method.
The syntax to achieve this is as follows:
variable = input(".....")
Example:
>>> name = input("Enter your name: ")
Enter your name: Sharvin
When you use the input method and press enter, you'll be prompted with the text that you enter in the input method. Let's check if our assignment is working or not:
>>> print(name)
Sharvin
There it is! It is working perfectly. Here Sharvin is of the type string.
>>> type(name)
<class 'str'>
Let's try one more example where we will assign an integer rather than a string and check the type.
>>> date = input("Today's date: ")
Today's date: 12
>>> type(date)
<class 'str'>
Are you confused? We entered an integer 12 and it's still giving us its type as a string. It's not a bug. It's how input is intended to work. To convert the string to integer we will use typecasting.
Typecasting:
We saw that the input method returns a string for the integer also. Now if we want to compare this output with another integer then we need a way to convert it back to an integer.
>>> date_to_int = int(date)
>>> type(date_to_int)
<class 'int'>
Here we took the date that we have declared above in the User input section and converted it into the integer using the Python's inbuilt int method. This is called typecasting.
Basically you can do the following conversion with the help of typecasting:
integer to string:
str()string to integer:
int()integer to float:
float()
Note: Conversion from float to integer is also possible.
>>> type(date)
<class 'str'>

# Converting from string to float
>>> date_to_float = float(date)
>>> type(date_to_float)
<class 'float'>

# Converting from float to string
>>> date_to_string = str(date_to_float)
>>> type(date_to_string)
<class 'str'>

# Converting from float to integer
>>> date_to_int = int(date_to_float)
>>> type(date_to_int)
<class 'int'>
Dictionaries:
Imagine you want to store some user details. So how can you store these details? Yes, we can use variable to store them as follows:
>>> fname = "Sharvin"
>>> lname = "Shah"
>>> profession = "Developer"
To access this value we can do the following:
>>> print(fname)
Sharvin
But is this an elegant and optimized way to access it? The answer is no. To make it more friendly, let's store the data in a key-value dictionary.
What is a dictionary? A dictionary is a collection that is unordered and mutable ( i.e. it can be updated ).
Following is the format of the dictionary:
data = {
    "key" : "value"
}
Let's understand the dictionary further by an example:
>>> user_details = {
...     "fname": "Sharvin",
...     "lname": "Shah",
...     "profession": "Developer"
... }
How to access a value in a dictionary
We can access the value inside a dictionary in two ways. We will take a look at both and then debug them to find out which is better.
Method 1: To access the value of fname key from user_details dictionary we can use the following syntax:
>>> user_details["fname"]
'Sharvin'
Method 2: We can also access the value of fname key from user_details dictionary using get.
>>> user_details.get("fname")
'Sharvin'
I know method 1 looks easier to understand. The problem with it occurs when we try to access the data that is not available in our dictionary.
>>> user_details["age"]
Traceback (most recent call last):
  File "<stdin>", line 1, in <module>
KeyError: 'age'
We get a KeyError which indicates that the key is not available. Let's try the same scenario with method 2.
>>> user_details.get("age")
We do not get anything printed in our console. Let's debug it further to know why this happened. Assign a variable age to our get operation and we will print it in our console.
>>> age = user_details.get("age")
>>> print(age)
None
So when get doesn't find the key it sets the value to None. Because of this, we do not get any error. Now you may be wondering which one is right. Most of the time using method 2 makes more sense, but for some strict checking conditions, we need to use method 1.
How to check if a key exists
You may be wondering how to check if the dictionary has a particular key or not in it. Python provides the built-in method keys() to solve this issue.
>>> if "age" in user_details.keys():
...     print("Yes it is present")
... else:
...     print("Not present")
...
We will get the following output:
Not present
What if we want to check if the dictionary is empty or not? To understand this let's declare an empty dictionary as follows:
>>> user_details = {}
When we use if-else on a dictionary directly it either returns true if data is present or false if empty.
>>> if user_details:
...     print("Not empty")
... else:
...     print("Empty")
...
Output:
Empty
We can also use Python's inbuilt method bool to check if the dictionary is empty or not. Remember bool returns False if the dictionary is empty and True if it is filled.
>>> bool(user_details)
False

>>> user_details = {
...     "fname" : "Sharvin"
... }
>>> bool(user_details)
True
How to update the value of an existing key
So now we know how to get a particular key and find if it exists – but how do you update it in the dictionary?
Declare a dictionary as follows:
>>> user_details = {
...     "fname":"Sharvin",
...     "lname": "Shah",
...     "profession": "Developer"
... }
To update the value use the following syntax:
>>> user_details["profession"] = "Software Developer"
>>> print(user_details)
{'fname': 'Sharvin', 'lname': 'Shah', 'profession': 'Software Developer'}
Updating a value of key in dictionary is same as assigning a value to the variable.
How to add a key-value pair
The next question is how to add a new value to the dictionary? Let's add an age key with a value of 100.
>>> user_details["age"] = "100"
>>> print(user_details)
{'fname': 'Sharvin', 'lname': 'Shah', 'profession': 'Software Developer', 'age': '100'}
As you can see a new key-value is added in our dictionary.
How to remove a key-value pair
To remove a key-value from the dictionary, Python provides an inbuilt method called pop.
>>> user_details.pop("age")
'100'

>>> print(user_details)
{'fname': 'Sharvin', 'lname': 'Shah', 'profession': 'Software Developer'}
This removes the age key-value pair from the user_details dictionary. We can also use a del operator to delete the value.
>>> del user_details["age"]

>>> print(user_details)
{'fname': 'Sharvin', 'lname': 'Shah', 'profession': 'Software Developer'}
The del method can also be used to delete complete dictionary. Use the following syntax to delete complete dictionary del user_details.
How to copy a dictionary
A dictionary cannot be copied in a traditional way. For example, you cannot copy value of dictA to dictB as follows:
dictA = dictB
To copy the values you need to use the copy method.
>>> dictB = user_details.copy()

>>> print(dictB)
{'fname': 'Sharvin', 'lname': 'Shah', 'profession': 'Software Developer'}
Lists:
Imagine you have a bunch of data that is not labeled. In other words, each piece of data doesn't have a key that defines it. So how will you store it? Lists to the rescue. They are defined as follows:
data = [ 1, 5, "xyz", True ]
A list is a collection of random, ordered, and mutable data (i.e., it can be updated).
How to access list elements
Let's try to access the first element:
>>> data[1]
5
Wait what happened here? We are trying to access the first element but we are getting the second element. Why?
Indexing of the list begins from zero. So what do I mean by this? The indexing of the position of the elements begins from zero. The syntax to access an element is as follows:
list[position_in_list]
To access the first element we need to access it as follows:
>>> data[0]
1
You can also specify a range to access the element between those positions.
>>> data[2:4]
['xyz', True]
Here, the first value represents the start while the last value represents the position until which we want the value.
How to add an item to a list
To add an item in the list we need to use the append method provided by python.
>>> data.append("Hello")

>>> data
[1, 5, 'abc', True, 'Hello']
How to change the value of an item
To change the value of an item, use the following syntax:
>>> data[2] = "abc"

>>> data
[1, 5, 'abc', True]
How to remove an item from a list
To remove an item from a list we can use the Python's inbuilt remove method.
>>> data.remove("Hello")
>>> data
[1, 5, 'abc', True]
How to loop through a list
We can also loop through the list to find a certain element and operate on it.
>>> for i in data:
...     print(i)
...
Output:
1
5
abc
True
How to check if an item exists or not
To check if a particular item exists or not in list we can use if loop as follows:
>>> if 'abc' in data:
...     print("yess..")
...
yess..
How to copy list data
To copy list data from one list to another we need to use copy method.
>>> List2 = data.copy()
>>> List2
[1, 5, 'abc', True]
How to check the length of a list
We can also check the length of list using Python's inbuilt len method.
>>> len(data)
4
How to join two lists
To join two list we can use the + operator.
>>> list1 = [1, 4, 6, "hello"]
>>> list2 = [2, 8, "bye"]
>>> list1 + list2
[1, 4, 6, 'hello', 2, 8, 'bye']
What happens if we try to access a element position which is not available in the list? We get a list index out of range error in such a condition.
>>> list1[6]
Traceback (most recent call last):
  File "<stdin>", line 1, in <module>
IndexError: list index out of range
Tuples:
The tuple is a data type which is ordered and immutable (i.e. data cannot be changed).
Let's create a tuple:
>>> data = ( 1, 3 , 5, "bye")
>>> data
(1, 3, 5, 'bye')
How to access a tuple element
We can access elements in the tuple the same way as we access them in a list:
>>> data[3]
'bye'
We can access the index range as follows:
>>> data[2:4]
(5, 'bye')
How to change a tuple's value
If you are thinking wait – how can we change the value of tuple, then you are right my friend. We cannot change the value of tuple as it is immutable. We get the following error if we try to change the value of a tuple:
>>> data[1] = 8
Traceback (most recent call last):
  File "<stdin>", line 1, in <module>
TypeError: 'tuple' object does not support item assignment
There's a workaround available to change the value of a tuple:
>>> data = ( 1, 3 , 5, "bye")
>>> data_two = list(data) # Convert data to list
>>> data_two[1] = 8 # Update value as list is mutable
>>> data = tuple(data_two) # Convert again to tuple
>>> data
(1, 8, 5, 'bye')
All other methods that we have seen in the list are applicable for the tuple also.
[ Note: Once a tuple is created a new value cannot be added in it. ].
Sets:
Sets are another data type in Python which are unordered and unindexed. Sets are declared as follows:
>>> data = { "hello", "bye", 10, 15 }
>>> data
{10, 15, 'hello', 'bye'}
How to access a value
As sets are unindexed we cannot directly access the value in a set. Thus to access the value in the set you need to use a for loop.
>>> for i in data:
...     print(i)
...

10
15
hello
bye
How to change a value
Once the set is created, values cannot be changed.
How to add an item
To add an item to the set python provides an inbuilt method called add.
>>> data.add("test")
>>> data
{10, 'bye', 'hello', 15, 'test'}
How to check length
To check the length of the set we use the len method.
>>> len(data)
5
How to remove an item
To remove an item use the remove method:
>>> data.remove("test")
>>> data
{10, 'bye', 'hello', 15}
Functions and Arguments:
Functions are a handy way to declare an operation that we want to perform. With the help of functions, you can separate logic according to the operation.
Functions are a block of code that helps us in the reusability of the repetitive logic. Functions can be both inbuilt and user-defined.
To declare a function we use the def keyword. Following is the syntax of the functions:
>>> def hello_world():
...     print("Hello world")
...
Here we are declaring a function which, when called, prints a "Hello world" statement. To call a function we use the following syntax:
>>> hello_world()
We will get the following output:
Hello world
Remember that the () brackets in a function call means to execute it. Remove those round brackets and try the call again.
>>> hello_world
You'll get the following output:
<function hello_world at 0x1083eb510>
When we remove the round brackets from the function call then it gives us a function reference. Here above as you can see the reference of function hello_world points to this memory address 0x1083eb510.
Consider you have to perform an addition operation. You can do it by declaring a and b and then performing the addition.
>>> a = 5
>>> b = 10
>>> a + b
15
This is one way to go. But now consider that the value of a and b have changed and you need to do it again.
>>> a = 5
>>> b = 10
>>> a + b
15
>>> a = 2
>>> b = 11
>>> a + b
13
This still looks doable. Now imagine we need to add a set of two numbers a hundred times. The numbers within the set are different for every calculation. That's a lot to do. Don't worry – we have a function at our disposal to solve this issue.
>>> def add(a,b):
...     print(a+b)
...
Here we are adding a and b as a compulsory argument to the add function. To call this function we will use the following syntax:
>>> add(10,5)
Output:
15
See how easy it is to define a function and use it? So what happens if we don't pass an argument?
>>> add()
Traceback (most recent call last):
  File "<stdin>", line 1, in <module>
TypeError: add() missing 2 required positional arguments: 'a' and 'b'
Python throws a TypeError and informs us that the function requires two arguments.
Can you guess what will happen if we pass a third argument?
>>> add(10,5,1)
Traceback (most recent call last):
  File "<stdin>", line 1, in <module>
TypeError: add() takes 2 positional arguments but 3 were given
Well, Python will inform us that we have passed 3 arguments but there are only 2 positional arguments.
So what can we do when we don't know how many arguments a function can take? To solve this issue we use args and kwargs.
Args:
When you don't know how many arguments will be passed to the function, use args and kwargs (kwargs are discussed below).
To pass n number of arguments to a function we use args. We add a * in front of the argument.
Remember when you attach a
*in front, you will be receiving a tuple of arguments.
>>> def add(*num):
...     print(num)
...
Here *num is an instance of args. Now when we call the function add we can pass in n number of arguments and it won't throw a TypeError.
>>> add(1,2,3)
(1, 2, 3)

>>> add(1,2,3,4)
(1, 2, 3, 4)
Now to perform the addition operation we will use the Python's builtin function sum
>>> def add(*num):
...     print(sum(num))
...
Now when we call the add function we will get the following output:
>>> add(1,2,3) # Function call
6
>>> add(1,2,3,4) # Function call
10
Keyword Arguments:
There are times when we don't know the order of the arguments that will be passed to our function when it's called. In such a scenario we use keyword arguments because you can pass them in any order in your call and our function will know the value. Take a look at this example:
>>> def user_details(username, age):
...     print("Username is", username)
...     print("Age is", age)
...
Let's call this function as follows:
>>> user_details("Sharvin", 100)
We will get the following output:
Username is Sharvin
Age is 100
Well this looks correct, but imagine if we called our function in this way:
>>> user_details(100, "Sharvin")
We will get the following output:
Username is 100
Age is Sharvin
This does not look right. What happened is username took the value of 100 while age took the value of "Sharvin". In scenarios like this where we don't know the order of arguments we can use keyword arguments when calling the function:
>>> user_details(age=100, username="Sharvin")
Output:
Username is Sharvin
Age is 100
Default Argument:
Suppose there is a condition where we are not sure if a particular argument will get a value or not when the function is called. In such a scenario we can use Default arguments as follows:
>>> def user_details(username, age = None):
...     print("Username is", username)
...     print("Age is", age)
...
Here we are assigning a None to our age argument. If we don't pass a second argument while calling the function it will take None as a default value.
Let's call the function:
>>> user_details("Sharvin")
Output:
Username is Sharvin
Age is None
If we pass in the second argument it will override None and use it as the value.
>>> user_details("Sharvin", 200)
Username is Sharvin
Age is 200
But what will happen if we assign the first argument in our function as default and the second as a compulsory argument? Go to the Python shell and try this out:
>>> def user_details(username=None, age):
...     print("Username is", username)
...     print("Age is", age)
...
You'll get the following error:
  File "<stdin>", line 1
SyntaxError: non-default argument follows default argument
Remember: All compulsory arguments must be declared first and then the default argument must be declared.
kwargs:
There can be a situation where you don't know how many keyword arguments will be passed into the function. In such a scenario we can use Kwargs.
To use kwargs we put ** in front of the argument.
Remember: When you attach a
**in front, you will be receiving a dictionary of arguments.
Let's understand this by example. We will declare a function which accepts username as it's argument with ** in front of it.
>>> def user(**username):
...     print(username)
...
When we call the user function as follows we will receive a dictionary.
>>> user(username1="xyz",username2="abc")
Output:
{'username1': 'xyz', 'username2': 'abc'}
So what's happening here? It looks the same as args, right?
No, it's not. In args, you cannot access a particular value by its name as it is in the form of a tuple. Here we get the data in the form of a dictionary so we can easily access the value.
Consider this example:
>>> def user(**user_details):
...     print(user_details['username'])
...
Let's call our function:
>>> user(username="Sharvin",age="1000")
And you'll get the following output:
Sharvin
Scope:
A scope defines where a variable or function is available. There are two types of scope in Python: Global and Local.
Global Scope
A variable or function created in the main body of Python code is called a global variable or function and is part of the global scope. For example:
>>> greet = "Hello world"
>>> def testing():
...     print(greet)
...
>>> testing()
Hello world
Here the variable greet is available globally because it is declared in the body of the program.
Local Scope
A variable or function created inside a function is called a local variable or function and is part of the local scope:
>>> def testing():
...     greet = "Hello world"
...     print(greet)
...
>>> testing()
Hello world
Here greet is created inside the testing function and is only available there. Let's try to access it in our main body and see what happens:
>>> print(greet)
Traceback (most recent call last):
  File "<stdin>", line 1, in <module>
NameError: name 'greet' is not defined
Remember: Restart the Python console by pressing ctrl + d and starting the shell again by using the python3 command before testing the code above. The first example has you declare the greet variable in the global scope meaning it will still be available in memory when you run the second example.
As greet is not available globally we get the error that it is not defined.
Return Statement:
Until now our functions are pretty simple. They are receiving data, processing it, and printing them. But in the real world, you need a function to return output so that it can be used in different operations.
To achieve this, return statements are used. Remember, return statements are only part of functions and methods. The syntax for the return statement is quite easy.
>>> def add(a, b):
...     return a + b
...
>>> add(1,3)
4
Instead of printing our addition, we are returning the output. The value of the returned output can also be stored in a variable.
>>> sum = add(5,10)
>>> print(sum)
15
Lambda Expression:
Consider a situation where you don't want to perform much computation in a function. In such a situation writing a full-fledged function doesn't make sense. To solve this we use a lambda expression or lambda function.
So what is a lambda expression? It is an anonymous function and they are restricted to a single expression. The lambda expression can take n number of arguments.
The syntax for lambda expression is:
variable = lambda arguments: operation
Let's understand it more by example:
>>> sum = lambda a: a + 10
Here we have declared a variable sum which we are using to call the lambda function. a represents the argument that is passed to that function.
Let's call our function:
>>> x(5)
15
List comprehension:
Consider a situation where you want a list of squares. Normally you'll declare a squares list and then in a for loop you'll square out the numbers.
>>> squares = []
>>> for x in range(10):
...     squares.append(x**2)
...
>>> squares
[0, 1, 4, 9, 16, 25, 36, 49, 64, 81]
Well this is doable, but we can achieve this in a single line with the help of list comprehension.
There are two ways to achieve this. Let's understand both of them.
>>> squares = list(map(lambda x: x**2, range(10)))
>>> squares
[0, 1, 4, 9, 16, 25, 36, 49, 64, 81]
Here we are using list constructor to build a list and inside that lambda function which squares out the number. Another way to achieve the same result is as follows:
>>> squares = list(x**2 for x in range(10))
>>> squares
[0, 1, 4, 9, 16, 25, 36, 49, 64, 81]
I prefer this way because it is easier to more concise and easier to understand.
What about when we have a condition where we want a set of two numbers that are the same? Well, we need to write two for loops and one if loop.
Let's see how that will look:
>>> num_list = []
>>> for i in range(10):
...     for j in range(10):
...             if i == j:
...                     num_list.append((i,j))
...
>>> num_list
[(0, 0), (1, 1), (2, 2), (3, 3), (4, 4), (5, 5), (6, 6), (7, 7), (8, 8), (9, 9)]
That's a lot of work. And in terms of readability it's hard to understand.
Let's use list comprehension to achieve the same result.
>>> num_list = list((i,j) for i in range(10) for j in range(10) if i == j)

>>> num_list
[(0, 0), (1, 1), (2, 2), (3, 3), (4, 4), (5, 5), (6, 6), (7, 7), (8, 8), (9, 9)]
See how easy it is to get the same output in a single expression? Well, that's the power of list comprehension.
OOP concepts:
Python is a multi-paradigm programming language. It means Python can use different approaches to solve a problem. One of the paradigms is procedural or functional programming. It structures the code like a recipe – a set of steps in the form of functions and code blocks.
Another approach to solving the problem is by creating classes and objects. This is known as object-oriented oriented programming. An object is a collection of data (variables) and methods that act on those data. And classes are a blueprint for each object.
The important thing to understand in object-oriented programming is that objects are at the center of the paradigm – they not only represent the data but also the structure of the program.
You can choose the paradigm that best suits the problem at hand, mix different paradigms in one program, and/or switch from one paradigm to another as your program evolves.
Advantages of object oriented programming
Inheritance: This is one of the most useful concepts in OOP. It specifies that the child object will have all the properties and behavior of the parent object. Thus Inheritance allows us to define a class that inherits all the methods and properties from another class.
Polymorphism: To understand polymorphism let’s divide the word into two parts. The first part "poly" means many and "morph" means to form or shape. Thus polymorphism means one task can be performed in many different ways.
For example, you have a class animal, and all animals speak. But they speak differently. Here, the “speak” behavior is polymorphic and depends on the animal. So, the abstract “animal” concept does not actually “speak”, but specific animals (like dogs and cats) have a concrete implementation of the action “speak”.
Polymorphism means the same function name or method name being used for different types.
- Encapsulation: In object-oriented programming you can restrict access to methods and variables – we can make the methods and variables private. This can prevent the data from being modified by accident and is known as encapsulation.
First, we will understand classes, objects, and constructors. Then after that, we will look into the above properties again. If you already know about classes, objects, and constructors, feel free to skip ahead.
Classes:
There are primitive data structures available in Python, for example, numbers, strings, and lists. These can all be used for simple representations like name, place, cost, and so on.
But what if we have more complex data? If there is a pattern in the repetition of the properties of that data, what can we do?
Suppose we have 100 different animals. Every animal has a name, age, legs, etc. What if we want to add other properties to each animal, or one more animal gets added to that list? To manage such a complex scenario we need classes.
According to the official Python documentation:
Classes provide a means of bundling data and functionality together. Creating a new class creates a new type of object, allowing new instances of that type to be made.
Each class instance can have attributes attached to it for maintaining its state. Class instances can also have methods (defined by its class) for modifying its state.
Syntax of class:
class ClassName:

    <expression-1>
    .
    .
    .
    <expression-N>
We use class keyword to define a class. We will define a class Car.
class Car:
    pass
Methods:
Methods look the same as functions. The only difference is that methods are dependent on an object. A function can be invoked by name while methods need to be invoked by using their class reference. They are defined inside the class.
In our example, let's create two methods. One is an engine and another is a wheel. These two methods define the parts available in our car.
The below program will give us a better idea of classes:
>>> class Car:
...     def engine(self):
...             print("Engine")
...

>>> Car().engine()
Engine
Here we are calling the engine method by using the Car() reference.
To summarize, the class provides a blueprint of what should be defined but it does not provide any real content. The Car class above defines the engine but it will not state what a specific car’s engine is. It is specified by the object.
Objects:
The object is an instance of the class. Let’s consider the above example of a car. Here Car is our class and toyota is the object of the car. We can create multiple copies of the object. Every object must be defined using the class.
The syntax for creating an object is:
toyota = Car()
Let’s consider our Car example to understand objects a bit better:
class Car:

    def engine(self):
        print("Engine")

    def wheel(self):
        print("Wheel")

toyota = Car()
The above toyota = Car() is a class object. Class objects support two kinds of operations: attribute references and instantiation.
Class instantiation uses function notation. The instantiation operation (“calling” a class object) creates an empty object.
Now we can call different methods from our class Car using the object toyota that we have created. let’s call the method engine and wheel.
Open your editor and create a file named mycar.py. In that file copy the code below:
class Car:

    def engine(self):
        print("Engine")

    def wheel(self):
        print("Wheel")

if __name__ == "__main__":
    toyota = Car()
    toyota.engine()
    toyota.wheel()
Save the above code. Now let's take a closer look at our program.
Here we are creating a toyota object with the help of Car class. The toyota.engine() is a method object. What exactly happens when a method object is called?
In the call toyota.engine() doesn't take any argument but if you see the method declaration we can see that it takes a self argument.
You may be confused about why it is not throwing an error. Well whenever we use a method object, the call toyota.engine() is converted to Car.engine(toyota). We will understand more about the self in the upcoming section.
Run the program using the following command.
python mycar.py
You'll get the following output:
Engine
Wheel
Constructor:
The __init__ method is the constructor method in Python. The constructor method is used to initialize the data.
Go to the Python shell and enter this example:
>>> class Car():
...     def __init__(self):
...             print("Hello I am the constructor method.")
...
When we will call our class we will get the following output:
>>> toyota = Car()
Hello I am the constructor method.
Note: You will never have to call the init() method – it gets called automatically when you create a class instance.
Instance attributes:
All the classes have objects and all the objects have attributes. Attributes are the properties. We use __init__() method to specify an object’s initial attribute.
Let’s consider our car example:
class Car():
    def __init__(self, model):
        self.model = model  #instance attribute
In our example, each Car() has a specific model. Thus instance attributes are unique data to each instance.
Class attributes:
We saw that instance attributes are specific to each object but class attributes are the same for all the instances. Let us look at the example of the car with the help of class attributes.
class Car():

    no_of_wheels = 4 #class attribute
So each car can have different models but all the cars will have only 4 wheels.
Self:
Now let’s understand what self means and how we use it in object-oriented programming. self represents the instance of a class. By using the self keyword we can access the data initialized in the constructor and methods of a class.
Let's look at an example of how self can be used. Let’s create a method named brand under our class Car.
Inside that __init__ method, we will pass a model by passing our car’s model name when we are instantiating our object. This name can be accessed anywhere in the class, for example self.model in our case.
Go to the file named mycar.py and replace old code with this code:
class Car():

  def __init__(self, model):
    self.model = model

  def brand(self):
    print("The brand is", self.model)

if __name__ == "__main__":
  car = Car("Bmw")
  car.brand()
Now when we run our above program using the following command:
python mycar.py
We will get the following output:
The brand is Bmw
Note: self is a convention and not a real Python keyword. self is an argument in a method and we can use another name in place of it. But it is recommended to use self because it increases the readability of your code.
Inheritance:
Inheritance refers to when a class inherits the property of another class.
The class from which properties are inherited is called the base class. The class which inherits the property of another class is called the derived class.
Inheritance can be defined as a parent and child relationship. The child inherits the properties of the parent. Thus making the child a derived class while parent is a base class. Here the term property refers to attributes and methods.
The syntax for a derived class definition looks like this:
class DerivedClassName(BaseClassName):
    <statement-1>
    .
    .
    .
    <statement-N>
It’s important to note that child classes override or extend the attributes and behaviors of parent class methods. This is to say that child classes inherit all of the the attributes and behaviors of their parents – but they're also able to specify different behavior to follow.
The most basic type of class is an object, which generally all other classes inherit as their parent. Let’s modify our previous example to understand how inheritance works.
We will create a base class named vehicle:
class Vehicle:
    def __init__(self, name):
        self.name = name

    def getName(self):
        return self.name
We have created a class Vehicle and instantiated a constructor with self.name which we are using in getName method. Whenever this method will be called, it will return the name that has been passed when an object is instantiated for that class.
Now let’s create a child class Car:
class Vehicle:
    def __init__(self, name):
        self.name = name

    def getName(self):
        return self.name

class Car(Vehicle):
  pass
Car is a child class of Vehicle. It inherits all the method and attributes of parent class.
Now let’s use methods and attribute from the Vehicle class in our child class Car.
class Vehicle:

    def __init__(self, name, color='silver'):
        self.name = name
        self.color = color

    def get_name(self):
        return self.name

    def get_color(self):
        return self.color

class Car(Vehicle):
  pass

audi = Car("Audi r8")
print("The name of our car is", audi.get_name(), "and color is", audi.get_color())
Let's understand what we have done here.
We have declared a class named Vehicle with a constructor that takes name as an argument while color has a default argument.
We have two methods inside it. get_name returns name while get_color returns the color. We have instantiated an object and passed the car name.
One thing you'll notice here that we are using base class methods in our child class declaration.
Run the above program using the following command:
python mycar.py
Output:
The name of our car is Audi r8 and color is silver
We can also override a parent method or attribute. In the above example, we have defined our vehicle color has silver. But what if the color of our car is black?
Now for every child class, we can’t make changes in the parent class. There comes the overriding functionality.
class Vehicle:

    def __init__(self, name, color='silver'):
        self.name = name
        self.color = color

    def get_name(self):
        return self.name

    def get_color(self):
        return self.color

class Car(Vehicle):

    def get_color(self):
        self.color = 'black'
        return self.color

audi = Car("Audi r8")
print("The name of our car is", audi.get_name(), "and color is", audi.get_color()
As you can see in the above program, I have not instantiated a constructor. The reason behind this is that our child class Car is only using attributes from the Vehicle class and it is already inheriting them. So in such a scenario, there is no need to re-instantiate these attributes.
Now when we run the above program we will get the following output:
The name of our car is Audi r8 and color is black
Super:
super() returns a temporary object of the superclass that then allows us to call that superclass’s methods.
Calling the previously built methods with super() saves us from needing to rewrite those methods in our subclass, and allows us to swap out superclasses with minimal code changes. Thus super extends the functionality of the inherited method.
Let’s extend our car example using super(). We will instantiate a constructor with brand_name and color in the parent class, Vehicle. Now we will call this constructor from our child class (Car) using super. We will create a get_description method which is returning self.model from Car class and self.brand_name, self.color from the Vehicle class.
class Vehicle:

    def __init__(self, brand_name, color):
        self.brand_name = brand_name
        self.color = color

    def get_brand_name(self):
        return self.brand_name

class Car(Vehicle):

    def __init__(self, brand_name, model, color):
        super().__init__(brand_name, color)
        self.model = model

    def get_description(self):
        return "Car Name: " + self.get_brand_name() + self.model + " Color:" + self.color

c = Car("Audi ",  "r8", " Red")
print("Car description:", c.get_description())
print("Brand name:", c.get_brand_name())
When we run the above program we get following output:
Car description: Car Name: Audi r8 Color: Red
Brand name: Audi
Multiple Inheritance:
When a class inherits the method and attributes from multiple parent class then it is called multiple inheritance. This allows us to use the property from multiple base classes or parent classes in a derived or child class.
The general syntax of multiple Inheritance is as follows:
class DerivedClassName(Base1, Base2, Base3):
    <statement-1>
    .
    .
    .
    <statement-N>
Let’s extend our vehicle example using the multiple inheritance property. Here in this example, we will create 3 classes i.e. Vehicle, Cost and Car
The classes Vehicle and Cost will be the Parent class. A Vehicle class represents the general property while the Cost class represents its pricing.
As Car has a general property and cost will have two parent classes. Thus we will inherit multiple parent classes.
class Vehicle:

    def __init__(self, brand_name):
        self.brand_name = brand_name

    def get_brand_name(self):
        return self.brand_name


class Cost:

    def __init__(self, cost):
        self.cost = cost

    def get_cost(self):
        return self.cost


class Car(Vehicle, Cost):

    def __init__(self, brand_name, model, cost):
        self.model = model
        Vehicle.__init__(self, brand_name)
        Cost.__init__(self, cost)

    def get_description(self):
        return self.get_brand_name() + self.model + " is the car " + "and it's cost is " + self.get_cost()

c = Car("Audi ",  "r8", "2 cr")
print("Car description:", c.get_description())
Here you will find one thing in the above program that is different from all the other programs in this tutorial. I have used Vehicle.__init__(self, brand_name) in the constructor of Car class. This is one way of calling attributes from the parent class. Another was is super which I have explained above.
When we run the above program we will get the following output:
Car description: Audi r8 is the car and it's cost is 2 cr
Though it can be used effectively, multiple inheritance should be done with care so that our programs do not become ambiguous and difficult for other programmers to understand.
Polymorphism:
The word polymorphism means having many forms. In programming, polymorphism means same function name (but different signatures) being uses for different types.
Let’s extend our car program using polymorphism. We will create two classes, Car and Bike. Both the classes have common method or function, but they are printing different data. The program is pretty self-explanatory:
class Car:

    def company(self):
        print("Car belongs to Audi company.")

    def model(self):
        print("The Model is R8.")

    def color(self):
        print("The color is silver.")

class Bike:

    def company(self):
        print("Bike belongs to pulsar company.")

    def model(self):
        print("The Model is dominar.")

    def color(self):
        print("The color is black.")

def func(obj):
    obj.company()
    obj.model()
    obj.color()

car = Car()
bike = Bike()

func(car)
func(bike)
When we run the above code we will get the following output:
Car belongs to Audi company.
The Model is R8.
The color is silver.
Bike belongs to pulsar company.
The Model is dominar.
The color is black.
Encapsulation:
In most object-oriented programming, we can restrict access to methods and variables. This can prevent the data from being modified by accident and is known as encapsulation.
Let’s use encapsulation in our car example. Now imagine we have a super-secret engine. In the first example, we will hide our engine using a private variable. In the second example, we will hide our engine using a private method.
Example 1:
class Car:

  def __init__(self):
    self.brand_name = 'Audi '
    self.model = 'r8'
    self.__engine = '5.2 L V10'

  def get_description(self):
        return self.brand_name + self.model + " is the car"

c = Car()
print(c.get_description)
print(c.__engine)
In this example self.__engine is a private attribute. When we run this program we will get the following output.
Audi r8 is the car
AttributeError: 'Car' object has no attribute '__engine'
We get an error that Car object doesn't have _engine because it is a private object.
Example 2:
We can also define a private method by adding __ in front of the method name. Following is the example of how we can define a private method.
class Car:

  def __init__(self):
      self.brand_name = 'Audi '
      self.model = 'r8'

  def __engine(self):
      return '5.2 L V10'

  def get_description(self):
      return self.brand_name + self.model + " is the car"


c = Car()
print(c.get_description())
print(c.__engine())
In this example def __engine(self) is a private method. When we run this program we will get the following output.
Audi r8 is the car
AttributeError: 'Car' object has no attribute '__engine'
Now suppose we want to access the private attribute or method we can do it in the following way:
class Car:

  def __init__(self):
      self.brand_name = 'Audi '
      self.model = 'r8'
      self.__engine_name = '5.2 L V10'

  def __engine(self):
      return '5.2 L V10'

  def get_description(self):
      return self.brand_name + self.model + " is the car"


c = Car()
print(c.get_description())
print("Accessing Private Method: ", c._Car__engine())
print("Accessing Private variable: ", c._Car__engine_name)
The output of the following program is:
Audi r8 is the car
Accessing Private Method:  5.2 L V10
Accessing Private variable:  5.2 L V10
Encapsulation gives you more control over the degree of coupling in your code. It allows a class to change its implementation without affecting other parts of the code.
Decorator:
Imagine you have to extend the functionality of multiple functions. How will you do that?
Well, one way is you can make functional calls and in that function, you can handle it. Making changes in 30 to 40 function calls and remembering where to place the call is a messy task. But the more elegant way provided by Python is with decorators.
What is a decorator? A decorator is a function that takes a function and extends its functionality without modifying it explicitly. Well, I understand if you are still confused about what decorators are. Don't worry – we have a tool named example to explain it.
Let's try an example to understand the decorator. There are two ways to write a decorator.
Method 1
We declare a decorator function and in the arguments of the function we expect the function to be passed as an argument. Inside that, we write a wrapper function where operations are carried out and it is returned.
>>> def my_decorator(func):
...     def wrapper():
...             print("Line Number 1")
...             func()
...             print("Line Number 3")
...     return wrapper
...
>>> def say_hello():
...     print("Hello I am line Number 2")
...
To call the function we assign the decorator with say_hello as an argument.
>>> say_hello = my_decorator(say_hello)
We can also check the reference using say_hello. We will get the output that tells us it has been wrapped by the my_decorator function.
<function my_decorator.<locals>.wrapper at 0x10dc84598>
Let's call our say_hello function:
>>> say_hello()
Line Number 1
Hello I am line Number 2
Line Number 3
See the magic the line "Hello I am line Number 2" gets printed in between Line Number 1 and 3 because the function call gets executed there.
Method 1 is clunky, and because of that many people prefer a different approach.
Method 2
Here our decorator declaration remains same but we change how the call is assigned to that decorator. Whichever function requires that decorator wraps itself with @decorator_name.
>>> def my_decorator(func):
...     def wrapper():
...             print("Line Number 1")
...             func()
...             print("Line Number 3")
...     return wrapper
...
>>> @my_decorator
... def say_hello():
...     print("Hello I am line Number 2")
...
>>> say_hello()
Output is the same:
Line Number 1
Hello I am line Number 2
Line Number 3
A decorator is a powerful tool and it is used in the following development scenarios of an application:
Setup logger
Setup configuration
Setup Error catching
Extending common functionality for all function and classes
Exceptions:
When we were learning various syntax we came across various errors. Those errors occurred because of the syntax. But in a real-world application, errors (or commonly known as bugs) not only occur due to syntax issues but also because of network errors or some other cause.
To handle these issues we use Try - Except. In try block, we write the expression that we want to be executed, while in except block we catch the error. The Try-Except block looks as follows:
try:
    expression
except:
    catch error
Let's understand this by an example:
>>> try:
...     print(value)
... except:
...     print("Something went wrong")
...
Here we are trying to print the value variable but it is not defined. So we get the following output:
Something went wrong
You may be thinking that the line "something went wrong" is not that helpful. So how can we know what went wrong here?
We can print the exception and use it to find out what went wrong. Let's test this in our example:
>>> try:
...     print(value)
... except Exception as e:
...     print(e)
...
And the result is:
name 'value' is not defined
Whoa! That's magic. It is notifying me that 'value' is not defined.
Python also provides a tool named raise. Suppose you don't want a certain condition to occur and if it occurs you want to raise it. In such condition you can use raise. Consider the example below:
>>> i = 5
>>> if i < 6:
...     raise Exception("Number below 6 are not allowed")
...
The output we get is as follows:
Traceback (most recent call last):
  File "<stdin>", line 2, in <module>
Exception: Number below 6 are not allowed
There are many sub-types of Exceptions, so I recommend that you go through the Python Documentation to understand them.
Package Import:
You have learned the basics of Python and now you are all ready to build awesome applications. But hold on – we are still missing some important topics.
Without package import, you will be forced to write everything in one single file. Imagine what a mess it will be.
Create two files named main.py and hello.py. Remember both file needs to be in the same directory.
Under hello.py copy paste the following code:
def say_hello():
    print("Hello world")
Under main.py copy paste the following code:
import hello

if __name__ == "__main__":
    hello.say_hello()
In hello.py we have declared a say_hello() function which prints "Hello world". In main.py you'll see an import statement. We are importing the hello module and calling the say_hello() function from that module.
Run our program using the following command:
➜ python main.py
Output:
Hello world
Now let's understand how to import a module which is in another directory.
Let's create a directory named "data" and move our hello.py inside that directory.
Go to the main.py and change the previous import statement.
from data import hello

if __name__ == "__main__":
    hello.say_hello()
There are two ways to import from a directory.
Method 1:
from data import helloMethod 2:
import data.hello
I prefer method 1 because of its readability. You can choose whichever method looks better to you.
Let's run our application using the following command:
➜ python main.py
And an error occurs. Wait why did this happen? We did everything right. Let's go through the error:
Traceback (most recent call last):
  File "main.py", line 1, in <module>
    from data import hello
ImportError: No module named data
Well Python is telling us that it doesn't recognize a module named data. To solve this issue create a __init__.py inside data directory. Leave the file blank and run the program again and you'll get the following output:
Hello world
Well python by default does not treat a directory as a module. To inform Python to treat a directory as a module, __init__.py is required.
JSON Handling:
If you have worked previously with web development or app development you may be aware that all the API calls take place in JSON format. While JSON looks similar to a dictionary in Python, remember that it's very different.
To handle JSON, Python provides an inbuilt json package. To use this package we need to import it as follows:
import json
This library provides two methods which help us in handling the JSON. Let's understand them one by one.
JSON loads:
If you have a JSON string and want to convert it back to a dictionary you need to use the loads method. Go to the Python shell and copy-paste the following code:
>>> import json
>>> json_string = '{ "user_name":"Sharvin", "age":1000}' #JSON String
>>> type(json_string)
<class 'str'>
>>> data = json.loads(json_string)
>>> type(data)
<class 'dict'>
>>> data
{'user_name': 'Sharvin', 'age': 1000}
JSON dumps:
Now let's convert our data back to the JSON string format using the dumps method.
>>> jsonString = json.dumps(data)
>>> type(jsonString)
<class 'str'>
>>> jsonString
'{"user_name": "Sharvin", "age": 1000}'
To learn more about JSON Manipulation, go through the Python Documentation.
That's it!
And we're done! I hope you now understand the basics of Python. Congratulations! That's a huge achievement.
Feedback is welcomed. Also if you want to learn about any other topic you can tweet the topic name on Twitter and include my Twitter handle. [ @sharvinshah26 ]