

As part of the Google CASA process, developers can run static analysis on their application’s source code using an inline integration with OpenText’s Fortify Source Code Analyzer (SCA) via the CASA portal.
Naturally, I had to prepare my source code as per instruction. In this article, I will share how I packaged and submitted my Add-on's source code in Ubuntu OS.
But before that, let's talk a little about Tier 2 CASA assessment.
What is Tier 2 CASA Security Assessment?
The Tier 2 CASA (Cloud Application Security Assessment) is a self-service security assessment process for applicants seeking access to Google Workspace data or to comply with specific Google Workspace policies.
It allows developers to scan their applications and submit the results for verification without an external assessor accessing the code or infrastructure.
Importance Tier 2 CASA security assessment
Tier 2 CASA is important for several reasons:
- Security Assurance: It provides independent verification of your application's security posture, reducing the risk of data breaches and protecting user privacy.
- Compliance: It helps meet security requirements for accessing Google Workspace data or adhering to Google policies, like the Workspace Marketplace Terms of Service.
- Efficiency: It's a faster and more cost-effective alternative to Tier 1 assessments, which involves external assessors directly examining your application.
- Trust: If your addon is published without verification it'll display an "unverified" message to the clients while installing the addon, which creates distrust and can lead to the installation process of your addon to be abandoned.
In the context of my Google Workspace Addon Scan Me, the use of restrictive OAuth scope auth/drive of Google Drive API likely triggered the need for a Tier 2 assessment. This scope grants your addon access to see, edit, create, and delete all of your Google Drive files, which falls under Google's security and privacy requirements.
Additional Resources
Disclaimer: While I'll explain the Tier 2 CASA process, it's crucial to consult the official documentation and Google's security guidelines for specific requirements and guidance.
The assessment certification is free, by the way. To prepare your addon for the CASA assessment process follow the following steps.
Step 1 – Sign up for the new Assessment Procedure
If you're using restrictive scopes, you'll receive an email from Google's Verification team at some point requesting to verify the scopes after you've submitted your add-on for verification.
This email is the notification document. So, you need to download this email as a PDF, which must be submitted in the application form later on.
In that email, you'll find the following instructions for Tier 2 evaluation. You'll find a link to register or log-in to the CASA portal. Click the link and register to the site. Then click on Start New Assessment> Create New Assessment.
Fill in the information asked carefully. Upload the previously downloaded email where you're asked for a Tier 2 notification pdf.
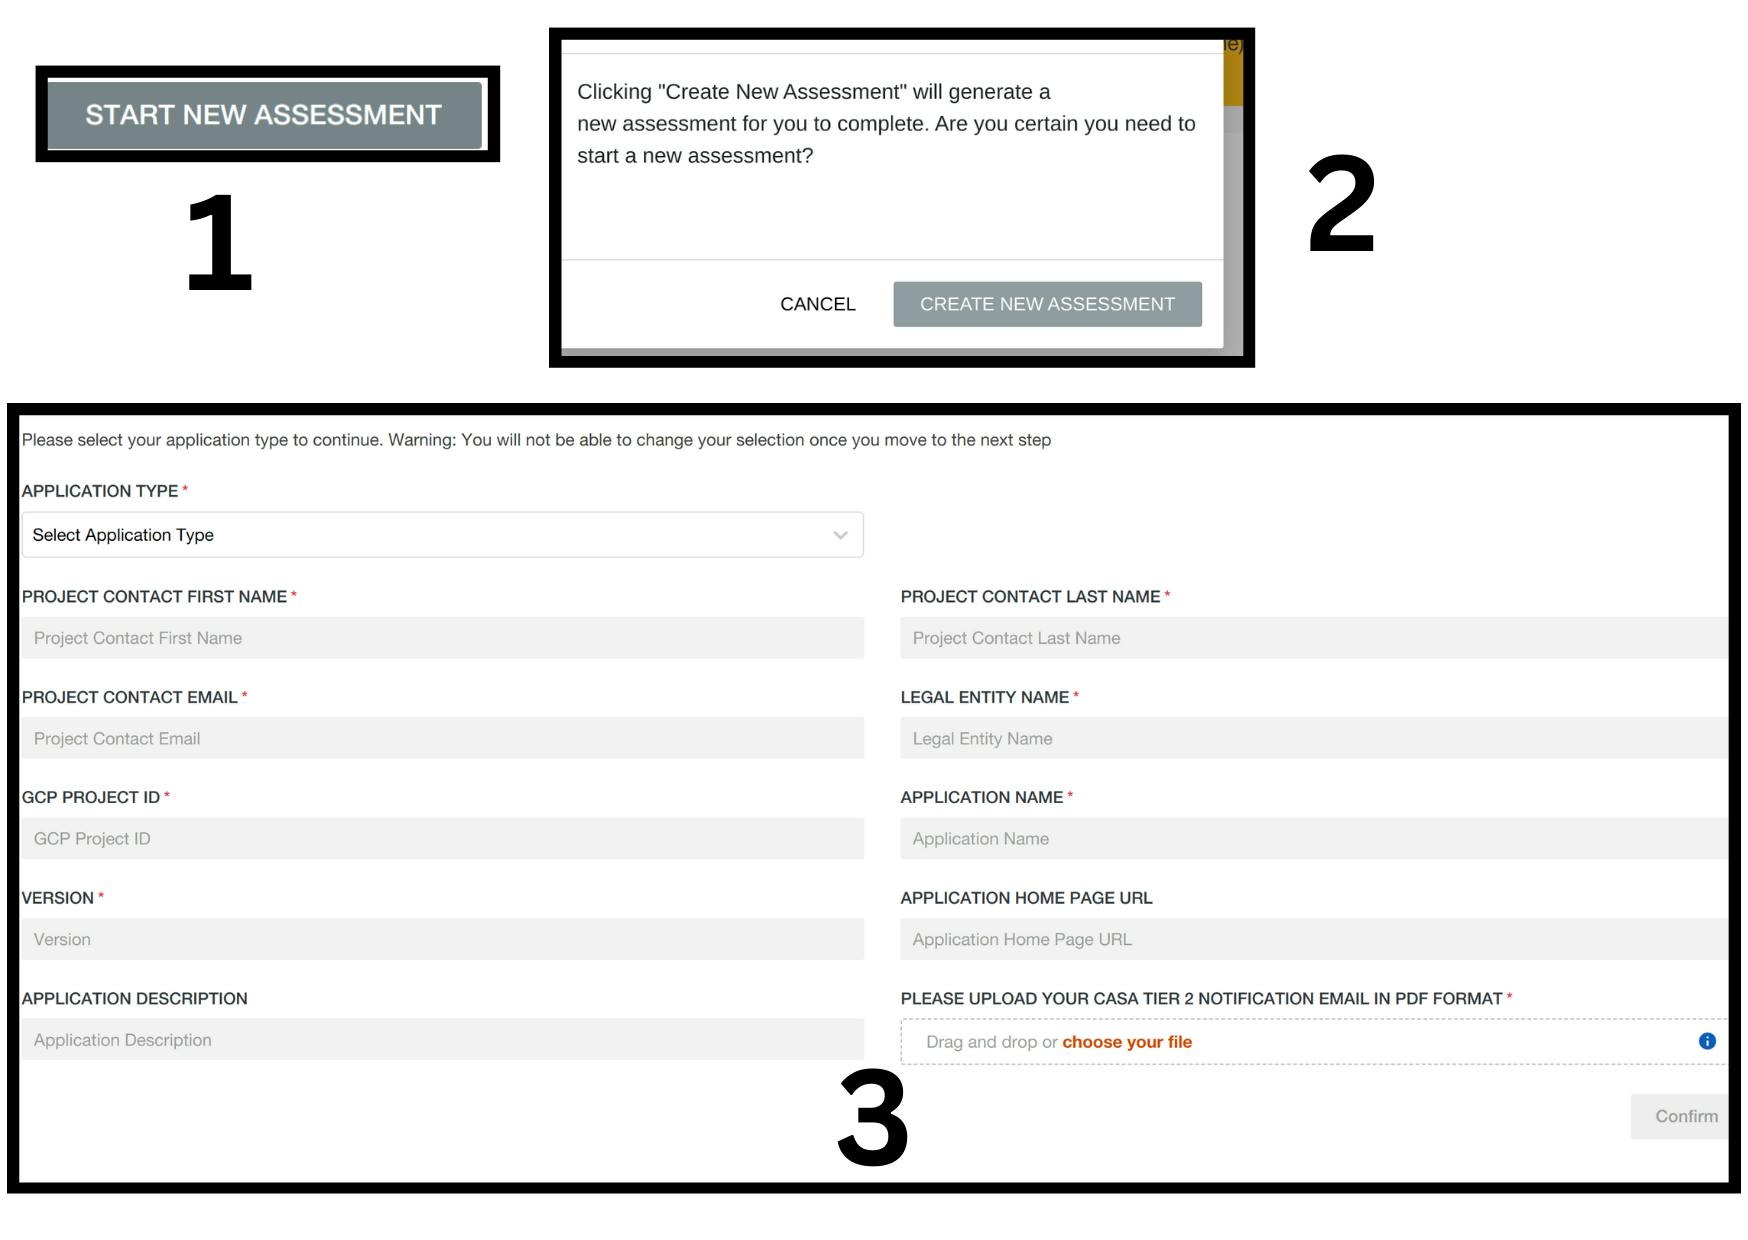 Starting New CASA Assesment of the Addon
Note: For Google Workspace Addon, the type of application is Local App.
Caution: As shown in the image above, even though "Project ID" is asked in the input field, they are asking for the Project Number included in the email, not the Project ID of your Google Cloud Console project.
After you carefully fill in the details and submit the form, you'll arrive at a new screen – Application Screening – where there are two things that you should download:
 Download Scan Cenral Package and Setup Insruction
- Fortify Scan Central Package.
- Instruction on compressing your application's source code for initial assessment.
Step 2 – Download and Setup Java JDK
To use the Scan Central package as mentioned in the instructions, a minimum of JDK 11 is required.
For setting up the path for the Java environment in Linux, I followed this instruction on StackOverflow.
Step 3 – Setup Path for Scan Central
Now let's add the path to the Scan Central in our system.
In your CLI, open .bashrc file with sudo nano ~/.bashrc. Append the following path at the end of the file:
# SCAN Central
# Path looks like following
#/home/<username>/Fortify_ScanCentral_Client_22.2.1_x64/bin

 export PATH=$PATH:<Path To bin folder in Scan Central>
Save (CTRL+S) and exit (CTRL + X) the file.
Open .profile with sudo nano ~/.profile and add the same path as above. You can check the version of Scan Central in your CLI with the command scancentral -version, to make sure the setup was successful.
Step 4 – Packaging Source Code for Assessment
To package the source code for your Google Workspace Addon, go to the root directory of your project. If you're following the instruction manual, go to the section for JavaScript code packaging.
In the root directory run any of the following commands:
#cmd 1
scancentral package -bt none -o myPackage.zip
# or cmd 2
scancentral package -bt none --scan-node-modules -o myPackage.zip
Note: The command scancentral.bat is for Windows users.
As mentioned in the instruction, command 2 increases the size of the package and is not necessary for Node.js or Angular. I created Workspace Addon so I don't have node-modules in my source code.
After that, you'll see a compressed package named myPackage in the directory where you ran the packaging operation.
Step 5 – Initiate the Scan Process
After packaging, go back to the CASA portal and click on your assessment ID link in the list, and open up the Application Screening window. Here:
- Click the Begin Scan Process button.
- Upload the package you just compressed.
- Click the Upload File & Initiate Scan button.
 Upload Source Code To Fortify Scan
This will initiate auto scanning of your application which is the beginning of assessment for your Addon.
Reminder: As I've personally experienced, if your source code uses the Math.random() method, then the auto-scanner will not pass your code.
If you pass this phase, the manual verification process will begin where you'll have to fill in forms for the survey. Go to this link for the questions that'll be asked in the CASA survey. Here, choose the Local App option for App Type for a Google Workspace Add-on. I want to remind you that they will change based on the answer provided.
Conclusion
Alright, I'm hoping this blog helped you reduce the time and confusion that I had to encounter when I was trying to assess my addon. And please don't give up midway during the evaluation otherwise your months of hard work will be in vain.
My addon Scan Me, scans the Google Drive and prepares an audit report in a spreadsheet file of your choosing in your Google Drive. It makes it extremely easy for you to analyze your Google Drive from one place, and it also offers a free quota. If you're looking for a similar addon I hope you'll try this addon.
This is Nibesh khadka, have a good day.